
Container corn growing might sound like something out of a children’s book, but trust me, it’s a surprisingly rewarding and totally achievable DIY project! Forget sprawling acres; we’re bringing the charm of a cornfield right to your patio, balcony, or even your sunny kitchen windowsill.
For centuries, corn has been a staple crop, deeply woven into the cultures and traditions of countless civilizations. From ancient Mesoamerica, where it was revered as a sacred gift, to modern-day barbecues, corn holds a special place in our hearts (and stomachs!). But who says you need a farm to enjoy the satisfaction of harvesting your own sweet, juicy corn?
In today’s fast-paced world, many of us crave a connection to nature, a way to de-stress, and a source of fresh, healthy food. Container corn growing offers all of that and more! Imagine stepping outside to pluck a perfectly ripe ear of corn, knowing you nurtured it from a tiny seed. It’s an incredibly fulfilling experience, and this DIY guide will show you exactly how to make it happen. Plus, it’s a fantastic way to teach kids about where their food comes from and the magic of gardening. So, let’s ditch the grocery store corn and embark on this exciting journey of growing our own delicious, homegrown corn in containers!
Grow Your Own Corn in Containers: A Beginner’s Guide
Hey there, fellow gardening enthusiasts! Ever dreamt of biting into a juicy, homegrown ear of corn, fresh from your own little garden? Well, guess what? You don’t need acres of farmland to make that dream a reality. You can absolutely grow corn in containers, even if you only have a balcony or a small patio. It’s a fun, rewarding project, and I’m here to guide you through every step of the way. Let’s get started!
Choosing the Right Corn Variety
First things first, not all corn varieties are created equal when it comes to container gardening. You’ll want to opt for shorter, more compact varieties that are specifically bred for smaller spaces. Here are a few of my personal favorites:
* ‘On Deck’: This is a super-sweet variety that matures quickly and produces smaller ears, perfect for containers.
* ‘Golden Bantam’: A classic heirloom variety known for its delicious flavor and relatively short stalks.
* ‘Trinity’: Another excellent choice for containers, offering good yields and a manageable size.
* ‘Baby Corn’: If you’re looking for something unique, try growing baby corn! It’s fun, easy, and adds a gourmet touch to your meals.
Gathering Your Supplies
Okay, now that we’ve picked our corn variety, let’s gather the necessary supplies. Here’s what you’ll need:
* Large Containers: This is crucial! Corn plants need plenty of space for their roots to grow. I recommend using containers that are at least 12-18 inches in diameter and depth. The bigger, the better, really. Think large buckets, half whiskey barrels, or even sturdy plastic tubs.
* High-Quality Potting Mix: Don’t skimp on the potting mix! Use a well-draining mix that’s rich in organic matter. Avoid using garden soil, as it can become compacted in containers and hinder drainage. I like to use a mix of compost, peat moss, and perlite.
* Corn Seeds: Obviously! Make sure you purchase seeds from a reputable source to ensure good germination rates.
* Slow-Release Fertilizer: Corn is a heavy feeder, so a slow-release fertilizer will provide a steady supply of nutrients throughout the growing season. Look for a fertilizer with a balanced NPK ratio (nitrogen, phosphorus, and potassium).
* Watering Can or Hose: Essential for keeping your corn plants hydrated.
* Optional:
* Stakes or Trellis: For taller varieties, you might want to provide some support to prevent them from toppling over in strong winds.
* Bird Netting: To protect your developing ears of corn from hungry birds.
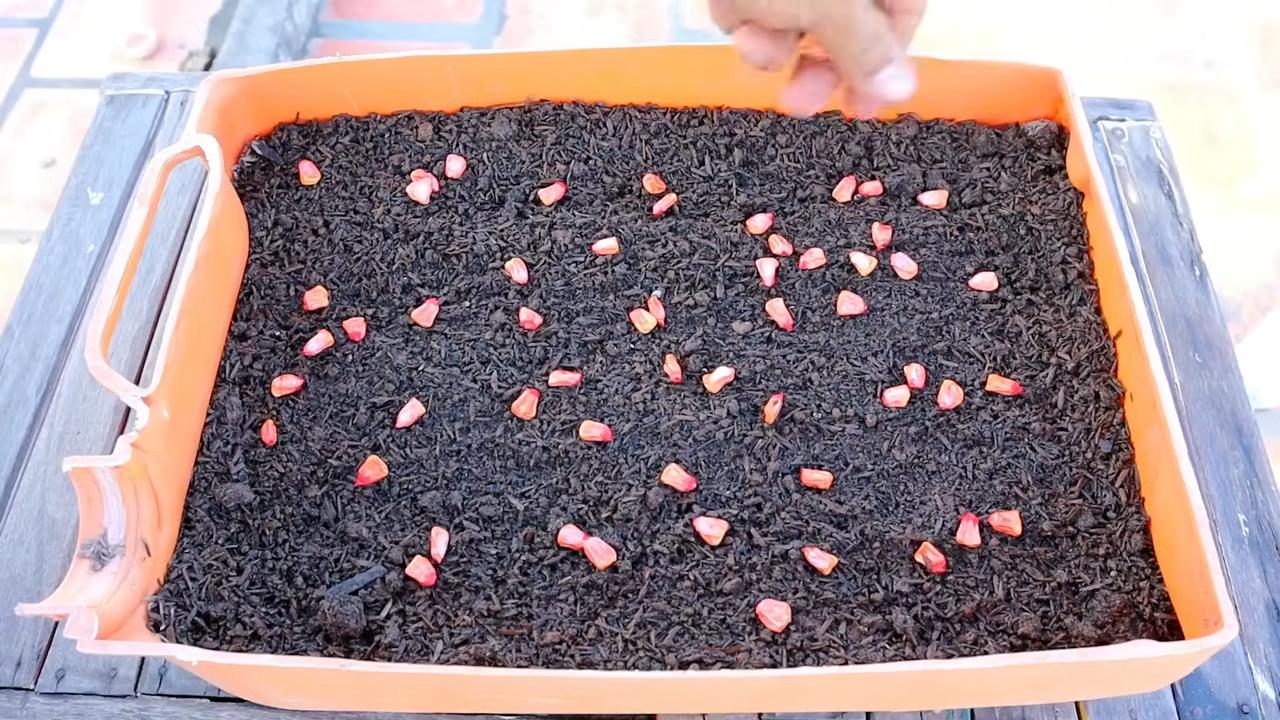
Planting Your Corn Seeds
Now for the fun part – planting! Here’s how I do it:
1. Prepare Your Containers: Fill your containers with the potting mix, leaving a few inches of space at the top.
2. Sow the Seeds: Plant the corn seeds about 1-2 inches deep and 4-6 inches apart. I usually plant 3-4 seeds per container and then thin them out later, keeping the strongest seedling.
3. Water Thoroughly: Gently water the soil until it’s evenly moist but not waterlogged.
4. Choose a Sunny Location: Corn needs at least 6-8 hours of direct sunlight per day to thrive. Place your containers in a sunny spot where they’ll receive plenty of light.
5. Be Patient: Germination usually takes about 7-10 days, depending on the temperature and moisture levels.
Caring for Your Container Corn
Once your corn seedlings emerge, it’s time to provide them with the care they need to grow strong and healthy.
1. Watering: Corn plants need consistent moisture, especially during hot weather. Water deeply whenever the top inch of soil feels dry to the touch. Avoid overwatering, as this can lead to root rot.
2. Fertilizing: As I mentioned earlier, corn is a heavy feeder. Apply a slow-release fertilizer according to the package instructions. You can also supplement with liquid fertilizer every few weeks to give your plants an extra boost. I like to use a balanced liquid fertilizer diluted to half strength.
3. Thinning: Once your seedlings are a few inches tall, thin them out to one plant per container (if you planted multiple seeds). Choose the strongest, healthiest-looking seedling and snip off the others at the base.
4. Pollination: Corn is wind-pollinated, which can be a challenge in a container setting. To ensure good pollination, you can hand-pollinate your corn plants. When the tassels (the male flowers at the top of the plant) start to shed pollen, gently shake the stalks to release the pollen. You can also collect the pollen in a small container and then dust it onto the silks (the female flowers that emerge from the developing ears of corn). Repeat this process for several days to ensure that all the silks are pollinated.
5. Pest and Disease Control: Keep an eye out for common corn pests like corn earworms and aphids. You can usually control these pests with organic insecticides like neem oil or insecticidal soap. Also, watch out for fungal diseases like rust and leaf spot. Improve air circulation around your plants and avoid overhead watering to prevent these diseases. If you notice any signs of disease, treat your plants with a fungicide.
6. Supporting Your Plants: As your corn plants grow taller, they may need some support to prevent them from toppling over. You can use stakes or a trellis to provide support. Simply tie the stalks to the stakes or trellis with twine.
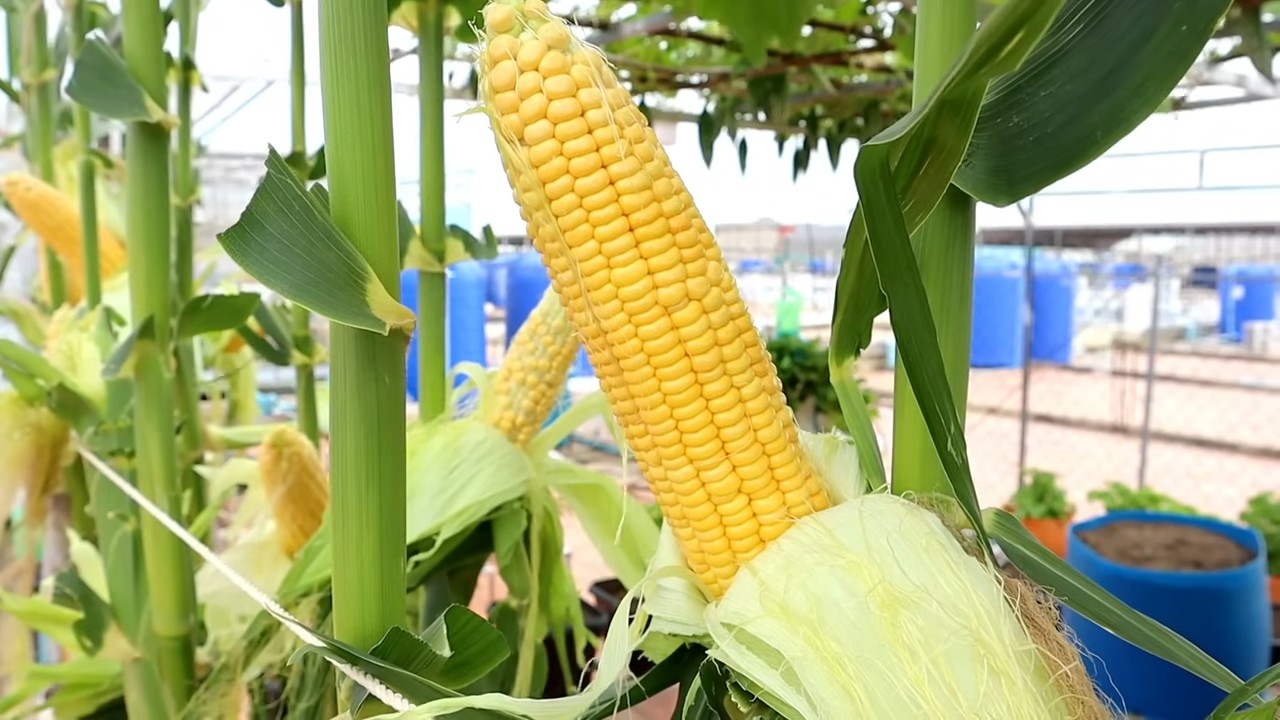
Harvesting Your Corn
The moment we’ve all been waiting for – harvesting! Here’s how to tell when your corn is ready to pick:
1. Check the Silks: The silks should turn brown and dry.
2. Feel the Ears: The ears should feel plump and full.
3. Peel Back the Husk: Gently peel back a portion of the husk and puncture a kernel with your fingernail. If the liquid that comes out is milky, the corn is ready to harvest. If it’s clear, the corn needs more time to mature.
4. Harvest Carefully: To harvest, grasp the ear firmly and twist it downward. The ear should snap off easily from the stalk.
Troubleshooting Common Problems
Even with the best care, you might encounter some challenges when growing corn in containers. Here are a few common problems and how to solve them:
* Poor Germination: If your corn seeds aren’t germinating, it could be due to several factors, such as cold soil temperatures, poor-quality seeds, or overwatering. Make sure the soil is warm enough (at least 60°F) and use fresh, high-quality seeds. Avoid overwatering, as this can cause the seeds to rot.
* Stunted Growth: Stunted growth can be caused by a lack of nutrients, insufficient sunlight, or rootbound plants. Make sure you’re fertilizing your corn plants regularly and that they’re receiving at least 6-8 hours of direct sunlight per day. If your plants are rootbound, transplant them into larger containers.
* Poor Pollination: As I mentioned earlier, poor pollination can be a problem in container settings. Hand-pollinate your corn plants to ensure good pollination.
* Pest Infestations: Keep an eye out for common corn pests like corn earworms and aphids. Control these pests with organic insecticides like neem oil or insecticidal soap.
* Disease Problems: Prevent fungal diseases like rust and leaf spot by improving air circulation around your plants and avoiding overhead watering. Treat any signs of disease with a fungicide.
Extra Tips for Success
Here are a few extra tips to help you succeed with container corn growing:
* Succession Planting: Plant new corn seeds every few weeks to extend your harvest season.
* Companion Planting: Plant companion plants like beans and squash around your corn to improve soil health and deter pests.
* Mulching: Apply a layer of mulch around your corn plants to help retain moisture and suppress weeds.
* Record Keeping: Keep a record of your planting dates, fertilizer applications, and any problems you encounter. This will help you learn from your mistakes and improve your results in future years.
Growing corn in containers is a truly rewarding experience. With a little bit of planning and care, you can enjoy fresh, homegrown corn right from your own backyard (or balcony!). So, grab your seeds, get your hands dirty, and get ready to enjoy the sweet taste of success! Happy gardening!
Conclusion
So, there you have it! Growing your own corn in containers isn’t just a fun gardening project; it’s a surprisingly accessible way to enjoy fresh, homegrown corn, even without a sprawling backyard. We’ve walked you through the steps, from selecting the right variety to ensuring proper pollination, and hopefully, dispelled any myths about the difficulty of this endeavor.
Why is this DIY trick a must-try? Because the taste of freshly picked corn, bursting with sweetness, is simply incomparable to anything you can buy at the store. It’s a flavor explosion that embodies the essence of summer. Beyond the taste, growing your own corn offers a unique connection to your food. You’ll witness the entire life cycle of the plant, from tiny seedling to towering stalk, and gain a newfound appreciation for the effort that goes into producing the food we often take for granted. Plus, it’s a fantastic learning experience for kids and adults alike, fostering a love for gardening and sustainable living.
But the benefits don’t stop there. Container corn growing allows you to control the growing environment, minimizing the risk of pests and diseases that can plague traditional cornfields. You can tailor the soil composition, watering schedule, and sun exposure to create the perfect conditions for your corn to thrive. This level of control often translates to higher yields and healthier plants.
Looking for variations? Consider experimenting with different corn varieties. While we’ve focused on shorter, container-friendly types, you might be surprised at what you can achieve with a little extra care and attention. Try planting a mix of sweet corn and ornamental corn for a visually stunning display. You can also interplant your corn with other companion plants, such as beans or squash, to create a mini-ecosystem in your containers. This practice, known as the “Three Sisters” method, is a traditional Native American technique that promotes healthy growth and maximizes space utilization.
Another exciting variation is to try succession planting. By planting new corn seeds every few weeks, you can extend your harvest season and enjoy fresh corn for a longer period. This is particularly useful if you have limited space and want to make the most of your container garden.
We wholeheartedly encourage you to give this DIY container corn growing trick a try. It’s a rewarding experience that will bring joy to your taste buds and a sense of accomplishment to your gardening efforts. Don’t be afraid to experiment, adapt the techniques to your specific environment, and most importantly, have fun!
Once you’ve harvested your first batch of homegrown corn, we’d love to hear about your experience. Share your photos, tips, and challenges in the comments below. Let’s create a community of container corn growers and learn from each other’s successes and failures. Together, we can unlock the secrets to growing the best corn possible, right in our own backyards (or balconies!). So, grab your seeds, prepare your containers, and get ready to embark on a delicious and rewarding gardening adventure. Happy growing!
Frequently Asked Questions (FAQ)
What is the best type of corn to grow in a container?
The best types of corn for container growing are dwarf or shorter varieties specifically bred for smaller spaces. Look for terms like “container corn,” “dwarf corn,” or “baby corn” on the seed packet. These varieties typically reach a height of 4-5 feet, making them manageable in containers. Some popular choices include ‘On Deck,’ ‘Golden Bantam,’ and ‘Trinity.’ Avoid taller, field corn varieties, as they require more space and are less likely to thrive in containers.
How big of a container do I need for growing corn?
Corn plants need a substantial amount of space for their roots to develop properly. A minimum container size of 12 inches in diameter and 12 inches deep is recommended for each plant. However, larger containers, such as 15-20 gallons, are even better, as they provide more room for root growth and help retain moisture. Consider using a large pot, half-barrel, or even a repurposed container like a large trash can (with drainage holes, of course!). Remember that corn grows best in clumps, so aim for a container that can accommodate at least 3-4 plants.
What kind of soil should I use for container corn growing?
Corn requires rich, well-draining soil. A good potting mix is essential for container growing. Avoid using garden soil, as it can become compacted in containers and hinder drainage. Look for a potting mix that contains a blend of peat moss, perlite, and vermiculite. You can also amend your potting mix with compost or well-rotted manure to provide additional nutrients. The ideal soil pH for corn is between 6.0 and 6.8.
How often should I water my container corn?
Corn plants are heavy drinkers, especially during hot weather. Water your container corn deeply and regularly, ensuring that the soil remains consistently moist but not waterlogged. Check the soil moisture daily by sticking your finger about an inch into the soil. If it feels dry, it’s time to water. During hot, sunny days, you may need to water your corn plants twice a day. Be sure to water at the base of the plant to avoid wetting the foliage, which can increase the risk of fungal diseases.
How much sunlight does container corn need?
Corn requires at least 6-8 hours of direct sunlight per day to thrive. Choose a location for your container corn that receives plenty of sunlight throughout the day. If you live in a particularly hot climate, you may need to provide some afternoon shade to prevent the plants from overheating.
How do I pollinate my container corn?
Corn is wind-pollinated, meaning that the pollen from the tassels (the male flowers at the top of the plant) needs to reach the silks (the female flowers that emerge from the developing ears). In a container setting, natural wind pollination may not be sufficient. To ensure proper pollination, you can hand-pollinate your corn plants. Gently shake the tassels over the silks to release the pollen. You can also collect the pollen in a small container and then use a paintbrush to apply it to the silks. Repeat this process every day for about a week, or until the silks start to turn brown.
When is the best time to harvest my container corn?
The time it takes for corn to mature varies depending on the variety, but generally, it takes about 60-90 days from planting to harvest. To determine if your corn is ready to harvest, check the silks. They should be brown and dry. You can also gently peel back the husk and poke a kernel with your fingernail. If the liquid that comes out is milky, the corn is ready to harvest. If the liquid is clear, it’s not quite ready. If the liquid is doughy, it’s overripe. To harvest, simply twist and pull the ear of corn from the stalk.
What are some common pests and diseases that affect container corn?
Some common pests that can affect container corn include aphids, corn earworms, and spider mites. You can control these pests by using insecticidal soap, neem oil, or by hand-picking them off the plants. Common diseases that can affect container corn include rust and leaf blight. To prevent these diseases, ensure good air circulation around the plants and avoid wetting the foliage when watering. You can also use a fungicide if necessary.
Can I grow corn in containers indoors?
While it’s possible to grow corn in containers indoors, it’s challenging. Corn requires a lot of sunlight, which can be difficult to provide indoors. You would need to use strong grow lights to supplement natural sunlight. Additionally, indoor pollination can be tricky. However, if you’re up for the challenge, you can certainly give it a try. Just be prepared to provide the plants with plenty of light, water, and nutrients.
How do I fertilize my container corn?
Corn is a heavy feeder and requires regular fertilization. Start fertilizing your corn plants about two weeks after they emerge from the soil. Use a balanced fertilizer, such as 10-10-10, and follow the instructions on the label. You can also use a liquid fertilizer, such as fish emulsion or seaweed extract, every two weeks. Avoid over-fertilizing, as this can lead to excessive foliage growth and reduced ear production. Side-dress your corn plants with compost or well-rotted manure every few weeks to provide additional nutrients.
Leave a Comment