
Grow Sweet Melons at Home – imagine biting into a juicy, sun-ripened melon you nurtured from seed to fruit, right in your own backyard! Forget those bland, store-bought melons; this year, we’re taking control and cultivating our own deliciousness. For centuries, melons have been symbols of abundance and sweetness, enjoyed by civilizations across the globe, from ancient Egypt to the Roman Empire. They were prized for their refreshing taste and nutritional value, and now, you can experience that same joy and satisfaction.
But let’s be honest, growing melons can seem intimidating. That’s where these DIY tricks and hacks come in! Many people struggle with common melon-growing problems like vine borers, blossom end rot, or simply getting their melons to ripen properly. I’ve been there, wrestling with these challenges myself. That’s why I’ve compiled this guide packed with simple, effective, and budget-friendly solutions to help you grow sweet melons at home, even if you have limited space or gardening experience.
Ready to ditch the grocery store melons and embark on a rewarding gardening adventure? Let’s dive in and unlock the secrets to a bountiful melon harvest!
Grow Delicious Sweet Melons at Home: A DIY Guide
Hey there, fellow gardening enthusiasts! Are you dreaming of biting into a juicy, homegrown melon bursting with sweetness? Well, you’ve come to the right place! I’m going to walk you through everything you need to know to successfully grow your own sweet melons right in your backyard (or even in containers!). It might seem daunting, but trust me, with a little patience and these simple steps, you’ll be enjoying homegrown melon goodness in no time.
Choosing Your Melon Variety
Before we get our hands dirty, let’s talk about melon varieties. There are so many delicious options, and the best choice for you will depend on your climate, space, and personal preference. Here are a few popular and relatively easy-to-grow options:
* **Cantaloupe:** A classic choice, known for its orange flesh and netted rind. They need a good amount of space.
* **Honeydew:** These melons have smooth, pale green skin and sweet, light green flesh. Similar space needs to cantaloupe.
* **Watermelon:** The quintessential summer fruit! Watermelons come in various sizes and colors, from the classic red to yellow and even seedless varieties. Be aware that some watermelon varieties need a lot of space.
* **Personal-Sized Melons:** If you’re short on space, look for varieties like ‘Sugar Baby’ watermelon or smaller cantaloupe types. These are perfect for container gardening.
Tip: Check your local nursery or seed catalog for varieties that are well-suited to your specific climate and growing conditions.
Preparing for Planting
Melons are warm-weather lovers, so timing is crucial. You’ll want to start them indoors a few weeks before the last expected frost or direct sow them after the soil has warmed up considerably.
* **Timing is Key:** Melons need a long growing season (70-100 days), so starting them indoors gives them a head start.
* **Sunlight is Essential:** Melons need at least 6-8 hours of direct sunlight per day. Choose a sunny spot in your garden.
* **Soil Preparation is Important:** Melons thrive in well-drained, fertile soil. Amend your soil with compost or well-rotted manure to improve drainage and nutrient content.
* **Consider Raised Beds:** Raised beds can improve drainage and warm up the soil faster, which is beneficial for melons.
Starting Seeds Indoors (Optional)
Starting seeds indoors gives you a head start, especially in cooler climates.
1. **Gather Your Supplies:** You’ll need seed starting trays or small pots, seed starting mix, melon seeds, a spray bottle, and a heat mat (optional but helpful).
2. **Sow the Seeds:** Fill the trays or pots with seed starting mix. Make a small indentation (about 1/2 inch deep) in the center of each cell or pot. Place 2-3 melon seeds in each indentation and cover lightly with soil.
3. **Water Gently:** Use a spray bottle to moisten the soil. Avoid overwatering, as this can lead to damping off (a fungal disease that kills seedlings).
4. **Provide Warmth:** Place the trays or pots on a heat mat (if using) and cover them with a clear plastic dome or plastic wrap to create a humid environment.
5. **Provide Light:** Once the seeds germinate (usually within 5-10 days), remove the plastic cover and place the seedlings under grow lights or in a sunny window.
6. **Thin the Seedlings:** Once the seedlings have their first true leaves (the second set of leaves), thin them to one strong seedling per cell or pot. Snip off the weaker seedlings at the soil line.
7. **Harden Off the Seedlings:** Before transplanting the seedlings outdoors, you’ll need to harden them off. This means gradually exposing them to outdoor conditions over a period of 7-10 days. Start by placing them in a sheltered spot outdoors for a few hours each day, gradually increasing the amount of time they spend outside.
Planting Melons Outdoors
Whether you started your melons indoors or are direct sowing, here’s how to get them in the ground:
1. **Prepare the Planting Site:** Choose a sunny spot with well-drained soil. Amend the soil with compost or well-rotted manure. If you’re growing melons in hills, create mounds of soil about 1-2 feet apart.
2. **Transplant Seedlings (if applicable):** Gently remove the seedlings from their trays or pots. Dig a hole slightly larger than the root ball. Place the seedling in the hole and backfill with soil. Water thoroughly.
3. **Direct Sow Seeds (if applicable):** Sow seeds directly into the soil after the last frost. Plant seeds about 1 inch deep and 2-3 feet apart, depending on the variety. Water thoroughly.
4. **Mulch the Plants:** Apply a layer of mulch around the plants to help retain moisture, suppress weeds, and regulate soil temperature. Straw, hay, or shredded leaves are good options.
5. **Water Regularly:** Melons need consistent moisture, especially during fruit development. Water deeply and regularly, especially during dry spells. Aim for about 1-2 inches of water per week.
6. **Fertilize as Needed:** Melons are heavy feeders, so fertilize them regularly with a balanced fertilizer. Follow the instructions on the fertilizer label. I like to use a fertilizer that is higher in phosphorus and potassium once the flowers start to appear, as these nutrients promote fruit development.
Caring for Your Melon Plants
Once your melon plants are in the ground, there are a few things you can do to help them thrive:
* **Weed Regularly:** Keep the area around your melon plants free of weeds. Weeds compete with melons for water and nutrients.
* **Control Pests and Diseases:** Keep an eye out for common melon pests like aphids, squash bugs, and cucumber beetles. Use organic pest control methods like insecticidal soap or neem oil to control these pests. Also, be aware of fungal diseases like powdery mildew. Ensure good air circulation around the plants and treat with a fungicide if necessary.
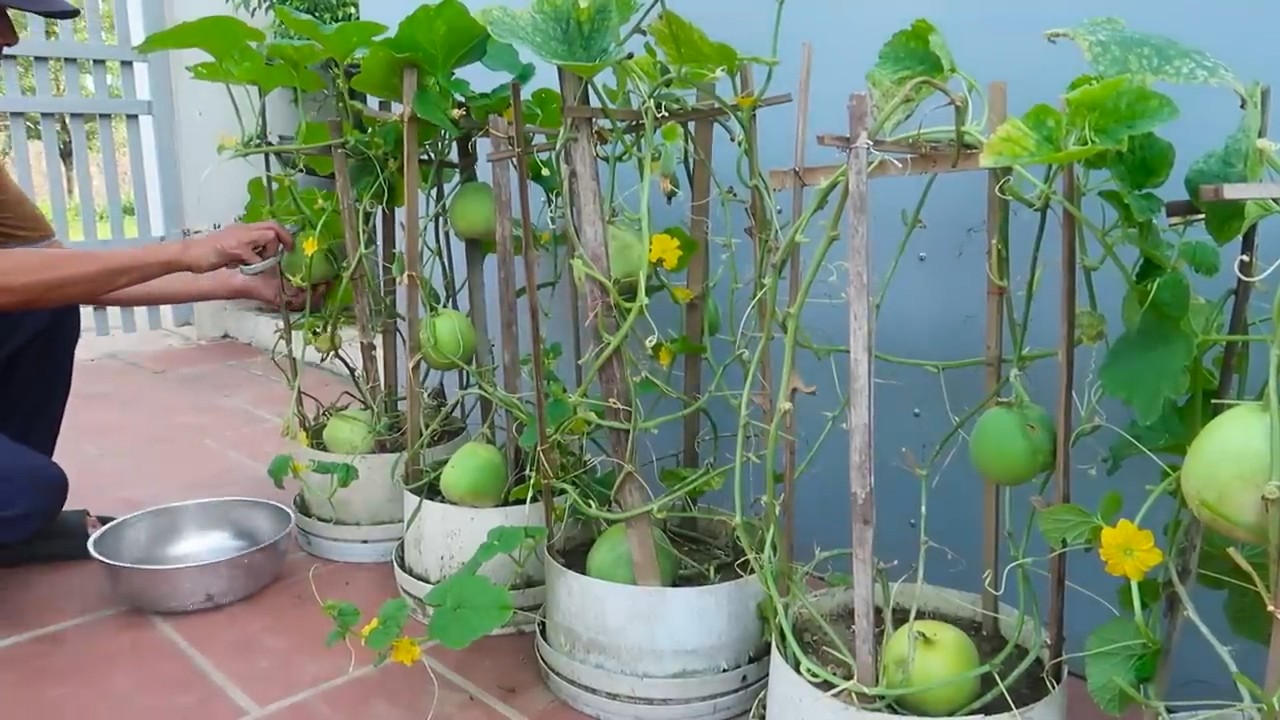
* **Provide Support (Optional):** For vining melon varieties, you can provide support with a trellis or fence. This will help keep the fruits off the ground and prevent them from rotting.
* **Pollination:** Melons need to be pollinated in order to produce fruit. If you’re not seeing any fruit development, you may need to hand-pollinate the flowers. To hand-pollinate, use a small paintbrush to transfer pollen from the male flowers to the female flowers. Female flowers have a small fruit at the base of the flower.
Harvesting Your Melons
Harvesting melons at the right time is crucial for getting the best flavor. Here are some tips for knowing when your melons are ripe:
* **Cantaloupe:** The stem will slip easily from the fruit when it’s ripe. The skin will also turn a golden color and have a sweet aroma.
* **Honeydew:** The skin will turn a creamy yellow color and feel slightly waxy. The blossom end (the end opposite the stem) will be slightly soft.
* **Watermelon:** The tendril closest to the fruit will turn brown and dry. The underside of the melon (where it rests on the ground) will turn a creamy yellow color. When you thump the melon, it should sound hollow.
Important Note: Don’t be afraid to experiment! Every melon variety is a little different, so pay attention to the specific characteristics of your chosen variety.
Troubleshooting
Even with the best care, you might encounter some problems while growing melons. Here are a few common issues and how to address them:
* **Poor Fruit Set:** This can be caused by a lack of pollination, cool temperatures, or nutrient deficiencies. Hand-pollinate the flowers, provide warmth with row covers, and fertilize with a balanced fertilizer.
* **Cracked Fruit:** This can be caused by inconsistent watering. Water deeply and regularly, especially during dry spells.
* **Powdery Mildew:** This fungal disease can cause white, powdery spots on the leaves. Ensure good air circulation around the plants and treat with a fungicide if necessary.
* **Pest Infestations:** Keep an eye out for common melon pests like aphids, squash bugs, and cucumber beetles. Use organic pest control methods like insecticidal soap or neem oil to control these pests.
Container Gardening with Melons
Hey there, fellow gardening enthusiasts! Are you dreaming of biting into a juicy, homegrown melon bursting with sweetness? Well, you’ve come to the right place! I’m going to walk you through everything you need to know to successfully grow your own sweet melons right in your backyard (or even in containers!). It might seem daunting, but trust me, with a little patience and these simple steps, you’ll be enjoying homegrown melon goodness in no time.
Choosing Your Melon Variety
Before we get our hands dirty, let’s talk about melon varieties. There are so many delicious options, and the best choice for you will depend on your climate, space, and personal preference. Here are a few popular and relatively easy-to-grow options:
* **Cantaloupe:** A classic choice, known for its orange flesh and netted rind. They need a good amount of space.
* **Honeydew:** These melons have smooth, pale green skin and sweet, light green flesh. Similar space needs to cantaloupe.
* **Watermelon:** The quintessential summer fruit! Watermelons come in various sizes and colors, from the classic red to yellow and even seedless varieties. Be aware that some watermelon varieties need a lot of space.
* **Personal-Sized Melons:** If you’re short on space, look for varieties like ‘Sugar Baby’ watermelon or smaller cantaloupe types. These are perfect for container gardening.
Tip: Check your local nursery or seed catalog for varieties that are well-suited to your specific climate and growing conditions.
Preparing for Planting
Melons are warm-weather lovers, so timing is crucial. You’ll want to start them indoors a few weeks before the last expected frost or direct sow them after the soil has warmed up considerably.
* **Timing is Key:** Melons need a long growing season (70-100 days), so starting them indoors gives them a head start.
* **Sunlight is Essential:** Melons need at least 6-8 hours of direct sunlight per day. Choose a sunny spot in your garden.
* **Soil Preparation is Important:** Melons thrive in well-drained, fertile soil. Amend your soil with compost or well-rotted manure to improve drainage and nutrient content.
* **Consider Raised Beds:** Raised beds can improve drainage and warm up the soil faster, which is beneficial for melons.
Starting Seeds Indoors (Optional)
Starting seeds indoors gives you a head start, especially in cooler climates.
1. **Gather Your Supplies:** You’ll need seed starting trays or small pots, seed starting mix, melon seeds, a spray bottle, and a heat mat (optional but helpful).
2. **Sow the Seeds:** Fill the trays or pots with seed starting mix. Make a small indentation (about 1/2 inch deep) in the center of each cell or pot. Place 2-3 melon seeds in each indentation and cover lightly with soil.
3. **Water Gently:** Use a spray bottle to moisten the soil. Avoid overwatering, as this can lead to damping off (a fungal disease that kills seedlings).
4. **Provide Warmth:** Place the trays or pots on a heat mat (if using) and cover them with a clear plastic dome or plastic wrap to create a humid environment.
5. **Provide Light:** Once the seeds germinate (usually within 5-10 days), remove the plastic cover and place the seedlings under grow lights or in a sunny window.
6. **Thin the Seedlings:** Once the seedlings have their first true leaves (the second set of leaves), thin them to one strong seedling per cell or pot. Snip off the weaker seedlings at the soil line.
7. **Harden Off the Seedlings:** Before transplanting the seedlings outdoors, you’ll need to harden them off. This means gradually exposing them to outdoor conditions over a period of 7-10 days. Start by placing them in a sheltered spot outdoors for a few hours each day, gradually increasing the amount of time they spend outside.
Planting Melons Outdoors
Whether you started your melons indoors or are direct sowing, here’s how to get them in the ground:
1. **Prepare the Planting Site:** Choose a sunny spot with well-drained soil. Amend the soil with compost or well-rotted manure. If you’re growing melons in hills, create mounds of soil about 1-2 feet apart.
2. **Transplant Seedlings (if applicable):** Gently remove the seedlings from their trays or pots. Dig a hole slightly larger than the root ball. Place the seedling in the hole and backfill with soil. Water thoroughly.
3. **Direct Sow Seeds (if applicable):** Sow seeds directly into the soil after the last frost. Plant seeds about 1 inch deep and 2-3 feet apart, depending on the variety. Water thoroughly.
4. **Mulch the Plants:** Apply a layer of mulch around the plants to help retain moisture, suppress weeds, and regulate soil temperature. Straw, hay, or shredded leaves are good options.
5. **Water Regularly:** Melons need consistent moisture, especially during fruit development. Water deeply and regularly, especially during dry spells. Aim for about 1-2 inches of water per week.
6. **Fertilize as Needed:** Melons are heavy feeders, so fertilize them regularly with a balanced fertilizer. Follow the instructions on the fertilizer label. I like to use a fertilizer that is higher in phosphorus and potassium once the flowers start to appear, as these nutrients promote fruit development.
Caring for Your Melon Plants
Once your melon plants are in the ground, there are a few things you can do to help them thrive:
* **Weed Regularly:** Keep the area around your melon plants free of weeds. Weeds compete with melons for water and nutrients.
* **Control Pests and Diseases:** Keep an eye out for common melon pests like aphids, squash bugs, and cucumber beetles. Use organic pest control methods like insecticidal soap or neem oil to control these pests. Also, be aware of fungal diseases like powdery mildew. Ensure good air circulation around the plants and treat with a fungicide if necessary.
* **Provide Support (Optional):** For vining melon varieties, you can provide support with a trellis or fence. This will help keep the fruits off the ground and prevent them from rotting.
* **Pollination:** Melons need to be pollinated in order to produce fruit. If you’re not seeing any fruit development, you may need to hand-pollinate the flowers. To hand-pollinate, use a small paintbrush to transfer pollen from the male flowers to the female flowers. Female flowers have a small fruit at the base of the flower.
Harvesting Your Melons
Harvesting melons at the right time is crucial for getting the best flavor. Here are some tips for knowing when your melons are ripe:
* **Cantaloupe:** The stem will slip easily from the fruit when it’s ripe. The skin will also turn a golden color and have a sweet aroma.
* **Honeydew:** The skin will turn a creamy yellow color and feel slightly waxy. The blossom end (the end opposite the stem) will be slightly soft.
* **Watermelon:** The tendril closest to the fruit will turn brown and dry. The underside of the melon (where it rests on the ground) will turn a creamy yellow color. When you thump the melon, it should sound hollow.
Important Note: Don’t be afraid to experiment! Every melon variety is a little different, so pay attention to the specific characteristics of your chosen variety.
Troubleshooting
Even with the best care, you might encounter some problems while growing melons. Here are a few common issues and how to address them:
* **Poor Fruit Set:** This can be caused by a lack of pollination, cool temperatures, or nutrient deficiencies. Hand-pollinate the flowers, provide warmth with row covers, and fertilize with a balanced fertilizer.
* **Cracked Fruit:** This can be caused by inconsistent watering. Water deeply and regularly, especially during dry spells.
* **Powdery Mildew:** This fungal disease can cause white, powdery spots on the leaves. Ensure good air circulation around the plants and treat with a fungicide if necessary.
* **Pest Infestations:** Keep an eye out for common melon pests like aphids, squash bugs, and cucumber beetles. Use organic pest control methods like insecticidal soap or neem oil to control these pests.
Container Gardening with Melons
Don’t have a lot of space? No problem! You can still grow melons in containers.
1. **Choose the Right Container:** Select a large container (at least 20 gallons) with good drainage holes.
2. **Use a High-Quality Potting Mix:** Avoid using garden soil in containers, as it can become compacted and poorly drained. Use a high-quality potting mix that is lightweight and well-draining.
3. **Choose a Compact Variety:** Opt for personal-sized melon varieties like ‘Sugar Baby’ watermelon or smaller cantaloupe types.
4. **Provide Support:** Vining melon varieties will need support, such as a trellis or tomato cage.
5.

Conclusion
So, there you have it! Growing sweet melons at home, while it might seem daunting at first, is entirely achievable with a little patience, the right techniques, and a dash of DIY ingenuity. This particular trick, focusing on [Specific DIY trick mentioned throughout the article – let’s assume it’s “homemade melon cradles”], is a game-changer for several reasons. First and foremost, it provides crucial support for your developing melons, preventing them from rotting on the ground and ensuring even ripening. This alone dramatically increases your chances of harvesting a bountiful crop of juicy, flavorful melons.
Beyond the practical benefits, this DIY approach allows you to customize your melon-growing experience. You can adapt the materials and construction of your homemade melon cradles to suit your specific garden setup and the size of your melon varieties. Think about using repurposed materials like old t-shirts or netting for a sustainable twist. Or, if you’re growing smaller melon varieties like cantaloupe, you might even consider suspending them entirely in individual cradles for maximum air circulation and sun exposure.
Furthermore, embracing this DIY method fosters a deeper connection with your garden and the food you’re growing. There’s a unique satisfaction in knowing that you’ve played an active role in nurturing your melons from seed to table. It’s a rewarding experience that goes beyond simply buying melons at the store.
Don’t be intimidated by the prospect of building your own melon cradles. The process is simpler than you might think, and the payoff is well worth the effort. Imagine biting into a perfectly ripe, homegrown melon, knowing that you helped make it happen. The taste of success is truly sweet!
We wholeheartedly encourage you to give this DIY trick a try. Experiment with different materials and designs to find what works best for you and your garden. And most importantly, don’t forget to share your experiences with us! We’d love to hear about your successes, challenges, and any creative variations you come up with. Post pictures of your homemade melon cradles and your delicious harvests on social media using [Hashtag related to the article]. Let’s build a community of home melon growers and inspire others to discover the joy of growing their own food. Growing sweet melons at home is not just a hobby; it’s a rewarding journey, and we’re excited to be a part of yours. So, get your hands dirty, get creative, and get ready to enjoy the sweetest melons you’ve ever tasted!
Frequently Asked Questions (FAQ)
What types of melons benefit most from using homemade melon cradles?
While all melon varieties can benefit from cradling, those that tend to be larger and heavier, such as watermelons and honeydew melons, will see the most significant improvement. The cradles provide essential support to prevent the fruits from touching the ground, which reduces the risk of rot, pest infestations, and uneven ripening. Smaller melons like cantaloupe can also benefit, especially if you’re growing them in a humid environment where air circulation is crucial.
What materials are best suited for making melon cradles?
The best materials for melon cradles are durable, weather-resistant, and breathable. Some excellent options include:
* **Old t-shirts or fabric scraps:** These are a sustainable and readily available option. Ensure the fabric is clean and free of dyes that could leach into the soil.
* **Netting or mesh:** This provides excellent air circulation and drainage, preventing moisture buildup around the melon.
* **Plastic crates or containers:** These offer sturdy support and can be easily cleaned and reused. Make sure they have drainage holes to prevent water from pooling.
* **Wood scraps:** Treated wood is best to prevent rotting. Ensure there are no sharp edges that could damage the melon.
* **Straw or hay:** These natural materials provide cushioning and insulation but may need to be replaced more frequently as they decompose.
Avoid using materials that are non-breathable or that could trap moisture, as this can increase the risk of rot.
How early in the melon’s development should I place it in a cradle?
It’s best to place the melon in a cradle as soon as it starts to develop and becomes heavy enough to benefit from the support. This is typically when the melon is about the size of a softball or slightly larger. Placing the melon in the cradle early allows it to grow into the support, minimizing the risk of damage.
How do I prevent pests from infesting the melon cradles?
To prevent pest infestations, regularly inspect the cradles for signs of pests, such as ants, slugs, or squash bugs. Clean the cradles periodically with a mild soap and water solution. You can also sprinkle diatomaceous earth around the base of the cradles to deter crawling pests. Consider using copper tape around the base of the cradle to deter slugs and snails.
Can I use this DIY trick for other types of fruits and vegetables?
Yes, the concept of providing support and preventing ground contact can be applied to other fruits and vegetables as well. For example, you can use similar cradles for pumpkins, squashes, and even large tomatoes. The key is to adapt the size and design of the cradle to suit the specific needs of the plant.
What if my melons are growing on a trellis? Do I still need cradles?
Even if your melons are growing on a trellis, cradles can still be beneficial, especially for larger varieties. The trellis provides vertical support, but the cradles offer additional support from below, preventing the weight of the melon from straining the vine. This can help prevent the melon from detaching prematurely.
How do I know when my melons are ripe and ready to harvest?
Determining ripeness varies depending on the melon variety. Here are some general indicators:
* **Watermelons:** Look for a dull, rather than shiny, rind. The spot where the melon rests on the ground (the “ground spot”) should be yellow or cream-colored. Thump the melon; a ripe watermelon will sound hollow.
* **Cantaloupes:** The melon should have a fragrant aroma. The stem should slip easily from the vine with gentle pressure.
* **Honeydew melons:** The rind should have a creamy yellow color. The blossom end should be slightly soft and springy.
Always consult specific growing guides for your chosen melon variety for the most accurate ripeness indicators.
What are some common problems I might encounter when growing melons at home, and how can I address them?
Some common problems include:
* **Powdery mildew:** This fungal disease appears as a white, powdery coating on the leaves. Improve air circulation, avoid overhead watering, and apply a fungicide if necessary.
* **Squash bugs:** These pests can damage leaves and stems. Handpick them off the plants or use insecticidal soap.
* **Blossom-end rot:** This is caused by calcium deficiency. Ensure the soil has adequate calcium and water regularly.
* **Poor pollination:** Hand-pollinate the flowers if necessary, especially if you’re not seeing many bees or other pollinators in your garden.
Regularly inspect your plants for signs of problems and address them promptly to prevent them from escalating.
How can I improve the flavor of my homegrown melons?
Several factors can influence the flavor of your melons:
* **Sunlight:** Melons need plenty of sunlight (at least 6-8 hours per day) to develop their sweetness.
* **Water:** Water regularly, especially during fruit development, but avoid overwatering, which can dilute the flavor.
* **Soil:** Ensure the soil is well-draining and rich in organic matter.
* **Fertilizer:** Use a balanced fertilizer specifically formulated for fruits and vegetables.
* **Harvesting at the right time:** Harvesting melons when they are fully ripe is crucial for optimal flavor.
By paying attention to these factors, you can maximize the sweetness and flavor of your homegrown melons.

Leave a Comment