
Broccoli Planting Weekly Harvest: Imagine stepping into your backyard and harvesting fresh, vibrant broccoli whenever you need it. No more trips to the grocery store, no more wilted veggies – just crisp, delicious broccoli straight from your garden to your table! This isn’t just a dream; it’s an achievable reality with the right know-how.
For centuries, cultivating our own food has been a cornerstone of human civilization. From ancient Roman gardens to the victory gardens of World War II, growing your own produce has always been a way to connect with nature, ensure food security, and enjoy the unparalleled taste of homegrown goodness. And while broccoli might not have the same romantic history as, say, tomatoes, its nutritional power and versatility make it a worthy addition to any home garden.
But let’s be honest, getting a consistent and bountiful broccoli planting weekly harvest can feel like a challenge. That’s where these DIY tricks and hacks come in! I’m going to share my secrets to maximizing your broccoli yield, ensuring a steady supply of this superfood throughout the growing season. We’ll cover everything from choosing the right varieties to optimizing your watering schedule and protecting your precious plants from pests. So, grab your gardening gloves, and let’s get ready to enjoy a season of delicious, homegrown broccoli!
DIY: From Seed to Supper – My Broccoli Growing Adventure!
Hey there, fellow garden enthusiasts! I’m so excited to share my broccoli growing journey with you. Broccoli is one of my absolute favorite vegetables, and there’s nothing quite like the taste of freshly harvested, homegrown broccoli. It might seem a little intimidating at first, but trust me, with a little planning and effort, you can absolutely grow your own delicious broccoli. This guide will walk you through every step, from starting seeds indoors to enjoying a bountiful harvest. Let’s get started!
Phase 1: Starting Your Broccoli Seeds
Broccoli thrives in cooler weather, so timing is crucial. I usually start my seeds indoors about 6-8 weeks before the last expected frost in spring, or about 12-14 weeks before the first expected frost in fall. This gives the seedlings a head start and ensures they’re ready to go into the garden when the conditions are just right.
* Materials You’ll Need:
* Broccoli seeds (choose a variety that suits your climate)
* Seed starting trays or small pots
* Seed starting mix (a light, well-draining mix is best)
* Spray bottle filled with water
* Heat mat (optional, but helpful for germination)
* Grow lights (optional, but highly recommended for strong seedlings)
* Why Start Indoors? Starting indoors gives you more control over the growing environment. You can protect the delicate seedlings from harsh weather, pests, and diseases, ensuring a higher success rate.
Step-by-Step Instructions:
1. Prepare Your Seed Starting Trays: Fill your seed starting trays or small pots with seed starting mix. Gently press the mix down to remove any air pockets.
2. Sow the Seeds: Make a small indentation (about ¼ inch deep) in the center of each cell or pot. Place 2-3 broccoli seeds in each indentation. This increases the chances of at least one seed germinating.
3. Cover the Seeds: Gently cover the seeds with a thin layer of seed starting mix.
4. Water Thoroughly: Use a spray bottle to thoroughly moisten the soil. Avoid overwatering, as this can lead to damping off, a fungal disease that can kill seedlings.
5. Provide Warmth: Place the seed starting trays on a heat mat (if using) to maintain a soil temperature of around 70-75°F (21-24°C). This will speed up germination.
6. Provide Light: Place the trays under grow lights (if using) or in a sunny window. If using a window, rotate the trays regularly to ensure even growth.
7. Maintain Moisture: Keep the soil consistently moist, but not soggy. Check the moisture level daily and water as needed.
8. Thin the Seedlings: Once the seedlings have emerged and have their first true leaves (the second set of leaves), thin them to one seedling per cell or pot. Choose the strongest, healthiest-looking seedling and snip off the others at the soil line.
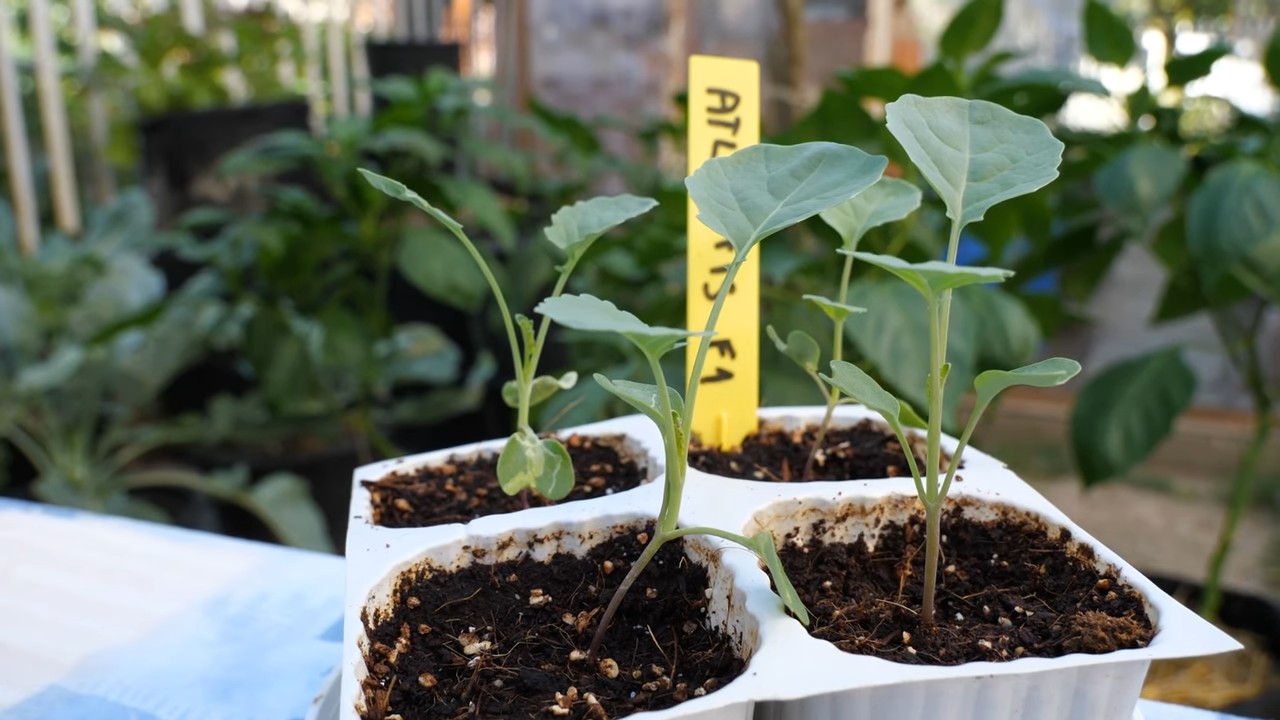
Phase 2: Transplanting Your Broccoli Seedlings
Once your broccoli seedlings have developed several sets of true leaves and are about 4-6 inches tall, they’re ready to be transplanted into the garden. This is a crucial step, so take your time and be gentle with the seedlings.
* Preparing the Garden Bed:
* Choose a sunny location that receives at least 6 hours of direct sunlight per day.
* Broccoli prefers well-drained soil that is rich in organic matter. Amend the soil with compost or well-rotted manure before planting.
* The ideal soil pH for broccoli is between 6.0 and 7.0. You can test your soil pH with a soil testing kit and amend it accordingly.
* Hardening Off: Before transplanting, you’ll need to harden off the seedlings. This process gradually acclimates them to outdoor conditions, reducing transplant shock. Start by placing the seedlings outdoors in a sheltered location for a few hours each day, gradually increasing the amount of time they spend outside over the course of a week.
Step-by-Step Instructions:
1. Prepare the Planting Holes: Dig holes that are slightly larger than the root balls of the seedlings. Space the holes about 18-24 inches apart.
2. Remove the Seedlings: Gently remove the seedlings from their trays or pots. Be careful not to damage the roots. If the seedlings are root-bound (the roots are tightly circling the bottom of the pot), gently loosen the roots before planting.
3. Plant the Seedlings: Place the seedlings in the holes and backfill with soil. Gently firm the soil around the base of the plants.
4. Water Thoroughly: Water the seedlings thoroughly after planting.
5. Mulch: Apply a layer of mulch around the plants to help retain moisture, suppress weeds, and regulate soil temperature. I like to use straw or shredded leaves.
6. Protect from Pests: Broccoli is susceptible to several pests, including cabbage worms, aphids, and flea beetles. Consider using row covers to protect the plants from these pests. You can also use organic pest control methods, such as insecticidal soap or neem oil.
Phase 3: Caring for Your Broccoli Plants
Once your broccoli plants are in the ground, it’s important to provide them with the care they need to thrive. This includes regular watering, fertilizing, and pest control.
* Watering: Broccoli needs consistent moisture to grow well. Water deeply and regularly, especially during dry periods. Aim for about 1-1.5 inches of water per week.
* Fertilizing: Broccoli is a heavy feeder, meaning it needs a lot of nutrients to grow. Fertilize the plants every 2-3 weeks with a balanced fertilizer or a fertilizer that is high in nitrogen.
* Weeding: Keep the garden bed free of weeds, as they can compete with the broccoli plants for nutrients and water.
* Pest Control: Regularly inspect the plants for pests and diseases. Take action promptly to control any problems that arise.
Step-by-Step Instructions:
1. Water Regularly: Check the soil moisture regularly and water when the top inch of soil feels dry.
2. Fertilize: Apply fertilizer according to the package directions. Be careful not to over-fertilize, as this can burn the plants.
3. Weed Regularly: Pull weeds by hand or use a hoe to cultivate the soil around the plants.
4. Monitor for Pests: Inspect the plants regularly for pests and diseases. Look for signs of damage, such as holes in the leaves or discoloration.
5. Control Pests: If you find pests, take action promptly to control them. Use organic pest control methods whenever possible.
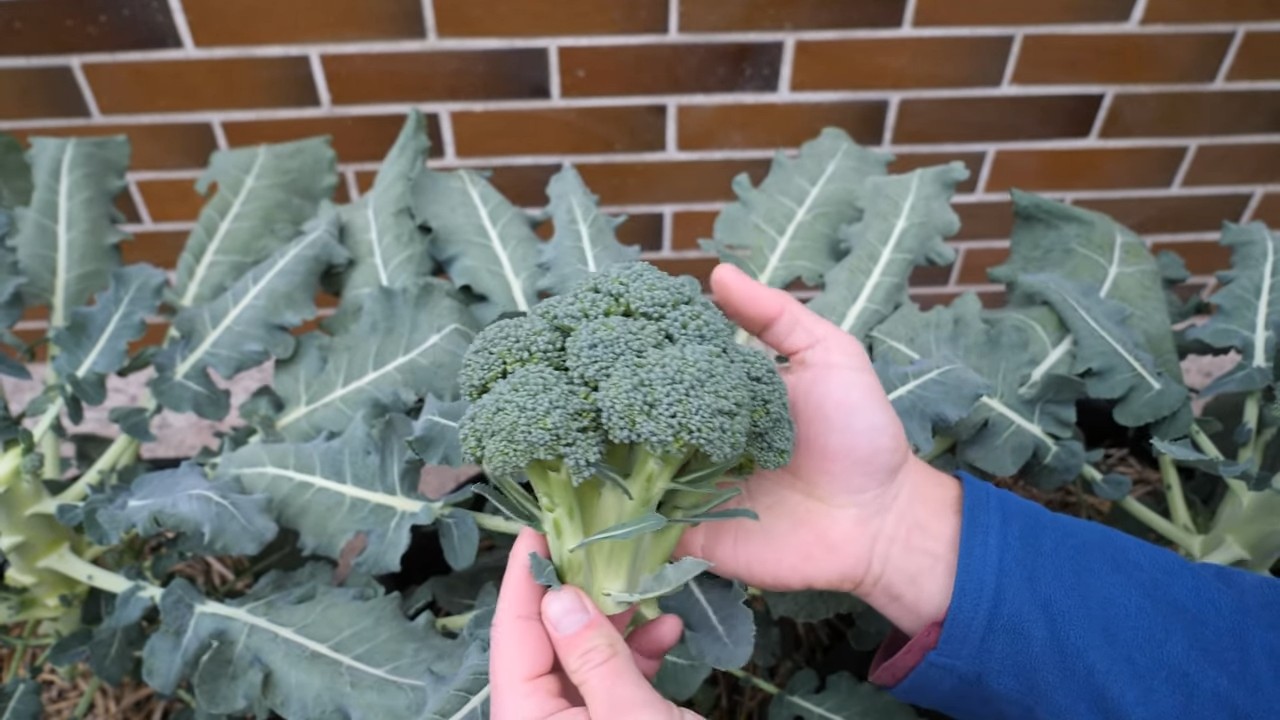
Phase 4: Harvesting Your Broccoli
The moment you’ve been waiting for! Harvesting your own broccoli is incredibly rewarding. You’ll know it’s time to harvest when the central head is firm and tight, and the flower buds are still closed.
* When to Harvest:
* The central head should be 4-7 inches in diameter.
* The flower buds should be tightly closed and green.
* If the flower buds start to open and turn yellow, it’s time to harvest immediately.
* Extending the Harvest: After you harvest the central head, the plant will produce side shoots. These smaller heads can be harvested over several weeks, extending your harvest season.
Step-by-Step Instructions:
1. Cut the Central Head: Use a sharp knife to cut the central head from the plant. Cut the stem at an angle, about 5-6 inches below the head.
2. Harvest Side Shoots: As the side shoots develop, harvest them when they are the desired size.
3. Store Your Broccoli: Store your freshly harvested broccoli in the refrigerator. It will keep for about a week.
Phase 5: Weekly Harvest and Continued Care
Even after harvesting the main head, your broccoli plant can keep giving! The key is to encourage the growth of those delicious side shoots.
* Encouraging Side Shoot Growth:
* Continue to water and fertilize the plant regularly.
* Remove any yellowing or damaged leaves.
* Monitor for pests and diseases.
Weekly Harvest Routine:
1. Inspect the Plant: Each week, take a close look at your broccoli plant. Check for new side shoots that are ready to harvest.
2. Harvest Ripe Side Shoots: Harvest any side shoots that are firm and have tightly closed buds. Use a sharp knife to cut the stem just below the head.
3. Fertilize Lightly: After each harvest, give the plant a light feeding of fertilizer to encourage continued growth.
4. Water Consistently: Ensure the plant receives consistent watering, especially during hot or
Conclusion
So, there you have it! Mastering the art of broccoli planting for a bountiful weekly harvest is not just about following instructions; it’s about understanding the plant’s needs and adapting your approach to your specific environment. We’ve explored the key steps, from selecting the right variety and preparing the soil to nurturing your broccoli plants through their growth cycle and ensuring a consistent weekly harvest.
Why is this DIY approach a must-try? Because it empowers you to take control of your food source, enjoy the freshest, most flavorful broccoli imaginable, and significantly reduce your grocery bills. Store-bought broccoli simply can’t compare to the vibrant taste and nutritional value of homegrown, freshly harvested heads. Plus, the satisfaction of nurturing a plant from seed to table is an incredibly rewarding experience.
But the journey doesn’t end here! Feel free to experiment with different broccoli varieties to discover your favorites. Try succession planting, staggering your planting dates by a few weeks, to extend your harvest season even further. Consider companion planting, incorporating herbs like rosemary or thyme to deter pests naturally. You can also explore different fertilization methods, such as using compost tea or organic fertilizers, to boost your broccoli’s growth and yield.
Don’t be afraid to get your hands dirty and personalize your broccoli planting strategy. Every garden is unique, and what works for one gardener may not work for another. The key is to observe your plants closely, learn from your experiences, and adapt your approach accordingly.
We’re confident that with a little patience and dedication, you’ll be enjoying a delicious and abundant weekly harvest of homegrown broccoli in no time. So, grab your seeds, prepare your soil, and embark on this exciting gardening adventure!
We encourage you to try this DIY broccoli planting method and share your experiences with us. Let us know what varieties you’re growing, what challenges you’ve encountered, and what successes you’ve achieved. Your insights will not only help other gardeners but also contribute to a collective understanding of how to optimize broccoli planting for a consistent weekly harvest. Share your photos, tips, and stories in the comments below – we can’t wait to hear from you! Happy gardening!
Frequently Asked Questions (FAQ)
What is the best time of year to start broccoli planting for a weekly harvest?
The ideal time for broccoli planting depends on your climate. In cooler regions with mild summers, you can start seeds indoors 6-8 weeks before the last expected frost and transplant them outdoors in early spring. For warmer climates with hot summers, it’s best to plant broccoli in the late summer or early fall for a winter harvest. The goal is to avoid the hottest part of the summer, as high temperatures can cause broccoli to bolt (go to seed) prematurely. To achieve a weekly harvest, consider succession planting, starting new seeds every 2-3 weeks. This will ensure a continuous supply of broccoli throughout the growing season.
How much space does each broccoli plant need?
Broccoli plants need adequate space to grow and develop healthy heads. Generally, you should space broccoli plants 18-24 inches apart in rows that are 30-36 inches apart. This spacing allows for proper air circulation, which helps prevent fungal diseases, and provides enough room for the plants to mature without competing for resources. If you’re growing broccoli in containers, choose pots that are at least 12 inches in diameter and depth.
What type of soil is best for broccoli planting?
Broccoli thrives in well-drained, fertile soil that is rich in organic matter. The ideal soil pH for broccoli is between 6.0 and 7.0. Before planting, amend your soil with compost, aged manure, or other organic materials to improve its fertility and drainage. Broccoli is a heavy feeder, so it’s important to provide it with a steady supply of nutrients. Consider adding a slow-release fertilizer at planting time or side-dressing your plants with compost or fertilizer throughout the growing season.
How often should I water my broccoli plants?
Broccoli plants need consistent moisture to thrive. Water your broccoli plants deeply and regularly, especially during dry periods. Aim to keep the soil consistently moist but not waterlogged. A good rule of thumb is to water when the top inch of soil feels dry to the touch. Mulching around your broccoli plants can help retain moisture and suppress weeds.
What are some common pests and diseases that affect broccoli?
Broccoli is susceptible to several pests and diseases, including cabbage worms, aphids, flea beetles, clubroot, and downy mildew. To prevent pest problems, consider using row covers to protect your plants from insects. Regularly inspect your plants for signs of pests and diseases, and take action promptly if you notice any problems. Organic pest control methods, such as insecticidal soap or neem oil, can be effective for controlling many common broccoli pests. To prevent diseases, ensure good air circulation around your plants and avoid overhead watering.
How do I know when my broccoli is ready to harvest?
Broccoli is ready to harvest when the central head is firm, tight, and a deep green color. The individual florets should be tightly closed. If the florets start to open and turn yellow, it’s a sign that the broccoli is overripe. To harvest broccoli, use a sharp knife to cut the central head from the plant, leaving several inches of stem. After harvesting the central head, the plant will often produce side shoots, which you can harvest as they mature. This will help you achieve that consistent weekly harvest.
Can I grow broccoli in containers?
Yes, you can successfully grow broccoli in containers, as long as you provide them with enough space, sunlight, and nutrients. Choose containers that are at least 12 inches in diameter and depth. Use a high-quality potting mix that is well-draining and rich in organic matter. Place your containers in a location that receives at least 6 hours of sunlight per day. Water your container-grown broccoli plants regularly and fertilize them every 2-3 weeks with a balanced fertilizer.
How can I extend my broccoli harvest season?
To extend your broccoli harvest season, consider succession planting, starting new seeds every 2-3 weeks. This will ensure a continuous supply of broccoli throughout the growing season. You can also choose broccoli varieties that have different maturity dates. Some varieties mature earlier than others, allowing you to harvest broccoli over a longer period. Additionally, protecting your broccoli plants from frost can help extend the harvest season into the fall.
What are some good companion plants for broccoli?
Companion planting can help improve the health and yield of your broccoli plants. Some good companion plants for broccoli include herbs like rosemary, thyme, and sage, which can deter pests. Other beneficial companion plants include marigolds, nasturtiums, and onions. Avoid planting broccoli near members of the nightshade family, such as tomatoes, peppers, and eggplants, as they can compete for resources.
My broccoli is bolting (going to seed). What can I do?
Bolting is a common problem with broccoli, especially in hot weather. Once broccoli starts to bolt, the heads become bitter and inedible. To prevent bolting, choose heat-tolerant broccoli varieties and plant them at the right time of year. Provide your broccoli plants with consistent moisture and shade during hot weather. If your broccoli starts to bolt, harvest the heads immediately, even if they are not fully mature. You can still eat the leaves and stems of bolted broccoli, although they may be slightly bitter.
Leave a Comment