
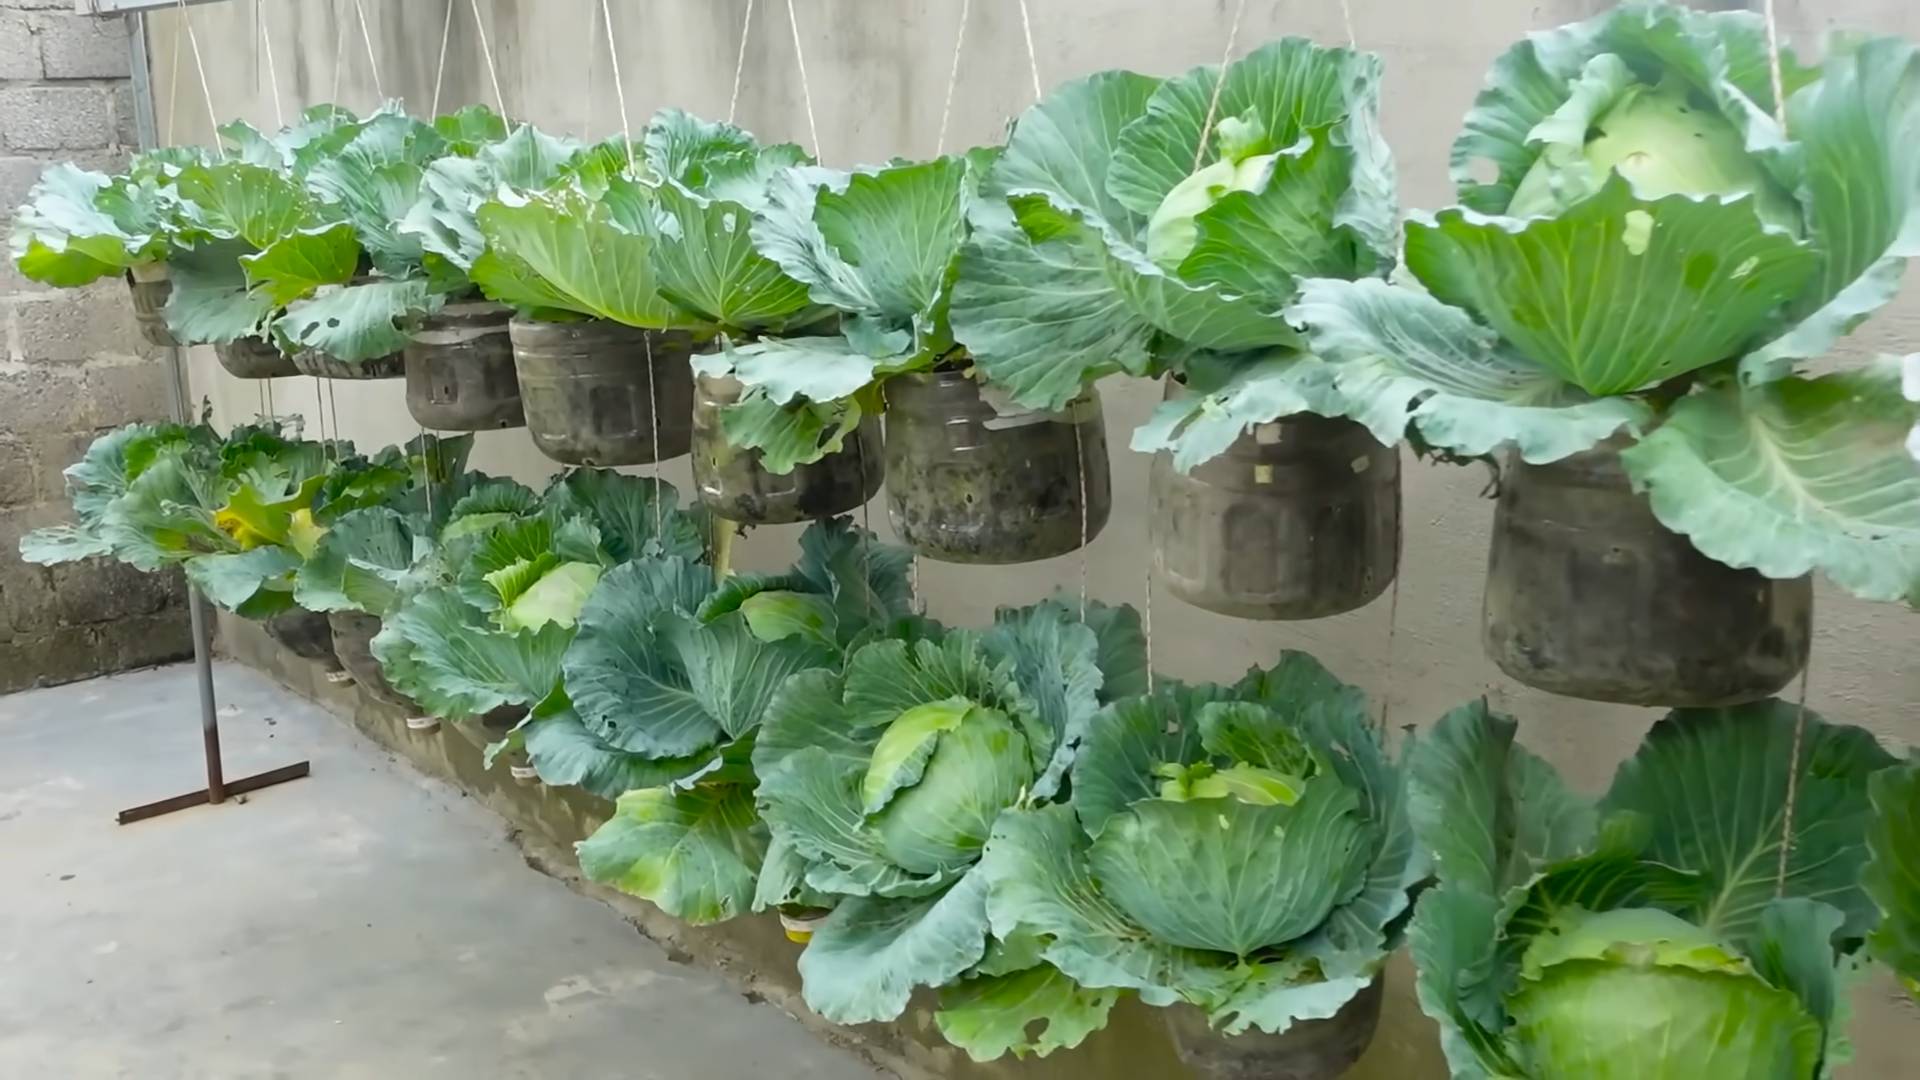
Bottle Grown Cabbage: Imagine harvesting fresh, crisp cabbage right from your windowsill, even if you don’t have a sprawling garden! Sounds too good to be true? Well, get ready to be amazed because this DIY guide will show you exactly how to cultivate your own miniature cabbage patch using nothing more than recycled plastic bottles.
The concept of container gardening, and specifically upcycling materials for planting, has roots stretching back centuries. From ancient hanging gardens to resourceful wartime victory gardens, people have always found innovative ways to grow food in limited spaces. Today, with increasing urbanization and a growing desire for sustainable living, the need for space-saving gardening solutions is more pressing than ever.
Let’s face it, not everyone has access to a large garden plot. Apartment dwellers, urban residents, and those with limited mobility often miss out on the joy of growing their own food. But with this simple bottle grown cabbage trick, anyone can experience the satisfaction of nurturing a plant from seed to harvest. Plus, it’s a fantastic way to reduce waste and contribute to a greener lifestyle. I’m excited to share this easy and rewarding project with you, so let’s get started and transform those empty bottles into thriving cabbage containers!
Bottle Grown Cabbage: A Fun and Easy DIY Project!
Hey there, fellow gardening enthusiasts! Ever thought about growing cabbage in a bottle? It sounds a little crazy, I know, but trust me, it’s a super fun and surprisingly effective way to cultivate these leafy greens, especially if you’re short on space or just looking for a unique gardening project. I’ve been experimenting with this method for a while now, and I’m excited to share my experience with you. Let’s dive in!
Why Bottle Grown Cabbage?
Before we get started, you might be wondering, “Why bother growing cabbage in a bottle?” Well, there are several advantages:
* Space Saving: This method is perfect for small spaces like balconies, patios, or even indoors with proper lighting.
* Pest Control: The bottle acts as a barrier against some common cabbage pests, making it easier to manage infestations.
* Unique Aesthetic: Let’s be honest, a cabbage growing out of a bottle is a conversation starter! It adds a quirky and interesting element to your garden.
* Controlled Environment: You have more control over the soil, watering, and overall environment, which can lead to healthier and more productive plants.
* Recycling: It’s a great way to reuse plastic bottles and reduce waste.
Materials You’ll Need
Okay, let’s gather our supplies. Here’s what you’ll need to get started:
* Large Plastic Bottle (2-3 liters): A clear or translucent bottle works best. Make sure it’s clean and free of any residue. Soda or water bottles are perfect.
* Cabbage Seeds or Seedlings: You can start from seeds or purchase seedlings from a local nursery. I personally prefer starting from seeds, as it gives me more control over the entire process.
* Potting Soil: Use a high-quality potting mix that’s well-draining and rich in nutrients.
* Perlite or Vermiculite: These help improve drainage and aeration in the soil.
* Scissors or Utility Knife: For cutting the bottle.
* Drill or Nail: To create drainage holes.
* Watering Can or Spray Bottle: For watering your cabbage.
* Optional: Liquid Fertilizer: To provide extra nutrients as the cabbage grows.
Preparing the Bottle
This is a crucial step, so pay close attention!
1. Clean the Bottle: Thoroughly wash the plastic bottle with soap and water to remove any dirt or residue. Rinse it well and let it dry completely.
2. Cut the Bottle: Using scissors or a utility knife, carefully cut the bottle in half horizontally. You’ll be using the bottom half as your container. I usually cut it about two-thirds of the way up, leaving a larger bottom section.
3. Create Drainage Holes: This is super important! Use a drill or nail to create several drainage holes in the bottom of the bottle. This will prevent water from logging and rotting the roots. I usually make about 5-6 holes, evenly spaced.
4. Optional: Prepare the Top Half: You can save the top half of the bottle to use as a mini-greenhouse or cloche to protect your seedling in the early stages. Just invert it over the bottom half.
Planting Your Cabbage
Now for the fun part – planting!
1. Prepare the Soil Mix: In a large container, mix your potting soil with perlite or vermiculite. I usually use a ratio of about 3 parts potting soil to 1 part perlite/vermiculite. This ensures good drainage and aeration.
2. Fill the Bottle: Fill the bottom half of the bottle with the prepared soil mix, leaving about an inch of space at the top.
3. Sowing Seeds (if starting from seeds): If you’re starting from seeds, sow them directly into the soil, following the instructions on the seed packet. I usually plant 2-3 seeds per bottle and thin them out later, keeping the strongest seedling. Cover the seeds lightly with soil.
4. Transplanting Seedlings (if using seedlings): If you’re using seedlings, gently remove them from their containers and loosen the roots slightly. Dig a small hole in the soil and place the seedling in the hole, making sure the top of the root ball is level with the soil surface. Backfill with soil and gently firm it around the base of the plant.
5. Water Thoroughly: After planting, water the soil thoroughly until water drains out of the drainage holes. This will help settle the soil and ensure the roots are properly hydrated.
Caring for Your Bottle Grown Cabbage
This is where the real magic happens! Consistent care is key to a healthy and productive cabbage plant.
1. Sunlight: Cabbage needs at least 6 hours of sunlight per day. Place your bottle grown cabbage in a sunny location, such as a windowsill, balcony, or patio. If you don’t have enough natural light, you can supplement with grow lights.
2. Watering: Water your cabbage regularly, keeping the soil consistently moist but not waterlogged. Check the soil moisture by sticking your finger into the soil. If it feels dry to the touch, it’s time to water. Avoid overwatering, as this can lead to root rot.
3. Fertilizing: Cabbage is a heavy feeder, so it needs regular fertilization. Start fertilizing about 2-3 weeks after planting, using a liquid fertilizer diluted to half strength. Follow the instructions on the fertilizer label. I usually fertilize every 2-3 weeks.
4. Pest Control: Keep an eye out for common cabbage pests, such as aphids, cabbage worms, and slugs. Inspect your plant regularly and take action if you see any signs of infestation. You can use organic pest control methods, such as insecticidal soap or neem oil. The bottle itself will help deter some pests.
5. Thinning (if starting from seeds): If you planted multiple seeds per bottle, thin them out to one seedling once they have developed a few true leaves. Choose the strongest and healthiest seedling and gently remove the others.
6. Rotating: Rotate the bottle regularly to ensure even sunlight exposure on all sides of the plant. This will help prevent the plant from leaning towards the light.
7. Support: As your cabbage grows, it may become top-heavy. You may need to provide some support to prevent it from tipping over. You can use a stake or trellis to support the plant.
Harvesting Your Cabbage
The moment you’ve been waiting for!
1. Timing: Cabbage is typically ready to harvest in 60-100 days, depending on the variety. You’ll know it’s ready when the head is firm and compact.
2. Harvesting: To harvest your cabbage, use a sharp knife to cut the head from the stem, leaving a few outer leaves intact.
3. Enjoy: Now you can enjoy your homegrown cabbage in salads, soups, stews, or any other dish you like!
Troubleshooting
Even with the best care, you might encounter some challenges along the way. Here are a few common problems and how to address them:
* Yellowing Leaves: This could be a sign of overwatering, underwatering, or nutrient deficiency. Check the soil moisture and adjust your watering accordingly. If the soil is dry, water more frequently. If it’s waterlogged, water less frequently. You may also need to fertilize your plant.
* Slow Growth: This could be due to insufficient sunlight, poor soil, or nutrient deficiency. Make sure your plant is getting enough sunlight and fertilize it regularly. You may also need to repot it into a larger container with fresh soil.
* Pest Infestation: Inspect your plant regularly for pests and take action if you see any signs of infestation. Use organic pest control methods, such as insecticidal soap or neem oil.
* Root Rot: This is caused by overwatering and poor drainage. Make sure your bottle has adequate drainage holes and avoid overwatering. If you suspect root rot, you may need to repot your plant into fresh soil.
Choosing the Right Cabbage Variety
Not all cabbage varieties are created equal when it comes to bottle gardening. Here are a few that I’ve found to be particularly well-suited for this method:
* Dwarf Varieties: These smaller varieties are ideal for container gardening and won’t outgrow your bottle too quickly. Look for varieties like ‘Dwarf Blue Vates’ or ‘Golden Acre’.
* Early Varieties: These varieties mature quickly, allowing you to harvest your cabbage sooner. ‘Early Jersey Wakefield’ is a popular choice.
* Red Cabbage: Red cabbage adds a beautiful splash of color to your garden and is just as easy to grow as green cabbage.
Tips for Success
Here are a few extra tips to help you succeed with bottle grown cabbage:
* Use a clear bottle: This

Conclusion
So, there you have it! Growing cabbage in a bottle might sound unconventional, but it’s a surprisingly effective and rewarding method, especially for urban gardeners, those with limited space, or anyone simply looking for a fun and unique gardening project. This DIY trick offers a multitude of benefits, from maximizing your yield in a small area to providing a fascinating educational experience for children and adults alike.
The beauty of this method lies in its simplicity and adaptability. You’re not confined to a traditional garden bed; you can place your bottle-grown cabbages on balconies, patios, or even indoors with sufficient light. Imagine the satisfaction of harvesting fresh, crisp cabbage heads from a recycled bottle – a testament to your ingenuity and resourcefulness!
Beyond the space-saving aspect, bottle growing offers better control over the growing environment. You can easily monitor and adjust the soil moisture, temperature, and nutrient levels, leading to healthier and more robust plants. This is particularly beneficial for those living in areas with challenging soil conditions or unpredictable weather patterns.
Don’t be afraid to experiment with different cabbage varieties. While smaller, compact varieties like ‘Golden Acre’ or ‘Dwarf Morden’ are particularly well-suited for bottle growing, you can certainly try your hand at larger varieties with a bit of extra support. Consider using larger bottles or even creating a support structure around the bottle to accommodate the growing cabbage head.
Furthermore, you can enhance the nutrient content of your soil by adding organic amendments like compost or worm castings. Regular fertilization with a balanced liquid fertilizer will also ensure that your cabbages receive the essential nutrients they need to thrive.
We encourage you to embrace this innovative approach to gardening and discover the joys of bottle-grown cabbage. It’s a sustainable, space-saving, and incredibly rewarding way to cultivate your own fresh produce.
But the real magic happens when you share your experiences! We’d love to hear about your successes, challenges, and creative adaptations. Did you try a different type of bottle? Did you find a particularly effective fertilizer? Share your tips and tricks in the comments below and let’s build a community of bottle-growing enthusiasts!
Don’t just take our word for it – give this DIY trick a try and experience the satisfaction of harvesting your own bottle-grown cabbage. You might be surprised at how easy and rewarding it is! This method truly showcases how you can grow cabbage in a bottle and enjoy fresh produce even with limited space.
Now, let’s address some frequently asked questions to help you get started on your bottle-growing journey.
Frequently Asked Questions
What type of bottle is best for growing cabbage?
The ideal bottle size depends on the variety of cabbage you intend to grow. For smaller, compact varieties like ‘Golden Acre’ or ‘Dwarf Morden’, a 2-liter soda bottle or a gallon-sized water jug will suffice. For larger varieties, you’ll need a larger container, such as a 3-gallon water bottle or even a repurposed bucket. Ensure the bottle is clean and has drainage holes at the bottom to prevent waterlogging. Clear plastic bottles are generally preferred as they allow you to monitor the soil moisture levels more easily. However, you can also use opaque bottles, just be sure to check the soil moisture regularly.
How do I prepare the bottle for planting?
First, thoroughly clean the bottle with soap and water to remove any residue. Then, drill or poke several drainage holes at the bottom of the bottle to allow excess water to escape. Next, cut off the top portion of the bottle, leaving enough of the neck intact to provide support for the plant. You can either discard the top portion or repurpose it as a mini-greenhouse to protect the seedlings during their early stages of growth. Finally, fill the bottle with a well-draining potting mix that is rich in organic matter.
What type of soil should I use?
A well-draining potting mix is crucial for successful bottle-grown cabbage. Avoid using garden soil, as it tends to compact and doesn’t provide adequate drainage. A good potting mix should consist of a blend of peat moss, perlite, and vermiculite. You can also add compost or worm castings to enrich the soil with nutrients. The ideal pH level for cabbage is between 6.0 and 7.0. You can test the pH of your soil using a soil testing kit and adjust it accordingly.
How often should I water my bottle-grown cabbage?
Water your bottle-grown cabbage regularly, especially during hot and dry weather. The frequency of watering will depend on the weather conditions, the size of the bottle, and the type of soil you’re using. As a general rule, water when the top inch of soil feels dry to the touch. Avoid overwatering, as this can lead to root rot. When watering, water deeply and slowly, allowing the water to saturate the soil evenly.
How much sunlight does bottle-grown cabbage need?
Cabbage requires at least 6 hours of direct sunlight per day to thrive. Place your bottle-grown cabbage in a sunny location where it will receive ample sunlight. If you’re growing your cabbage indoors, you may need to supplement with artificial lighting, such as grow lights. Rotate the bottle regularly to ensure that all sides of the plant receive equal sunlight.
How do I fertilize my bottle-grown cabbage?
Cabbage is a heavy feeder and requires regular fertilization to produce healthy heads. Fertilize your bottle-grown cabbage every 2-3 weeks with a balanced liquid fertilizer, such as a 10-10-10 or a 20-20-20 fertilizer. Follow the instructions on the fertilizer label for proper dilution rates. You can also add organic fertilizers, such as compost tea or fish emulsion, to provide additional nutrients.
How do I protect my bottle-grown cabbage from pests and diseases?
Monitor your bottle-grown cabbage regularly for signs of pests and diseases. Common cabbage pests include aphids, cabbage worms, and flea beetles. You can control these pests by handpicking them off the plants, spraying them with insecticidal soap, or using organic pesticides like neem oil. Common cabbage diseases include black rot and clubroot. Prevent these diseases by using disease-resistant varieties, practicing crop rotation, and ensuring good drainage.
How long does it take to grow cabbage in a bottle?
The time it takes to grow cabbage in a bottle depends on the variety of cabbage, the growing conditions, and the size of the bottle. Generally, it takes between 60 and 90 days from transplanting to harvest. You can harvest your cabbage when the head is firm and compact.
Can I grow other vegetables in bottles?
Absolutely! The bottle-growing method can be adapted to grow a variety of other vegetables, including lettuce, spinach, herbs, and even tomatoes. The key is to choose varieties that are well-suited for container gardening and to provide them with the appropriate growing conditions. Experiment with different vegetables and see what works best for you.
What if my cabbage outgrows the bottle?
If your cabbage outgrows the bottle, you have a couple of options. You can either transplant it to a larger container or support the growing head with stakes or a trellis. If you choose to transplant it, be careful not to damage the roots. Gently remove the cabbage from the bottle and replant it in a larger container filled with fresh potting mix. If you choose to support the head, use stakes or a trellis to prevent it from falling over.

Leave a Comment