
Grow bitter gourd like a pro, even if you think you have a “brown thumb”! Have you ever dreamed of harvesting your own vibrant, knobbly bitter gourds right from your backyard? I know I have! There’s something incredibly satisfying about nurturing a plant from seed to table, and with this guide, you’ll be well on your way to enjoying the unique, slightly bitter flavor of homegrown goodness.
Bitter gourd, also known as bitter melon or karela, has a rich history, deeply rooted in Asian and African cultures. For centuries, it’s been prized not only for its distinctive taste but also for its impressive health benefits. From traditional medicine to culinary delights, this remarkable vegetable has earned its place in gardens and kitchens worldwide.
But let’s be honest, growing bitter gourd can sometimes feel like a challenge. That’s where these DIY tricks and hacks come in! I’m going to share my tried-and-true methods for creating the perfect growing environment, tackling common pests and diseases, and maximizing your yield. Whether you’re a seasoned gardener or just starting out, these tips will empower you to grow bitter gourd successfully and enjoy a bountiful harvest. So, grab your gardening gloves, and let’s get started!

DIY: Growing Bitter Gourd Like a Pro (Even if You’re a Beginner!)
Okay, so you want to grow bitter gourd? Awesome! It might sound intimidating, but trust me, it’s totally doable, even if you don’t have a green thumb. I’m going to walk you through everything you need to know, from seed to harvest. Get ready for some delicious (and slightly bitter!) homegrown goodness.
What You’ll Need: The Bitter Gourd Starter Pack
Before we dive in, let’s gather our supplies. This is what I’ve found works best:
* Bitter Gourd Seeds: You can find these online or at your local garden center. Look for varieties that are suited to your climate.
* Seed Starting Tray or Small Pots: These are perfect for getting your seeds going indoors.
* Seed Starting Mix: This is a light, airy soil mix that’s ideal for delicate seedlings.
* Larger Pots (if starting indoors): You’ll need these to transplant your seedlings into before moving them outdoors. Aim for at least 12-inch diameter pots.
* Well-Draining Soil: Bitter gourd loves rich, well-draining soil. You can use a good quality potting mix or amend your garden soil with compost and aged manure.
* Compost or Aged Manure: This will provide essential nutrients for healthy growth.
* Trellis or Support Structure: Bitter gourd is a vine, so it needs something to climb on. A trellis, fence, or even a sturdy tomato cage will work.
* Gardening Gloves: Protect those hands!
* Watering Can or Hose: For keeping your plants hydrated.
* Fertilizer (Optional): A balanced fertilizer can give your plants a boost, but it’s not always necessary.
* Pruning Shears or Scissors: For trimming and shaping your vines.
Phase 1: Seed Starting – Getting Those Little Guys Going
Starting your seeds indoors gives them a head start, especially if you live in a cooler climate. Here’s how I do it:
1. Soaking the Seeds: This is a trick I learned that really helps with germination. Soak your bitter gourd seeds in warm water for 24 hours before planting. This softens the hard outer shell and encourages sprouting.
2. Planting the Seeds: Fill your seed starting tray or small pots with seed starting mix. Make a small hole (about 1/2 inch deep) in the center of each pot. Place one or two seeds in each hole and cover them gently with soil.
3. Watering and Warmth: Water the soil gently until it’s moist but not soggy. Place the tray or pots in a warm location, like a sunny windowsill or under a grow light. Bitter gourd seeds need warmth to germinate, ideally between 75-85°F (24-29°C).
4. Patience is Key: Keep the soil consistently moist, but don’t overwater. You should see seedlings emerge in about 7-14 days.
5. Thinning (If Necessary): If you planted two seeds per pot and both germinate, thin out the weaker seedling, leaving only the strongest one.
Phase 2: Transplanting – Moving to Bigger and Better Things
Once your seedlings have developed a few sets of true leaves (the leaves that look like miniature versions of the adult leaves), it’s time to transplant them into larger pots or directly into your garden.
1. Hardening Off (Important!): Before transplanting outdoors, you need to “harden off” your seedlings. This means gradually exposing them to outdoor conditions over a period of about a week. Start by placing them outside in a sheltered spot for an hour or two each day, gradually increasing the amount of time they spend outdoors. This helps them adjust to the sun, wind, and temperature changes.
2. Choosing the Right Location: Bitter gourd needs plenty of sunshine (at least 6-8 hours per day) and well-draining soil. Choose a location in your garden that meets these requirements.
3. Preparing the Soil: Amend your garden soil with compost or aged manure to improve its fertility and drainage. Dig a hole that’s slightly larger than the root ball of your seedling.
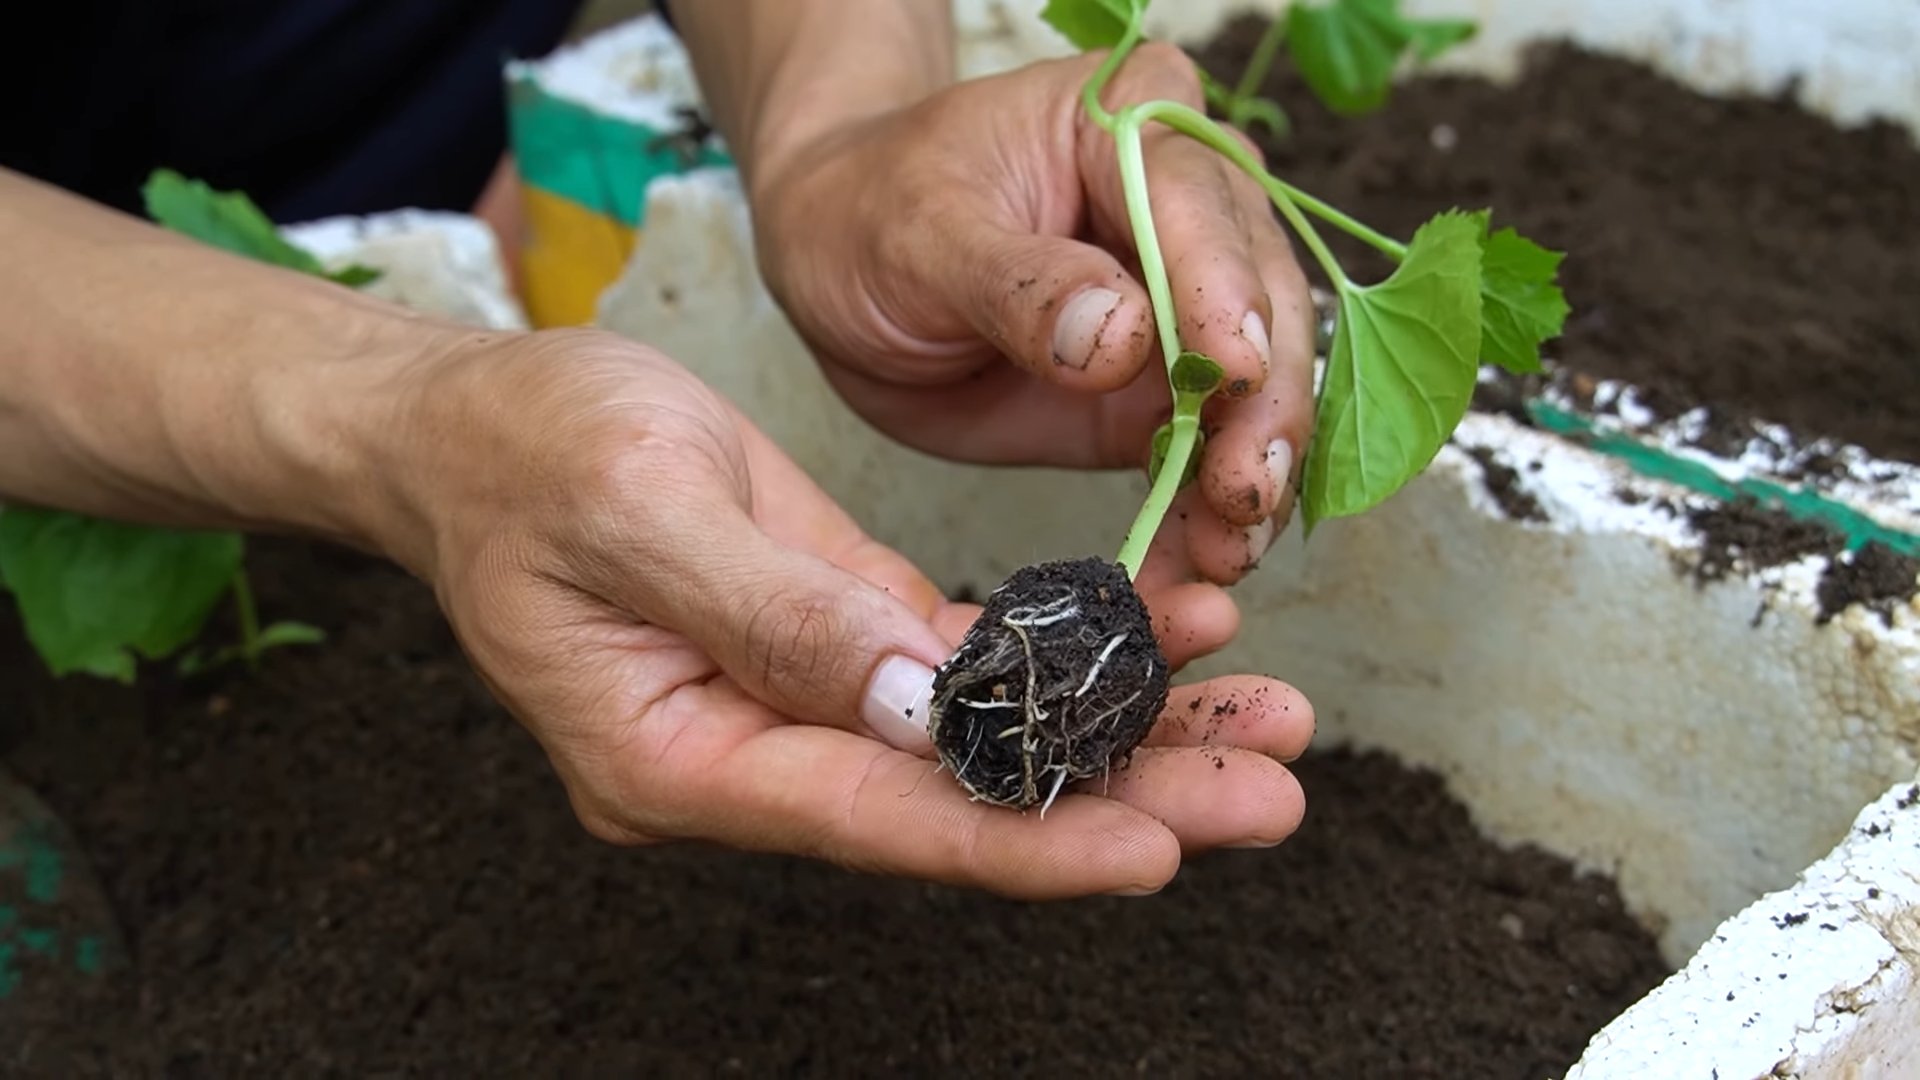
4. Transplanting Carefully: Gently remove the seedling from its pot, being careful not to damage the roots. Place the seedling in the hole and backfill with soil. Water thoroughly.
5. Spacing: If you’re planting multiple bitter gourd plants, space them about 2-3 feet apart to allow for adequate growth.
Phase 3: Trellis Time – Giving Them Something to Climb
Bitter gourd is a vine, so it needs a trellis or other support structure to climb on. This helps to keep the fruits off the ground, improves air circulation, and makes harvesting easier.
1. Setting Up the Trellis: Install your trellis or support structure near your bitter gourd plants. Make sure it’s sturdy enough to support the weight of the vines and fruits. I’ve used everything from simple bamboo stakes to elaborate wooden trellises.
2. Training the Vines: As the vines grow, gently guide them towards the trellis and encourage them to climb. You can use plant ties or twine to secure them to the trellis if needed.
3. Pruning (Optional): Pruning can help to improve air circulation and encourage fruit production. Remove any dead or yellowing leaves, and trim back any overly aggressive vines. I usually prune mine lightly to keep them manageable.
Phase 4: Watering and Feeding – Keeping Them Happy and Healthy
Watering and feeding are essential for healthy bitter gourd growth.
1. Watering Regularly: Water your bitter gourd plants regularly, especially during hot, dry weather. Aim to keep the soil consistently moist, but not soggy. Water deeply and less frequently, rather than shallowly and often.
2. Fertilizing (Optional): If you want to give your plants a boost, you can fertilize them every few weeks with a balanced fertilizer. Follow the instructions on the fertilizer package. I sometimes use a liquid seaweed fertilizer, which seems to work well.
3. Mulching: Apply a layer of mulch around your plants to help retain moisture, suppress weeds, and regulate soil temperature. Straw, wood chips, or shredded leaves work well.
Phase 5: Pest and Disease Control – Keeping the Bad Guys Away
Like all plants, bitter gourd can be susceptible to pests and diseases. Here’s how to deal with them:
1. Common Pests: Aphids, squash bugs, and cucumber beetles are common pests that can attack bitter gourd plants. You can control them with insecticidal soap, neem oil, or by hand-picking them off the plants.
2. Common Diseases: Powdery mildew and downy mildew are common fungal diseases that can affect bitter gourd. You can prevent them by providing good air circulation and avoiding overhead watering. If you see signs of disease, treat the plants with a fungicide.
3. Prevention is Key: The best way to deal with pests and diseases is to prevent them in the first place. Keep your garden clean and free of debris, and water your plants properly.
Phase 6: Harvesting – The Sweet (or Bitter!) Reward
Harvesting is the most rewarding part of growing bitter gourd!
1. When to Harvest: Bitter gourd is typically ready to harvest about 2-3 months after planting. The fruits should be firm and green, and the skin should be slightly waxy.
2. How to Harvest: Use pruning shears or a sharp knife to cut the fruits from the vine. Be careful not to damage the vine.
3. Taste Test: The bitterness of bitter gourd increases as it ripens. If you prefer a milder flavor, harvest the fruits when they are younger and smaller.
4. Enjoy! Bitter gourd can be used in a variety of dishes, from stir-fries to soups to curries. It’s also a popular ingredient in traditional medicine.
Troubleshooting: Common Bitter Gourd Problems and Solutions
Even with the best care, you might encounter some problems along the way. Here are a few common issues and how to fix them:
* Poor Germination: If your seeds aren’t germinating, make sure they’re getting enough warmth and moisture. Try soaking them in warm water for 24 hours before planting. Also, make sure your seeds are fresh.
* Yellowing Leaves: Yellowing leaves can be a sign of overwatering, underwatering, or nutrient deficiency. Check the soil moisture and adjust your watering accordingly. If the soil is dry, water deeply. If it’s soggy, let it dry out before watering again. You can also try fertilizing your plants with a balanced fertilizer.
* Lack of Fruit Production: If your plants are growing well but not producing fruit, it could be due to a lack of pollination. Bitter gourd plants have separate male and female flowers. You can hand-pollinate the flowers by transferring pollen from
Conclusion
So, there you have it! Growing your own bitter gourd, while it might seem intimidating at first, is incredibly rewarding and achievable with this simple DIY trick. We’ve shown you how to bypass some of the common hurdles that prevent successful cultivation, setting you up for a bountiful harvest of this nutritious and flavorful vegetable.
Why is this a must-try? Because it empowers you to take control of your food source, ensuring you have access to fresh, organic bitter gourd whenever you desire. Store-bought varieties often lack the vibrant flavor and nutritional punch of homegrown produce. Plus, there’s an undeniable satisfaction in nurturing a plant from seed to table. This method significantly increases your chances of success, even if you’re a beginner gardener. It addresses the common issues of germination and early seedling vulnerability, giving your bitter gourd plants a strong start.
But don’t stop there! Experiment with different varieties of bitter gourd. Some are longer and thinner, while others are shorter and more bulbous. Each has a slightly different flavor profile. You can also adjust the soil composition to influence the bitterness level. Adding more organic matter can sometimes mellow the flavor. Consider companion planting with herbs like basil or marigolds to deter pests naturally. Another variation to consider is growing bitter gourd vertically on a trellis or fence. This not only saves space but also improves air circulation, reducing the risk of fungal diseases. You can also try different types of fertilizers, both organic and inorganic, to see which yields the best results in your specific growing conditions. Remember to always follow the instructions on the fertilizer packaging.
We wholeheartedly encourage you to try this DIY trick for growing bitter gourd. It’s a game-changer! Don’t be afraid to get your hands dirty and embrace the learning process. Gardening is all about experimentation and adapting to your local environment.
Once you’ve reaped the rewards of your labor, we’d love to hear about your experience. Share your photos, tips, and any variations you’ve tried in the comments below. Let’s build a community of bitter gourd enthusiasts and learn from each other’s successes (and even failures!). Your insights could be invaluable to other aspiring gardeners. Did you find a particular fertilizer worked wonders? Did you discover a unique way to protect your plants from pests? Share it all!
Growing your own food is a powerful and fulfilling experience. This DIY method for growing bitter gourd is just the beginning. Embrace the journey, enjoy the process, and savor the delicious rewards. Happy gardening!
Frequently Asked Questions (FAQ)
What if my bitter gourd seeds still don’t germinate after using this trick?
Even with the best methods, seed germination isn’t always guaranteed. Several factors can influence germination rates, including seed age, quality, and environmental conditions. First, ensure your seeds are relatively fresh. Bitter gourd seeds typically have a shelf life of about one to two years. If your seeds are older than that, their viability may be reduced. Second, check the temperature. Bitter gourd seeds prefer warm temperatures for germination, ideally between 75°F and 85°F (24°C and 29°C). If your ambient temperature is too low, consider using a heat mat to provide consistent warmth. Third, make sure the soil is consistently moist but not waterlogged. Overwatering can lead to seed rot. Finally, if you’ve tried all these steps and your seeds still aren’t germinating, consider trying a different batch of seeds from a reputable source. Sometimes, the problem lies with the seed quality itself. You can also try scarifying the seeds by gently rubbing them with sandpaper to weaken the seed coat and promote water absorption.
How often should I water my bitter gourd plants?
Watering frequency depends on several factors, including the climate, soil type, and stage of plant growth. Generally, bitter gourd plants need consistent moisture, especially during hot and dry periods. A good rule of thumb is to water deeply whenever the top inch of soil feels dry to the touch. Avoid frequent, shallow watering, as this can encourage shallow root growth and make the plants more susceptible to drought stress. During the fruiting stage, bitter gourd plants require more water to support fruit development. Monitor the plants closely and adjust watering accordingly. Mulching around the base of the plants can help retain moisture in the soil and reduce the need for frequent watering. Also, consider using a soaker hose or drip irrigation system to deliver water directly to the roots, minimizing water loss through evaporation.
What kind of fertilizer should I use for bitter gourd?
Bitter gourd plants benefit from a balanced fertilizer that provides essential nutrients for growth and fruit production. A fertilizer with an NPK ratio of 10-10-10 or 14-14-14 is a good starting point. However, you can adjust the fertilizer based on the stage of plant growth. During the early stages, a fertilizer with a higher nitrogen content can promote leafy growth. Once the plants start to flower and fruit, switch to a fertilizer with a higher phosphorus and potassium content to support fruit development. Organic fertilizers, such as compost, manure, and bone meal, are also excellent options for providing slow-release nutrients and improving soil health. Apply fertilizer according to the instructions on the packaging, and avoid over-fertilizing, as this can damage the plants. Side-dressing with compost tea or liquid seaweed extract can also provide additional nutrients and boost plant health.
How do I deal with pests and diseases on my bitter gourd plants?
Bitter gourd plants can be susceptible to various pests and diseases, including aphids, squash bugs, cucumber beetles, powdery mildew, and downy mildew. Regular monitoring of your plants is crucial for early detection and prevention. For aphids, you can try spraying the plants with a strong stream of water or using insecticidal soap. Squash bugs can be handpicked or trapped under boards placed near the plants. Cucumber beetles can be controlled with neem oil or pyrethrin-based insecticides. To prevent powdery mildew and downy mildew, ensure good air circulation around the plants and avoid overhead watering. You can also apply a fungicide specifically designed for these diseases. Companion planting with herbs like basil and marigolds can help deter pests naturally. Crop rotation and using disease-resistant varieties can also minimize the risk of pest and disease problems.
When is the best time to harvest bitter gourd?
The best time to harvest bitter gourd depends on the variety and your personal preference. Generally, bitter gourds are ready for harvest when they are still green and firm, before they start to turn yellow or orange. The size of the fruit can also be an indicator of ripeness. Check the seed packet or plant tag for specific information on the expected size and color of mature fruits. Use a sharp knife or pruning shears to cut the bitter gourd from the vine, leaving a short stem attached. Harvesting regularly encourages the plant to produce more fruits. If you prefer a less bitter flavor, harvest the gourds when they are younger and smaller. Overripe bitter gourds tend to be more bitter and have tougher skin.
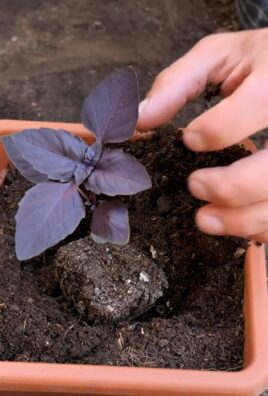
Can I grow bitter gourd in containers?
Yes, you can successfully grow bitter gourd in containers, provided you choose a large enough container and provide adequate support for the vines. A container that is at least 12 inches in diameter and 12 inches deep is recommended. Use a well-draining potting mix and ensure the container has drainage holes to prevent waterlogging. Place the container in a sunny location that receives at least 6-8 hours of direct sunlight per day. Provide a trellis or other support structure for the vines to climb. Water regularly and fertilize as needed. Container-grown bitter gourd plants may require more frequent watering and fertilization than those grown in the ground. Choose a compact or bush variety of bitter gourd for container gardening, as they tend to be more manageable.
How can I reduce the bitterness of bitter gourd?
Bitter gourd is known for its distinctive bitter flavor, but there are several ways to reduce the bitterness before cooking. One common method is to slice the bitter gourd and soak it in salted water for at least 30 minutes. The salt helps to draw out some of the bitter compounds. You can also blanch the bitter gourd in boiling water for a few minutes before cooking. Another technique is to rub the sliced bitter gourd with salt and then squeeze out the excess water. Some people also find that removing the seeds and pith (the white spongy part inside) can help reduce the bitterness. Cooking bitter gourd with acidic ingredients, such as vinegar or lemon juice, can also help to balance the flavor. Experiment with different methods to find what works best for your taste preferences.

Leave a Comment