
Grow Spinach Indoors? Absolutely! Imagine fresh, vibrant spinach gracing your salads and smoothies, even when the snow is falling outside. Forget those limp, pre-packaged greens from the store – we’re talking about crisp, nutrient-packed spinach grown right in your own home! For centuries, cultivating edible plants indoors has been a practice rooted in necessity and ingenuity. From ancient Roman orangeries to Victorian-era conservatories, people have sought ways to extend the growing season and enjoy fresh produce year-round.
But you don’t need a sprawling greenhouse to enjoy the benefits of indoor gardening. In today’s busy world, having access to fresh, healthy food is more important than ever. Learning how to grow spinach indoors is a fantastic way to boost your diet, reduce your grocery bills, and connect with nature, all from the comfort of your own home. I’m going to show you some simple, effective DIY tricks and hacks that will have you harvesting delicious spinach in no time, even if you’ve never grown anything before! Get ready to unleash your inner gardener and enjoy the satisfaction of growing your own food – it’s easier than you think!

Growing Spinach Indoors: A Beginner’s Guide
Hey there, fellow plant enthusiasts! Ever dreamt of having fresh, vibrant spinach right at your fingertips, no matter the season? Well, dream no more! Growing spinach indoors is totally achievable, and I’m here to guide you through every step of the process. Trust me, there’s nothing quite like snipping off a few leaves for a salad or smoothie, knowing you grew them yourself. Let’s get started!
Choosing the Right Spinach Variety
First things first, not all spinach varieties are created equal when it comes to indoor growing. Some are better suited for containers and indoor conditions than others. Here are a few of my personal favorites:
* Baby’s Leaf Hybrid: This one is a classic for a reason. It grows quickly, produces tender leaves, and is relatively compact, making it perfect for smaller spaces.
* Space Spinach: Don’t let the name fool you; you don’t need to be an astronaut to grow this one! It’s known for its disease resistance and smooth leaves.
* Tyee: If you’re looking for a variety that can tolerate slightly warmer temperatures, Tyee is a great option. It’s also known for its bolt resistance (meaning it’s less likely to go to seed prematurely).
* Winter Bloomsdale: This heirloom variety is a reliable choice, especially if you’re planning to grow spinach during the cooler months.
Gathering Your Supplies
Before we dive into the planting process, let’s make sure you have everything you need. Here’s a checklist of essential supplies:
* Spinach Seeds: Obviously! Choose a variety that suits your preferences and growing conditions.
* Containers: You’ll need containers that are at least 6 inches deep. I prefer using pots that are 8-12 inches in diameter to give the spinach roots plenty of room to grow. Make sure your containers have drainage holes!
* Potting Mix: Use a high-quality potting mix that’s well-draining and rich in organic matter. Avoid using garden soil, as it can become compacted in containers.
* Grow Lights (Optional but Recommended): While spinach can tolerate some shade, it thrives with plenty of light. If you don’t have a sunny windowsill, consider investing in a grow light.
* Watering Can or Spray Bottle: For gentle watering.
* Fertilizer (Optional): A balanced liquid fertilizer can help boost growth, but it’s not essential.
* Seed Starting Tray (Optional): If you prefer to start your seeds indoors before transplanting them to larger containers.
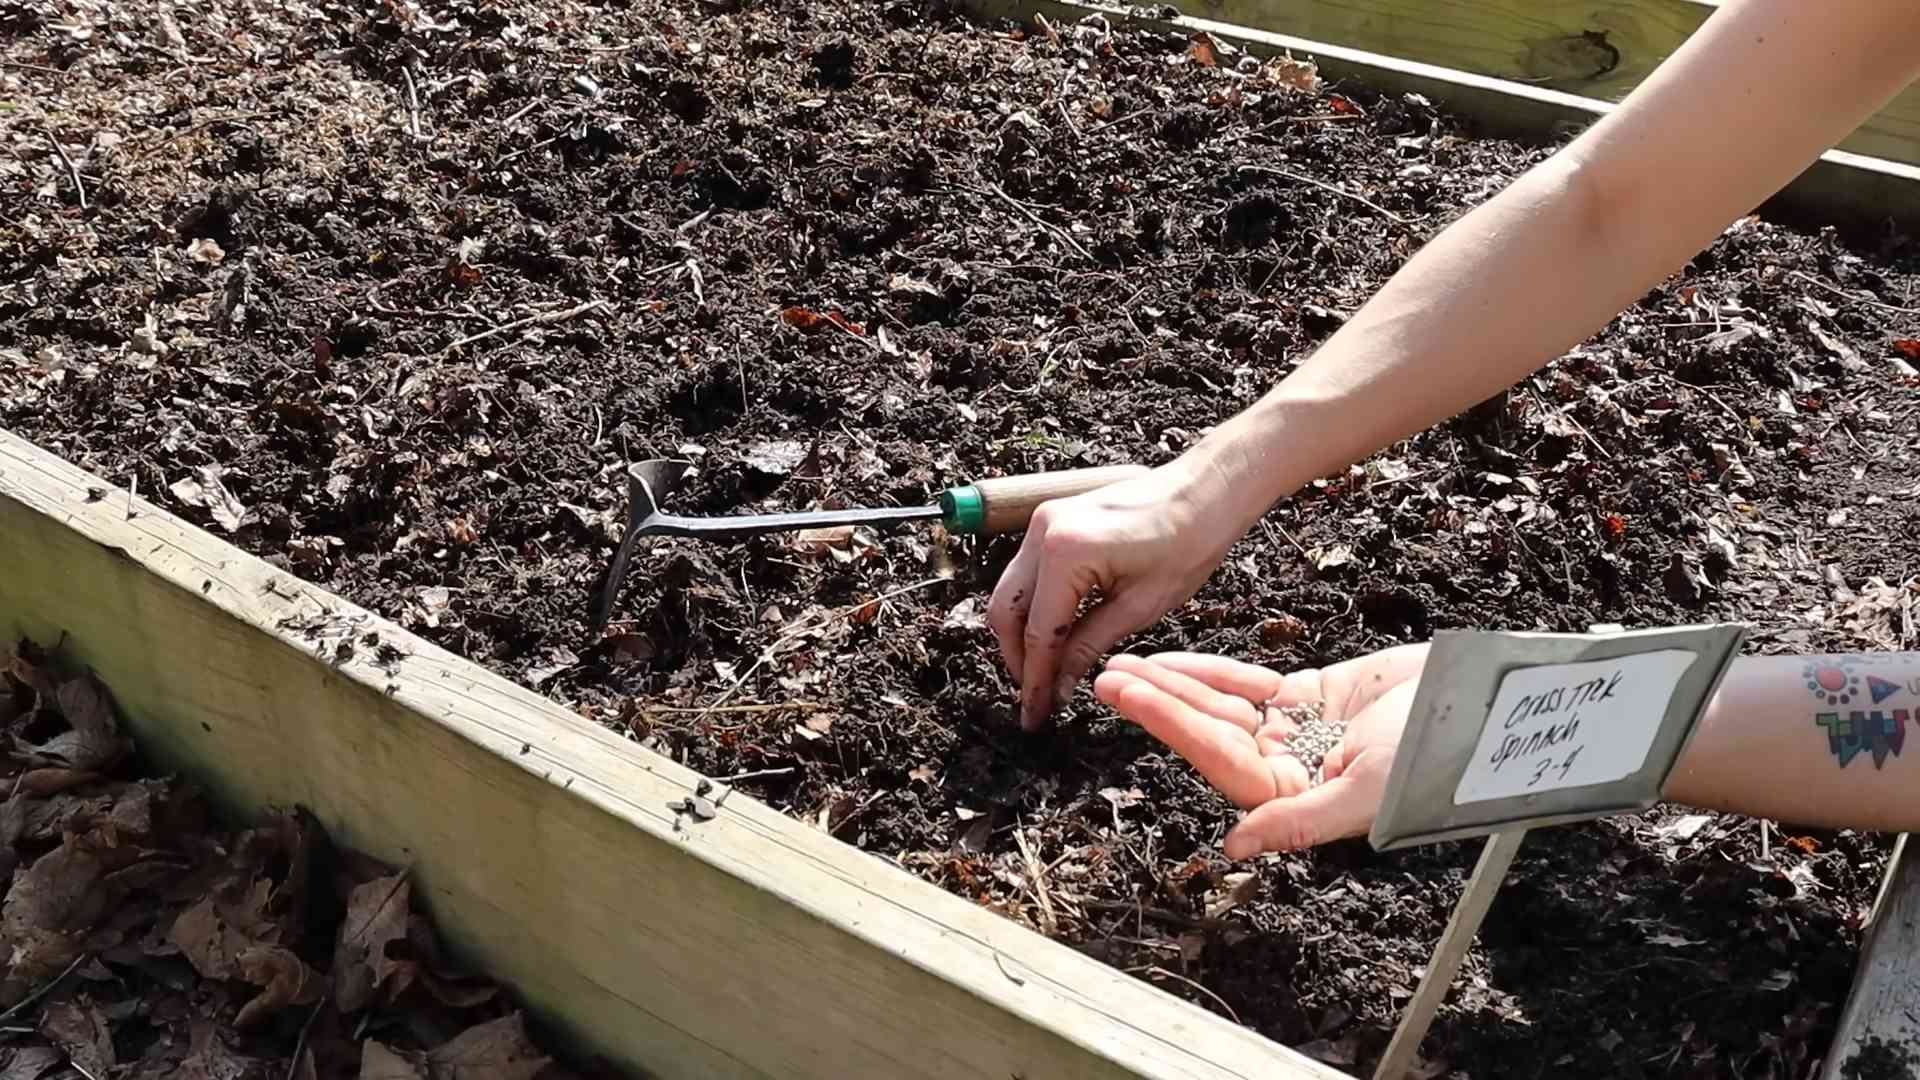
Planting Your Spinach Seeds
Now for the fun part! Let’s get those seeds in the soil.
1. Prepare Your Containers: Fill your containers with potting mix, leaving about an inch of space at the top. Gently pat down the soil.
2. Sow the Seeds: Sprinkle the spinach seeds evenly over the surface of the soil. You can also sow them in rows, spacing them about an inch apart.
3. Cover the Seeds: Cover the seeds with a thin layer of potting mix, about 1/4 inch deep.
4. Water Gently: Use a watering can or spray bottle to gently moisten the soil. Be careful not to overwater, as this can cause the seeds to rot.
5. Provide Light: Place your containers in a sunny windowsill or under a grow light. If using a grow light, position it a few inches above the soil surface.
6. Maintain Moisture: Keep the soil consistently moist, but not soggy. Water when the top inch of soil feels dry to the touch.
Caring for Your Indoor Spinach
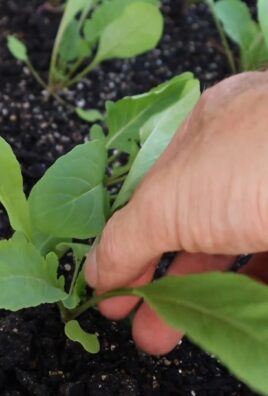
Once your spinach seeds have germinated (usually within 5-10 days), it’s time to provide them with the care they need to thrive.
1. Thin Seedlings (If Necessary): If you sowed your seeds densely, you may need to thin the seedlings to prevent overcrowding. Once the seedlings have a few true leaves, thin them to about 2-3 inches apart. Simply snip off the weaker seedlings at the soil line. Don’t pull them out, as this can disturb the roots of the remaining plants.
2. Provide Adequate Light: Spinach needs at least 6 hours of light per day. If you’re growing spinach in a sunny windowsill, rotate the containers regularly to ensure that all sides of the plants receive equal light. If you’re using a grow light, keep it on for 12-14 hours per day.
3. Water Regularly: Spinach needs consistent moisture to grow well. Water when the top inch of soil feels dry to the touch. Avoid overwatering, as this can lead to root rot.
4. Fertilize (Optional): If you want to give your spinach a boost, you can fertilize it every 2-3 weeks with a balanced liquid fertilizer. Follow the instructions on the fertilizer label. I usually dilute the fertilizer to half strength to avoid burning the plants.
5. Maintain Cool Temperatures: Spinach prefers cool temperatures, ideally between 60-70°F (15-21°C). Avoid placing your spinach plants near heat sources, such as radiators or vents.
6. Watch for Pests and Diseases: While spinach is relatively pest-resistant, it can sometimes be affected by aphids, spider mites, or fungal diseases. Inspect your plants regularly for any signs of problems. If you notice any pests, you can try spraying them with insecticidal soap or neem oil. For fungal diseases, improve air circulation and avoid overwatering.
Harvesting Your Spinach
The best part of growing your own spinach is, of course, the harvest! You can start harvesting spinach leaves when they are about 4-6 inches long.
1. Harvest Outer Leaves: Harvest the outer leaves first, leaving the inner leaves to continue growing. This is known as the “cut-and-come-again” method, and it allows you to harvest spinach continuously for several weeks.
2. Use Scissors or a Knife: Use scissors or a knife to cut the leaves off at the base of the stem.
3. Wash and Enjoy: Wash the spinach leaves thoroughly before eating them. You can use them in salads, smoothies, soups, or any other dish that calls for spinach.
Troubleshooting Common Problems
Even with the best care, you might encounter a few challenges when growing spinach indoors. Here are some common problems and how to address them:
* Yellowing Leaves: This can be caused by overwatering, underwatering, nutrient deficiencies, or lack of light. Check the soil moisture and adjust your watering accordingly. If the leaves are yellowing due to nutrient deficiencies, try fertilizing with a balanced liquid fertilizer. If the leaves are yellowing due to lack of light, move your plants to a sunnier location or provide them with supplemental light.
* Leggy Growth: This is usually caused by insufficient light. The plants are stretching towards the light source, resulting in long, weak stems. Move your plants to a sunnier location or provide them with supplemental light.
* Bolting (Premature Flowering): This is usually caused by high temperatures or stress. Once spinach bolts, the leaves become bitter and unpalatable. To prevent bolting, maintain cool temperatures and avoid stressing the plants. Choose bolt-resistant varieties.
* Pests: Aphids and spider mites are common pests that can affect spinach. Inspect your plants regularly for any signs of pests. If you notice any pests, you can try spraying them with insecticidal soap or neem oil.
* Fungal Diseases: Fungal diseases can be caused by overwatering, poor air circulation, or high humidity. Improve air circulation by spacing your plants further apart and avoiding overcrowding. Avoid overwatering and water only when the top inch of soil feels dry to the touch.
Extending Your Harvest
Want to keep the spinach coming? Here are a few tips for extending your harvest:
* Succession Planting: Sow new seeds every 2-3 weeks to ensure a continuous supply of spinach.
* Cool Temperatures: Spinach thrives in cool temperatures, so try to keep your growing area as cool as possible.
* Harvest Regularly: Harvesting the outer leaves regularly encourages the plant to produce more leaves.
* Overwintering: In some climates, you can overwinter spinach indoors. Simply move your plants to a cool, bright location and reduce watering.
Enjoying Your Homegrown Spinach
Congratulations! You’ve successfully grown spinach indoors. Now it’s time to enjoy the fruits (or rather, leaves) of your labor. Here are a few ideas for using your homegrown spinach:
* Salads: Add fresh spinach leaves to your favorite salads.
* Smoothies: Blend spinach into your smoothies for a healthy boost.
* Soups: Add spinach to soups for extra nutrients and flavor.
* Sautéed Spinach: Sauté spinach with garlic and olive oil for a simple and delicious side dish.
* Spinach Dip:
Conclusion
So, there you have it! Growing spinach indoors is not only achievable, but it’s also a remarkably rewarding experience. Forget those limp, pre-packaged greens from the grocery store. Imagine stepping into your kitchen and harvesting crisp, vibrant spinach leaves whenever you need them. The difference in taste and texture is truly remarkable, and the satisfaction of nurturing your own food from seed to table is unparalleled.
This DIY trick for growing spinach indoors is a must-try for several compelling reasons. First, it provides a constant supply of fresh, nutritious greens, regardless of the season or your outdoor space limitations. Second, it’s incredibly cost-effective. A packet of spinach seeds is far cheaper than repeatedly buying spinach at the store, and you’ll be reducing your carbon footprint by minimizing transportation and packaging waste. Third, it’s a fantastic way to connect with nature and learn about the growing process. Even if you’re a complete beginner, you’ll find that growing spinach indoors is surprisingly easy and enjoyable.
But the best part? You can customize your indoor spinach garden to suit your preferences. Want to try different varieties? Go for it! Experiment with baby spinach for salads, or try a more robust variety for cooking. You can also adjust the lighting and temperature to optimize growth and flavor. Consider adding companion plants like basil or chamomile to deter pests and enhance the overall health of your indoor garden.
Don’t be afraid to experiment! Try different potting mixes, fertilizer schedules, and even different containers to see what works best for you. You might be surprised at the results.
We’ve covered the basics, from selecting the right seeds and containers to providing adequate light and water. We’ve also addressed common challenges and offered solutions to help you overcome them. Now, it’s your turn to put this knowledge into practice and experience the joy of growing your own spinach indoors.
We are confident that you’ll find this DIY project to be both fun and fulfilling. So, grab your seeds, gather your supplies, and get ready to embark on your indoor spinach growing adventure!
We encourage you to try this DIY trick and share your experiences with us. Let us know what worked well for you, what challenges you faced, and any tips or tricks you discovered along the way. Your feedback will help us improve this guide and inspire others to grow their own spinach indoors. Share your photos and stories on social media using #IndoorSpinachGarden and let’s create a community of indoor gardeners! Happy growing!
Frequently Asked Questions (FAQ)
What are the best spinach varieties to grow indoors?
While many spinach varieties can be grown indoors, some are better suited than others. Look for varieties that are compact and quick-growing, such as ‘Baby’s Leaf Hybrid,’ ‘Space,’ ‘Bloomsdale Long Standing,’ or ‘Tyee Hybrid.’ These varieties tend to thrive in the controlled environment of an indoor garden and produce abundant yields. Consider the size of your containers when selecting a variety; smaller containers may be better suited for more compact varieties. Also, research the specific light requirements of each variety to ensure they align with the lighting conditions you can provide indoors.
How much light does indoor spinach need?
Spinach requires a significant amount of light to grow properly. Ideally, it needs at least 6-8 hours of direct sunlight per day. However, if you don’t have a sunny windowsill, you can supplement with artificial grow lights. Fluorescent or LED grow lights are excellent options. Place the lights a few inches above the spinach plants and keep them on for 12-14 hours per day. Monitor your plants closely and adjust the light as needed. If the leaves are pale or leggy, it indicates that they are not getting enough light. Remember that the intensity and duration of light are crucial for healthy spinach growth.
What type of soil is best for growing spinach indoors?
Spinach prefers well-draining soil that is rich in organic matter. A good potting mix for indoor spinach should consist of a combination of peat moss, perlite, and vermiculite. You can also add compost or aged manure to enrich the soil and provide essential nutrients. Avoid using garden soil, as it can be too heavy and may contain pests or diseases. Ensure that the potting mix is loose and airy to allow for proper root development. Before planting, moisten the soil thoroughly but avoid overwatering. A slightly acidic to neutral pH (around 6.5 to 7.0) is ideal for spinach growth.
How often should I water my indoor spinach plants?
Water spinach regularly to keep the soil consistently moist, but not waterlogged. Check the soil moisture level daily by sticking your finger about an inch into the soil. If it feels dry, it’s time to water. Water deeply, allowing the excess water to drain out of the bottom of the container. Avoid overhead watering, as this can lead to fungal diseases. Instead, water at the base of the plants. During warmer months or in drier climates, you may need to water more frequently. Conversely, during cooler months or in humid environments, you may need to water less often. Adjust your watering schedule based on the specific needs of your plants and the environmental conditions.
How do I fertilize my indoor spinach plants?
Spinach is a heavy feeder and benefits from regular fertilization. Start fertilizing your spinach plants about two weeks after they germinate. Use a balanced liquid fertilizer diluted to half strength. Apply the fertilizer every two to three weeks, following the instructions on the fertilizer label. You can also use organic fertilizers, such as compost tea or fish emulsion. Avoid over-fertilizing, as this can lead to excessive leaf growth and reduced flavor. Monitor your plants closely and adjust the fertilizer schedule as needed. If the leaves are yellowing or stunted, it may indicate a nutrient deficiency.
What are some common pests and diseases that affect indoor spinach?
While indoor spinach is generally less susceptible to pests and diseases than outdoor spinach, it can still be affected by certain problems. Common pests include aphids, spider mites, and whiteflies. These pests can be controlled with insecticidal soap or neem oil. Diseases that can affect indoor spinach include powdery mildew and damping-off. Powdery mildew can be prevented by ensuring good air circulation and avoiding overhead watering. Damping-off is a fungal disease that affects seedlings and can be prevented by using sterile potting mix and avoiding overwatering. Regularly inspect your plants for signs of pests or diseases and take action promptly to prevent them from spreading.
How long does it take for spinach to grow indoors?
Spinach is a relatively fast-growing crop. From seed to harvest, it typically takes about 4-6 weeks. You can start harvesting spinach leaves when they are about 4-6 inches long. Harvest the outer leaves first, allowing the inner leaves to continue growing. This cut-and-come-again method allows you to harvest spinach continuously for several weeks. The exact time it takes for spinach to grow indoors will depend on the variety, growing conditions, and your specific care practices.
Can I grow spinach indoors year-round?
Yes, you can grow spinach indoors year-round, provided you can provide the necessary light, temperature, and humidity. Spinach prefers cooler temperatures, ideally between 60-70°F (15-21°C). If your indoor environment is too warm, the spinach may bolt (go to seed) prematurely. You can use air conditioning or fans to keep the temperature cool. Humidity levels should be moderate, around 40-60%. You can increase humidity by placing a tray of water near the plants or using a humidifier. With proper care, you can enjoy fresh, homegrown spinach throughout the year.


Leave a Comment