
Growing Rosemary in Containers: Unlock the secrets to a thriving herb garden, even without a sprawling backyard! Have you ever dreamed of snipping fresh, fragrant rosemary right outside your kitchen door? I know I have! There’s something incredibly satisfying about using homegrown herbs in your cooking, and rosemary is definitely a star player.
Rosemary, with its rich history stretching back to ancient Mediterranean civilizations, was revered for its medicinal and symbolic properties. The ancient Greeks and Romans associated it with memory and remembrance, often wearing rosemary garlands or placing sprigs in coffins. Today, while we might not be warding off evil spirits with it, we can certainly enjoy its culinary and aromatic benefits.
But let’s face it, not everyone has the space or the ideal soil conditions for a traditional herb garden. That’s where the magic of container gardening comes in! Growing Rosemary in Containers is not only possible, but it’s also a fantastic way to control the plant’s environment and ensure its success. This DIY guide will provide you with simple, effective tricks and hacks to cultivate a flourishing rosemary plant in a pot, regardless of your gardening experience. Imagine the joy of adding a sprig of freshly grown rosemary to your roast chicken or infusing your olive oil with its delightful aroma. Let’s get started and transform your balcony, patio, or even a sunny windowsill into a fragrant rosemary haven!
Growing Rosemary in Containers: A Beginner’s Guide
Okay, so you want to grow rosemary in a container? Awesome! Rosemary is such a fantastic herb to have around. It smells amazing, tastes delicious in so many dishes, and is relatively easy to care for, especially when grown in a pot. I’ve been growing rosemary in containers for years, and I’m excited to share my tips and tricks with you. Let’s get started!
Choosing the Right Container and Soil
First things first, you need a good home for your rosemary. The container and soil are crucial for success.
* Container Size: Rosemary needs room to grow, so don’t skimp on the pot size. I recommend a container that’s at least 12 inches in diameter and 12 inches deep. A larger pot is even better, as it will give the roots more space to spread out and prevent the plant from becoming root-bound.
* Drainage: This is non-negotiable! Rosemary hates soggy roots. Make sure your container has plenty of drainage holes. If it doesn’t, you can drill some yourself.
* Material: The material of the container is less critical, but I prefer terracotta or ceramic pots. They’re breathable, which helps prevent overwatering. Plastic pots are fine too, but be extra careful not to overwater.
* Soil: Rosemary thrives in well-draining soil that’s slightly acidic to neutral. Avoid using garden soil, as it’s often too heavy and doesn’t drain well. I like to use a mix of:
* Potting mix (about 60%)
* Perlite or vermiculite (about 20%) for drainage
* Compost (about 20%) for nutrients
Planting Your Rosemary
Now that you have your container and soil ready, it’s time to plant your rosemary!
1. Prepare the Container: Place a layer of gravel or broken pottery at the bottom of the container to further improve drainage. This isn’t strictly necessary, but I find it helps.
2. Fill with Soil: Fill the container with your soil mixture, leaving a few inches of space at the top.
3. Remove Rosemary from Nursery Pot: Gently remove the rosemary plant from its nursery pot. If the roots are tightly packed, gently loosen them with your fingers. This will encourage them to spread out into the new soil.
4. Plant the Rosemary: Place the rosemary plant in the center of the container. The top of the root ball should be level with the soil surface.
5. Fill in with Soil: Fill in the remaining space around the plant with soil. Gently pat the soil down to remove any air pockets.
6. Water Thoroughly: Water the rosemary plant thoroughly until water drains out of the drainage holes. This will help settle the soil and hydrate the roots.
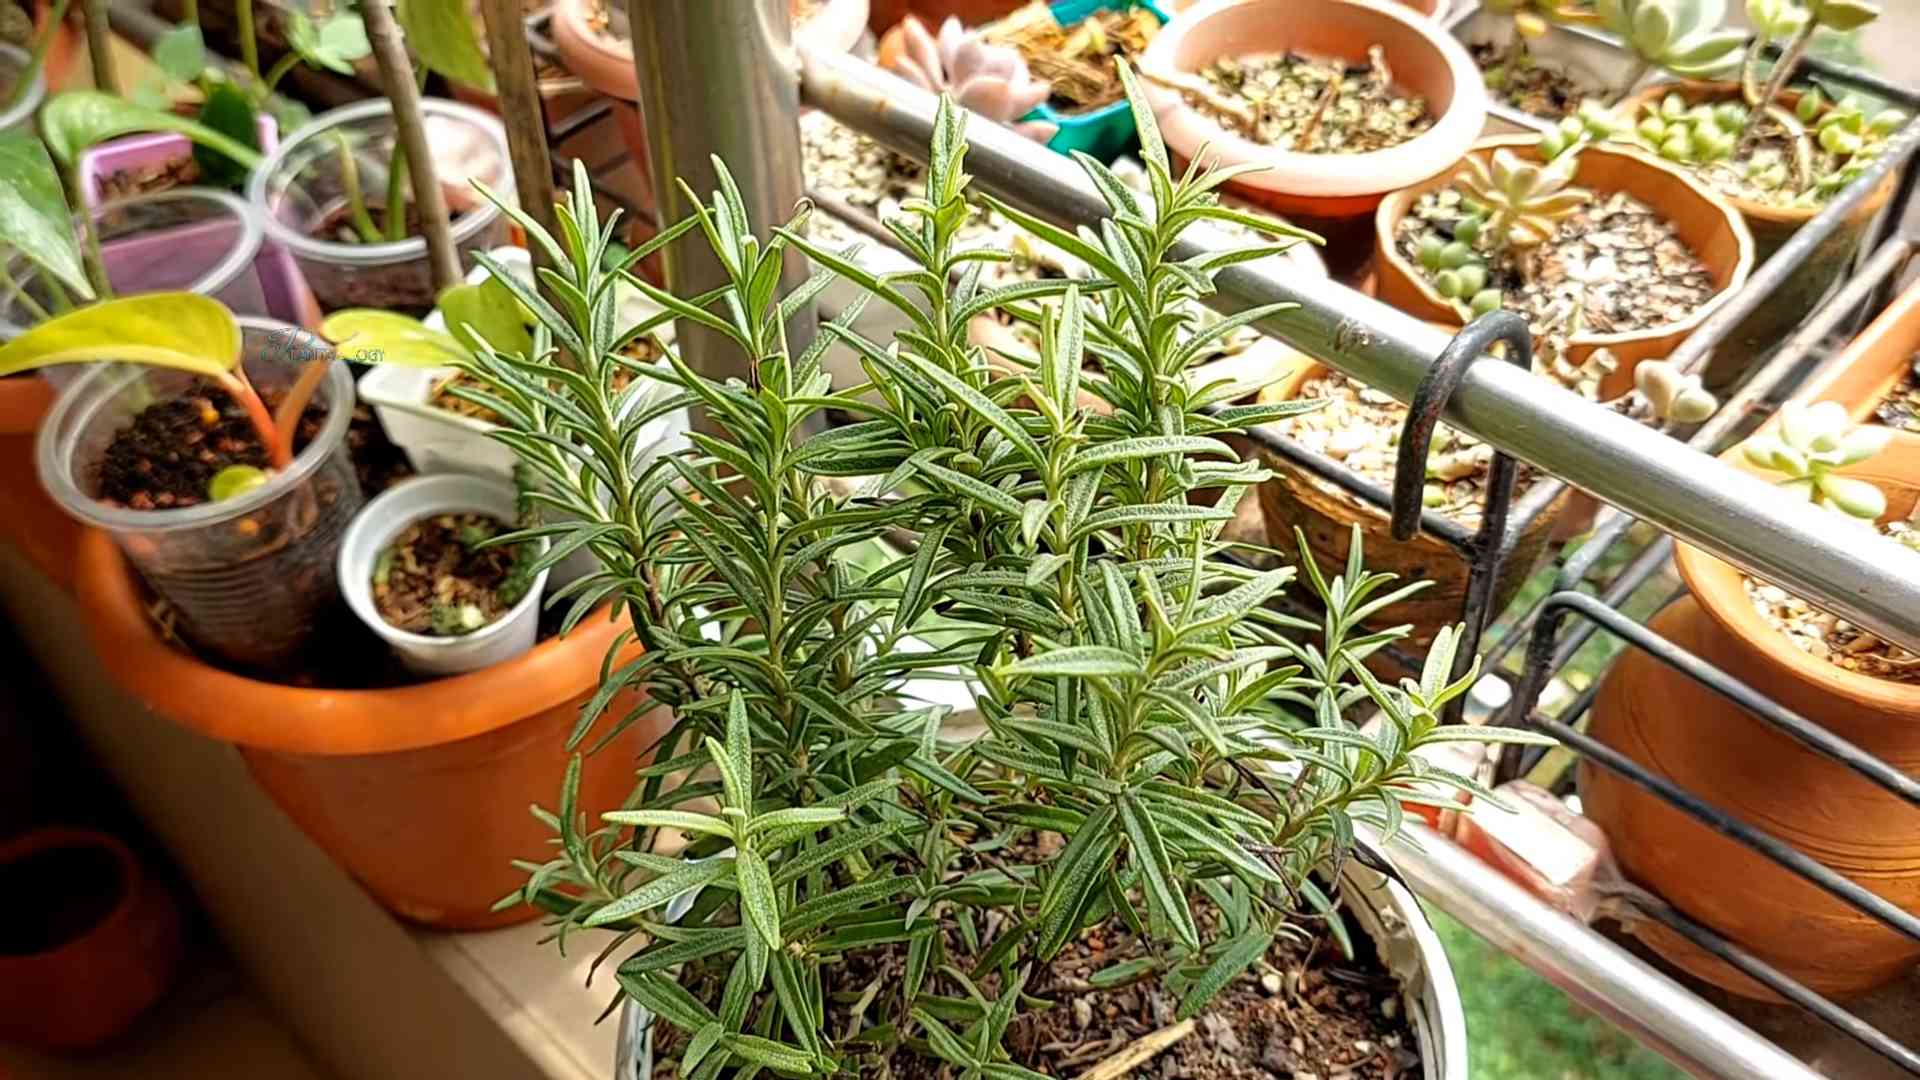
Caring for Your Container Rosemary
Okay, you’ve planted your rosemary. Now comes the ongoing care. Don’t worry, it’s not too demanding!
* Sunlight: Rosemary loves sunshine! It needs at least 6-8 hours of direct sunlight per day. Place your container in a sunny spot, such as a south-facing balcony or patio. If you don’t have enough sunlight, you can supplement with a grow light.
* Watering: As I mentioned before, rosemary hates soggy roots. Water only when the top inch of soil feels dry to the touch. When you do water, water deeply until water drains out of the drainage holes. During the hot summer months, you may need to water more frequently. In the winter, you can water less often.
* Fertilizing: Rosemary isn’t a heavy feeder, but it will benefit from occasional fertilization. I like to use a balanced liquid fertilizer diluted to half strength every 2-3 weeks during the growing season (spring and summer). You can also use a slow-release fertilizer at the beginning of the growing season.
* Pruning: Pruning is essential for keeping your rosemary plant healthy and productive. Prune regularly to encourage bushier growth and prevent the plant from becoming leggy. You can prune at any time of year, but I prefer to do it in the spring after the last frost. When pruning, remove any dead, damaged, or diseased branches. You can also trim back the tips of the branches to encourage new growth. Don’t be afraid to prune! Rosemary is very forgiving.
* Overwintering: Rosemary is hardy in zones 8-10, but if you live in a colder climate, you’ll need to overwinter your container rosemary indoors. Before the first frost, bring your container indoors and place it in a sunny location. Water sparingly during the winter months. You can also use a grow light to supplement the sunlight. In the spring, after the last frost, you can move your rosemary back outdoors.
* Pests and Diseases: Rosemary is relatively pest and disease resistant, but it can be susceptible to aphids, spider mites, and powdery mildew. Check your plant regularly for signs of pests or diseases. If you find any, treat them promptly with an appropriate insecticide or fungicide. I prefer to use organic solutions whenever possible. For aphids, a strong spray of water can often do the trick. For spider mites, try increasing the humidity around the plant. For powdery mildew, improve air circulation and avoid overhead watering.
* Repotting: Eventually, your rosemary plant will outgrow its container. When this happens, you’ll need to repot it into a larger container. Repotting is best done in the spring. Choose a container that’s a few inches larger than the current container. Gently remove the rosemary plant from its current container and loosen the roots. Place the plant in the new container and fill in with fresh soil. Water thoroughly.
Harvesting Your Rosemary
One of the best things about growing rosemary is being able to harvest fresh sprigs whenever you need them!
* When to Harvest: You can harvest rosemary at any time of year, but the flavor is most intense in the spring and summer.
* How to Harvest: Use sharp scissors or pruning shears to cut off sprigs of rosemary. Cut the sprigs just above a leaf node. This will encourage new growth.
* How to Store: Fresh rosemary can be stored in the refrigerator for up to a week. Wrap the sprigs in a damp paper towel and place them in a plastic bag. You can also dry rosemary for longer storage. To dry rosemary, hang the sprigs upside down in a cool, dry place. Once the sprigs are completely dry, you can store them in an airtight container.
Troubleshooting
Even with the best care, you might encounter some problems with your container rosemary. Here are a few common issues and how to fix them:
* Yellowing Leaves: Yellowing leaves can be caused by overwatering, underwatering, nutrient deficiency, or pests. Check the soil moisture and adjust your watering accordingly. Fertilize if necessary. Inspect the plant for pests.
* Brown Tips: Brown tips can be caused by dry air, underwatering, or fertilizer burn. Increase the humidity around the plant. Water more frequently. Reduce the amount of fertilizer you’re using.
* Leggy Growth: Leggy growth is caused by insufficient sunlight. Move the plant to a sunnier location or supplement with a grow light. Prune regularly to encourage bushier growth.
* Powdery Mildew: Powdery mildew is a fungal disease that appears as a white, powdery coating on the leaves. Improve air circulation and avoid overhead watering. Treat with a fungicide if necessary.
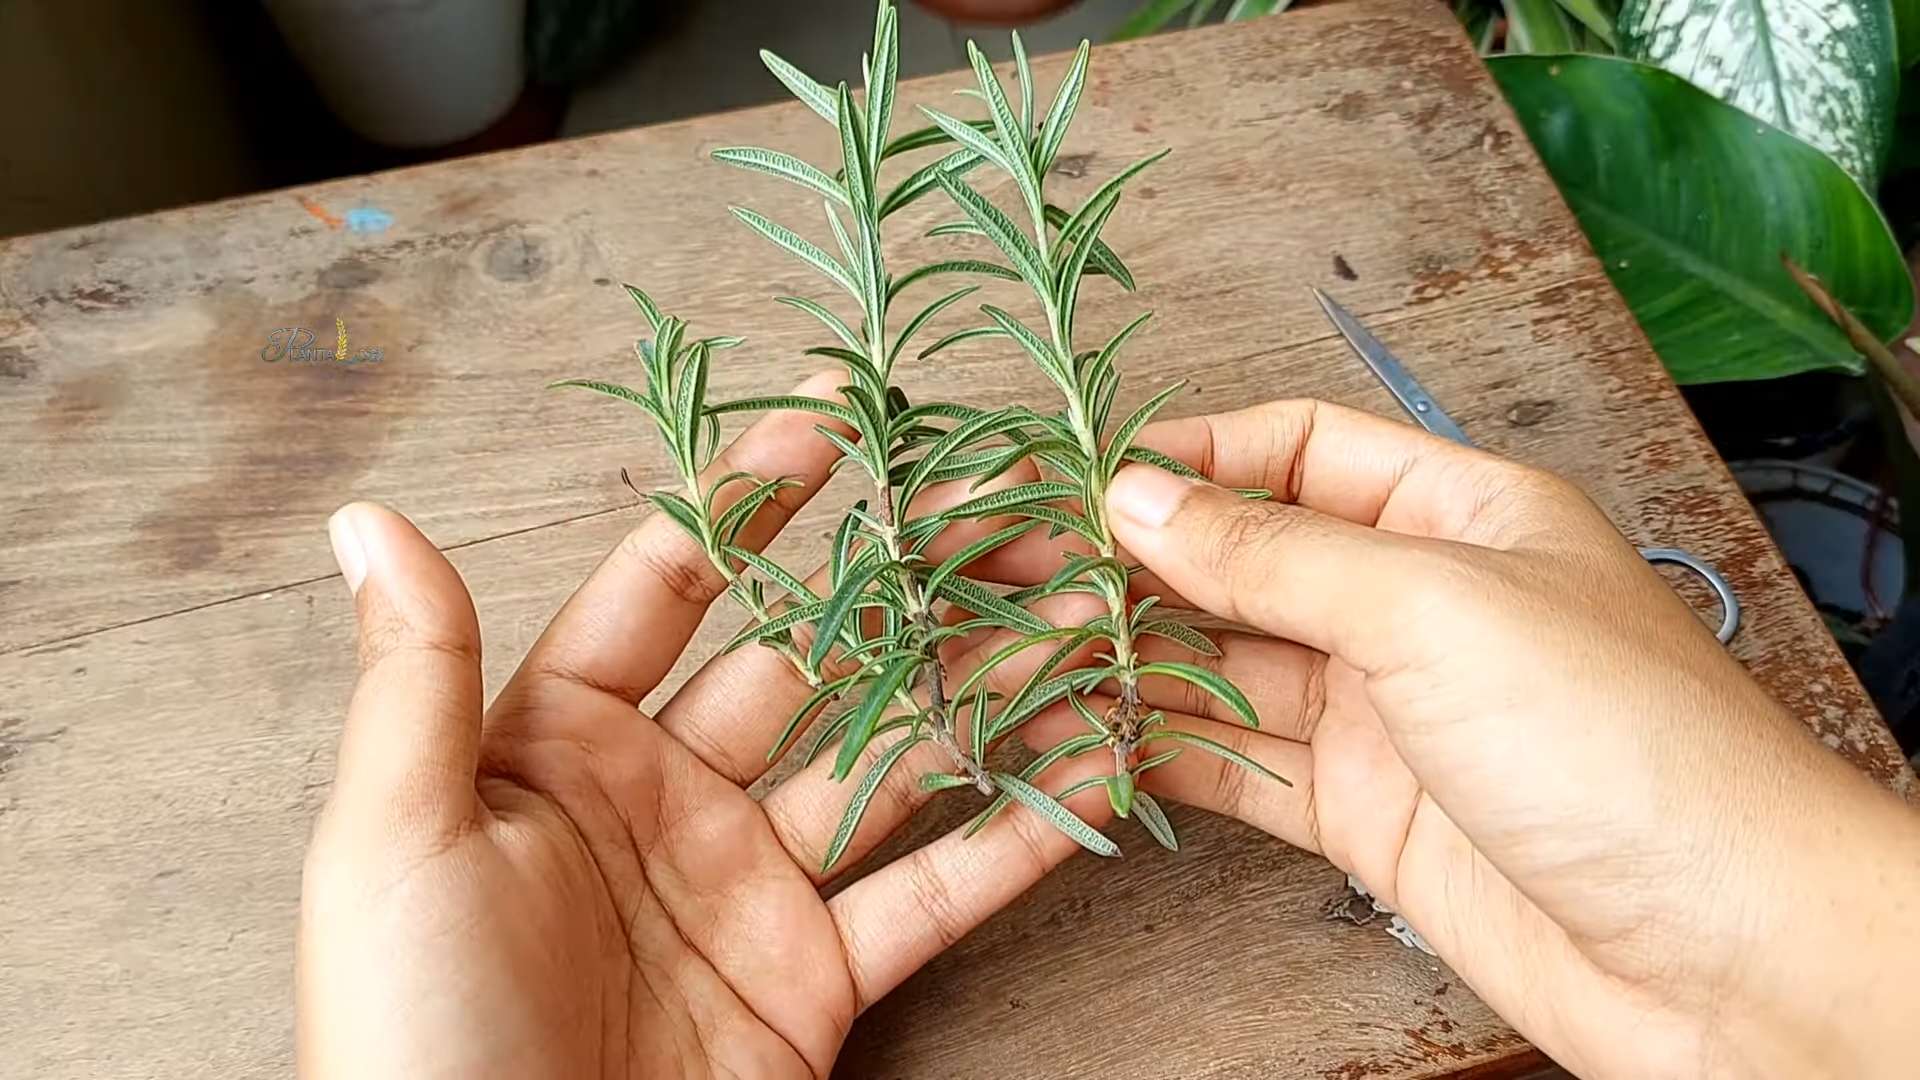
Propagating Rosemary
Want more rosemary plants? You can easily propagate rosemary from cuttings!
1. Take Cuttings: In the spring or summer, take 4-6 inch cuttings from new growth. Remove the leaves from the bottom inch of the cutting.
2. Rooting Hormone: Dip the cut end of the cutting in rooting hormone. This will help encourage root growth.
3. Plant Cuttings: Plant the cuttings in a pot filled with well-draining potting mix.
4. Water and Cover: Water the cuttings thoroughly and cover the pot with a plastic bag or humidity dome. This will help keep the cuttings moist.
5. Wait for Roots: Place the pot in a warm, bright location, but out of direct sunlight. Keep the soil moist but not soggy. In a few weeks, the cuttings should start to root.
6. Transplant: Once the cuttings have rooted, you can transplant them into individual pots.
Enjoy Your Rosemary!
And that’s it! You’re now ready to grow your own rosemary in a container. With a little care and attention, you’ll have a thriving rosemary plant that you can enjoy for years to come. Happy gardening! I hope this guide has been helpful, and I wish you the best of luck with your rosemary growing adventure! Remember, don’t be afraid to experiment and learn as you go. Gardening is all about trial and error, and the rewards are well worth the effort.
Conclusion
So, there you have it! Growing rosemary in containers is not only achievable but also incredibly rewarding. Imagine stepping outside your door and snipping fresh, fragrant rosemary sprigs whenever you need them. No more trips to the grocery store for wilted herbs or settling for dried rosemary when you crave that vibrant, piney flavor. This DIY project brings the essence of the Mediterranean right to your doorstep, transforming your balcony, patio, or even a sunny windowsill into a thriving herb garden.
Why is this a must-try? Because it empowers you to control the quality of your rosemary, ensuring it’s organic, pesticide-free, and bursting with flavor. Plus, it’s a fantastic way to add a touch of greenery and fragrance to your living space. The aromatic oils released by the rosemary plant can even have a calming effect, creating a more relaxing and inviting atmosphere.
But the benefits don’t stop there. Growing your own rosemary is also a sustainable choice. You’re reducing your carbon footprint by eliminating the need for transportation and packaging associated with store-bought herbs. And let’s be honest, there’s a certain satisfaction that comes from nurturing a plant from a small seedling or cutting to a flourishing herb.
Ready to take your rosemary cultivation to the next level? Consider these variations:
* Experiment with different rosemary varieties: From the upright ‘Blue Spires’ to the trailing ‘Prostratus,’ each variety offers a unique growth habit and flavor profile.
* Create a rosemary topiary: With a little pruning and training, you can transform your rosemary plant into a stunning ornamental piece.
* Combine rosemary with other herbs: Plant rosemary alongside thyme, lavender, and sage in a mixed herb container garden for a beautiful and fragrant display.
* Infuse oils and vinegars: Use your homegrown rosemary to create flavorful infusions for cooking and salad dressings.
* Dry your rosemary: Harvest and dry your rosemary sprigs to preserve their flavor for use throughout the year.
Growing rosemary in containers is a simple yet impactful way to enhance your culinary creations, beautify your living space, and connect with nature. It’s a project that offers both immediate gratification and long-term benefits.
We encourage you to give this DIY trick a try. Start small, learn as you go, and don’t be afraid to experiment. Once you experience the joy of harvesting your own fresh rosemary, you’ll wonder why you didn’t start sooner.
We’d love to hear about your experiences! Share your tips, successes, and even your challenges in the comments below. Let’s create a community of rosemary enthusiasts and inspire others to embark on this rewarding journey. Don’t forget to share photos of your thriving rosemary containers on social media using #ContainerRosemary and #DIYHerbs. Happy growing!
Frequently Asked Questions (FAQ)
1. What is the best type of container for growing rosemary?
The ideal container for rosemary should be made of terracotta or plastic, with drainage holes. Terracotta pots allow for better airflow and drainage, which rosemary appreciates. Plastic pots retain moisture longer, so be mindful of overwatering. The size of the container should be at least 12 inches in diameter to accommodate the rosemary’s root system. As the plant grows, you may need to transplant it into a larger container.
2. What kind of soil should I use for container rosemary?
Rosemary thrives in well-draining soil that is slightly acidic to neutral (pH 6.0-7.0). A good potting mix for rosemary consists of equal parts potting soil, perlite, and coarse sand. This combination provides adequate drainage and aeration, preventing root rot. Avoid using garden soil, as it can be too heavy and compact for container gardening.
3. How much sunlight does rosemary need when grown in a container?
Rosemary requires at least 6-8 hours of direct sunlight per day to thrive. Place your container in a sunny location, such as a south-facing balcony or patio. If you live in a region with intense summer heat, provide some afternoon shade to prevent the plant from scorching. If you’re growing rosemary indoors, supplement with grow lights if necessary.
4. How often should I water my container rosemary?
Water rosemary thoroughly when the top inch of soil feels dry to the touch. Avoid overwatering, as rosemary is susceptible to root rot. During the growing season (spring and summer), you may need to water more frequently than during the dormant season (fall and winter). Ensure that the container has good drainage to prevent water from pooling at the bottom.
5. Does rosemary need fertilizer when grown in a container?
Yes, rosemary benefits from regular fertilization, especially when grown in a container. Use a balanced liquid fertilizer (e.g., 10-10-10) diluted to half strength every 2-4 weeks during the growing season. Avoid over-fertilizing, as this can lead to leggy growth and reduced flavor. You can also amend the soil with compost or aged manure to provide slow-release nutrients.
6. How do I prune rosemary grown in a container?
Pruning rosemary regularly encourages bushier growth and prevents the plant from becoming leggy. Prune after flowering, removing about one-third of the plant’s growth. Use sharp, clean pruning shears to make clean cuts just above a leaf node. You can also pinch back the tips of the stems to promote branching.
7. Can I grow rosemary indoors in a container?
Yes, you can grow rosemary indoors in a container, provided you meet its sunlight and drainage requirements. Place the container in a sunny windowsill or under grow lights. Ensure that the container has good drainage and avoid overwatering. Indoor rosemary may require more frequent pruning to maintain its shape and prevent it from becoming leggy.
8. How do I protect my container rosemary from pests and diseases?
Rosemary is generally resistant to pests and diseases, but it can be susceptible to aphids, spider mites, and root rot. Inspect your plant regularly for signs of infestation or disease. Treat aphids and spider mites with insecticidal soap or neem oil. Prevent root rot by ensuring good drainage and avoiding overwatering.
9. Can I propagate rosemary from cuttings?
Yes, propagating rosemary from cuttings is a simple and effective way to create new plants. Take 4-6 inch cuttings from healthy stems in the spring or summer. Remove the lower leaves and dip the cut end in rooting hormone. Plant the cuttings in a well-draining potting mix and keep them moist until they develop roots.
10. How do I overwinter rosemary grown in a container?
In regions with cold winters, rosemary grown in containers needs protection from frost and freezing temperatures. Bring the container indoors to a cool, sunny location, such as a garage or sunroom. Water sparingly during the winter months, allowing the soil to dry out slightly between waterings. Alternatively, you can insulate the container with burlap or bubble wrap and place it in a sheltered location outdoors.


Leave a Comment