
Grow Tomatoes Home, and you’ll unlock a world of flavor and satisfaction right in your backyard! Imagine biting into a sun-ripened tomato, bursting with sweetness, knowing you nurtured it from a tiny seed. That’s the magic of home gardening, and it’s more accessible than you might think. For centuries, cultivating tomatoes has been a cherished tradition, dating back to the Aztecs and Incas who first domesticated these vibrant fruits. From humble beginnings to becoming a staple in cuisines worldwide, tomatoes hold a special place in our hearts (and our salads!).
But let’s be honest, sometimes growing tomatoes can feel like a battle against pests, diseases, and unpredictable weather. That’s where these DIY tricks and hacks come in! I’m here to share my tried-and-true secrets to help you grow tomatoes home successfully, even if you’re a complete beginner. Whether you’re dealing with limited space, struggling with blossom end rot, or simply want to maximize your yield, I’ve got you covered. Get ready to ditch the store-bought tomatoes and enjoy the unparalleled taste of homegrown goodness. Let’s get our hands dirty and transform your garden into a tomato paradise!
Growing Delicious Tomatoes at Home: A DIY Guide
Hey there, fellow gardening enthusiasts! I’m so excited to share my tried-and-true method for growing juicy, flavorful tomatoes right in your own backyard (or even on your balcony!). Forget those bland, store-bought tomatoes – nothing beats the taste of a homegrown beauty, still warm from the sun. This guide will walk you through every step, from choosing the right variety to harvesting your bounty. Let’s get started!
Choosing the Right Tomato Variety
Before we even think about soil, let’s talk tomatoes! The sheer variety can be overwhelming, but understanding a few key differences will make your choice much easier.
* Determinate vs. Indeterminate: This is crucial! Determinate tomatoes grow to a certain size and produce all their fruit at once, making them ideal for canning. Indeterminate tomatoes, on the other hand, keep growing and producing fruit throughout the season. I personally prefer indeterminate varieties for a continuous harvest.
* Size and Shape: From tiny cherry tomatoes to massive beefsteaks, the size is up to you! Consider how you plan to use your tomatoes. Cherry tomatoes are great for salads, while beefsteaks are perfect for slicing on sandwiches.
* Disease Resistance: Look for varieties labeled with letters like V, F, N, T, or A. These indicate resistance to common tomato diseases like Verticillium wilt, Fusarium wilt, Nematodes, Tobacco Mosaic Virus, and Alternaria. Trust me, disease resistance is a lifesaver!
* My Personal Recommendations: For cherry tomatoes, I love ‘Sungold’ (super sweet!) and ‘Black Cherry’ (unique flavor). For slicing tomatoes, ‘Brandywine’ (heirloom flavor) and ‘Early Girl’ (reliable and early producer) are excellent choices. For paste tomatoes (for sauces), ‘Roma’ is a classic.
Starting Your Tomato Seeds (or Buying Seedlings)
You have two options here: start your own seeds indoors or buy seedlings from a nursery. Starting seeds gives you more control over the variety and can save you money, but it requires a bit more effort.
Starting Seeds Indoors (Recommended for Best Results)
1. Gather Your Supplies: You’ll need seed starting trays or small pots, seed starting mix (not regular potting soil!), tomato seeds, a spray bottle, a heat mat (optional but helpful), and a grow light (essential!).
2. Sow the Seeds: Fill your trays or pots with seed starting mix. Moisten the mix thoroughly with the spray bottle. Plant 2-3 seeds per cell or pot, about ¼ inch deep. Gently cover the seeds with more mix.
3. Provide Warmth and Light: Place the trays on a heat mat (if using) and under the grow light. The ideal temperature for germination is around 75-85°F. Keep the grow light on for 14-16 hours per day.
4. Keep the Soil Moist: Use the spray bottle to keep the soil consistently moist, but not soggy. Overwatering can lead to damping off, a fungal disease that kills seedlings.
5. Thin the Seedlings: Once the seedlings have their first true leaves (the second set of leaves that appear after the initial seed leaves), thin them to one seedling per cell or pot. Snip off the weaker seedlings at the soil line with scissors. Don’t pull them out, as this can disturb the roots of the remaining seedling.
6. Harden Off the Seedlings: About a week before you plan to transplant the seedlings outdoors, you need to “harden them off.” This gradually acclimates them to the outdoor conditions. Start by placing the seedlings outdoors in a sheltered location for an hour or two each day, gradually increasing the time each day. Protect them from direct sunlight and strong winds at first.
Buying Seedlings
1. Choose Healthy Seedlings: Look for seedlings that are stocky, green, and have a healthy root system. Avoid seedlings that are leggy (tall and spindly), yellowing, or have signs of disease or pests.
2. Check the Roots: Gently remove a seedling from its pot and inspect the roots. They should be white or light brown and fill the pot without being root-bound (tightly circling the pot).
3. Consider the Variety: Make sure the seedlings are labeled with the variety name and that it’s a variety you want to grow.
Preparing Your Garden Bed or Containers
Tomatoes need plenty of sunshine and well-drained soil. Choose a location that gets at least 6-8 hours of direct sunlight per day.
Preparing the Garden Bed
1. Choose a Sunny Location: As I mentioned, tomatoes crave sunshine!
2. Improve the Soil: Tomatoes are heavy feeders, so they need rich, fertile soil. Amend your soil with plenty of compost or well-rotted manure. This will improve drainage, aeration, and nutrient content.
3. Check the Soil pH: Tomatoes prefer a slightly acidic soil pH of around 6.0-6.8. You can test your soil pH with a soil testing kit and amend it accordingly.
4. Till or Dig the Soil: Loosen the soil to a depth of at least 12 inches. This will allow the roots to grow easily.
5. Add Fertilizer: Incorporate a slow-release fertilizer formulated for tomatoes into the soil. Follow the instructions on the fertilizer package.
Preparing Containers
1. Choose the Right Size Container: Tomatoes need large containers to thrive. I recommend at least a 5-gallon container for determinate varieties and a 10-gallon container for indeterminate varieties.
2. Use High-Quality Potting Mix: Don’t use garden soil in containers! It will compact and drain poorly. Use a high-quality potting mix that is specifically formulated for containers.
3. Ensure Good Drainage: Make sure your containers have drainage holes to prevent waterlogging.
4. Consider Self-Watering Containers: These can be a great option for busy gardeners, as they help to maintain consistent moisture levels.
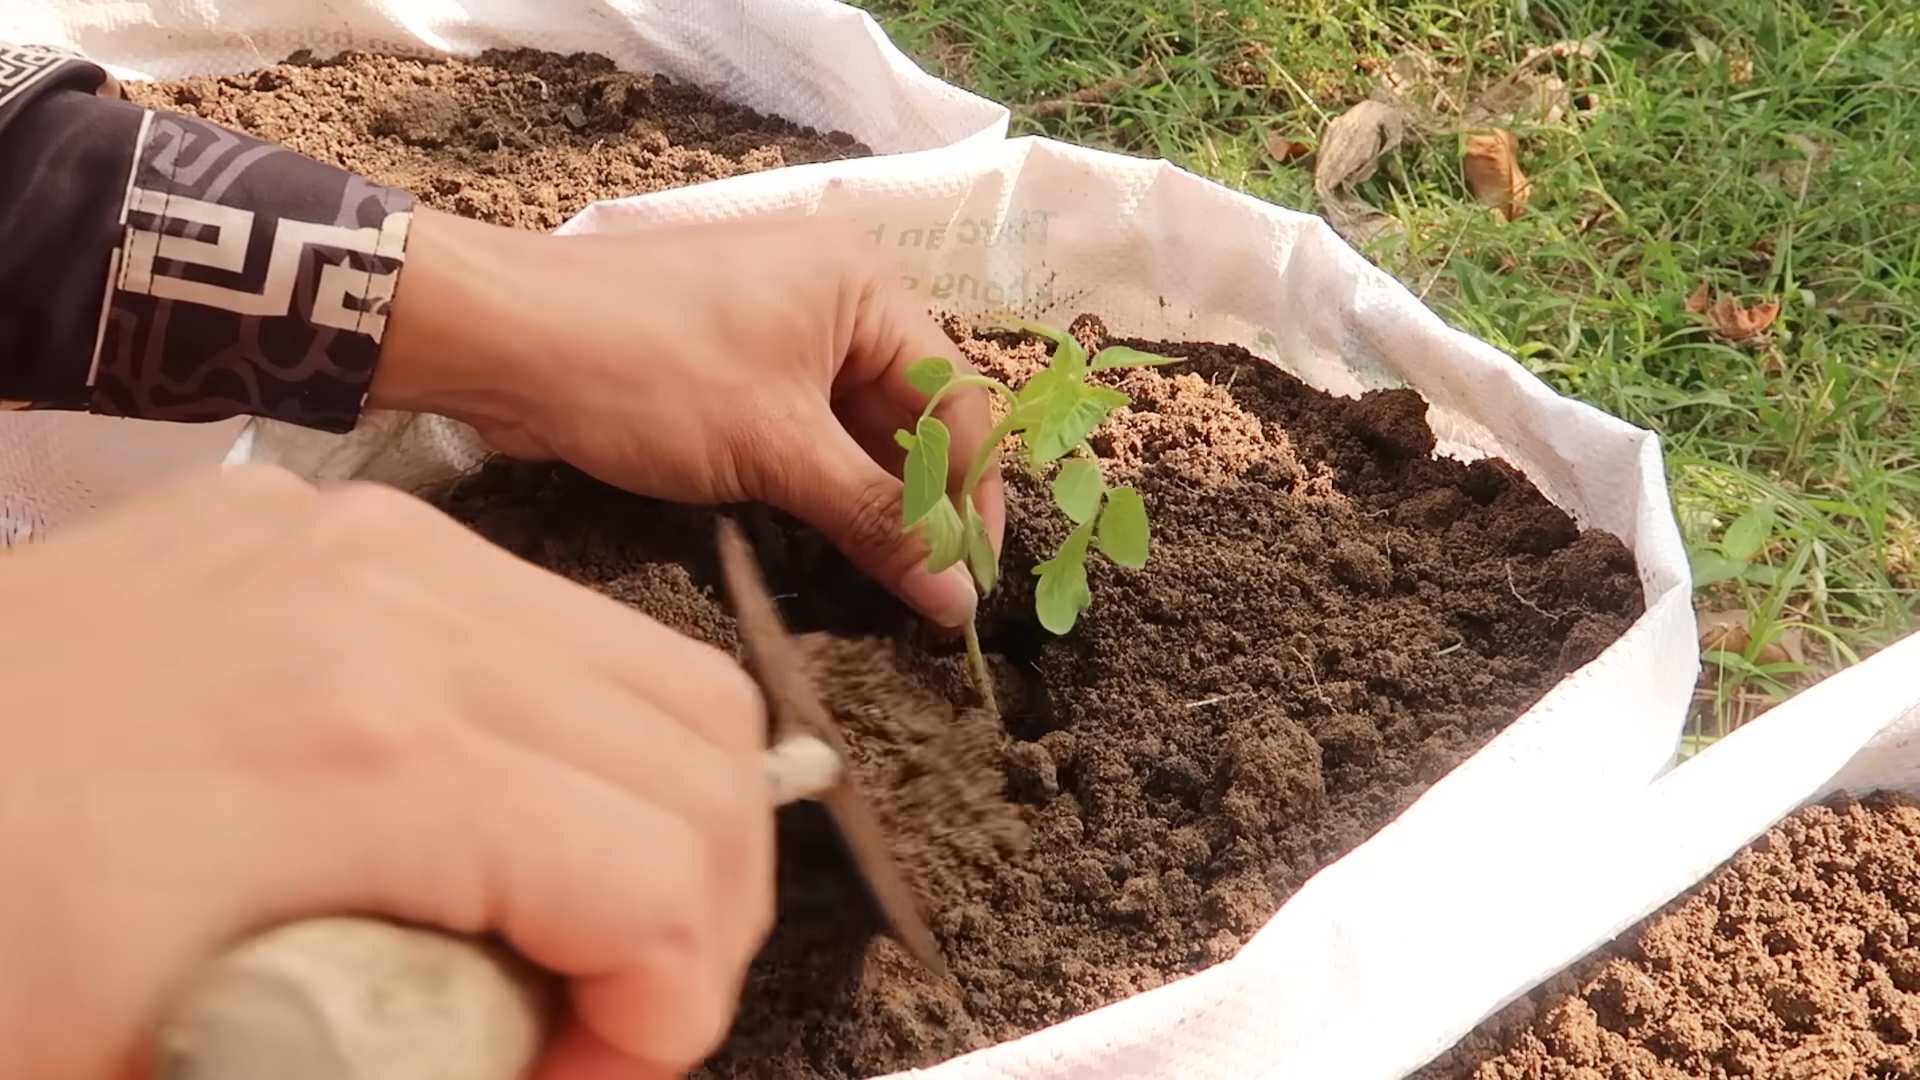
Transplanting Your Tomato Seedlings
Now for the exciting part – planting your tomatoes!
1. Choose a Cloudy Day: Transplanting on a cloudy day will help to reduce stress on the seedlings.
2. Dig a Hole: Dig a hole that is deep enough to bury the bottom third of the tomato seedling’s stem. This may seem strange, but tomatoes can grow roots along their stems, which will result in a stronger, healthier plant.
3. Remove the Bottom Leaves: Gently remove the bottom leaves from the seedling.
4. Plant the Seedling: Place the seedling in the hole and backfill with soil. Gently firm the soil around the base of the plant.
5. Water Thoroughly: Water the seedling thoroughly after planting.
6. Add Support: Tomatoes, especially indeterminate varieties, need support to prevent them from sprawling on the ground. Use stakes, cages, or trellises to support your plants. I prefer cages because they provide all-around support.
7. Mulch: Apply a layer of mulch around the base of the plants. Mulch will help to retain moisture, suppress weeds, and regulate soil temperature. Straw, wood chips, or shredded leaves are all good options.
Caring for Your Tomato Plants
Consistent care is key to a bountiful harvest.
1. Watering: Water your tomato plants deeply and regularly, especially during hot, dry weather. Aim to water at the base of the plant to avoid wetting the foliage, which can lead to disease.
2. Fertilizing: Fertilize your tomato plants every 2-3 weeks with a fertilizer formulated for tomatoes. Follow the instructions on the fertilizer package.
3. Pruning: Pruning is important for indeterminate tomato varieties. Remove suckers (the small shoots that grow between the main stem and the branches) to encourage the plant to focus its energy on producing fruit.
4. Pest and Disease Control: Keep an eye out for pests and diseases. Common tomato pests include aphids, tomato hornworms, and whiteflies. Common tomato diseases include early blight, late blight, and blossom end rot. Treat pests and diseases promptly with appropriate organic or chemical controls. I always try organic methods first!
5. Blossom End Rot Prevention: Blossom end rot is caused by a calcium deficiency. To prevent it, ensure consistent watering and add calcium to the soil. Crushed eggshells are a great natural source of calcium.
Harvesting Your Tomatoes
The moment you’ve been waiting for!
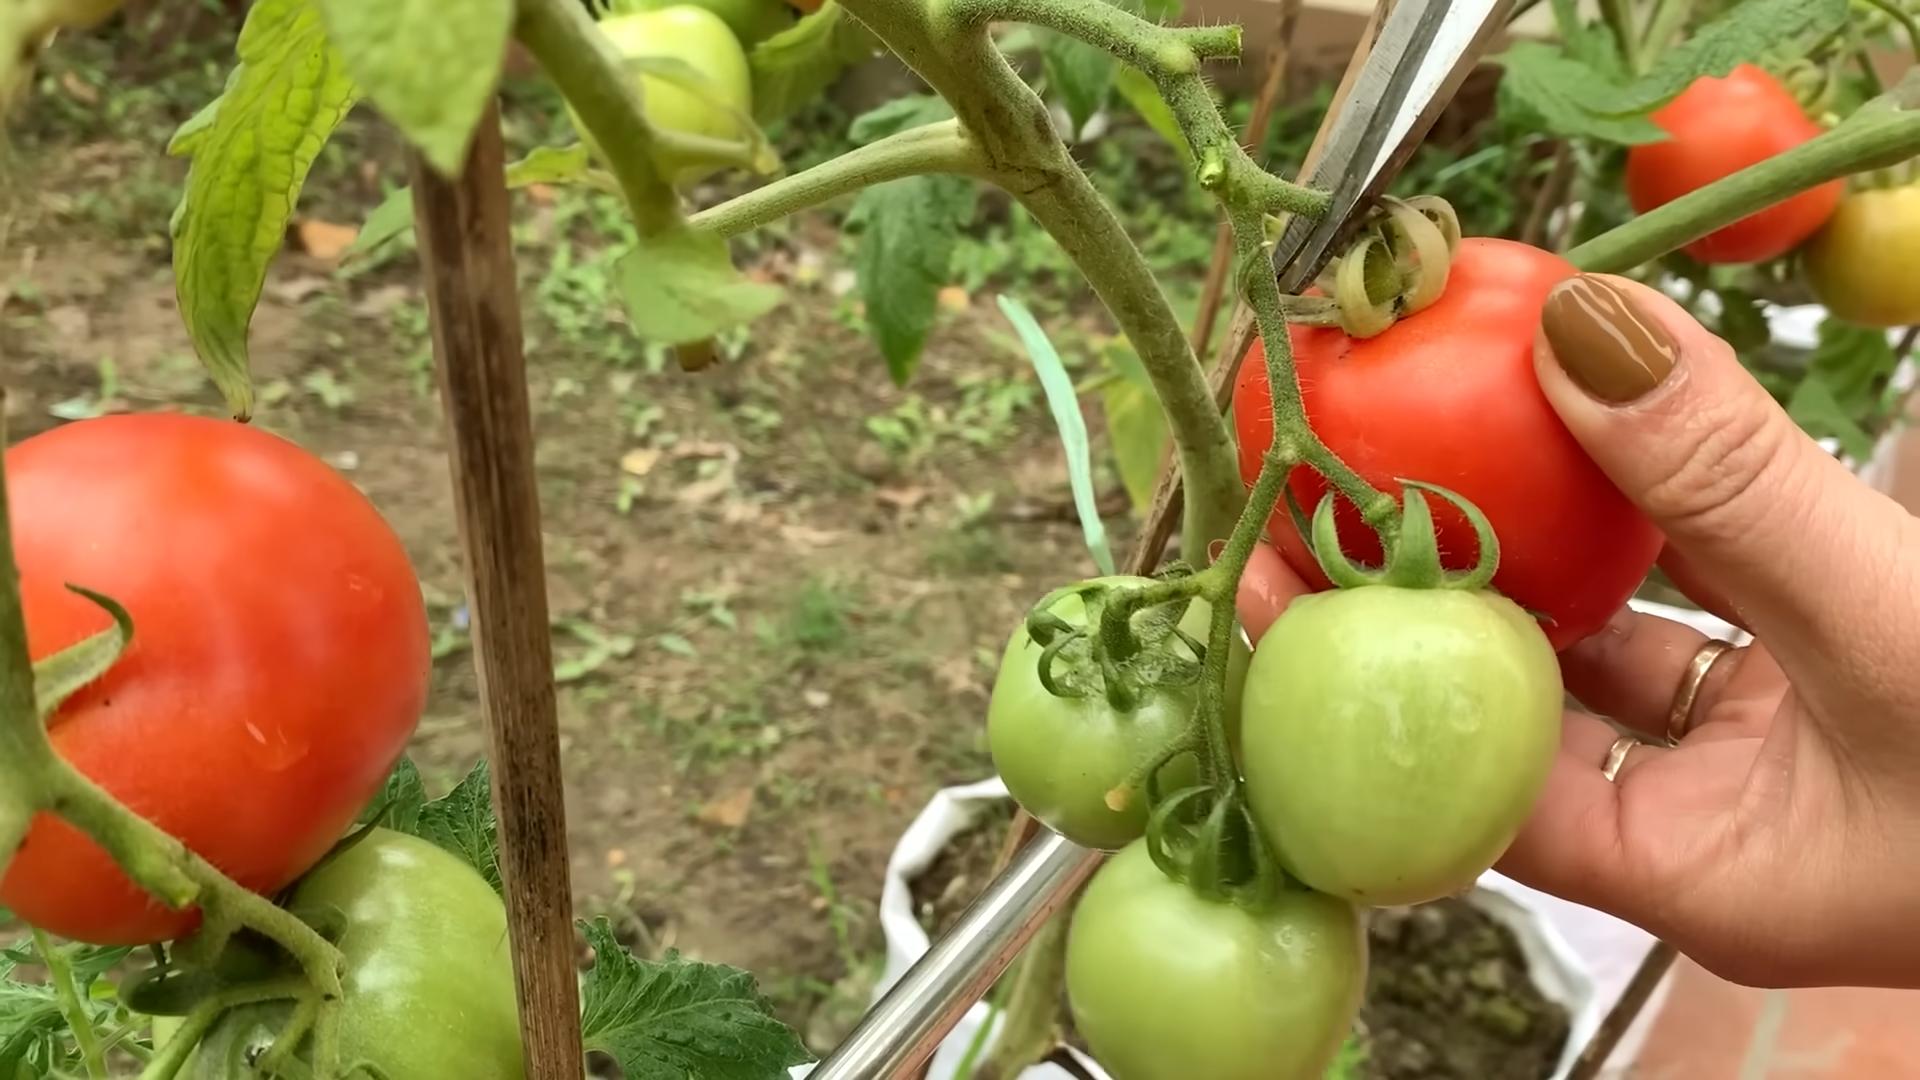
1. Harvest When Ripe: Tomatoes are ripe when they are fully colored and slightly soft to the touch.
2. Gently Twist or Cut: Gently twist the tomato from the vine or cut it off with pruning shears.
3. Store Properly: Store ripe tomatoes at room temperature. Refrigerating them can affect their flavor and texture.
4. Enjoy! Savor the taste of your homegrown tomatoes! Use them in salads, sandwiches, sauces,
Conclusion
So, there you have it! Growing your own tomatoes at home isn’t just a pipe dream; it’s an achievable and incredibly rewarding experience. We’ve explored a simple yet effective DIY trick that can significantly boost your tomato yield and overall plant health. This method, focusing on [mention the specific DIY trick discussed in the main article, e.g., “creating a self-watering container from recycled materials” or “using eggshells as a calcium supplement”], is a game-changer for both novice and experienced gardeners alike.
Why is this DIY trick a must-try? Because it addresses some of the most common challenges faced when growing tomatoes: inconsistent watering, nutrient deficiencies, and pest infestations. By implementing this technique, you’re not just growing tomatoes; you’re creating an optimal environment for them to thrive. You’re minimizing water waste, providing a slow-release source of essential nutrients, and potentially deterring pests naturally. The result? Healthier plants, bigger yields, and tastier tomatoes.
But don’t stop there! The beauty of DIY is the opportunity for customization. Feel free to experiment with variations of this trick to suit your specific needs and preferences. For example, if you’re using a self-watering container, try adding a layer of mulch on top of the soil to further conserve moisture and suppress weeds. If you’re using eggshells, consider crushing them into a finer powder for faster absorption. You could even try different types of organic fertilizers in conjunction with the eggshells to provide a more comprehensive nutrient boost. Think about companion planting too! Basil, marigolds, and carrots are all great companions for tomatoes, helping to deter pests and improve growth.
Ultimately, the best way to discover what works best for you is to get your hands dirty and try it out. Don’t be afraid to experiment and adapt the technique to your specific growing conditions and tomato varieties. Remember, gardening is a journey of learning and discovery.
We are confident that this DIY trick will transform your tomato-growing experience. Imagine biting into a juicy, sun-ripened tomato that you grew yourself, knowing that you played a direct role in its deliciousness. That’s the satisfaction that awaits you.
So, what are you waiting for? Give this DIY trick a try and share your experience with us! We’d love to hear about your successes, challenges, and any variations you’ve discovered. Post photos of your thriving tomato plants and share your tips in the comments section below. Let’s build a community of tomato-growing enthusiasts and help each other achieve the best possible harvest. Let’s all grow tomatoes home and enjoy the fruits (or vegetables!) of our labor!
Frequently Asked Questions (FAQ)
What are the benefits of growing tomatoes at home?
Growing tomatoes at home offers numerous advantages. Firstly, you have complete control over the growing process, ensuring that your tomatoes are free from harmful pesticides and chemicals. Secondly, homegrown tomatoes often taste significantly better than store-bought ones, as they are allowed to ripen fully on the vine. Thirdly, gardening is a therapeutic and rewarding activity that can reduce stress and improve your overall well-being. Finally, growing your own food can save you money in the long run.
What are the best tomato varieties to grow at home?
The best tomato varieties to grow at home depend on your climate, growing space, and personal preferences. Determinate varieties, such as Roma and Celebrity, are compact and ideal for small gardens or containers. Indeterminate varieties, such as Beefsteak and Cherry tomatoes, require more space and support but produce a continuous harvest throughout the growing season. Heirloom varieties, such as Brandywine and Cherokee Purple, are known for their unique flavors and colors. Consider your local climate and growing conditions when selecting tomato varieties.
How much sunlight do tomatoes need?
Tomatoes require at least 6-8 hours of direct sunlight per day to thrive. Choose a sunny location in your garden or on your patio for your tomato plants. If you live in a particularly hot climate, some afternoon shade may be beneficial to prevent sunscald.
What type of soil is best for growing tomatoes?
Tomatoes prefer well-drained soil that is rich in organic matter. Amend your soil with compost or other organic materials to improve its fertility and drainage. A slightly acidic soil pH of 6.0-6.8 is ideal for tomato growth.
How often should I water my tomato plants?
Water your tomato plants deeply and regularly, especially during hot and dry weather. Aim to keep the soil consistently moist but not waterlogged. Water at the base of the plant to avoid wetting the foliage, which can increase the risk of fungal diseases. The frequency of watering will depend on your climate, soil type, and the size of your plants.
How do I fertilize my tomato plants?
Tomatoes are heavy feeders and require regular fertilization. Use a balanced fertilizer specifically formulated for tomatoes, following the instructions on the label. Fertilize your plants at planting time and then every few weeks throughout the growing season. You can also supplement with organic fertilizers such as compost tea or fish emulsion.
How do I prevent pests and diseases from attacking my tomato plants?
Preventing pests and diseases is crucial for a successful tomato harvest. Practice good garden hygiene by removing weeds and debris from around your plants. Use organic pest control methods such as insecticidal soap or neem oil to control common pests like aphids and whiteflies. Choose disease-resistant tomato varieties and provide good air circulation to prevent fungal diseases. Consider using companion planting to deter pests and attract beneficial insects.
What are some common problems that can affect tomato plants?
Some common problems that can affect tomato plants include blossom end rot, tomato hornworms, and fungal diseases such as early blight and late blight. Blossom end rot is caused by a calcium deficiency and can be prevented by ensuring consistent watering and adding calcium to the soil. Tomato hornworms are large caterpillars that can quickly defoliate tomato plants; handpicking them off is an effective control method. Fungal diseases can be prevented by choosing disease-resistant varieties, providing good air circulation, and avoiding overhead watering.
How do I know when my tomatoes are ripe?
Tomatoes are ripe when they have reached their mature color and are slightly soft to the touch. The color will vary depending on the variety. Gently twist the tomato from the vine; if it comes off easily, it is ripe.
Can I grow tomatoes in containers?
Yes, you can successfully grow tomatoes in containers. Choose a large container with good drainage and use a high-quality potting mix. Select determinate tomato varieties that are well-suited for container growing. Provide adequate sunlight, water, and fertilizer.
What is the DIY trick mentioned in the article and how does it help?
The DIY trick mentioned in the article [mention the specific DIY trick again, e.g., “involves creating a self-watering container from recycled materials”]. This helps by [explain the benefits of the trick, e.g., “providing consistent moisture to the roots, reducing water waste, and minimizing the risk of overwatering or underwatering”]. It’s a simple and effective way to improve tomato growth and yield.
Can I adapt the DIY trick for different types of tomatoes or growing conditions?
Absolutely! The beauty of DIY is its flexibility. You can adapt the trick to suit your specific needs and preferences. For example, if you’re growing tomatoes in a hot climate, you might want to add extra mulch to the container to conserve moisture. If you’re growing a large indeterminate variety, you’ll need to provide a sturdy support system. Experiment and see what works best for you.
How can I share my experience with the DIY trick and connect with other tomato growers?
We encourage you to share your experience with the DIY trick in the comments section below. Post photos of your tomato plants, share your tips and tricks, and ask questions. Let’s build a community of tomato-growing enthusiasts and help each other achieve the best possible harvest. We’re excited to see your success stories!

Leave a Comment