
Grow Broccoli at Home? Absolutely! Imagine stepping into your backyard and harvesting crisp, vibrant broccoli heads, bursting with flavor and freshness. It’s not just a dream; it’s an achievable reality with a few simple tricks and a little DIY spirit. For centuries, cultivating our own food has been a cornerstone of self-sufficiency and a connection to the earth. From ancient Roman gardens to medieval monastery plots, growing your own vegetables has always been a rewarding endeavor.
But let’s face it, the supermarket broccoli just doesn’t compare to the taste of homegrown. Plus, with rising grocery costs and concerns about pesticides, knowing how to grow broccoli at home gives you control over what you’re eating. This DIY guide is your roadmap to success, packed with easy-to-follow tips and hacks that will transform your garden into a broccoli-producing powerhouse. Whether you’re a seasoned gardener or a complete beginner, I’m here to show you how to cultivate this nutritious and delicious vegetable right in your own backyard. Get ready to roll up your sleeves and discover the joy of homegrown broccoli!
Grow Your Own Broccoli: A Beginner’s Guide to a Bountiful Harvest
Hey there, fellow gardening enthusiasts! I’m so excited to share my experience and guide you through the process of growing your own broccoli at home. Trust me, there’s nothing quite like the taste of freshly harvested broccoli, especially when you’ve nurtured it from seed to table. It’s easier than you might think, and I’m here to break it down into manageable steps. Let’s get started!
Choosing the Right Broccoli Variety
First things first, let’s talk broccoli varieties. There are tons to choose from, and the best one for you will depend on your climate and growing season. Here are a few popular options:
* ‘Waltham 29’: A classic, reliable variety that’s known for its good flavor and cold hardiness. It’s a great choice for beginners.
* ‘Calabrese’: This is probably the most common type you’ll find in stores. It produces a large central head followed by smaller side shoots.
* ‘DiCicco’: A fast-maturing variety that’s perfect if you’re short on time. It produces smaller heads but plenty of them.
* ‘Purple Sprouting’: A unique variety that produces purple florets. It’s a bit more tolerant of warmer weather than other types.
* ‘Romanesco’: If you’re feeling adventurous, try growing Romanesco broccoli. Its fractal-like head is a real showstopper!
I personally love ‘Waltham 29’ because it’s so dependable, but feel free to experiment and find what works best for you.
Starting Your Broccoli Seeds
You can either start your broccoli seeds indoors or directly sow them in your garden. I prefer starting them indoors because it gives them a head start and protects them from pests.
Starting Seeds Indoors:
1. Gather Your Supplies: You’ll need seed starting trays or small pots, seed starting mix (not regular potting soil!), broccoli seeds, a spray bottle, and a grow light (optional but highly recommended).
2. Prepare the Seed Starting Mix: Moisten the seed starting mix with water until it’s damp but not soggy.
3. Sow the Seeds: Fill the trays or pots with the moistened mix and make a small indentation (about 1/4 inch deep) in the center of each cell or pot. Place 2-3 broccoli seeds in each indentation.
4. Cover the Seeds: Gently cover the seeds with more seed starting mix.
5. Water Gently: Use a spray bottle to mist the surface of the soil. Avoid overwatering, which can lead to damping off (a fungal disease that kills seedlings).
6. Provide Light and Warmth: Place the trays or pots in a warm location (around 70-75°F) and provide plenty of light. A grow light is ideal, but a sunny windowsill can also work. If using a windowsill, rotate the trays or pots regularly to prevent the seedlings from leaning towards the light.
7. Keep the Soil Moist: Check the soil moisture daily and mist with water as needed to keep it consistently damp.
8. Thin the Seedlings: Once the seedlings have their first true leaves (the second set of leaves), thin them to one seedling per cell or pot. Choose the strongest, healthiest-looking seedling and snip off the others at the soil line. Don’t pull them out, as this can disturb the roots of the remaining seedling.
Direct Sowing Seeds:
1. Prepare the Soil: Choose a sunny spot in your garden with well-drained soil. Amend the soil with compost or other organic matter to improve its fertility and drainage.
2. Sow the Seeds: Sow the seeds about 1/2 inch deep and 1-2 inches apart in rows.
3. Water Gently: Water the soil gently to keep it moist.
4. Thin the Seedlings: Once the seedlings have their first true leaves, thin them to about 18-24 inches apart.
Transplanting Your Broccoli Seedlings
Whether you started your seeds indoors or directly sowed them, you’ll eventually need to transplant your broccoli seedlings to their final growing location.
1. Harden Off the Seedlings: If you started your seeds indoors, you’ll need to harden them off before transplanting them. This means gradually exposing them to outdoor conditions over a period of 7-10 days. Start by placing the seedlings in a sheltered location outdoors for a few hours each day, gradually increasing the amount of time they spend outside.
2. Prepare the Planting Site: Choose a sunny spot in your garden with well-drained soil. Amend the soil with compost or other organic matter to improve its fertility and drainage. Broccoli needs at least 6 hours of sunlight per day.
3. Dig the Holes: Dig holes that are slightly larger than the root balls of the seedlings. Space the holes 18-24 inches apart.
4. Transplant the Seedlings: Gently remove the seedlings from their trays or pots and place them in the holes. Make sure the top of the root ball is level with the surrounding soil.
5. Fill the Holes: Fill the holes with soil and gently firm the soil around the seedlings.
6. Water Thoroughly: Water the seedlings thoroughly after transplanting.
Caring for Your Broccoli Plants
Once your broccoli plants are in the ground, it’s important to provide them with the care they need to thrive.
* Watering: Broccoli needs consistent moisture, especially during hot, dry weather. Water deeply and regularly, aiming for about 1-1.5 inches of water per week. Avoid overhead watering, which can promote fungal diseases. Drip irrigation or soaker hoses are ideal.
* Fertilizing: Broccoli is a heavy feeder, so it needs plenty of nutrients. Fertilize your plants every 2-3 weeks with a balanced fertilizer or compost tea.
* Weeding: Keep the area around your broccoli plants free of weeds. Weeds compete with broccoli for water and nutrients.
* Mulching: Apply a layer of mulch around your broccoli plants to help retain moisture, suppress weeds, and regulate soil temperature. Straw, wood chips, or shredded leaves are all good options.
* Pest Control: Broccoli is susceptible to a variety of pests, including cabbage worms, aphids, and flea beetles. Inspect your plants regularly for signs of pests and take action as needed. I prefer using organic pest control methods, such as handpicking pests, using insecticidal soap, or applying Bacillus thuringiensis (Bt).
* Supporting the Plants: As your broccoli plants grow, they may become top-heavy and require support. You can use stakes or cages to support the plants and prevent them from falling over.
Harvesting Your Broccoli
The moment you’ve been waiting for! Harvesting your own broccoli is so rewarding.
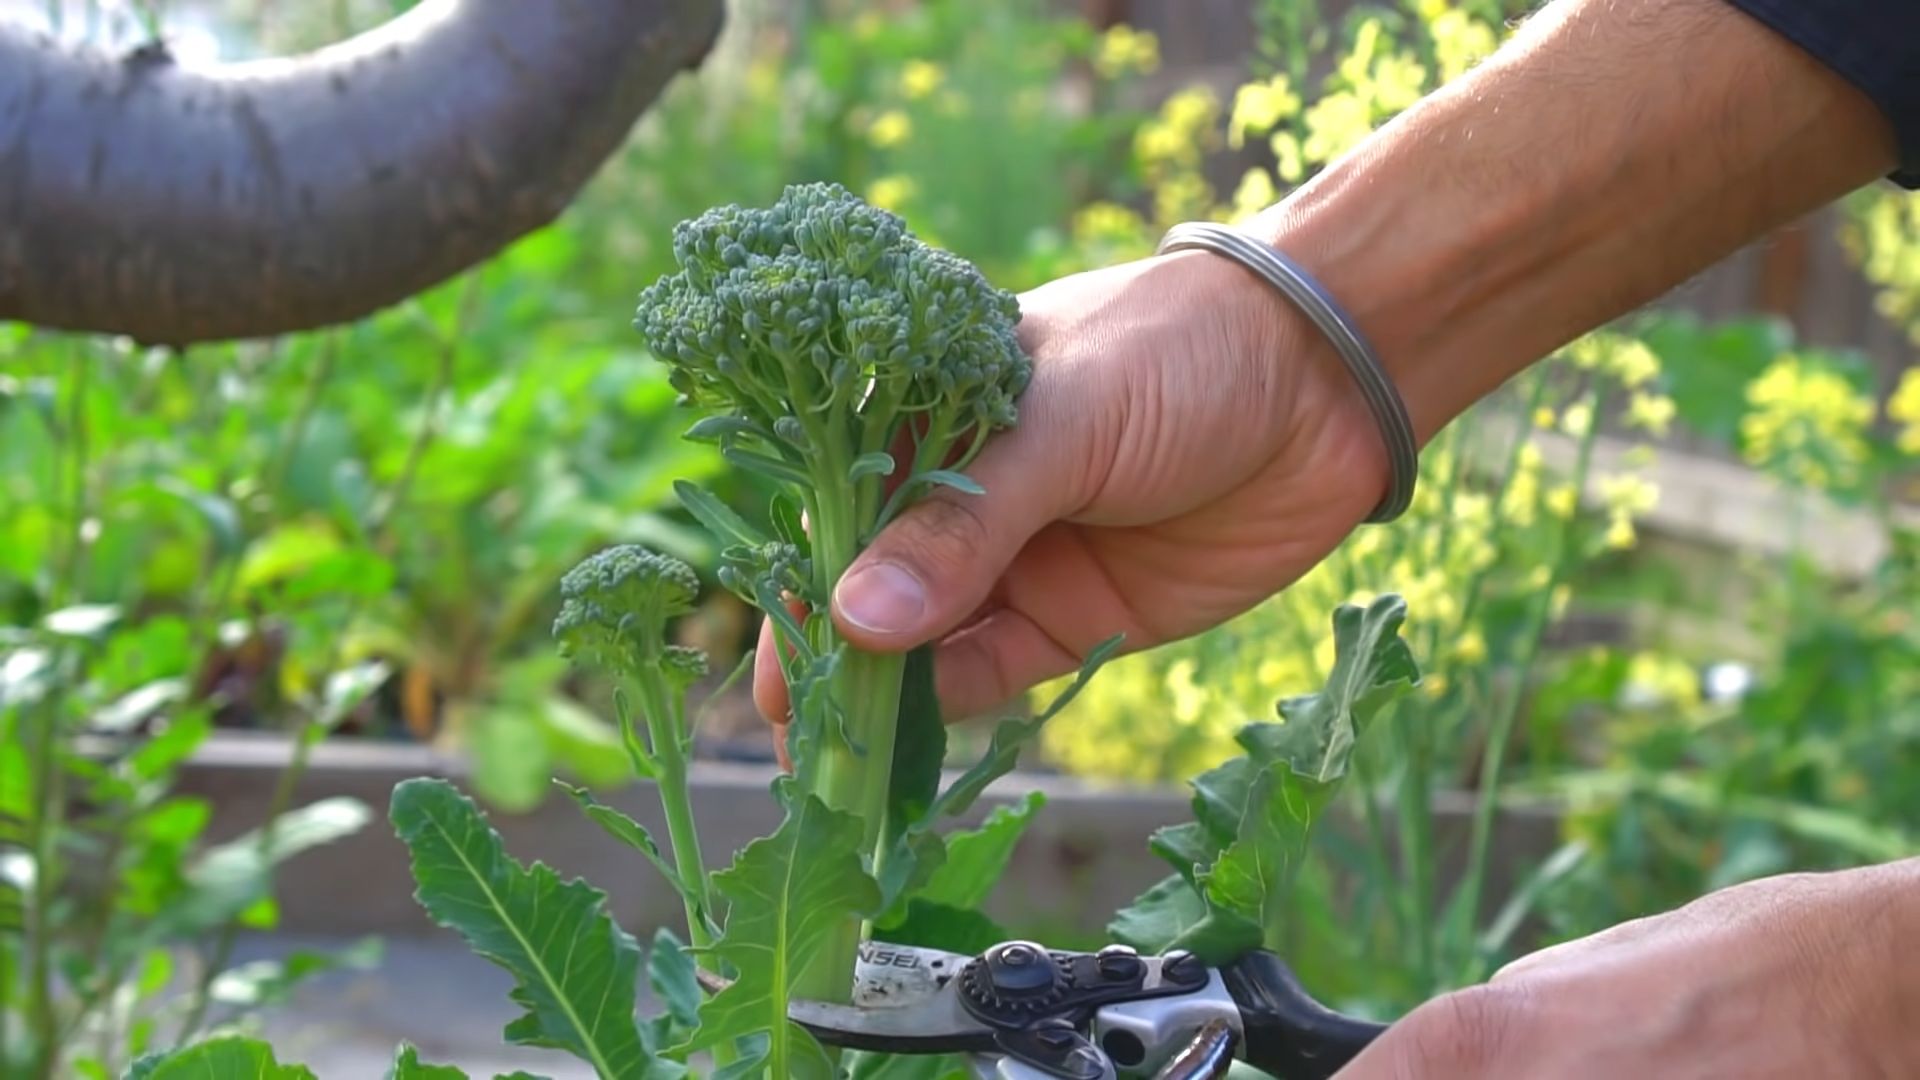
1. Timing is Key: Broccoli is ready to harvest when the central head is firm and tight, and the florets are still green and unopened. If the florets start to open and turn yellow, it’s time to harvest immediately.
2. Cut the Head: Use a sharp knife to cut the central head from the plant, leaving a few inches of stem attached.
3. Encourage Side Shoots: After harvesting the central head, your broccoli plant will produce smaller side shoots. These can be harvested as they mature.
4. Enjoy Your Harvest: Enjoy your freshly harvested broccoli in salads, stir-fries, soups, or roasted as a side dish. It’s also great steamed or blanched.
Troubleshooting Common Broccoli Problems
Even with the best care, you may encounter some problems while growing broccoli. Here are a few common issues and how to address them:
* Buttoning: This is when the broccoli head forms prematurely and remains small. It’s often caused by stress, such as lack of water or nutrients. Make sure your plants are getting enough water and fertilizer.
* Yellowing Florets: This indicates that the broccoli head is overripe. Harvest immediately.
* Cabbage Worms: These green caterpillars can devour broccoli leaves. Handpick them off the plants or use Bacillus thuringiensis (Bt).
* Aphids: These small, sap-sucking insects can weaken broccoli plants. Spray them with insecticidal soap.
* Flea Beetles: These tiny beetles can create small holes in broccoli leaves. Cover the plants with row covers to prevent flea beetles from reaching them.
* Clubroot: This fungal disease causes swollen, dis
Hey there, fellow gardening enthusiasts! I’m so excited to share my experience and guide you through the process of growing your own broccoli at home. Trust me, there’s nothing quite like the taste of freshly harvested broccoli, especially when you’ve nurtured it from seed to table. It’s easier than you might think, and I’m here to break it down into manageable steps. Let’s get started!
Choosing the Right Broccoli Variety
First things first, let’s talk broccoli varieties. There are tons to choose from, and the best one for you will depend on your climate and growing season. Here are a few popular options:
* ‘Waltham 29’: A classic, reliable variety that’s known for its good flavor and cold hardiness. It’s a great choice for beginners.
* ‘Calabrese’: This is probably the most common type you’ll find in stores. It produces a large central head followed by smaller side shoots.
* ‘DiCicco’: A fast-maturing variety that’s perfect if you’re short on time. It produces smaller heads but plenty of them.
* ‘Purple Sprouting’: A unique variety that produces purple florets. It’s a bit more tolerant of warmer weather than other types.
* ‘Romanesco’: If you’re feeling adventurous, try growing Romanesco broccoli. Its fractal-like head is a real showstopper!
I personally love ‘Waltham 29’ because it’s so dependable, but feel free to experiment and find what works best for you.
Starting Your Broccoli Seeds
You can either start your broccoli seeds indoors or directly sow them in your garden. I prefer starting them indoors because it gives them a head start and protects them from pests.
Starting Seeds Indoors:
1. Gather Your Supplies: You’ll need seed starting trays or small pots, seed starting mix (not regular potting soil!), broccoli seeds, a spray bottle, and a grow light (optional but highly recommended).
2. Prepare the Seed Starting Mix: Moisten the seed starting mix with water until it’s damp but not soggy.
3. Sow the Seeds: Fill the trays or pots with the moistened mix and make a small indentation (about 1/4 inch deep) in the center of each cell or pot. Place 2-3 broccoli seeds in each indentation.
4. Cover the Seeds: Gently cover the seeds with more seed starting mix.
5. Water Gently: Use a spray bottle to mist the surface of the soil. Avoid overwatering, which can lead to damping off (a fungal disease that kills seedlings).
6. Provide Light and Warmth: Place the trays or pots in a warm location (around 70-75°F) and provide plenty of light. A grow light is ideal, but a sunny windowsill can also work. If using a windowsill, rotate the trays or pots regularly to prevent the seedlings from leaning towards the light.
7. Keep the Soil Moist: Check the soil moisture daily and mist with water as needed to keep it consistently damp.
8. Thin the Seedlings: Once the seedlings have their first true leaves (the second set of leaves), thin them to one seedling per cell or pot. Choose the strongest, healthiest-looking seedling and snip off the others at the soil line. Don’t pull them out, as this can disturb the roots of the remaining seedling.
Direct Sowing Seeds:
1. Prepare the Soil: Choose a sunny spot in your garden with well-drained soil. Amend the soil with compost or other organic matter to improve its fertility and drainage.
2. Sow the Seeds: Sow the seeds about 1/2 inch deep and 1-2 inches apart in rows.
3. Water Gently: Water the soil gently to keep it moist.
4. Thin the Seedlings: Once the seedlings have their first true leaves, thin them to about 18-24 inches apart.
Transplanting Your Broccoli Seedlings
Whether you started your seeds indoors or directly sowed them, you’ll eventually need to transplant your broccoli seedlings to their final growing location.
1. Harden Off the Seedlings: If you started your seeds indoors, you’ll need to harden them off before transplanting them. This means gradually exposing them to outdoor conditions over a period of 7-10 days. Start by placing the seedlings in a sheltered location outdoors for a few hours each day, gradually increasing the amount of time they spend outside.
2. Prepare the Planting Site: Choose a sunny spot in your garden with well-drained soil. Amend the soil with compost or other organic matter to improve its fertility and drainage. Broccoli needs at least 6 hours of sunlight per day.
3. Dig the Holes: Dig holes that are slightly larger than the root balls of the seedlings. Space the holes 18-24 inches apart.
4. Transplant the Seedlings: Gently remove the seedlings from their trays or pots and place them in the holes. Make sure the top of the root ball is level with the surrounding soil.
5. Fill the Holes: Fill the holes with soil and gently firm the soil around the seedlings.
6. Water Thoroughly: Water the seedlings thoroughly after transplanting.
Caring for Your Broccoli Plants
Once your broccoli plants are in the ground, it’s important to provide them with the care they need to thrive.
* Watering: Broccoli needs consistent moisture, especially during hot, dry weather. Water deeply and regularly, aiming for about 1-1.5 inches of water per week. Avoid overhead watering, which can promote fungal diseases. Drip irrigation or soaker hoses are ideal.
* Fertilizing: Broccoli is a heavy feeder, so it needs plenty of nutrients. Fertilize your plants every 2-3 weeks with a balanced fertilizer or compost tea.
* Weeding: Keep the area around your broccoli plants free of weeds. Weeds compete with broccoli for water and nutrients.
* Mulching: Apply a layer of mulch around your broccoli plants to help retain moisture, suppress weeds, and regulate soil temperature. Straw, wood chips, or shredded leaves are all good options.
* Pest Control: Broccoli is susceptible to a variety of pests, including cabbage worms, aphids, and flea beetles. Inspect your plants regularly for signs of pests and take action as needed. I prefer using organic pest control methods, such as handpicking pests, using insecticidal soap, or applying Bacillus thuringiensis (Bt).
* Supporting the Plants: As your broccoli plants grow, they may become top-heavy and require support. You can use stakes or cages to support the plants and prevent them from falling over.
Harvesting Your Broccoli
The moment you’ve been waiting for! Harvesting your own broccoli is so rewarding.
1. Timing is Key: Broccoli is ready to harvest when the central head is firm and tight, and the florets are still green and unopened. If the florets start to open and turn yellow, it’s time to harvest immediately.
2. Cut the Head: Use a sharp knife to cut the central head from the plant, leaving a few inches of stem attached.
3. Encourage Side Shoots: After harvesting the central head, your broccoli plant will produce smaller side shoots. These can be harvested as they mature.
4. Enjoy Your Harvest: Enjoy your freshly harvested broccoli in salads, stir-fries, soups, or roasted as a side dish. It’s also great steamed or blanched.
Troubleshooting Common Broccoli Problems
Even with the best care, you may encounter some problems while growing broccoli. Here are a few common issues and how to address them:
* Buttoning: This is when the broccoli head forms prematurely and remains small. It’s often caused by stress, such as lack of water or nutrients. Make sure your plants are getting enough water and fertilizer.
* Yellowing Florets: This indicates that the broccoli head is overripe. Harvest immediately.
* Cabbage Worms: These green caterpillars can devour broccoli leaves. Handpick them off the plants or use Bacillus thuringiensis (Bt).
* Aphids: These small, sap-sucking insects can weaken broccoli plants. Spray them with insecticidal soap.
* Flea Beetles: These tiny beetles can create small holes in broccoli leaves. Cover the plants with row covers to prevent flea beetles from reaching them.
* Clubroot: This fungal disease causes swollen, distorted roots and stunted growth. Prevent clubroot by improving soil drainage and avoiding planting broccoli in the same spot year after year.
Extending Your Broccoli Season
Want to enjoy fresh broccoli for as long as possible? Here are a few tips for extending your growing season:
* Succession Planting: Plant broccoli seeds or seedlings every few weeks to ensure a continuous harvest.
* Fall Planting

Conclusion
So, there you have it! Growing broccoli at home is not only achievable, but it’s also incredibly rewarding. Forget those limp, overpriced heads at the grocery store. Imagine stepping into your garden and harvesting crisp, vibrant, and intensely flavorful broccoli whenever you desire. This DIY trick transforms your backyard (or even a sunny balcony!) into a miniature farm, providing you with a sustainable source of fresh produce.
But why is this a must-try? Beyond the obvious benefit of having access to fresher, healthier broccoli, growing your own allows you complete control over what goes into your food. No more worrying about pesticides or questionable farming practices. You know exactly where your broccoli comes from and how it was nurtured. Plus, the satisfaction of nurturing a plant from seed to harvest is an experience that’s hard to beat. It’s a connection to nature, a lesson in patience, and a tangible accomplishment all rolled into one.
And the possibilities don’t stop there! Once you’ve mastered the basics, you can experiment with different varieties of broccoli. Try growing Romanesco broccoli with its stunning fractal patterns, or perhaps some vibrant purple sprouting broccoli for a splash of color in your meals. You can also adjust your planting schedule to extend your harvest season, ensuring a steady supply of fresh broccoli throughout the year. Consider companion planting with herbs like rosemary or thyme to deter pests naturally and enhance the flavor of your broccoli.
Furthermore, think about the environmental impact. By growing your own broccoli, you’re reducing your carbon footprint by eliminating the transportation and packaging associated with store-bought produce. You’re also contributing to a more sustainable food system, one that prioritizes local production and reduces reliance on industrial agriculture.
We understand that the idea of growing your own food can seem daunting at first, but trust us, it’s easier than you think. With a little planning, some basic supplies, and a bit of patience, you can successfully grow broccoli at home and enjoy the many benefits it offers. The initial investment in seeds, soil, and perhaps a few containers will quickly pay for itself in the form of delicious, nutritious broccoli and the satisfaction of knowing you grew it yourself.
Don’t just take our word for it, though. We encourage you to give this DIY trick a try and experience the joy of homegrown broccoli firsthand. Start small, learn as you go, and don’t be afraid to experiment. We’re confident that you’ll be amazed at what you can achieve.
And most importantly, we want to hear about your experience! Share your tips, successes, and even your challenges in the comments below. Let’s create a community of home gardeners who are passionate about growing their own food and sharing their knowledge with others. Together, we can make a difference, one broccoli plant at a time. So, grab your seeds, get your hands dirty, and start growing your own delicious, healthy broccoli today! You’ll be amazed at how rewarding it is to grow broccoli at home.
Frequently Asked Questions (FAQ)
What is the best time of year to plant broccoli?
The ideal time to plant broccoli depends on your climate. In general, broccoli is a cool-season crop, meaning it thrives in temperatures between 60°F and 70°F (15°C and 21°C). For spring harvests, start seeds indoors 6-8 weeks before the last expected frost. Transplant seedlings outdoors 2-3 weeks before the last frost. For fall harvests, sow seeds directly into the garden in mid-summer, about 85-100 days before the first expected frost. If you live in a warmer climate with mild winters, you can also grow broccoli during the winter months. Check your local climate data and planting guides for specific recommendations for your region.
What kind of soil does broccoli need?
Broccoli prefers well-drained, fertile soil that is rich in organic matter. The ideal soil pH is between 6.0 and 7.0. Before planting, amend your soil with compost, aged manure, or other organic materials to improve drainage, fertility, and water retention. If your soil is heavy clay, consider adding sand or perlite to improve drainage. A soil test can help you determine the specific nutrient needs of your soil and guide your fertilization strategy.
How much sunlight does broccoli need?
Broccoli requires at least 6 hours of direct sunlight per day to thrive. Choose a planting location that receives full sun throughout the day. If you are growing broccoli indoors, use grow lights to supplement natural sunlight. Insufficient sunlight can result in leggy plants with small heads.
How often should I water broccoli?
Broccoli needs consistent moisture to produce large, healthy heads. Water deeply and regularly, especially during dry periods. Aim to keep the soil consistently moist but not waterlogged. Mulching around the plants can help retain moisture and suppress weeds. Check the soil moisture regularly by sticking your finger into the soil. If the top inch feels dry, it’s time to water.
What are some common pests and diseases that affect broccoli?
Broccoli is susceptible to several pests and diseases, including cabbage worms, aphids, flea beetles, clubroot, and downy mildew. Regularly inspect your plants for signs of infestation or disease. Use organic pest control methods, such as handpicking pests, using insecticidal soap, or applying Bacillus thuringiensis (Bt) for cabbage worms. To prevent diseases, practice crop rotation, ensure good air circulation, and avoid overhead watering. If you encounter a serious disease outbreak, consider using a fungicide labeled for use on broccoli.
How do I know when my broccoli is ready to harvest?
Broccoli is ready to harvest when the central head is firm, tight, and dark green. The individual florets should be tightly closed and not starting to open or flower. Use a sharp knife to cut the head from the plant, leaving several inches of stem. Side shoots will often develop after the main head is harvested, providing you with additional broccoli over a longer period.
Can I grow broccoli in containers?
Yes, you can successfully grow broccoli in containers, provided you choose a large enough container and provide adequate care. Select a container that is at least 12 inches in diameter and 12 inches deep. Use a high-quality potting mix and ensure the container has good drainage. Water regularly and fertilize as needed. Container-grown broccoli may require more frequent watering and fertilization than broccoli grown in the ground.
How do I store harvested broccoli?
To store harvested broccoli, refrigerate it immediately after harvesting. Wrap the broccoli head loosely in a plastic bag or store it in a container with a damp paper towel. Broccoli can be stored in the refrigerator for up to a week. For longer storage, you can blanch and freeze broccoli.
Can I eat the broccoli leaves?
Yes, broccoli leaves are edible and nutritious. They can be cooked like other leafy greens, such as kale or collard greens. Broccoli leaves are a good source of vitamins, minerals, and fiber.
What are some good companion plants for broccoli?
Good companion plants for broccoli include herbs like rosemary, thyme, and sage, which can help deter pests. Other beneficial companion plants include onions, garlic, and marigolds. Avoid planting broccoli near strawberries or tomatoes, as they can compete for nutrients or attract pests.

Leave a Comment