
Growing mini carrots at home might sound like a whimsical dream, but trust me, it’s totally achievable and incredibly rewarding! Forget those bland, store-bought carrots – imagine plucking sweet, crunchy, perfectly portioned mini carrots straight from your own garden. I’m so excited to share some simple DIY tricks that will transform your backyard (or even your balcony!) into a miniature carrot farm.
Carrots, believe it or not, have a rich history dating back thousands of years. Originally cultivated for their aromatic leaves and seeds, the vibrant orange root we know and love today is a relatively recent development. While the exact origins of mini carrots are a bit more modern, the desire for convenient and healthy snacks has certainly fueled their popularity.
Why should you try growing mini carrots at home? Well, for starters, you’ll have access to the freshest, most flavorful carrots imaginable. Plus, it’s a fantastic way to reduce your carbon footprint and connect with nature. But more importantly, in today’s fast-paced world, having access to healthy snacks is more important than ever. This DIY project is perfect for busy individuals and families who want to enjoy the benefits of homegrown produce without the commitment of a large garden. So, let’s dive in and discover the secrets to cultivating your own miniature carrot bounty!
Growing Mini Carrots: A Step-by-Step Guide to Tiny, Tasty Treats!
Okay, fellow gardening enthusiasts! Are you ready to embark on a journey to cultivate the cutest, most delicious mini carrots right in your own home? I’m so excited to share my tried-and-true method with you. It’s easier than you think, and the reward of harvesting your own tiny treasures is absolutely worth it. Let’s get our hands dirty!
What You’ll Need: The Essential Supplies
Before we dive into the planting process, let’s gather our supplies. Having everything ready beforehand will make the whole experience smoother and more enjoyable.
* Mini Carrot Seeds: This is the most crucial ingredient! Look for varieties specifically labeled as “mini carrots,” “baby carrots,” or “round carrots.” Nantes and Parisian are popular choices. I personally love the ‘Thumbelina’ variety – they’re perfectly round and adorable.
* Container: Choose a container that’s at least 6-8 inches deep. Carrots need room to grow downwards. A rectangular planter box, a large pot, or even a repurposed container will work perfectly. Make sure it has drainage holes!
* Potting Mix: Use a high-quality, well-draining potting mix. Avoid using garden soil, as it can be too heavy and compact, hindering root development. I prefer a mix that includes peat moss, perlite, and vermiculite.
* Watering Can or Spray Bottle: Gentle watering is key, especially when the seeds are first sown.
* Sunlight: Carrots need at least 6 hours of sunlight per day. Choose a sunny spot for your container. If you don’t have enough natural light, consider using a grow light.
* Optional:
* Seed starting tray (for pre-sprouting)
* Liquid fertilizer (for feeding your carrots later)
* Row cover (to protect from pests)
Step-by-Step Planting Instructions: From Seed to Sprout
Now for the fun part! Let’s get those seeds in the soil and watch our mini carrots come to life.
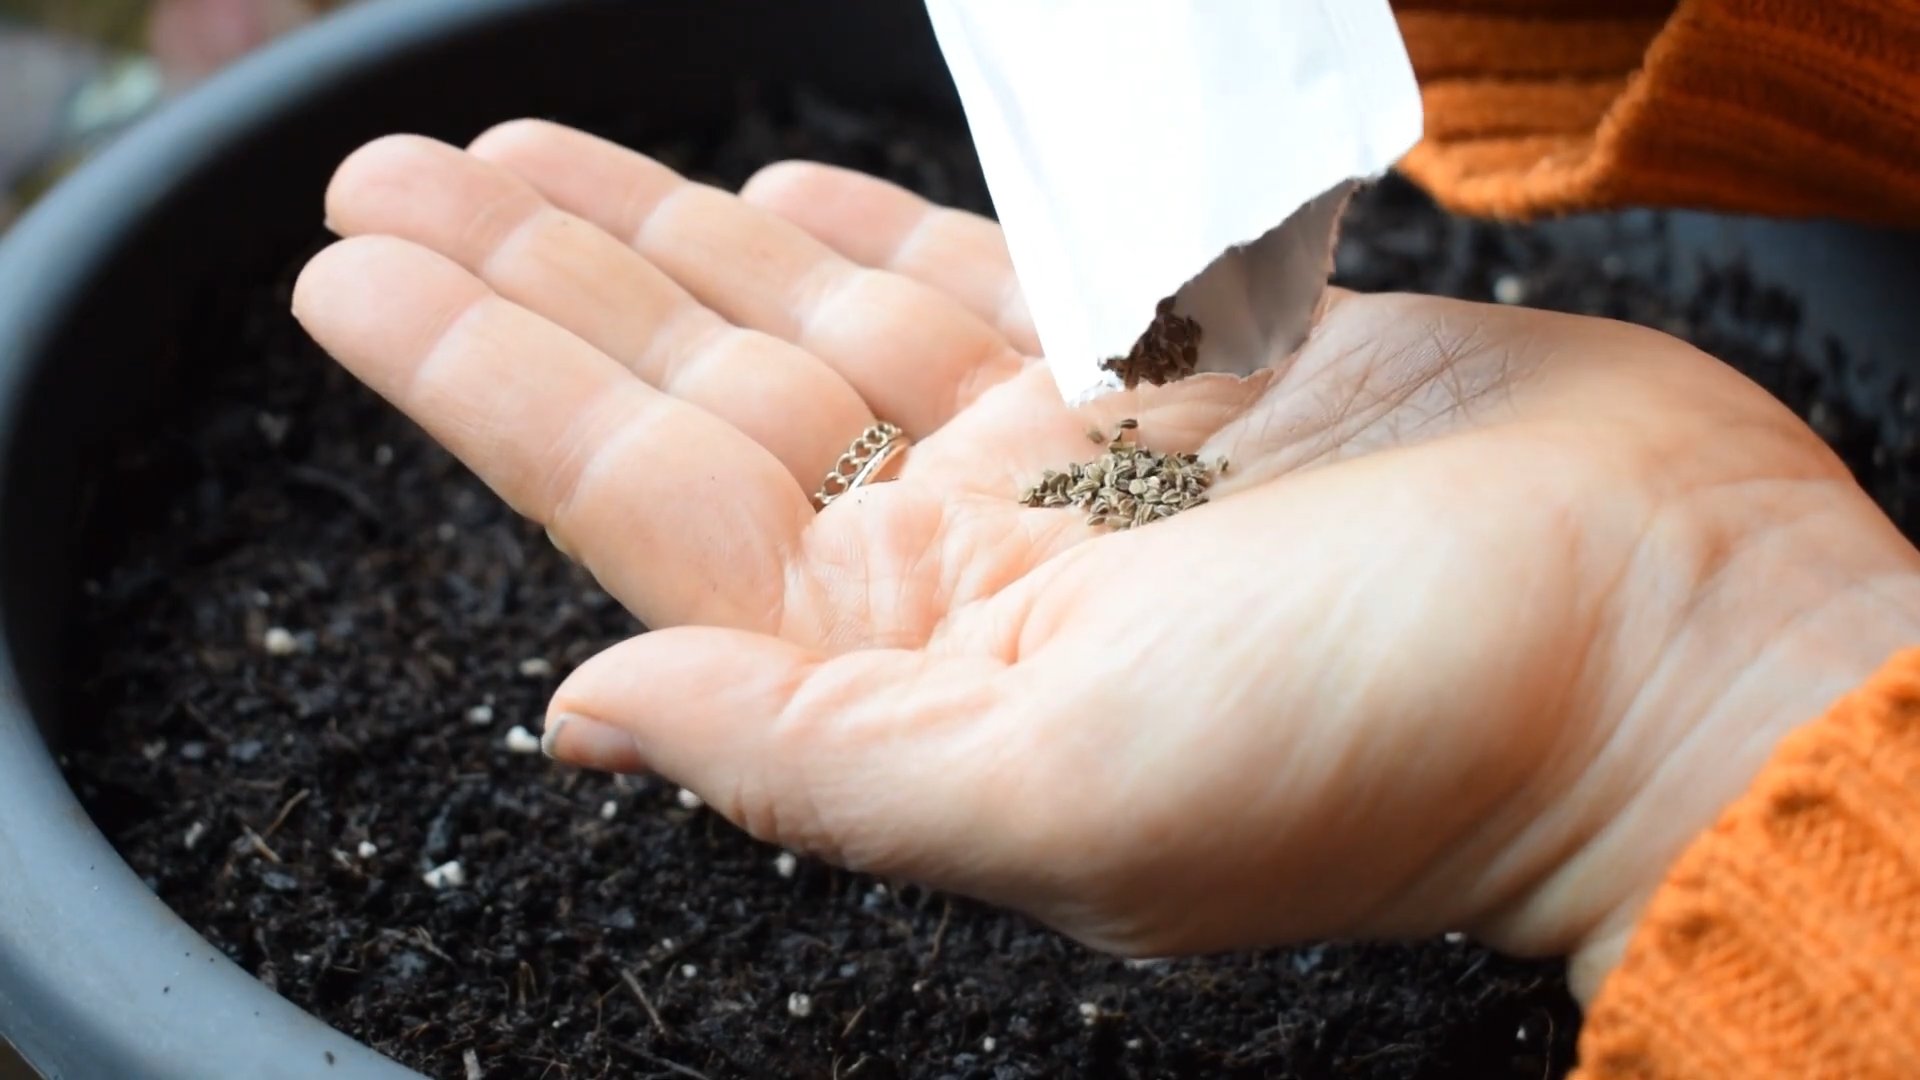
1. Prepare Your Container: Fill your container with the potting mix, leaving about an inch of space at the top. Gently pat down the soil to create a level surface.
2. Sow the Seeds: Mini carrot seeds are tiny, so handle them with care. Sprinkle the seeds evenly over the surface of the soil. Aim for about ½ inch spacing between seeds. Don’t worry if they’re a little crowded; we’ll thin them out later.
3. Cover the Seeds: Lightly cover the seeds with a thin layer of potting mix (about ¼ inch). You can also use vermiculite, which helps retain moisture.
4. Water Gently: Use a watering can or spray bottle to gently moisten the soil. Avoid overwatering, which can cause the seeds to rot. The soil should be damp but not soggy.
5. Provide Sunlight: Place your container in a sunny location that receives at least 6 hours of direct sunlight per day. If you’re using a grow light, position it a few inches above the soil surface.
6. Maintain Moisture: Keep the soil consistently moist but not waterlogged. Check the soil moisture daily and water as needed. A spray bottle is great for keeping the surface moist during the initial germination phase.
7. Be Patient: Germination typically takes 7-21 days, depending on the temperature and moisture levels. Don’t be discouraged if you don’t see sprouts right away. Just keep the soil moist and wait patiently.
Thinning and Spacing: Giving Your Carrots Room to Grow
Once your seedlings have emerged and have a few true leaves (the second set of leaves that appear after the initial seed leaves), it’s time to thin them out. This is crucial for allowing your mini carrots to develop properly.
1. Identify the Strongest Seedlings: Look for the healthiest and most vigorous seedlings. These are the ones you want to keep.
2. Thin the Seedlings: Gently remove the weaker seedlings, leaving about 1-2 inches of space between the remaining plants. You can use small scissors or tweezers to carefully snip the seedlings at the soil line. Be careful not to disturb the roots of the plants you’re keeping.
3. Water After Thinning: After thinning, water the remaining seedlings to help them settle in.
Caring for Your Mini Carrots: Watering, Fertilizing, and Pest Control
Now that your mini carrots are growing, it’s important to provide them with the care they need to thrive.
1. Watering: Water your carrots regularly, keeping the soil consistently moist but not waterlogged. Water deeply when the top inch of soil feels dry to the touch. Avoid overhead watering, which can promote fungal diseases.
2. Fertilizing: Carrots are not heavy feeders, but they will benefit from occasional fertilization. Use a balanced liquid fertilizer diluted to half strength. Fertilize every 2-3 weeks, starting when the seedlings are about 2 inches tall.
3. Weed Control: Keep your container free of weeds, which can compete with your carrots for nutrients and water. Gently remove any weeds that appear, being careful not to disturb the carrot roots.
4. Pest Control: Carrots can be susceptible to pests such as carrot rust flies and aphids. Inspect your plants regularly for signs of infestation. If you notice any pests, you can try using insecticidal soap or neem oil to control them. A row cover can also help prevent pests from reaching your plants.
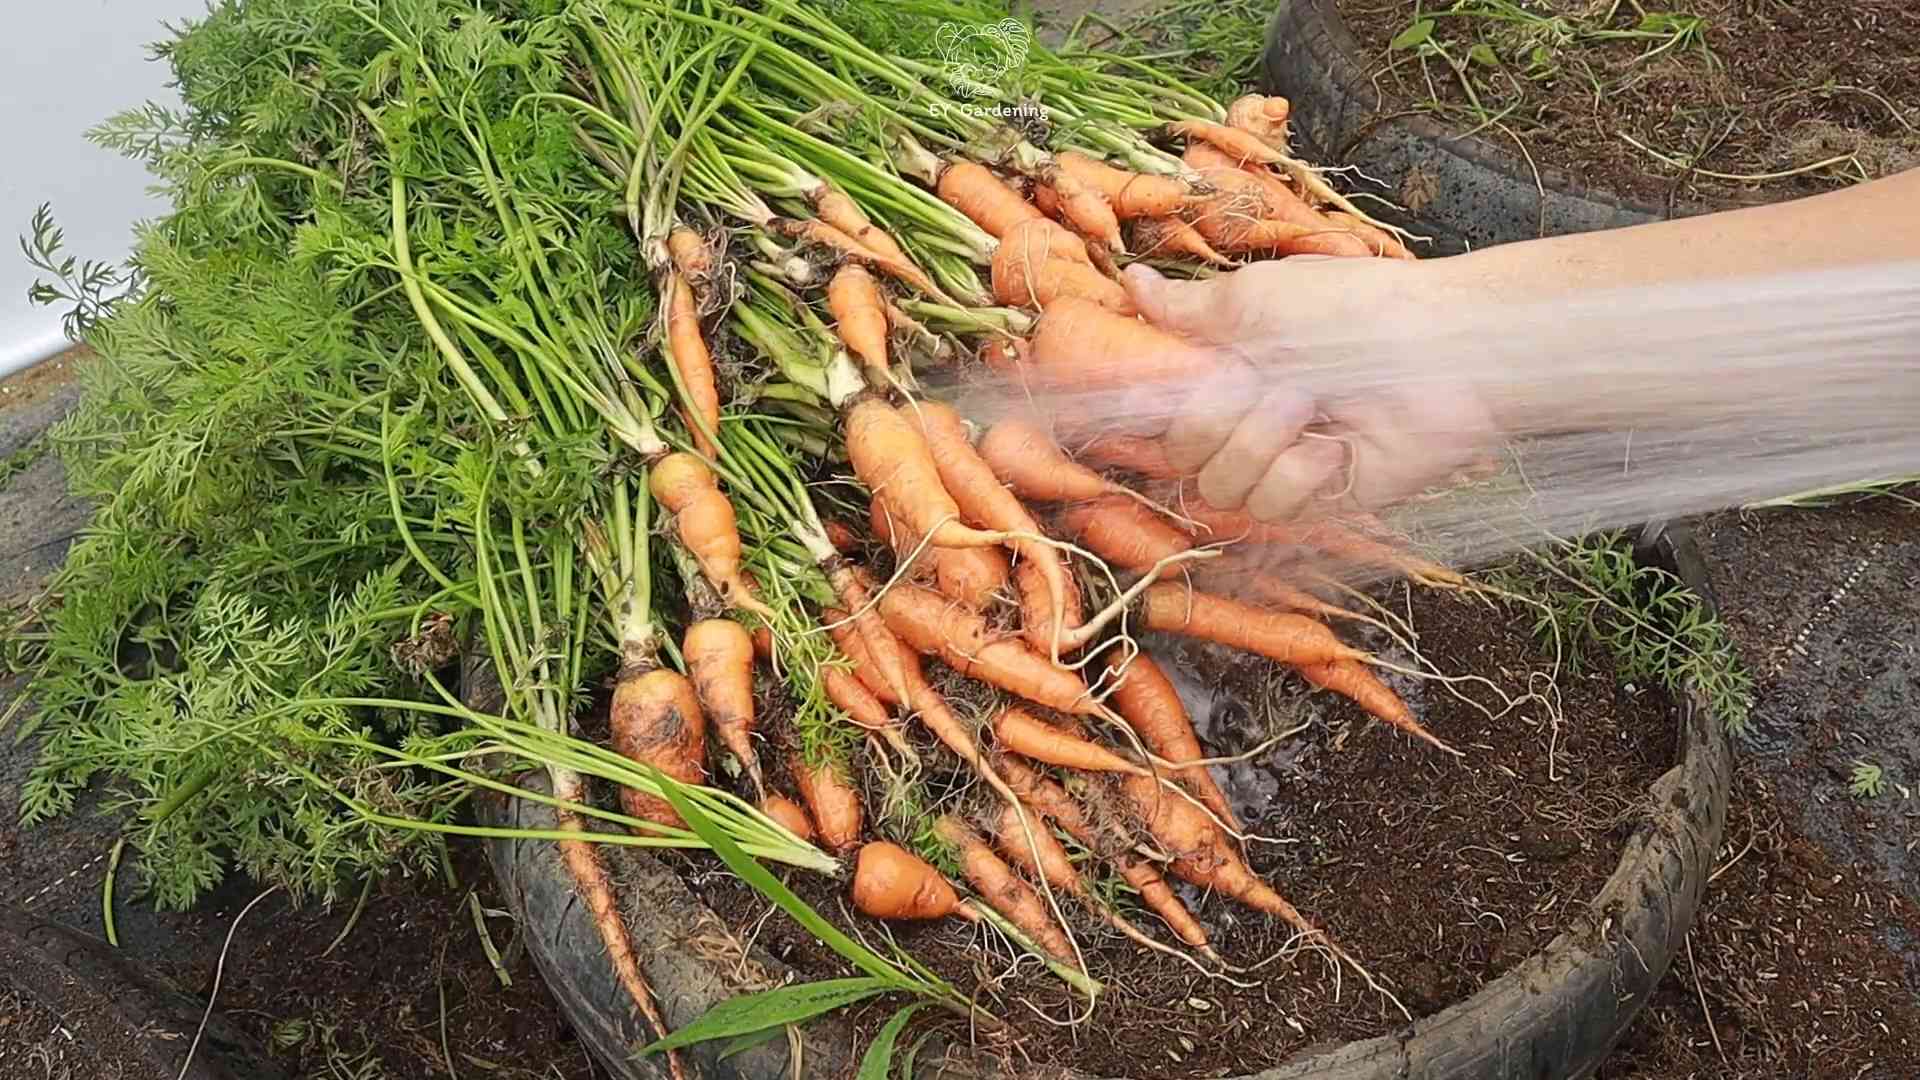
Harvesting Your Mini Carrots: The Sweet Reward
The moment we’ve all been waiting for! Harvesting your own homegrown mini carrots is incredibly satisfying.
1. Check for Maturity: Mini carrots typically mature in 50-70 days, depending on the variety. You can check for maturity by gently pulling back the soil around the base of the carrots to see if they have reached the desired size.
2. Harvest Carefully: Gently loosen the soil around the carrots with a trowel or fork. Then, carefully pull the carrots out of the soil, one at a time.
3. Wash and Enjoy: Wash your freshly harvested mini carrots thoroughly and enjoy them raw, roasted, or steamed. They’re delicious in salads, as a snack, or as a side dish.
Troubleshooting: Common Problems and Solutions
Even with the best care, you might encounter some challenges along the way. Here are some common problems and how to address them:
* Poor Germination: If your seeds don’t germinate, it could be due to several factors, such as old seeds, dry soil, or cold temperatures. Make sure your seeds are fresh, keep the soil consistently moist, and provide adequate warmth.
* Forked or Twisted Roots: Forked or twisted roots can be caused by compacted soil, rocks, or other obstacles in the soil. Use a high-quality potting mix and remove any rocks or debris from the container.
* Small Carrots: Small carrots can be caused by overcrowding, lack of nutrients, or insufficient sunlight. Thin your seedlings properly, fertilize regularly, and provide at least 6 hours of sunlight per day.
* Pest Infestations: Pests such as carrot rust flies and aphids can damage your carrots. Inspect your plants regularly and use appropriate pest control methods, such as insecticidal soap or neem oil.
Extra Tips for Success: Taking Your Mini Carrot Game to the Next Level
Here are a few extra tips to help you achieve even greater success with your mini carrot growing adventure:
* Succession Planting: Plant a new batch of seeds every few weeks to ensure a continuous harvest of mini carrots throughout the growing season.
* Companion Planting: Plant your carrots alongside companion plants such as onions, garlic, and rosemary. These plants can help deter pests and improve the flavor of your carrots.
* Soil Testing: If you’re having trouble growing healthy carrots, consider testing your soil to determine its pH and nutrient levels. This will help you identify any deficiencies and amend the soil accordingly.
* Record Keeping: Keep a gardening journal to track your progress, record your successes and failures, and learn from your experiences.
Experiment and Have Fun!
Growing mini carrots at home is a rewarding and enjoyable experience. Don’t be afraid to experiment with different varieties, techniques, and growing conditions. The most important thing is to have fun and learn along the way. Happy gardening!
Conclusion
So, there you have it! Growing mini carrots at home is not only achievable, but it’s also a rewarding and surprisingly simple project. Forget those bland, pre-packaged baby carrots from the store. Imagine the vibrant color, the intense sweetness, and the satisfying crunch of carrots you’ve nurtured from seed to table, all within the cozy confines of your own home. This DIY trick transforms the ordinary into the extraordinary, offering a taste experience that store-bought versions simply can’t match.
Why is this a must-try? Because it puts you in control. You dictate the soil, the sunlight, and the care, resulting in a product that’s fresher, healthier, and bursting with flavor. Plus, it’s an incredibly engaging activity, perfect for families, gardening enthusiasts, or anyone looking to add a touch of green to their living space. Think of the joy of watching those tiny sprouts emerge, the anticipation as the carrots slowly mature, and the ultimate satisfaction of harvesting your own miniature bounty.
But the fun doesn’t stop there! Feel free to experiment with different carrot varieties. Nantes carrots are known for their sweetness and uniform shape, making them ideal for mini versions. Chantenay carrots are another excellent choice, offering a robust flavor and adaptability to various soil conditions. You can also play around with container sizes and soil mixtures to find what works best for your environment. Consider adding companion plants like radishes or onions to deter pests and improve soil health.
And don’t limit yourself to just eating them raw! These mini carrots are incredibly versatile. Roast them with a drizzle of olive oil and herbs for a simple yet elegant side dish. Add them to salads for a pop of color and sweetness. Pickle them for a tangy and refreshing snack. Or, blend them into smoothies for a nutrient-packed boost. The possibilities are endless!
We wholeheartedly encourage you to give this DIY trick a try. It’s a fantastic way to connect with nature, learn about the growing process, and enjoy the unparalleled taste of homegrown produce. The process of growing mini carrots at home is a journey of discovery, and we’re confident that you’ll find it both enjoyable and rewarding.
Once you’ve embarked on your mini carrot growing adventure, we’d love to hear about your experience! Share your tips, tricks, and photos with us in the comments below. Let’s create a community of mini carrot enthusiasts and inspire others to embrace the joy of homegrown goodness. What varieties did you try? What challenges did you face? What successes did you celebrate? Your insights will be invaluable to fellow gardeners. So, grab your seeds, prepare your soil, and get ready to experience the magic of growing your own delicious mini carrots!
FAQ
What kind of container should I use for growing mini carrots?
The ideal container for growing mini carrots should be at least 6-8 inches deep to allow the roots to develop properly. While mini carrots don’t require as much space as full-sized varieties, they still need room to grow. Choose a container made of plastic, terracotta, or even a repurposed bucket or tub. Ensure the container has drainage holes to prevent waterlogging, which can lead to root rot. The width of the container will depend on how many carrots you want to grow. A container that is 12 inches in diameter can comfortably accommodate several plants.
What type of soil is best for growing mini carrots?
Mini carrots thrive in loose, well-draining soil that is rich in organic matter. Avoid heavy clay soils, as they can restrict root growth and result in misshapen carrots. A good soil mix consists of equal parts potting soil, compost, and sand or perlite. The compost provides essential nutrients, while the sand or perlite improves drainage. Before planting, amend the soil with a slow-release fertilizer to provide a steady supply of nutrients throughout the growing season. Ensure the soil pH is between 6.0 and 7.0 for optimal growth.
How often should I water my mini carrots?
Consistent watering is crucial for growing healthy mini carrots. Keep the soil consistently moist, but not waterlogged. Water deeply whenever the top inch of soil feels dry to the touch. The frequency of watering will depend on the weather conditions and the type of container you’re using. During hot, dry periods, you may need to water daily. Avoid overhead watering, as it can promote fungal diseases. Instead, water at the base of the plants to keep the foliage dry.
How much sunlight do mini carrots need?
Mini carrots require at least 6 hours of direct sunlight per day to thrive. Choose a location that receives ample sunlight throughout the day. If you’re growing carrots indoors, place them near a sunny window or use grow lights to supplement natural light. Insufficient sunlight can result in stunted growth and pale, underdeveloped carrots. Rotate the container regularly to ensure all sides of the plants receive equal exposure to sunlight.
When is the best time to harvest mini carrots?
Mini carrots are typically ready to harvest in 50-60 days after planting. You can harvest them when they reach about 2-3 inches in length. Gently loosen the soil around the carrots and pull them out by the greens. If the soil is dry, water it beforehand to make harvesting easier. You can also harvest mini carrots at different stages of maturity, depending on your preference. Younger carrots will be more tender and sweeter, while older carrots will have a more robust flavor.
Can I grow mini carrots indoors year-round?
Yes, you can grow mini carrots indoors year-round, provided you have adequate lighting and temperature control. Use grow lights to supplement natural light, especially during the winter months. Maintain a consistent temperature between 60-70°F (15-21°C). Ensure good air circulation to prevent fungal diseases. With proper care, you can enjoy a continuous supply of homegrown mini carrots throughout the year.
What are some common pests and diseases that affect mini carrots?
Common pests that affect mini carrots include aphids, carrot rust flies, and nematodes. Aphids can be controlled with insecticidal soap or neem oil. Carrot rust flies can be deterred by covering the plants with row covers. Nematodes can be managed by amending the soil with organic matter and practicing crop rotation. Common diseases that affect mini carrots include leaf blight and root rot. Leaf blight can be prevented by ensuring good air circulation and avoiding overhead watering. Root rot can be prevented by using well-draining soil and avoiding overwatering.
Can I save seeds from my mini carrots to plant next year?
Saving seeds from carrots is a bit more involved than with some other vegetables, as carrots are biennials, meaning they typically flower and produce seeds in their second year. To save seeds, you would need to overwinter the carrots and allow them to flower the following spring. However, for mini carrots grown in containers, this can be challenging. It’s generally easier to purchase fresh seeds each year to ensure good germination rates and consistent results.
How do I prevent my mini carrots from splitting?
Splitting in carrots is often caused by inconsistent watering. When the soil dries out and then is suddenly saturated, the carrots can absorb water too quickly, causing them to split. To prevent this, maintain consistent soil moisture by watering regularly and deeply. Mulching around the plants can also help to retain moisture in the soil.
Are there any companion plants that are beneficial for growing mini carrots?
Yes, several companion plants can benefit mini carrots. Onions and garlic can deter carrot rust flies. Radishes can help to loosen the soil and mark the rows for planting. Rosemary and sage can repel pests. Lettuce and spinach can provide ground cover and help to retain moisture in the soil. Planting these companion plants alongside your mini carrots can create a more balanced and productive garden ecosystem.

Leave a Comment