
Grow radishes indoors? Absolutely! Forget waiting for the perfect spring weather or battling garden pests. I’m here to tell you that fresh, peppery radishes are within your reach, no matter where you live or how much outdoor space you have. For centuries, humans have cultivated food in diverse environments, from ancient rooftop gardens in Babylon to the ingenious floating farms of Southeast Asia. This inherent drive to nurture and provide for ourselves is alive and well, and it’s why I’m so excited to share these simple, effective DIY tricks with you.
Let’s face it, store-bought radishes can be a bit… underwhelming. They often lack that vibrant flavor and satisfying crunch. But imagine plucking a crisp, ruby-red radish straight from your windowsill, knowing you nurtured it from seed to table. That’s the magic of indoor gardening! Plus, in today’s world, where access to fresh produce can be challenging or expensive, learning how to grow radishes indoors offers a fantastic way to supplement your diet with healthy, homegrown goodness. So, ditch the grocery store radish roulette and get ready to embark on a rewarding and delicious indoor gardening adventure. I promise, it’s easier than you think!
Grow Radishes Indoors: A Beginner’s Guide
Hey there, fellow gardening enthusiasts! Ever craved the peppery crunch of fresh radishes but the weather outside is less than ideal? Well, fret no more! I’m here to show you how to grow radishes indoors, bringing that vibrant flavor right to your kitchen. It’s easier than you think, and incredibly rewarding. Let’s get started!
What You’ll Need
Before we dive in, let’s gather our supplies. Here’s a checklist of everything you’ll need to successfully grow radishes indoors:
* Radish Seeds: Choose a variety suitable for container gardening. I personally love ‘Cherry Belle’ for its quick growth and mild flavor, but ‘French Breakfast’ and ‘Easter Egg’ are also great options.
* Containers: You’ll need containers that are at least 6 inches deep. Radishes need room to grow downwards. I recommend using plastic pots, but terracotta pots work too, just be mindful that they dry out faster.
* Potting Mix: Use a well-draining potting mix. Avoid using garden soil, as it can compact and hinder root growth. A mix of peat moss, perlite, and vermiculite is ideal.
* Grow Lights (Optional but Recommended): While radishes can grow near a sunny window, grow lights will ensure consistent and even growth, especially during the darker months.
* Watering Can or Spray Bottle: For gentle and even watering.
* Fertilizer (Optional): A balanced liquid fertilizer can give your radishes a boost, but it’s not strictly necessary.
* Small Shovel or Trowel: For planting the seeds.
* Labels and a Marker: To keep track of what you’ve planted.
Choosing the Right Radish Variety
Not all radishes are created equal, especially when it comes to indoor growing. Here’s what to look for:
* Short Maturing Varieties: Opt for varieties that mature quickly, typically within 20-30 days. This will give you a faster harvest and keep you motivated.
* Compact Varieties: Choose varieties that don’t grow too large, as they’ll be happier in containers.
* Flavor Preference: Consider your taste preferences. Some radishes are mild and sweet, while others are peppery and pungent.
Step-by-Step Planting Guide
Okay, now for the fun part! Let’s get those radish seeds in the soil.
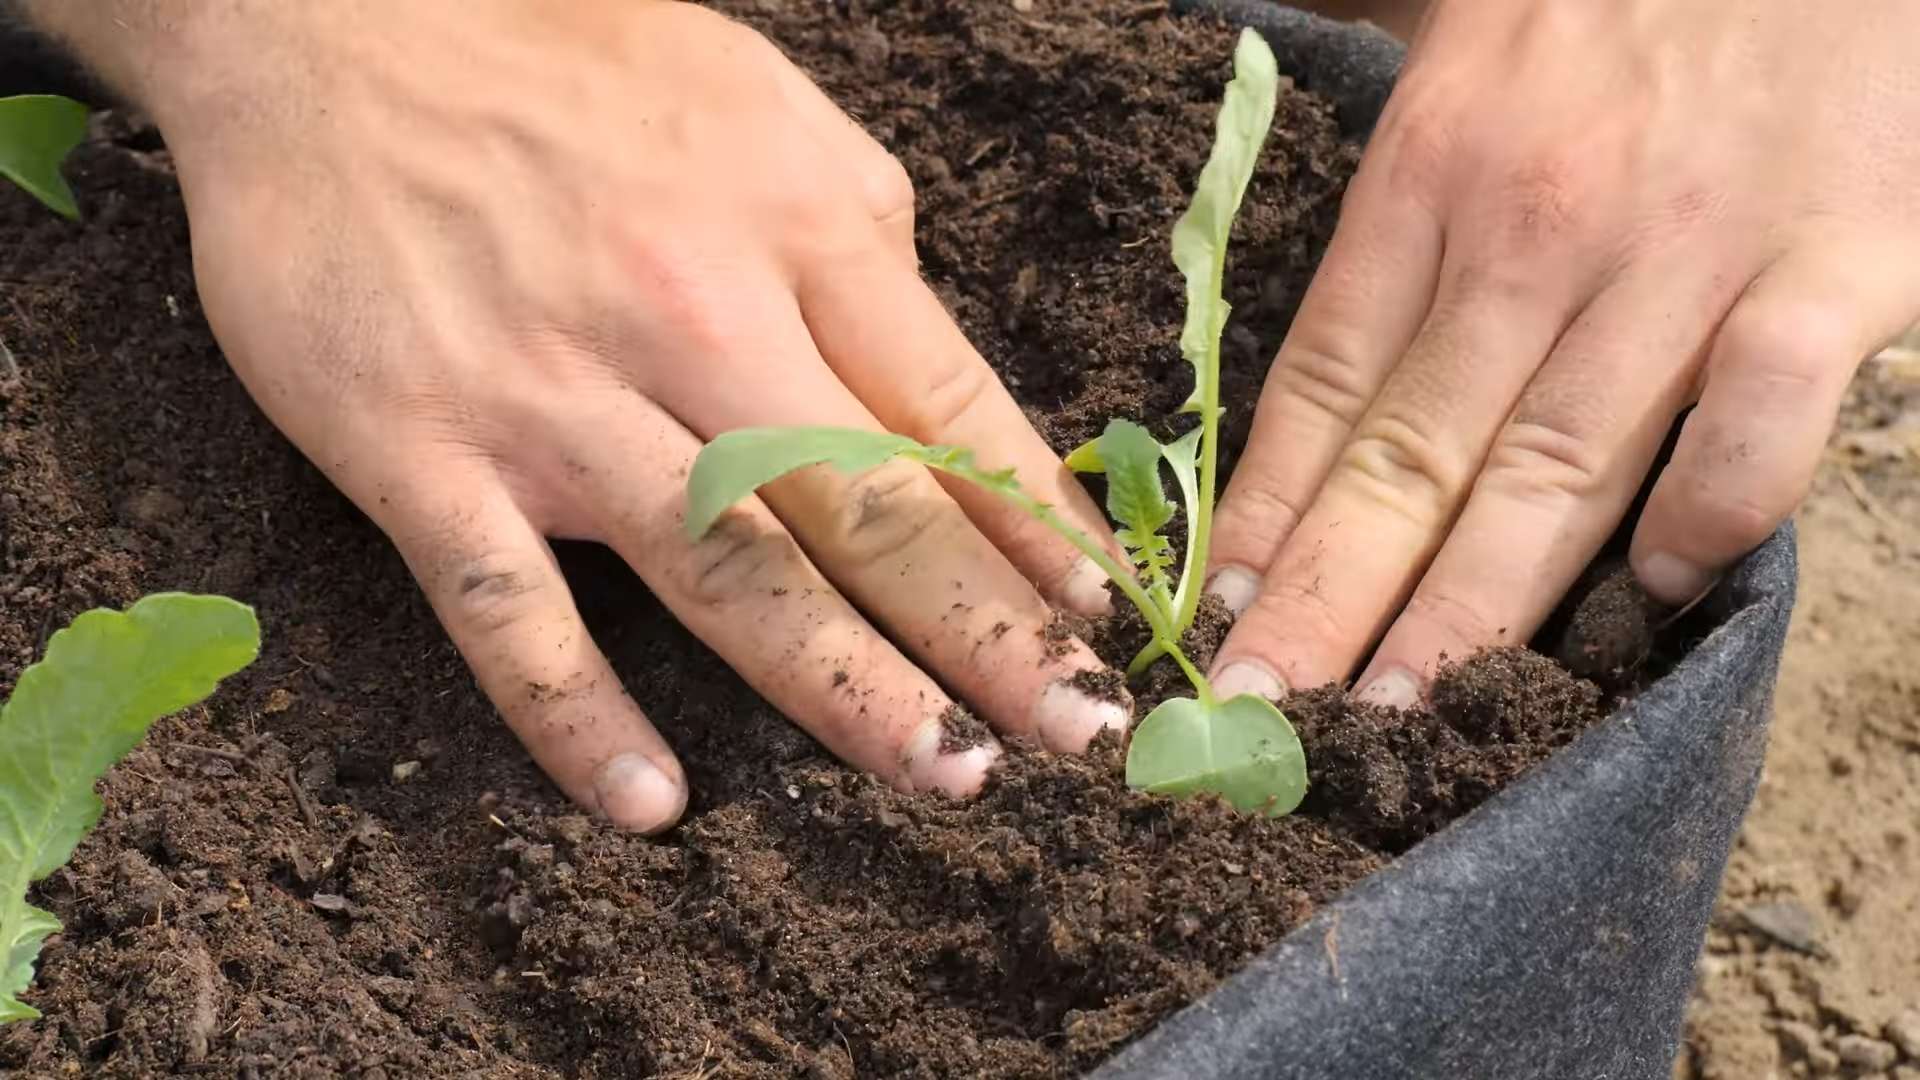
1. Prepare Your Containers: Fill your containers with the potting mix, leaving about an inch of space at the top. Gently pat down the soil to remove any air pockets.
2. Sow the Seeds: Sow the radish seeds about ½ inch deep and 1 inch apart. I like to use my finger to make small indentations in the soil, then drop the seeds in.
3. Cover the Seeds: Gently cover the seeds with potting mix and lightly water the soil. You want the soil to be moist, but not soggy.
4. Label Your Containers: Don’t forget to label your containers with the radish variety and the date you planted them. This will help you keep track of your progress.
5. Provide Light: Place your containers in a sunny location or under grow lights. If using grow lights, position them a few inches above the soil surface and keep them on for about 12-14 hours a day.
Watering and Maintenance
Proper watering is crucial for healthy radish growth. Here’s what you need to know:
1. Water Regularly: Keep the soil consistently moist, but not waterlogged. Radishes need consistent moisture to develop properly. I usually water every other day, but it depends on the humidity and temperature in my home.
2. Check the Soil Moisture: Stick your finger into the soil to check the moisture level. If the top inch of soil feels dry, it’s time to water.
3. Avoid Overwatering: Overwatering can lead to root rot, so be careful not to overdo it. Make sure your containers have drainage holes to allow excess water to escape.
4. Thin Seedlings (If Necessary): Once the seedlings emerge, thin them out if they’re too crowded. You want to give each radish plant enough space to grow. Aim for about 1 inch of space between plants.
5. Fertilize (Optional): If you want to give your radishes a boost, you can fertilize them with a balanced liquid fertilizer every two weeks. Follow the instructions on the fertilizer label.
Providing Adequate Light
Light is essential for radish growth. Here’s how to ensure your radishes get enough light:
1. Sunny Location: Place your containers in a location that receives at least 6 hours of direct sunlight per day. A south-facing window is ideal.
2. Grow Lights: If you don’t have enough natural light, use grow lights. LED grow lights are energy-efficient and provide the right spectrum of light for plant growth.
3. Rotate Containers: Rotate your containers regularly to ensure that all sides of the plants receive equal light. This will prevent them from leaning towards the light source.
4. Adjust Light Height: As your radishes grow, adjust the height of the grow lights to keep them a few inches above the plants.
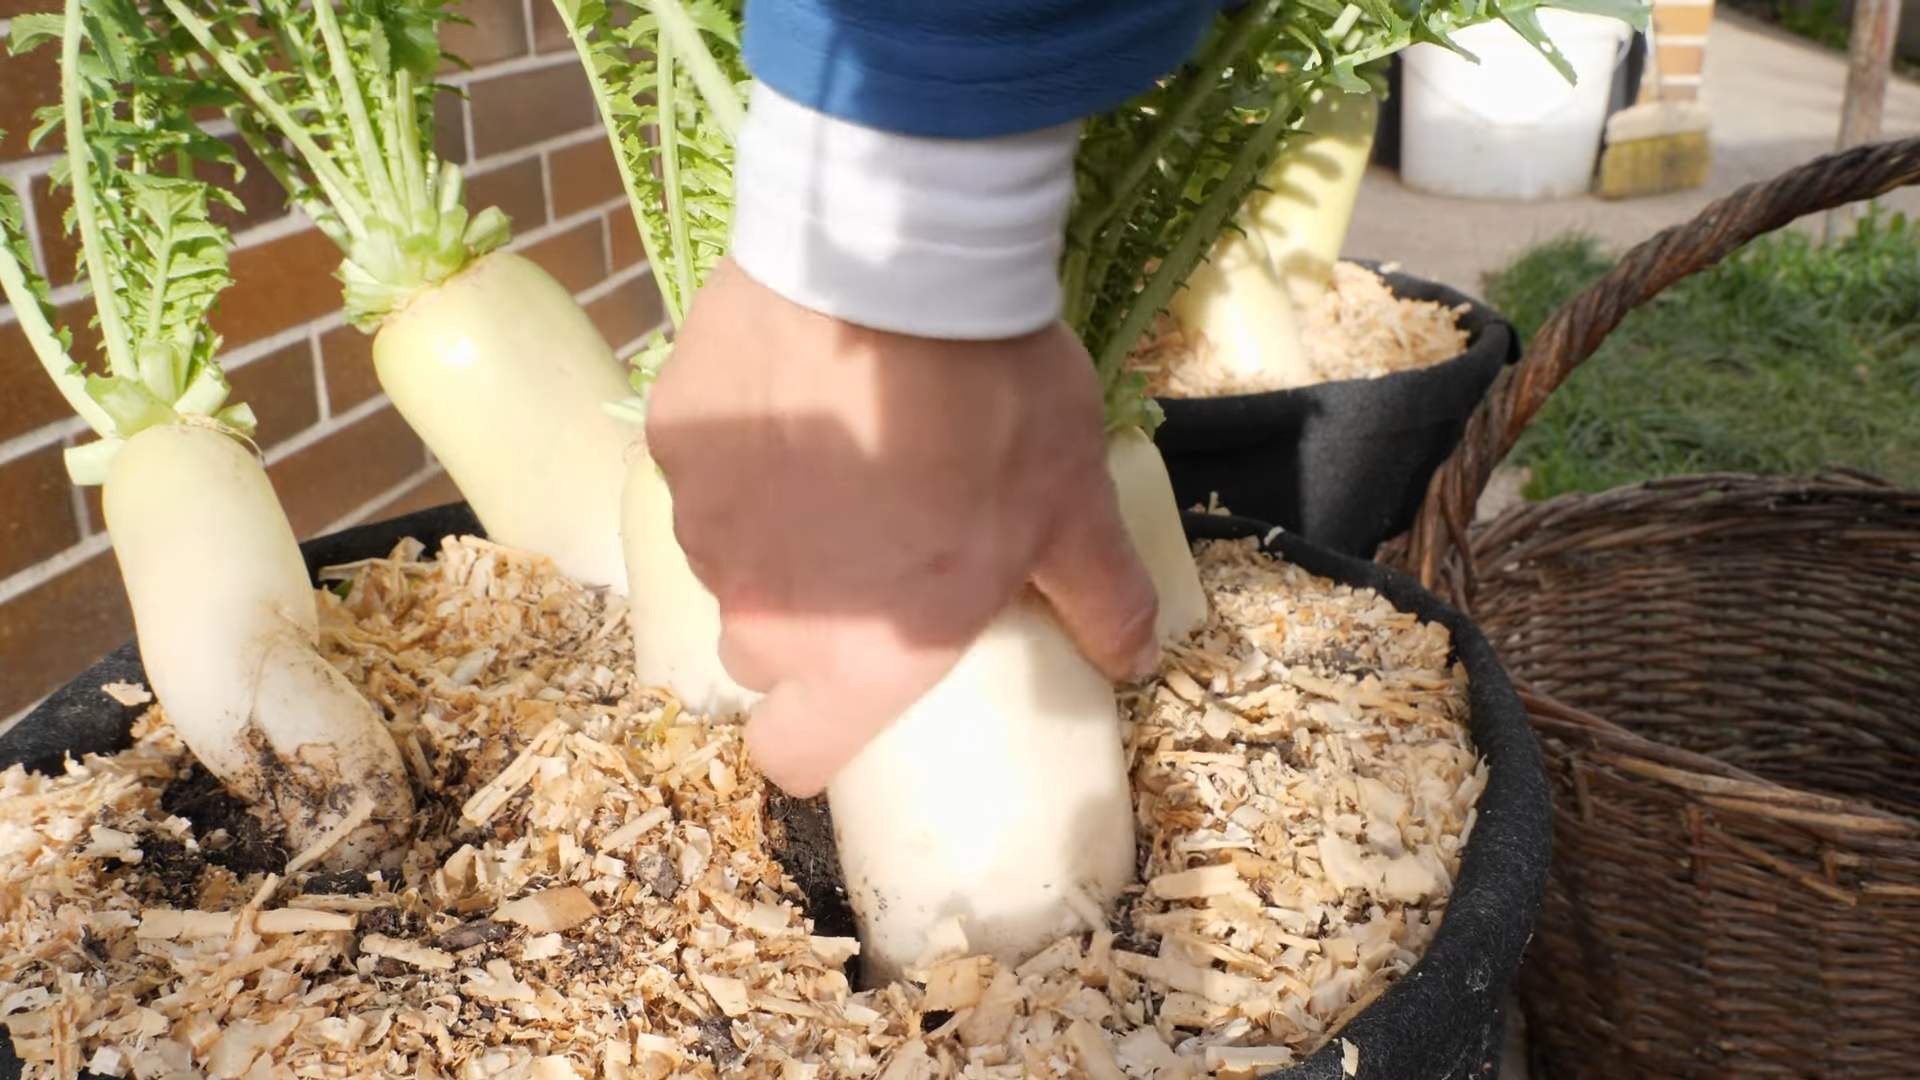
Harvesting Your Radishes
The moment you’ve been waiting for! Harvesting your homegrown radishes.
1. Check for Maturity: Radishes are typically ready to harvest in 20-30 days, depending on the variety. Check the seed packet for specific maturity dates.
2. Look for Size: The radishes should be about 1 inch in diameter. You can gently brush away some of the soil to check their size.
3. Harvest Carefully: Gently pull the radishes from the soil. If they’re difficult to pull, you can loosen the soil around them with a small trowel.
4. Wash and Enjoy: Wash the radishes thoroughly and enjoy them fresh. They’re delicious in salads, sandwiches, or as a crunchy snack.
Troubleshooting Common Problems
Even with the best care, you might encounter some problems while growing radishes indoors. Here are some common issues and how to address them:
* Leggy Seedlings: This is usually caused by insufficient light. Make sure your radishes are getting enough sunlight or grow light.
* Slow Growth: Slow growth can be caused by several factors, including insufficient light, poor soil, or lack of nutrients. Make sure your radishes are getting enough light, water, and nutrients.
* Root Rot: Root rot is caused by overwatering. Make sure your containers have drainage holes and avoid overwatering.
* Pests: Radishes are generally pest-resistant, but they can sometimes be affected by aphids or flea beetles. If you notice any pests, you can try spraying them with insecticidal soap.
* Splitting Radishes: This can be caused by inconsistent watering. Try to keep the soil consistently moist, but not waterlogged.
Extending Your Harvest
Want to keep those radishes coming? Here’s how to extend your harvest:
* Succession Planting: Sow a new batch of radish seeds every two weeks to ensure a continuous harvest.
* Choose Different Varieties: Plant different varieties of radishes with varying maturity dates to extend your harvest season.
* Cool Temperatures: Radishes prefer cool temperatures, so keep them in a cool location to prolong their growth.
Enjoying Your Homegrown Radishes
Now that you’ve harvested your radishes, it’s time to enjoy them! Here are some ideas:
* Salads: Slice or dice radishes and add them to your favorite salads for a peppery crunch.
* Sandwiches: Add thinly sliced radishes to sandwiches for a refreshing flavor.
* Snacks: Enjoy radishes as a healthy and crunchy snack. You can dip them in hummus or ranch dressing.
* Roasted Radishes: Roast radishes with olive oil and herbs for a delicious and unexpected side dish.
* Radish Greens: Don’t throw away the radish greens! They’re edible and nutritious. You can add them to salads, soups, or stir-fries.
Final Thoughts
Growing radishes indoors is a fun and rewarding experience. With a little bit of care and attention, you can enjoy fresh, homegrown radishes all year round. So, grab your seeds, get your hands dirty, and start growing! Happy gardening!
Conclusion
So, there you have it! Growing radishes indoors is not only possible, but it’s surprisingly easy and rewarding. Forget those bland, store-bought radishes that lack that peppery punch. With just a few simple steps, you can cultivate your own vibrant, crisp, and flavorful radishes right in the comfort of your home, regardless of the season.
This DIY trick is a must-try for several reasons. First, it offers unparalleled freshness. Imagine the convenience of snipping radishes directly from your container just moments before adding them to your salad or enjoying them as a crunchy snack. Second, it gives you complete control over the growing process. You can choose organic soil, avoid harmful pesticides, and ensure your radishes are grown in the best possible conditions. Third, it’s a fantastic way to add a touch of green to your indoor space, especially during the colder months when outdoor gardening is limited.
But the benefits don’t stop there. Growing radishes indoors is also an incredibly educational and engaging activity, particularly for children. It’s a wonderful way to teach them about the life cycle of plants, the importance of healthy eating, and the satisfaction of growing their own food.
Looking for variations? Consider experimenting with different radish varieties. ‘Cherry Belle’ is a classic choice, known for its bright red color and mild flavor. ‘French Breakfast’ radishes are longer and milder, while ‘Black Spanish’ radishes offer a more intense, peppery bite. You can also try growing radishes in different types of containers, from traditional pots to repurposed containers like yogurt tubs or plastic bottles. Just make sure your chosen container has adequate drainage.
Another fun variation is to try companion planting. Radishes are known to be good companions for carrots, lettuce, and spinach. Planting them together can help deter pests and improve the overall health of your indoor garden.
We’ve covered the basics of how to grow radishes indoors, but the real magic happens when you put these tips into practice. Don’t be afraid to experiment, adapt, and find what works best for you and your indoor environment.
We wholeheartedly encourage you to give this DIY trick a try. It’s a simple, affordable, and incredibly rewarding way to enjoy fresh, flavorful radishes year-round. And most importantly, we want to hear about your experience! Share your photos, tips, and stories with us in the comments below. Let’s create a community of indoor radish growers and inspire others to discover the joy of growing their own food. What are you waiting for? Get planting and experience the satisfaction of harvesting your own homegrown radishes!
Frequently Asked Questions (FAQ)
What is the best time of year to grow radishes indoors?
The beauty of growing radishes indoors is that you can do it year-round! Unlike outdoor gardening, you’re not limited by the seasons. As long as you provide the right conditions – adequate light, proper watering, and suitable soil – you can enjoy a continuous harvest of fresh radishes, even in the dead of winter. This makes indoor radish growing a fantastic option for those who live in areas with harsh climates or limited outdoor space.
How much light do radishes need when grown indoors?
Radishes need at least 6 hours of direct sunlight per day to thrive. If you don’t have a sunny windowsill, you can supplement with grow lights. Fluorescent or LED grow lights are excellent options. Position the lights a few inches above the radish seedlings and adjust as they grow. Remember, insufficient light can lead to leggy growth and poor radish development. So, ensuring adequate light is crucial for a successful indoor radish harvest.
What type of soil is best for growing radishes indoors?
Radishes prefer well-draining, loose soil that is rich in organic matter. A good potting mix specifically formulated for vegetables is ideal. You can also create your own mix by combining equal parts of potting soil, compost, and perlite or vermiculite. Avoid using heavy clay soil, as it can compact and hinder root development. Proper soil drainage is essential to prevent root rot and ensure healthy radish growth.
How often should I water my indoor radishes?
Keep the soil consistently moist, but not waterlogged. Water when the top inch of soil feels dry to the touch. Overwatering can lead to root rot, while underwatering can cause the radishes to become tough and bitter. A good rule of thumb is to water deeply and then allow the soil to dry out slightly before watering again. Check the soil moisture regularly, especially during warmer months, and adjust your watering schedule accordingly.
How long does it take for radishes to mature when grown indoors?
One of the great things about radishes is their quick growth rate. Most varieties mature in just 20 to 30 days. This makes them a perfect choice for impatient gardeners or those who want to see results quickly. Keep an eye on your radishes and harvest them when they reach the desired size. Overgrown radishes can become pithy and lose their flavor.
How do I know when my radishes are ready to harvest?
The best way to determine if your radishes are ready to harvest is to check their size. Most varieties are ready when the root is about 1 inch in diameter. You can also gently brush away some of the soil around the base of the plant to get a better look at the radish. If they look plump and well-formed, they’re likely ready to harvest. Don’t wait too long, as overgrown radishes can become tough and bitter.
Can I grow radishes in containers? What size container is needed?
Yes, radishes are well-suited for container gardening. Choose a container that is at least 6 inches deep to allow enough room for the roots to develop. The container should also have drainage holes to prevent waterlogging. You can grow multiple radishes in a single container, but be sure to space them about 1 inch apart to allow for adequate growth.
What are some common pests and diseases that affect indoor radishes?
While indoor radishes are generally less susceptible to pests and diseases than outdoor crops, they can still be affected. Common pests include aphids, flea beetles, and whiteflies. Diseases can include damping-off and root rot. To prevent these problems, use sterile potting mix, avoid overwatering, and inspect your plants regularly for signs of infestation or disease. If you spot any pests, you can try using insecticidal soap or neem oil. For diseases, remove affected plants and improve air circulation.
Can I eat the radish greens?
Absolutely! Radish greens are not only edible but also nutritious and delicious. They have a peppery flavor similar to the radish root. You can add them to salads, stir-fries, or soups. Just be sure to wash them thoroughly before eating.
How do I store harvested radishes?
To store harvested radishes, remove the greens and store them separately in the refrigerator. Place the radishes in a plastic bag or container with a damp paper towel to keep them crisp. They should last for about a week in the refrigerator.

Leave a Comment