
Growing Chives Indoors: Imagine snipping fresh, flavorful chives right from your kitchen windowsill, adding a burst of oniony goodness to your meals year-round! No more sad, wilted bunches from the grocery store – just vibrant, homegrown flavor at your fingertips. For centuries, chives have been a culinary staple, gracing dishes from European kitchens to Asian stir-fries. Their delicate flavor and ease of cultivation have made them a beloved herb across cultures.
But what if you don’t have a sprawling garden? Or maybe the weather outside is frightful? That’s where the magic of indoor gardening comes in! I’m here to show you some simple, effective DIY tricks to successfully growing chives indoors, even if you’re a complete beginner. This isn’t just about having fresh herbs; it’s about connecting with nature, adding a touch of green to your living space, and enjoying the satisfaction of growing your own food.
Many people struggle with keeping herbs alive indoors, often due to improper lighting, watering, or soil conditions. This article will demystify the process, providing you with easy-to-follow steps and insider tips to ensure your indoor chive garden thrives. Get ready to transform your kitchen into a miniature herb haven and elevate your culinary creations with the freshest chives imaginable!
Growing Chives Indoors: Your Guide to Fresh Herbs Straight from the Windowsill
Hey herb lovers! Are you tired of wilted herbs from the supermarket? Me too! That’s why today I’m showing you how to easily grow chives in your apartment. It’s easier than you think, and you’ll always have fresh herbs on hand to spice up your dishes. Let’s get started!
What you need: The Ingredients for Your Indoor Herb Garden
Before we get started, let’s make sure we have everything we need. Here is a list:
- Chive seeds or a chive plant: You can either start with seeds or get a small plant from a garden center. I personally find it exciting to start with seeds, but a plant is, of course, faster.
- A pot with drainage: It’s important that the pot has holes in the bottom so excess water can run off. Waterlogging is the enemy!
- High-quality potting soil or herb soil: Don’t use garden soil; it’s often too heavy. Potting soil or special herb soil is lighter and provides the best conditions for chive plants.
- A small shovel or trowel: For filling the pot with soil.
- A watering can or spray bottle: For watering the plants.
- A sunny location: Chives love light! A south-facing windowsill is ideal.
- Optional: A saucer for the pot to catch excess water.
Growing Chives from Seed: Step by Step to Success
If you’ve decided to start with seeds, here is a detailed guide:
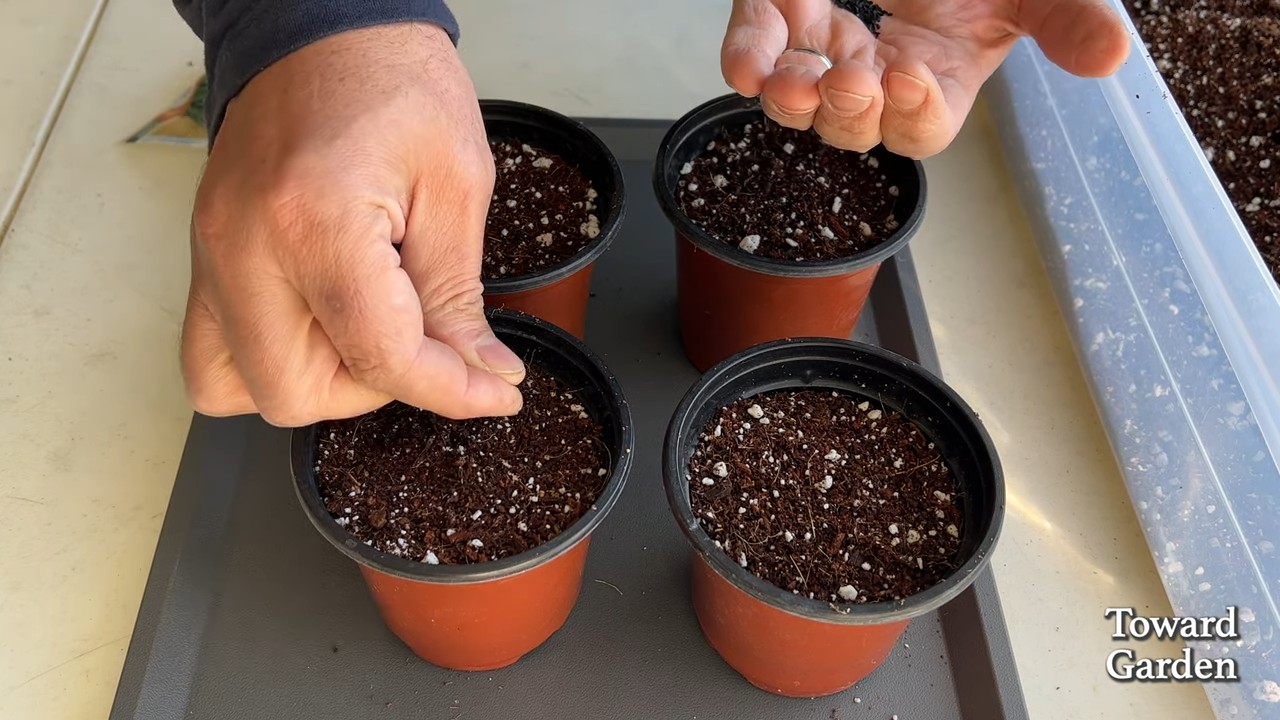
- Prepare the pot: Fill the pot with potting soil or herb soil. Leave about 2-3 cm (about 1 inch) of space to the rim. Press the soil down lightly.
- Sow the seeds: Distribute the chive seeds evenly on the soil. You can sow them quite densely, as not all seeds will germinate.
- Cover the seeds: Cover the seeds with a thin layer of soil (approx. 0.5 cm or 1/4 inch).
- Water: Gently moisten the soil with a spray bottle or a watering can with a sprinkler head. The soil should be damp, but not wet.
- The location: Place the pot in a warm and bright place. A south-facing windowsill is perfect.
- Patience is required: Chive seeds take about 10-14 days to germinate. Keep the soil moist during this time.
- Thinning (optional): When the seedlings are about 5 cm (2 inches) high, you can thin them if they are too dense. This means you remove some of the weaker plants so the stronger ones have more space to grow.
Planting Chives: The Quick Way to Fresh Herbs
If you bought a chive plant, the whole process is even easier:
- Prepare the pot: Fill the pot with potting soil or herb soil. Leave about 2-3 cm (about 1 inch) of space to the rim.
- Prepare the plant: Carefully remove the chive plant from its nursery pot. Loosen the roots a bit so they can spread better in the new pot.
- Planting: Place the chive plant in the center of the pot. The top of the root ball should be about level with the soil surface.
- Filling up: Fill the pot with soil and press it down lightly.
- Watering: Water the plant thoroughly until water runs out of the drainage holes.
- The location: Place the pot in a bright and sunny spot.
The Right Care: How to Keep Your Chives Happy and Healthy
To ensure your chives thrive, proper care is crucial. Here are my tips:
- Watering: Chives like it moist, but not wet. Water them regularly, but avoid waterlogging. The soil should feel slightly moist. In the summer, you may need to water daily; in the winter, less often.
- Light: Chives need a lot of light, at least 6 hours of sunlight per day. If your windowsill doesn’t get enough light, you can use a grow light.
- Fertilizing: Chives are not very demanding, but an occasional feeding does them good. Use an organic liquid fertilizer or compost tea. Fertilize every 2-3 weeks during the growing season (spring and summer).
- Cutting: Regular cutting promotes growth. Cut the stalks about 2-3 cm (1 inch) above the soil. Don’t worry, they grow back quickly!
- Removing flowers: If your chives bloom, remove the flowers. Flowering costs the plant energy and reduces leaf production. Although the flowers are edible, the leaves become a bit tougher as a result.
- Repotting: If your chives become too large for the pot, you can transplant them into a larger one. This is usually necessary every 1-2 years.
Common Problems and Solutions: What to Do When Chives Won’t Cooperate?
Problems can also arise when growing chives. Here are some common problems and how you can solve them:
- Yellow leaves: Yellow leaves can be a sign of too much or too little water. Check the soil’s moisture and adjust watering accordingly. Yellow leaves can also be caused by a nutrient deficiency. Fertilize your chives regularly.
- Poor growth: Poor growth can be caused by too little light. Move the chives to a brighter location or use a grow light. Nutrient deficiency can also be a reason.
- Pests: Chives are relatively resistant to pests, but occasionally aphids may appear. Rinse the aphids off with a strong jet of water or use an organic insecticide.
- Mold: Mold can be caused by high humidity and poor ventilation. Ensure good ventilation and avoid waterlogging.
Harvesting and Using Chives: Fresh Herbs for Your Kitchen
The best part of growing chives is, of course, the harvest! You can cut the stalks anytime you need them. Simply cut them with scissors or a knife.
Chives are versatile. They go wonderfully with:
- Egg dishes: Scrambled eggs, omelets, fried eggs
- Salads: Potato salad, cucumber salad, tomato salad
- Soups: Potato soup, vegetable soup
- Dips: Herb quark, sour cream
- Meat and fish dishes: As a garnish or ingredient
Propagating Chives: More Chives for Everyone!
If your chives are growing well, you can also propagate them. There are two ways:
Sowing: Let your chives flower and collect the seeds. You can then sow the seeds the following spring.
Division: Divide the plant into several parts when repotting. Each part should have its own roots. Then plant the parts in separate pots.
Conclusion
So, there you have it! Growing chives indoors is not only achievable but also incredibly rewarding. Imagine having a constant supply of fresh, flavorful chives right at your fingertips, ready to elevate your culinary creations at a moment’s notice. No more last-minute trips to the grocery store or settling for dried herbs that lack the vibrant punch of fresh chives. This simple DIY project is a game-changer for any home cook, regardless of their gardening experience.
The beauty of growing chives indoors lies in its simplicity and adaptability. It’s a low-maintenance endeavor that yields high rewards. Beyond the convenience of having fresh herbs readily available, you’re also adding a touch of greenery to your indoor space, creating a more inviting and vibrant atmosphere. Plus, you’re reducing your reliance on store-bought herbs, which often come with plastic packaging and a higher carbon footprint.
But the benefits don’t stop there. Consider the variations you can explore. Experiment with different types of chives, such as garlic chives, for a slightly different flavor profile. Try planting them in decorative pots to add a touch of style to your kitchen windowsill. You can even combine them with other herbs like parsley or basil in a larger container to create a mini indoor herb garden.
Growing chives indoors is more than just a gardening project; it’s an investment in your culinary enjoyment and a step towards a more sustainable lifestyle.
Don’t be intimidated if you’ve never grown herbs before. Chives are incredibly forgiving and easy to care for. With just a little bit of attention and the right conditions, you’ll be harvesting fresh chives in no time.
We encourage you to give this DIY trick a try. It’s a fun, rewarding, and practical way to enhance your cooking and bring a touch of nature indoors. Once you’ve experienced the joy of snipping fresh chives from your own indoor garden, you’ll wonder why you didn’t start sooner.
And most importantly, we want to hear about your experience! Share your tips, tricks, and photos of your indoor chive gardens in the comments below. Let’s create a community of indoor herb enthusiasts and inspire others to embrace the joys of growing their own food. What kind of container did you use? What challenges did you face, and how did you overcome them? Your insights could be invaluable to other readers who are just starting out. Let’s cultivate a thriving community of indoor chive growers!
FAQ
What kind of soil is best for growing chives indoors?
Chives thrive in well-draining soil that is rich in organic matter. A good quality potting mix specifically formulated for herbs or vegetables is ideal. You can also create your own mix by combining equal parts of potting soil, compost, and perlite or vermiculite. The compost provides essential nutrients, while the perlite or vermiculite improves drainage and aeration. Avoid using garden soil, as it can be too heavy and may contain pests or diseases. Ensure the soil is slightly acidic to neutral, with a pH between 6.0 and 7.0.
How much sunlight do indoor chives need?
Chives need at least 6-8 hours of direct sunlight per day to thrive. A south-facing windowsill is usually the best option, as it provides the most sunlight. If you don’t have a sunny windowsill, you can supplement with a grow light. Place the grow light about 6-12 inches above the plants and keep it on for 12-14 hours per day. Rotate the plants regularly to ensure even light exposure on all sides. Insufficient sunlight can lead to leggy growth and reduced flavor.
How often should I water my indoor chives?
Water your chives when the top inch of soil feels dry to the touch. Avoid overwatering, as this can lead to root rot. Water thoroughly until the water drains out of the bottom of the pot. Allow the soil to dry out slightly between waterings. The frequency of watering will depend on factors such as the size of the pot, the type of soil, and the humidity level in your home. In general, you’ll need to water more frequently during the warmer months and less frequently during the cooler months.
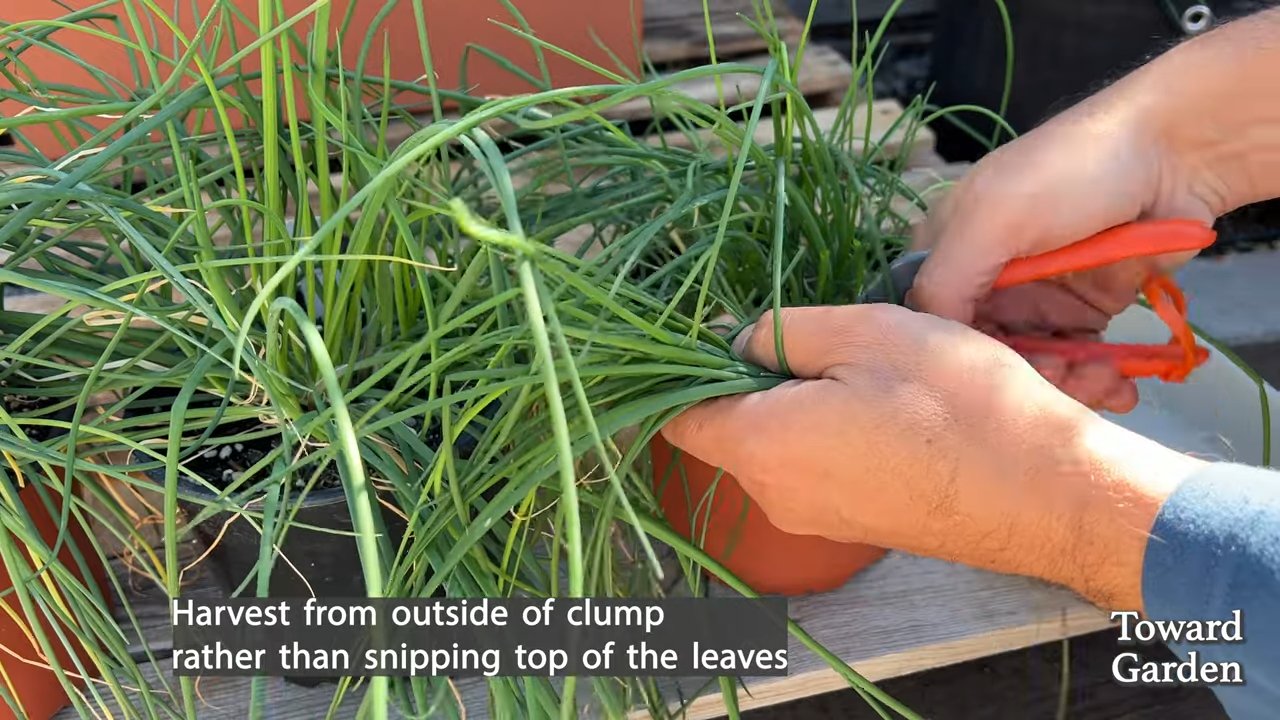
How do I harvest chives without killing the plant?
The key to harvesting chives successfully is to avoid cutting off more than one-third of the plant at a time. Use sharp scissors or pruning shears to snip the chives about an inch above the soil line. This will encourage new growth and prevent the plant from becoming stressed. Harvest from the outer edges of the plant first, leaving the inner shoots to continue growing. Regular harvesting will also help to keep the plant compact and prevent it from flowering, which can reduce the flavor of the leaves.
Do I need to fertilize my indoor chives?
Yes, chives benefit from regular fertilization, especially when grown indoors. Use a balanced liquid fertilizer diluted to half strength every 2-4 weeks during the growing season (spring and summer). Look for a fertilizer that is specifically formulated for herbs or vegetables. Avoid over-fertilizing, as this can burn the roots. You can also amend the soil with compost or worm castings to provide a slow-release source of nutrients.
My chives are turning yellow. What’s wrong?
Yellowing leaves can be a sign of several problems, including overwatering, underwatering, nutrient deficiency, or pest infestation. Check the soil moisture to determine if you’re watering too much or too little. If the soil is consistently wet, reduce the frequency of watering. If the soil is dry, water more thoroughly. If you suspect a nutrient deficiency, fertilize with a balanced liquid fertilizer. Inspect the plants for pests such as aphids or spider mites. If you find pests, treat them with an insecticidal soap or neem oil.
Can I grow chives from seed indoors?
Yes, you can grow chives from seed indoors. Start the seeds 6-8 weeks before the last expected frost. Sow the seeds about ¼ inch deep in a seed-starting mix. Keep the soil moist and warm (around 70-75°F). The seeds should germinate in 7-14 days. Once the seedlings have developed a few sets of true leaves, transplant them into individual pots. Harden off the seedlings before transplanting them outdoors in the spring.
How do I prevent pests and diseases from affecting my indoor chives?
The best way to prevent pests and diseases is to provide your chives with the proper growing conditions. This includes adequate sunlight, well-draining soil, and proper watering. Inspect the plants regularly for signs of pests or diseases. If you find any problems, address them promptly. Avoid overcrowding the plants, as this can create a humid environment that is conducive to disease. You can also use organic pest control methods such as insecticidal soap or neem oil to prevent infestations.
Can I move my indoor chives outdoors in the summer?
Yes, you can move your indoor chives outdoors in the summer, but it’s important to acclimate them gradually to the outdoor conditions. Start by placing them in a shady spot for a few hours each day, gradually increasing the amount of sunlight they receive over a period of a week or two. Protect them from strong winds and heavy rain. Bring them back indoors before the first frost in the fall.
What are some creative ways to use my homegrown chives?
The possibilities are endless! Fresh chives add a delicate onion flavor to a wide variety of dishes. Sprinkle them on salads, soups, omelets, baked potatoes, or grilled meats. Use them to garnish dips, sauces, and spreads. Mix them into cream cheese or sour cream for a flavorful topping. Add them to homemade vinaigrettes or marinades. You can even use them to make chive butter or chive oil. Get creative and experiment with different ways to incorporate your homegrown chives into your favorite recipes.

Leave a Comment