
Grow Watermelons Indoors? Absolutely! Imagine sinking your teeth into a juicy, homegrown watermelon in the dead of winter. Sounds like a dream, right? Well, it doesn’t have to be! For centuries, humans have been pushing the boundaries of agriculture, experimenting with techniques to cultivate their favorite fruits and vegetables in less-than-ideal conditions. From ancient Roman greenhouses to modern hydroponics, the desire to control our food source has always been a driving force.
But why would you even want to grow watermelons indoors? Maybe you live in a climate with a short growing season, or perhaps you simply crave the satisfaction of nurturing a plant from seed to fruit, regardless of the weather outside. Whatever your reason, this DIY guide is packed with simple, effective tricks and hacks to help you successfully cultivate these summertime favorites within the comfort of your own home. I’m going to show you how to create the perfect environment, from lighting and temperature to pollination and watering, so you can enjoy the sweet taste of success – and delicious, homegrown watermelons – all year round!
Wassermelonen drinnen ziehen: Dein DIY-Guide für eine süße Ernte
Hey Leute! Habt ihr jemals davon geträumt, saftige Wassermelonen mitten im Winter zu ernten? Klingt verrückt, oder? Aber mit ein bisschen Know-how und Geduld ist es absolut machbar, Wassermelonen auch drinnen anzubauen. Ich zeige euch, wie ihr das Projekt angehen könnt, damit ihr bald eure eigenen, selbstgezogenen Wassermelonen genießen könnt. Los geht’s!
Was du brauchst: Die Vorbereitung
Bevor wir loslegen, brauchen wir natürlich das richtige Equipment. Hier ist eine Liste mit allem, was du für dein Indoor-Wassermelonen-Abenteuer benötigst:
* Wassermelonensamen: Wähle am besten eine kompakte Sorte, die für den Anbau in Töpfen geeignet ist. Sorten wie ‘Sugar Baby’, ‘Bush Sugar Baby’ oder ‘Golden Midget’ sind eine gute Wahl.
* Große Töpfe: Wassermelonen brauchen Platz! Wähle Töpfe mit einem Durchmesser von mindestens 45-60 cm und einer Tiefe von 30-45 cm.
* Hochwertige Blumenerde: Eine gut durchlässige Blumenerde ist entscheidend. Du kannst auch deine eigene Mischung aus Blumenerde, Kompost und Perlit herstellen.
* Pflanzlampe: Wassermelonen brauchen viel Licht, besonders wenn du sie drinnen anbaust. Eine LED-Pflanzlampe mit vollem Spektrum ist ideal.
* Rankhilfe: Wassermelonenpflanzen sind Kletterer. Eine Rankhilfe, wie ein Spalier oder ein Gitter, hilft ihnen beim Wachsen.
* Dünger: Ein ausgewogener Flüssigdünger für Gemüse ist wichtig, um die Pflanzen mit Nährstoffen zu versorgen.
* Sprühflasche: Zum Befeuchten der Blätter und der Erde.
* Pinsel: Zum Bestäuben der Blüten (mehr dazu später).
* Thermometer: Um die Temperatur im Auge zu behalten.
* Feuchtigkeitsmesser: Um den Feuchtigkeitsgehalt der Erde zu überprüfen.
Schritt-für-Schritt-Anleitung: Vom Samen zur Frucht
Jetzt, wo wir alles haben, können wir mit dem eigentlichen Anbau beginnen. Hier ist eine detaillierte Anleitung, die dich durch jeden Schritt führt:
1. Samen keimen lassen
1. Vorbereitung: Lege die Wassermelonensamen für 24 Stunden in lauwarmes Wasser. Das hilft, die Keimung zu beschleunigen.
2. Aussaat: Fülle kleine Anzuchttöpfe oder Eierkartons mit Anzuchterde. Säe die Samen etwa 1-2 cm tief ein.
3. Befeuchten: Befeuchte die Erde vorsichtig mit einer Sprühflasche. Sie sollte feucht, aber nicht nass sein.
4. Wärme: Stelle die Anzuchttöpfe an einen warmen Ort (ca. 24-27°C). Eine Heizmatte kann helfen, die Temperatur zu halten.
5. Abdecken: Decke die Töpfe mit Frischhaltefolie oder einem durchsichtigen Deckel ab, um die Luftfeuchtigkeit zu erhöhen.
6. Warten: Die Samen sollten innerhalb von 7-10 Tagen keimen. Sobald die Keimlinge erscheinen, entferne die Abdeckung und stelle sie an einen hellen Ort.
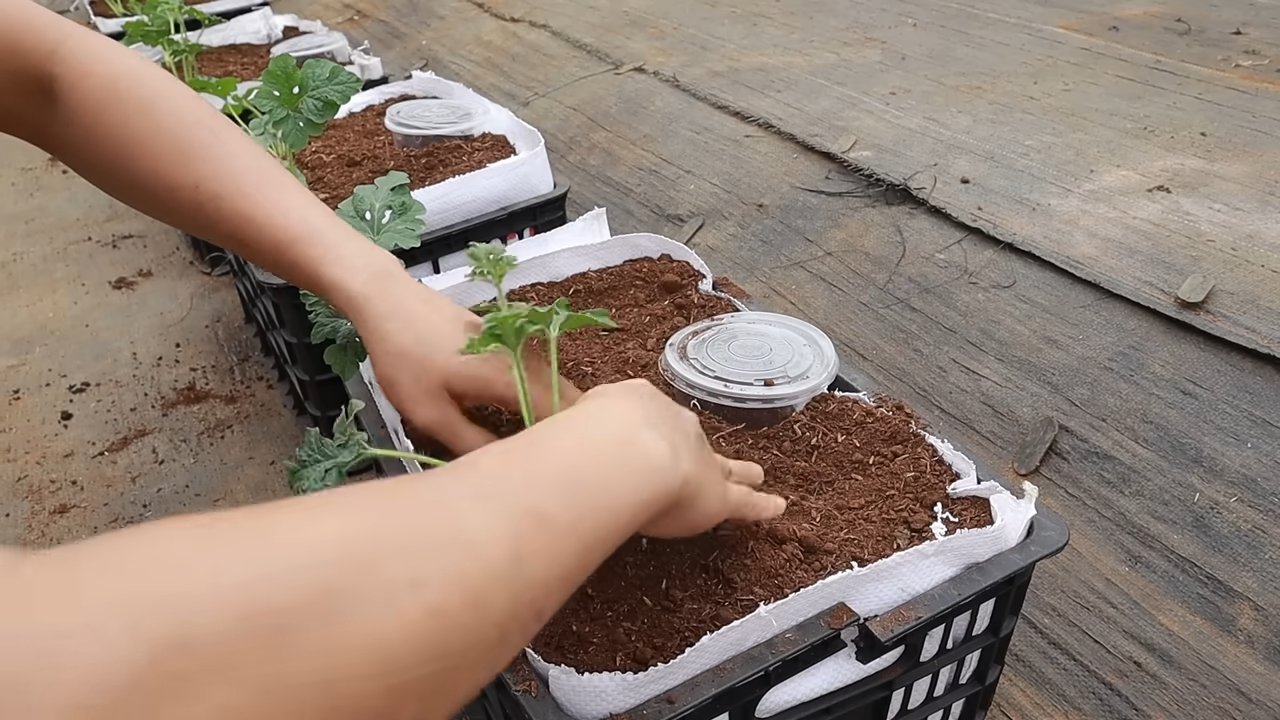
2. Umpflanzen in größere Töpfe
1. Vorbereitung: Sobald die Keimlinge 2-3 echte Blätter haben (nicht nur die Keimblätter), sind sie bereit zum Umpflanzen.
2. Große Töpfe vorbereiten: Fülle die großen Töpfe mit der hochwertigen Blumenerde.
3. Umpflanzen: Grabe vorsichtig ein Loch in die Erde, das groß genug für den Wurzelballen des Keimlings ist. Hebe den Keimling vorsichtig aus dem Anzuchttopf und setze ihn in das Loch.
4. Auffüllen: Fülle das Loch mit Erde auf und drücke sie leicht an.
5. Gießen: Gieße die Pflanzen gründlich, aber vermeide Staunässe.
3. Der richtige Standort und die Beleuchtung
1. Standort: Stelle die Töpfe an einen Ort, an dem die Pflanzen mindestens 6-8 Stunden direktes Licht pro Tag bekommen. Ein Südfenster ist ideal.
2. Pflanzlampe: Wenn du nicht genügend natürliches Licht hast, verwende eine LED-Pflanzlampe. Stelle die Lampe etwa 30-60 cm über die Pflanzen und lasse sie 12-16 Stunden pro Tag leuchten.
3. Temperatur: Wassermelonen mögen es warm. Die ideale Temperatur liegt zwischen 21-32°C. Vermeide Zugluft und plötzliche Temperaturschwankungen.
4. Bewässerung und Düngung
1. Bewässerung: Gieße die Pflanzen regelmäßig, aber vermeide Staunässe. Die Erde sollte immer leicht feucht sein. Überprüfe den Feuchtigkeitsgehalt mit einem Feuchtigkeitsmesser oder indem du deinen Finger in die Erde steckst.
2. Düngung: Beginne etwa 2 Wochen nach dem Umpflanzen mit dem Düngen. Verwende einen ausgewogenen Flüssigdünger für Gemüse und befolge die Anweisungen auf der Verpackung. Dünge die Pflanzen alle 2-3 Wochen.
5. Rankhilfe anbringen
1. Rankhilfe installieren: Sobald die Pflanzen größer werden, brauchen sie eine Rankhilfe. Stelle ein Spalier oder ein Gitter in den Topf und leite die Triebe der Pflanze daran entlang.
2. Anbinden: Du kannst die Triebe mit Pflanzenbindern oder weichen Schnüren an der Rankhilfe befestigen.
6. Bestäubung der Blüten
1. Blüten erkennen: Wassermelonenpflanzen haben männliche und weibliche Blüten. Die weiblichen Blüten haben einen kleinen Fruchtansatz direkt unter der Blüte.
2. Manuelle Bestäubung: Da drinnen keine Bienen oder andere Insekten zur Bestäubung vorhanden sind, musst du die Blüten manuell bestäuben.
3. Bestäubung durchführen: Nimm einen kleinen Pinsel und sammle Pollen von einer männlichen Blüte. Trage den Pollen dann vorsichtig auf die Narbe einer weiblichen Blüte auf.
4. Zeitpunkt: Bestäube die Blüten am besten am frühen Morgen, wenn sie geöffnet sind.
5. Wiederholen: Wiederhole die Bestäubung für mehrere weibliche Blüten, um die Chancen auf eine erfolgreiche Fruchtbildung zu erhöhen.
7. Fruchtentwicklung und Pflege
1. Fruchtansatz beobachten: Wenn die Bestäubung erfolgreich war, beginnt der Fruchtansatz unter der weiblichen Blüte zu wachsen.
2. Ausdünnen: Wenn mehrere Früchte an einer Pflanze wachsen, solltest du einige davon entfernen, damit die verbleibenden Früchte genügend Nährstoffe bekommen. Lasse maximal 2-3 Früchte pro Pflanze.
3. Unterstützung: Wenn die Früchte größer werden, kann es notwendig sein, sie mit kleinen Netzen oder Stoffstreifen zu unterstützen, um zu verhindern, dass sie abbrechen.
4. Drehen: Drehe die Früchte regelmäßig, damit sie gleichmäßig reifen.
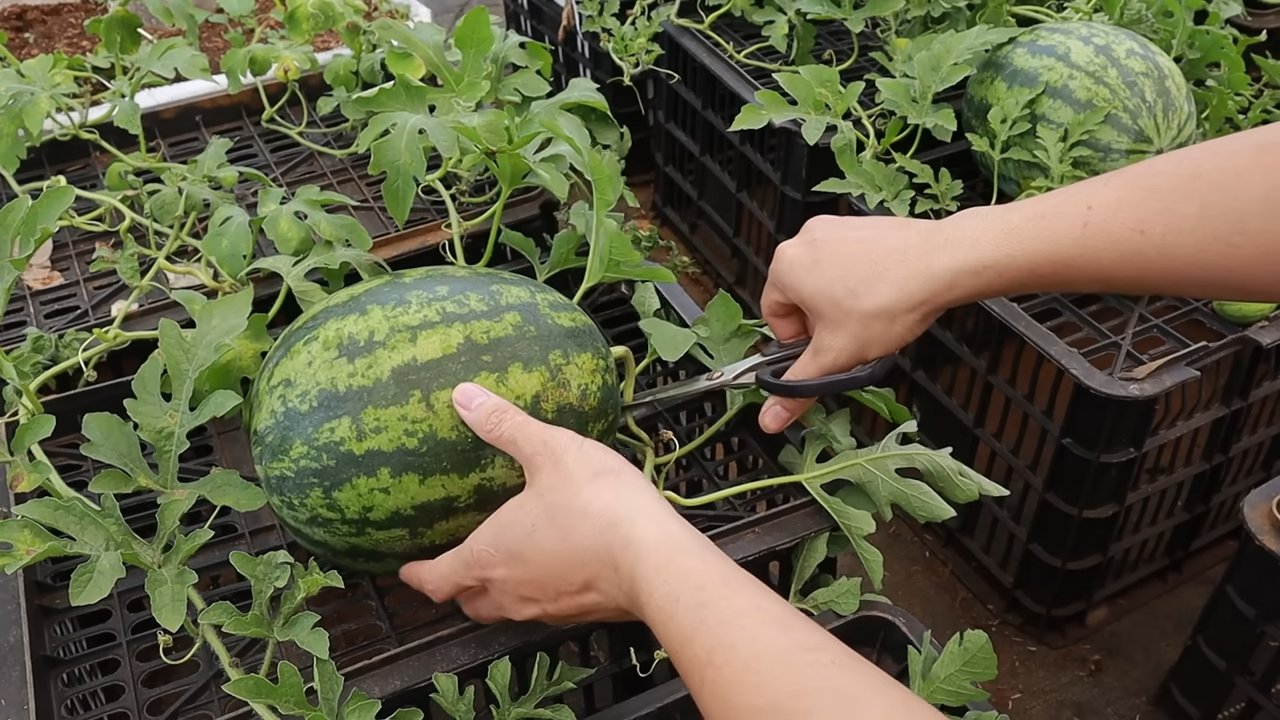
8. Erntezeit
1. Reifezeichen: Die Reifezeit hängt von der Sorte ab, aber im Allgemeinen dauert es etwa 80-90 Tage von der Aussaat bis zur Ernte. Achte auf folgende Reifezeichen:
* Die Schale der Wassermelone wird stumpf und verliert ihren Glanz.
* Die Stelle, an der die Wassermelone auf dem Boden liegt, wird gelblich.
* Wenn du auf die Wassermelone klopfst, sollte sie hohl klingen.
* Die Ranke, die sich am nächsten zur Frucht befindet, wird trocken und braun.
2. Ernten: Schneide die Wassermelone vorsichtig mit einem scharfen Messer oder einer Gartenschere von der Pflanze ab.
Zusätzliche Tipps und Tricks
* Luftfeuchtigkeit: Wassermelonen mögen eine hohe Luftfeuchtigkeit. Du kannst die Luftfeuchtigkeit erhöhen, indem du
Conclusion
So, there you have it! Growing watermelons indoors might seem like a daunting task, reserved for seasoned gardeners with acres of land, but with a little planning, dedication, and our simple DIY trick, you can absolutely cultivate these juicy delights right in the comfort of your own home. We’ve demystified the process, breaking it down into manageable steps that anyone can follow, regardless of their gardening experience.
Why is this DIY method a must-try? Because it opens up a world of possibilities! Imagine enjoying the sweet, refreshing taste of homegrown watermelon in the dead of winter, a taste of summer when you need it most. Think about the satisfaction of nurturing a plant from seed to fruit, witnessing the miracle of nature unfold before your eyes. And consider the environmental benefits – reducing your reliance on commercially grown produce, minimizing transportation emissions, and knowing exactly where your food comes from.
This isn’t just about growing watermelons; it’s about empowering yourself to take control of your food source, connect with nature, and experience the joy of gardening, even without a traditional outdoor space. Plus, it’s a fantastic conversation starter! Imagine the look on your friends’ faces when you tell them you grew a watermelon indoors.
But don’t just take our word for it. The real magic happens when you try it yourself. We encourage you to experiment with different watermelon varieties. Perhaps you’d like to try growing a smaller, personal-sized watermelon like ‘Sugar Baby’ or ‘Golden Midget’. Or maybe you’re feeling adventurous and want to tackle a larger variety, ensuring you have ample space and support for its growth. You can also experiment with different soil mixes to find what works best for your indoor environment. Consider adding compost tea for an extra boost of nutrients.
Remember, success in gardening often comes from trial and error. Don’t be discouraged if your first attempt isn’t perfect. Learn from your mistakes, adjust your approach, and keep trying. The reward of harvesting your own homegrown watermelon is well worth the effort.
We’re confident that with our DIY trick, you’ll be well on your way to enjoying the fruits (literally!) of your labor. So, grab your seeds, gather your supplies, and get ready to embark on this exciting indoor gardening adventure.
And most importantly, we want to hear about your experience! Share your photos, tips, and challenges with us in the comments below. Let’s create a community of indoor watermelon growers, supporting each other and celebrating our successes. Let us know what worked for you, what didn’t, and any variations you tried. Your feedback will help us refine our method and inspire others to give it a try. Let’s all learn together how to successfully grow watermelons indoors!
Frequently Asked Questions (FAQ)
1. What is the best watermelon variety to grow indoors?
While you can technically grow any watermelon variety indoors, smaller, bush-type varieties are generally more suitable due to space constraints. ‘Sugar Baby,’ ‘Golden Midget,’ and ‘Bush Sugar Baby’ are excellent choices. These varieties mature relatively quickly and produce smaller fruits, making them easier to manage in a container. Larger varieties like ‘Charleston Gray’ or ‘Crimson Sweet’ can be grown, but they require significantly more space, a larger container, and a more robust support system. Consider the size of your growing area and choose a variety that will thrive in that environment.
2. How much sunlight do indoor watermelons need?
Watermelons are sun-loving plants and require at least 6-8 hours of direct sunlight per day to thrive. If you don’t have a south-facing window that provides sufficient sunlight, you’ll need to supplement with grow lights. Full-spectrum LED grow lights are a great option, as they provide the necessary light spectrum for healthy plant growth. Position the grow lights a few inches above the plants and adjust the height as they grow. Monitor your plants closely for signs of insufficient light, such as leggy growth or pale leaves.
3. What size container do I need for growing watermelons indoors?
The size of the container depends on the watermelon variety you’re growing. For smaller varieties like ‘Sugar Baby,’ a 15-20 gallon container is usually sufficient. For larger varieties, you’ll need a container that’s at least 25-30 gallons. Ensure the container has drainage holes to prevent waterlogging. Choose a sturdy container made of plastic, ceramic, or wood. Consider using a fabric pot, as it allows for better aeration and drainage.
4. How often should I water my indoor watermelon plants?
Watermelon plants need consistent moisture, especially during flowering and fruiting. Water deeply whenever the top inch of soil feels dry to the touch. Avoid overwatering, as this can lead to root rot. The frequency of watering will depend on factors such as the size of the container, the type of soil, and the temperature and humidity of your indoor environment. Check the soil moisture regularly and adjust your watering schedule accordingly.
5. How do I pollinate my indoor watermelon flowers?
Watermelons are not self-pollinating, meaning they require pollination to produce fruit. Since you won’t have bees or other pollinators indoors, you’ll need to hand-pollinate the flowers. Use a small paintbrush or cotton swab to transfer pollen from the male flowers to the female flowers. Male flowers have a long, thin stem, while female flowers have a small, immature fruit at the base. Pollinate the flowers in the morning, when the pollen is most viable. Repeat the pollination process for several days to ensure successful fruit set.
6. What kind of fertilizer should I use for indoor watermelons?
Watermelons are heavy feeders and require regular fertilization. Use a balanced fertilizer with an NPK ratio of 10-10-10 during the early stages of growth. Once the plants start flowering, switch to a fertilizer with a higher phosphorus content (e.g., 5-10-5) to promote fruit development. Follow the instructions on the fertilizer label and avoid over-fertilizing, as this can damage the plants. You can also supplement with organic fertilizers like compost tea or fish emulsion.
7. How long does it take to grow a watermelon indoors?
The time it takes to grow a watermelon indoors depends on the variety and growing conditions. Generally, it takes 70-90 days from planting to harvest. Provide your plants with optimal sunlight, water, and nutrients to ensure they mature quickly. Monitor the fruits closely for signs of ripeness, such as a dull thud when tapped and a change in color on the underside of the fruit.
8. How do I support the weight of the growing watermelons?
As the watermelons grow, they can become quite heavy and may need support to prevent the vines from breaking. Use slings made of netting, fabric, or pantyhose to support the fruits. Tie the slings to a sturdy trellis or support structure. Ensure the slings are strong enough to hold the weight of the mature watermelons.
9. What are some common problems when growing watermelons indoors and how do I fix them?
Some common problems include powdery mildew, aphids, and spider mites. Powdery mildew can be treated with a fungicide or a homemade solution of baking soda and water. Aphids and spider mites can be controlled with insecticidal soap or neem oil. Ensure good air circulation to prevent fungal diseases. Regularly inspect your plants for pests and diseases and take action promptly to prevent them from spreading.
10. Can I grow watermelons indoors year-round?
Yes, with the right conditions, you can grow watermelons indoors year-round. You’ll need to provide adequate light, warmth, and humidity. Use grow lights to supplement natural sunlight during the winter months. Maintain a consistent temperature and humidity level. With proper care, you can enjoy fresh, homegrown watermelons any time of the year.

Leave a Comment