
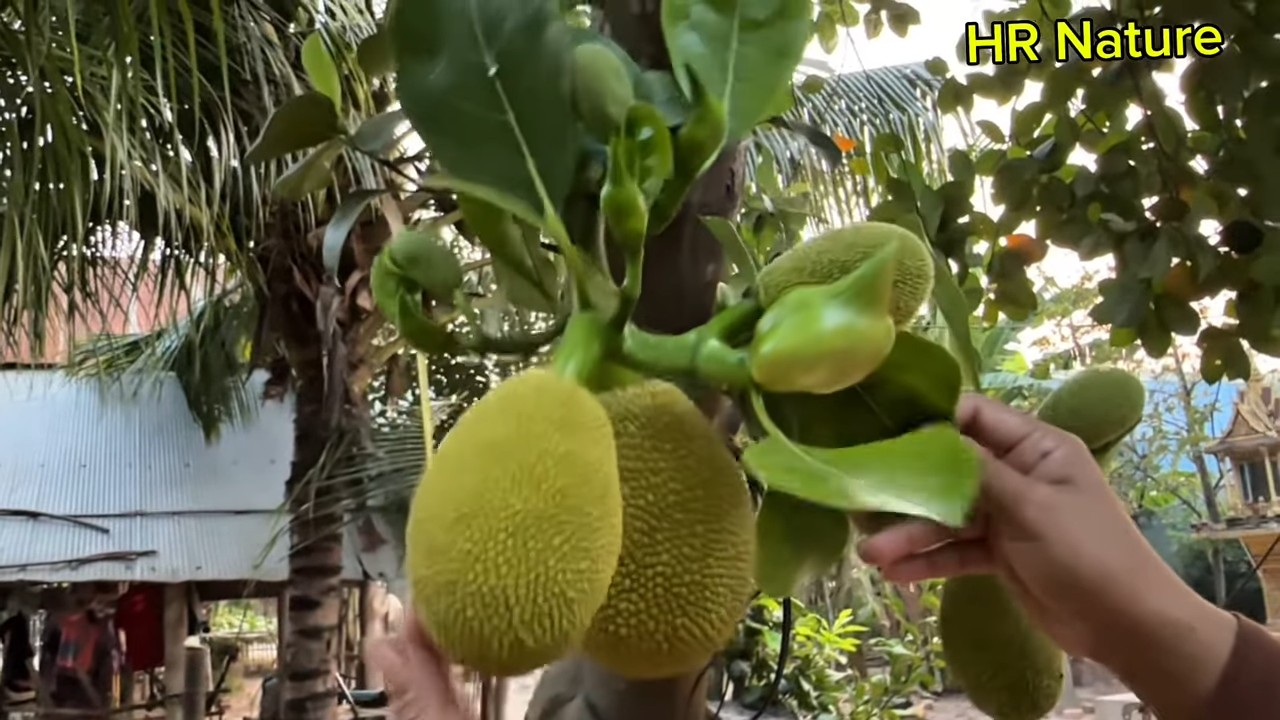
Grafting Jackfruit Trees Technique: Ever dreamed of harvesting your own juicy, sweet jackfruit right in your backyard? Imagine bypassing the years of waiting for a seedling to mature and instead, enjoying the fruits of your labor much sooner! That’s the magic of grafting, and it’s more accessible than you might think. This DIY guide will unlock the secrets to successfully grafting jackfruit trees, empowering you to cultivate your own tropical bounty.
Grafting, an ancient horticultural practice, has been used for centuries to propagate desirable traits in plants. Its roots can be traced back to ancient China and Rome, where farmers discovered the power of combining the best qualities of different plants. Think of it as plant surgery, where we’re carefully joining two plants to create a superior hybrid. For jackfruit, a fruit deeply embedded in South Asian culture and cuisine, grafting offers a significant advantage. It allows us to replicate trees with exceptional fruit quality, disease resistance, and even dwarf varieties that are perfect for smaller gardens.
Why should you learn this grafting jackfruit trees technique? Well, jackfruit trees grown from seed can be unpredictable, often taking 5-7 years to bear fruit, and the fruit quality can vary greatly. Grafting, on the other hand, ensures that you’re getting a tree with the exact characteristics you desire, and it significantly reduces the time to harvest. Plus, it’s a fantastic way to propagate rare or heirloom varieties. I’m excited to share these simple, step-by-step instructions that will guide you through the process, even if you’re a complete beginner. Let’s get started and turn your backyard into a jackfruit paradise!
Jackfruit-Bäumchen veredeln: Eine DIY-Anleitung für Anfänger
Hallo liebe Gartenfreunde! Habt ihr euch jemals gefragt, wie man die Ernte von Jackfruit-Bäumen beschleunigen und verbessern kann? Die Antwort ist: Veredelung! Es mag anfangs einschüchternd wirken, aber mit der richtigen Anleitung und etwas Geduld könnt ihr eure eigenen Jackfruit-Bäume veredeln und schon bald köstliche Früchte ernten. Ich zeige euch heute, wie das geht!
Was ist Veredelung und warum Jackfruit-Bäume veredeln?
Veredelung ist im Grunde eine Art “Chirurgie” für Pflanzen. Dabei werden Teile zweier verschiedener Pflanzen miteinander verbunden, sodass sie zusammenwachsen und als eine einzige Pflanze weiterleben. Der Vorteil? Man kann die positiven Eigenschaften beider Pflanzen kombinieren.
Bei Jackfruit-Bäumen ist die Veredelung besonders nützlich, weil:
* Frühere Ernte: Veredelte Bäume tragen oft schon nach 2-3 Jahren Früchte, während unveredelte Bäume 5-7 Jahre brauchen können.
* Bessere Fruchtqualität: Man kann Sorten mit besonders schmackhaften oder großen Früchten veredeln.
* Krankheitsresistenz: Man kann eine robuste Unterlage (die Wurzeln) mit einer ertragreichen Sorte kombinieren.
* Vermehrung von Wunschsorten: Wenn ihr eine Jackfruit-Sorte habt, die euch besonders gut schmeckt, könnt ihr sie durch Veredelung vermehren.
Welche Veredelungsmethode ist die richtige für Jackfruit?
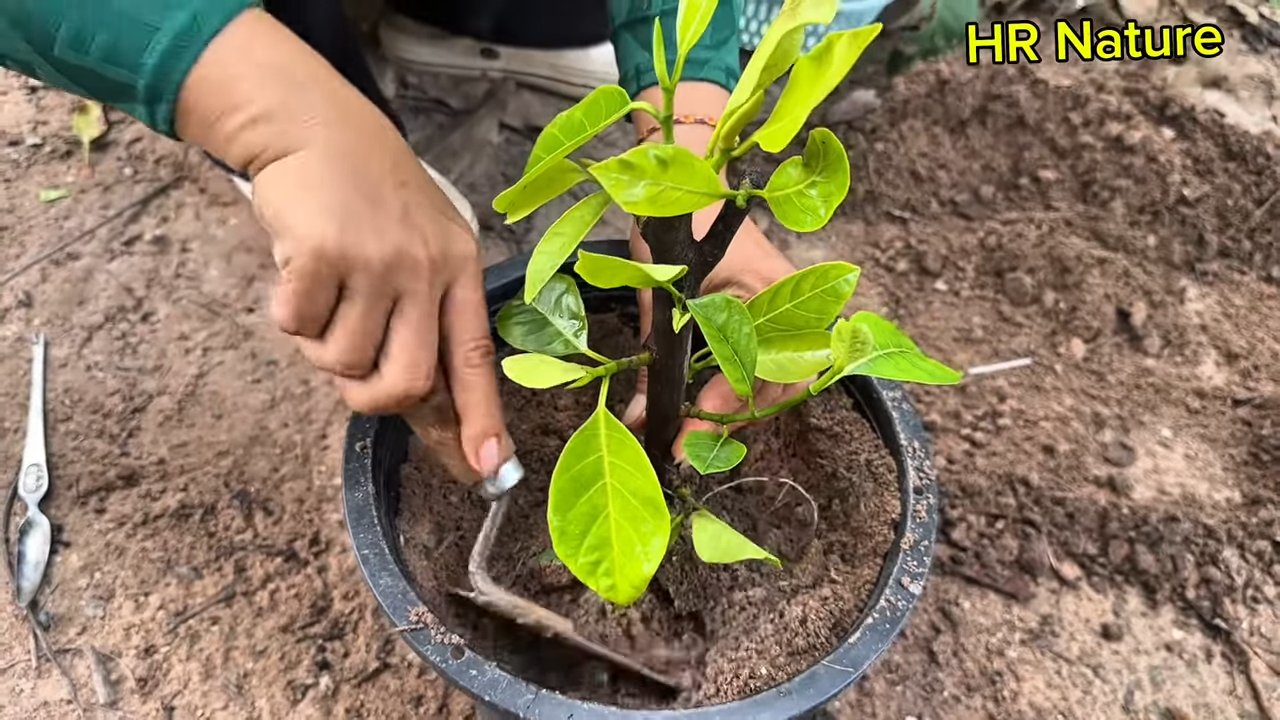
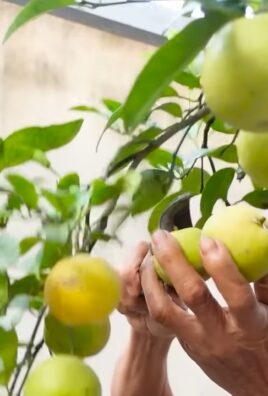
Es gibt verschiedene Veredelungsmethoden, aber für Jackfruit-Bäume hat sich die sogenannte “Chip-Budding”-Methode als besonders erfolgreich erwiesen. Dabei wird ein kleines Stück Rinde mit einem schlafenden Auge (Knospe) von der gewünschten Sorte (dem Edelreis) auf die Unterlage (den Wurzelstock) übertragen.
Was ihr für die Jackfruit-Veredelung benötigt:
Bevor wir loslegen, solltet ihr sicherstellen, dass ihr alles Notwendige zur Hand habt. Hier ist eine Liste:
* Unterlage: Ein gesunder Jackfruit-Sämling (ca. 6-12 Monate alt) mit einem Stammdurchmesser von etwa 1-2 cm. Achtet darauf, dass die Unterlage frei von Krankheiten und Schädlingen ist.
* Edelreis: Ein Zweig der gewünschten Jackfruit-Sorte. Wählt einen Zweig mit gesunden, gut entwickelten Knospen (Augen). Der Zweig sollte etwa bleistiftdick sein und von einem Baum stammen, der bereits Früchte trägt. Am besten schneidet ihr den Edelreis kurz vor der Veredelung.
* Veredelungsmesser: Ein scharfes, sauberes Messer ist unerlässlich. Ein spezielles Veredelungsmesser ist ideal, aber ein scharfes Taschenmesser tut es auch. Achtet darauf, dass das Messer desinfiziert ist, um die Übertragung von Krankheiten zu vermeiden.
* Veredelungsband oder -folie: Zum Fixieren des Edelreises auf der Unterlage. Es gibt spezielle Veredelungsbänder, aber auch Frischhaltefolie oder Klebeband können verwendet werden.
* Desinfektionsmittel: Zum Reinigen des Messers und der Hände, um die Übertragung von Krankheiten zu verhindern.
* Geduld und Sorgfalt: Veredelung erfordert Fingerspitzengefühl und Geduld. Lasst euch nicht entmutigen, wenn es beim ersten Mal nicht klappt!
Schritt-für-Schritt-Anleitung zur Chip-Budding-Veredelung von Jackfruit-Bäumen
Jetzt geht’s ans Eingemachte! Folgt diesen Schritten sorgfältig, um eure Jackfruit-Bäume erfolgreich zu veredeln:
1. Vorbereitung der Unterlage
1. Reinigung: Wählt eine glatte Stelle am Stamm der Unterlage in einer Höhe von etwa 15-20 cm über dem Boden. Reinigt die Stelle gründlich mit einem sauberen Tuch.
2. Schnitt: Mit dem Veredelungsmesser schneidet ihr einen flachen, rechteckigen Chip aus der Rinde der Unterlage. Der Chip sollte etwa 2-3 cm lang und 1 cm breit sein. Achtet darauf, dass ihr nicht zu tief schneidet, um das Kambium (die Wachstumsschicht) nicht zu beschädigen. Der Schnitt sollte leicht nach unten geneigt sein.
3. Unterer Schnitt: Am unteren Ende des rechteckigen Ausschnitts macht ihr einen weiteren, kurzen Schnitt, um den Chip vollständig zu entfernen.
2. Vorbereitung des Edelreises
1. Auswahl der Knospe: Wählt eine gesunde, gut entwickelte Knospe am Edelreis aus.
2. Schnitt: Mit dem Veredelungsmesser schneidet ihr einen Chip aus der Rinde des Edelreises, der die ausgewählte Knospe enthält. Der Chip sollte die gleiche Größe und Form haben wie der Chip, den ihr aus der Unterlage entfernt habt. Achtet darauf, dass die Knospe in der Mitte des Chips liegt.
3. Anpassung: Überprüft, ob der Chip vom Edelreis gut in den Ausschnitt der Unterlage passt. Wenn nötig, könnt ihr die Ränder des Chips vorsichtig mit dem Messer anpassen.
3. Einsetzen des Edelreises
1. Einsetzen: Setzt den Chip vom Edelreis vorsichtig in den Ausschnitt der Unterlage ein. Achtet darauf, dass die Kambiumschichten (die grünen Schichten unter der Rinde) von Edelreis und Unterlage möglichst gut aufeinander liegen.
2. Fixierung: Wickelt die Veredelungsstelle fest mit Veredelungsband oder -folie ein. Beginnt unterhalb des Chips und arbeitet euch nach oben, sodass die gesamte Veredelungsstelle abgedeckt ist. Achtet darauf, dass die Knospe selbst frei bleibt. Die Wicklung sollte fest genug sein, um den Chip an Ort und Stelle zu halten, aber nicht so fest, dass sie die Knospe erdrückt.
4. Nachsorge
1. Schutz: Schützt die veredelte Pflanze vor direkter Sonneneinstrahlung und starkem Wind. Ihr könnt sie beispielsweise in den Schatten stellen oder mit einem leichten Tuch abdecken.
2. Bewässerung: Gießt die Pflanze regelmäßig, aber vermeidet Staunässe.
3. Kontrolle: Kontrolliert die Veredelungsstelle regelmäßig auf Anzeichen von Wachstum. Nach etwa 2-3 Wochen sollte die Knospe anfangen, anzutreiben.
4. Entfernung des Bandes: Sobald die Knospe deutlich gewachsen ist, könnt ihr das Veredelungsband oder die -folie vorsichtig entfernen. Achtet darauf, die junge Trieb nicht zu beschädigen.
5. Wildtriebe entfernen: Entfernt alle Triebe, die unterhalb der Veredelungsstelle aus der Unterlage wachsen. Diese Wildtriebe würden der veredelten Sorte Nährstoffe entziehen.
Häufige Fehler und wie man sie vermeidet
Auch wenn ihr alle Schritte sorgfältig befolgt, kann es passieren, dass die Veredelung nicht gelingt. Hier sind einige häufige Fehler und wie ihr sie vermeiden könnt:
* Unsaubere Werkzeuge: Verwendet immer saubere und desinfizierte Werkzeuge, um die Übertragung von Krankheiten zu verhindern.
* Falsche Jahreszeit: Die beste Zeit für die Veredelung von Jackfruit-Bäumen ist in der Regel das Frühjahr oder der frühe Sommer, wenn die Pflanzen aktiv wachsen.
* Inkompatible Sorten: Nicht alle Jackfruit-Sorten sind miteinander kompatibel. Informiert euch vor der Veredelung, welche Sorten gut zusammenpassen.
* Schlechter Kontakt der Kambiumschichten: Achtet darauf, dass die Kambiumschichten von Edelreis und Unterlage möglichst gut aufeinander liegen. Dies ist entscheidend für das Zusammenwachsen der Pflanzen.
* Zu lockere oder zu feste Wicklung: Die Wicklung sollte fest genug sein, um den Chip an Ort und Stelle zu halten, aber nicht so fest, dass sie die Knospe erdrückt.
* Vernachlässigung der Nachsorge: Schützt die veredelte Pflanze vor extremen Bedingungen und gießt sie regelmäßig.
Geduld zahlt sich aus!
Die Veredelung von Jackfruit-Bäumen ist ein spannendes und lohnendes Projekt. Es erfordert zwar etwas Übung und Geduld, aber mit der richtigen Anleitung und etwas Sorgfalt könnt ihr
Conclusion
So, there you have it! Mastering the art of grafting jackfruit trees isn’t just about propagating a plant; it’s about unlocking a world of possibilities for your orchard, your garden, and even your local community. This DIY trick, while requiring patience and precision, offers a remarkable return on investment. Think about it: you can cultivate superior jackfruit varieties, accelerate fruit production, and even create trees that are more resistant to disease and pests.
Why is this a must-try? Because it empowers you to take control of your jackfruit cultivation. Instead of relying solely on commercially available seedlings, which may not always be the best quality or the exact variety you desire, you can create your own custom-designed jackfruit trees. Imagine selecting the perfect scion from a tree known for its exceptionally sweet and flavorful fruit and grafting it onto a hardy rootstock adapted to your local soil conditions. The potential for improved yields and fruit quality is immense.
But the benefits extend beyond just personal gain. By mastering grafting, you can contribute to the preservation and propagation of rare or heirloom jackfruit varieties. You can also share your knowledge and skills with others, helping to build a more resilient and sustainable food system in your community.
Ready to take your jackfruit game to the next level?
Don’t be afraid to experiment with different grafting techniques, such as cleft grafting, whip grafting, or veneer grafting, to see which one works best for you and your specific jackfruit varieties. Consider using different rootstocks to tailor your trees to different soil types and environmental conditions. For example, if you have heavy clay soil, you might want to use a rootstock that is known for its tolerance to waterlogged conditions.
And the variations don’t stop there! You can even graft multiple scions of different jackfruit varieties onto a single rootstock, creating a “fruit salad tree” that produces a diverse range of jackfruit flavors and textures. This is a great way to maximize space and add visual interest to your garden.
We encourage you to embark on this exciting journey of grafting jackfruit trees. It’s a rewarding experience that will connect you more deeply with the natural world and provide you with a bountiful harvest for years to come.
Once you’ve tried this DIY trick, we’d love to hear about your experience! Share your successes, your challenges, and any tips or tricks you’ve learned along the way in the comments section below. Let’s build a community of jackfruit grafting enthusiasts and learn from each other. Your insights could be invaluable to someone just starting out. Happy grafting!
Frequently Asked Questions (FAQ)
What is the best time of year to graft jackfruit trees?
The ideal time for grafting jackfruit trees is typically during the late winter or early spring, just before the tree begins to actively grow. This is when the sap flow is increasing, which promotes successful union between the scion and rootstock. Avoid grafting during periods of extreme heat, cold, or heavy rainfall, as these conditions can hinder the healing process and increase the risk of failure. In tropical climates with consistent temperatures, grafting can be attempted year-round, but monitoring weather conditions is still crucial.
How do I choose the right rootstock for grafting jackfruit?
Selecting the appropriate rootstock is vital for the success of your graft. Consider factors such as soil type, climate, disease resistance, and desired tree size. Seedlings from locally grown jackfruit trees are often a good choice, as they are already adapted to the local environment. Look for rootstocks that are healthy, vigorous, and free from any signs of disease or pests. If you have specific concerns about soil conditions or disease susceptibility, consult with a local agricultural extension agent or experienced jackfruit grower for recommendations on suitable rootstock varieties.
What type of scion wood should I use for grafting?
The scion wood should be taken from a healthy, mature jackfruit tree that produces high-quality fruit. Choose branches that are about the thickness of a pencil and have several healthy buds. The best time to collect scion wood is during the dormant season, before the buds begin to swell. Store the scion wood in a cool, moist place until you are ready to graft. You can wrap it in damp paper towels and place it in a plastic bag in the refrigerator. Make sure to label the scion wood with the variety name and the date it was collected.
How do I prevent infection after grafting?
Maintaining a clean and sterile environment is crucial to prevent infection after grafting. Use sharp, sterilized grafting tools to make clean cuts. Apply a grafting wax or sealant to all cut surfaces to protect them from moisture and pathogens. Monitor the graft site regularly for any signs of infection, such as discoloration, oozing, or mold growth. If you notice any signs of infection, carefully remove the affected area and reapply grafting wax. You can also use a fungicide to help prevent the spread of infection.
How long does it take for a grafted jackfruit tree to produce fruit?
Grafted jackfruit trees typically produce fruit much sooner than trees grown from seed. While seedling trees may take 5-7 years to bear fruit, grafted trees can start producing fruit in as little as 2-3 years. The exact time will depend on the variety of jackfruit, the grafting technique used, and the growing conditions. Proper care, including regular watering, fertilization, and pest control, will help to accelerate fruit production.
What are some common reasons why a jackfruit graft might fail?
Several factors can contribute to graft failure, including incompatibility between the scion and rootstock, improper grafting technique, infection, and unfavorable environmental conditions. Make sure to use compatible scion and rootstock varieties and follow proper grafting procedures. Keep the graft site clean and protected from moisture and pathogens. Avoid grafting during periods of extreme heat, cold, or heavy rainfall. Provide adequate water and nutrients to the grafted tree to promote healthy growth.
Can I graft different varieties of jackfruit onto the same tree?
Yes, it is possible to graft different varieties of jackfruit onto the same tree, creating a “fruit salad tree.” This can be a great way to maximize space and enjoy a diverse range of jackfruit flavors and textures. However, it is important to choose compatible varieties and to space the grafts adequately to allow each scion to develop properly. Be sure to label each graft clearly so you can keep track of the different varieties.
How do I care for a newly grafted jackfruit tree?
Newly grafted jackfruit trees require special care to ensure their survival and healthy growth. Protect the graft site from direct sunlight and strong winds. Water the tree regularly, but avoid overwatering. Fertilize the tree with a balanced fertilizer to promote root development and shoot growth. Monitor the tree for any signs of pests or diseases and take appropriate action if necessary. As the tree grows, prune it to maintain a desirable shape and to encourage fruit production.
Where can I find more information about grafting jackfruit trees?
There are many resources available to help you learn more about grafting jackfruit trees. You can consult with local agricultural extension agents, experienced jackfruit growers, or horticultural experts. You can also find valuable information online, in books, and in gardening magazines. Look for resources that provide detailed instructions on grafting techniques, rootstock selection, and scion wood collection. Don’t be afraid to experiment and learn from your own experiences. The key to successful jackfruit grafting is patience, persistence, and a willingness to learn. Mastering this DIY trick will reward you with delicious jackfruit for years to come.
Leave a Comment