
Growing peanuts in your backyard might sound like a whimsical dream, reserved for sprawling farms in Georgia, but I’m here to tell you it’s totally achievable, even in a small garden! Forget those store-bought peanuts – imagine the satisfaction of harvesting your own fresh, earthy, and undeniably delicious peanuts right outside your back door.
Peanuts, despite their name, aren’t actually nuts! They’re legumes, related to beans and peas, and their history stretches back thousands of years to South America. Evidence suggests peanuts were cultivated as early as 7,600 years ago in Peru! From ancient civilizations to modern-day snack foods, peanuts have nourished and delighted people across the globe.
But why should you bother growing peanuts in your backyard? Well, for starters, it’s incredibly rewarding! It’s a fantastic way to connect with nature, learn about the life cycle of a plant, and enjoy a truly unique gardening experience. Plus, homegrown peanuts taste amazing – fresher and more flavorful than anything you can buy in a store. More importantly, you’ll know exactly what went into growing them, avoiding any unwanted chemicals or additives. This DIY project is not only fun but also a step towards sustainable living and healthier eating. So, let’s ditch the grocery store peanuts and get our hands dirty! I’m going to share some simple tricks and tips to help you successfully cultivate your own peanut patch, no matter the size of your garden.
Erdnüsse im eigenen Garten anbauen: Eine Schritt-für-Schritt-Anleitung
Hallo Gartenfreunde! Habt ihr euch jemals gefragt, wie Erdnüsse eigentlich wachsen? Ich fand die Idee, sie selbst anzubauen, total faszinierend und habe es einfach ausprobiert. Und wisst ihr was? Es ist gar nicht so schwer! In diesem Artikel zeige ich euch, wie ihr auch in eurem Garten leckere Erdnüsse ernten könnt. Lasst uns loslegen!
Die Vorbereitung: Was ihr braucht und wann ihr anfangen solltet
Bevor wir mit dem Pflanzen beginnen, müssen wir sicherstellen, dass wir alles Nötige haben und den richtigen Zeitpunkt erwischen.
* Erdnüsse: Klingt logisch, oder? Aber Achtung: Nehmt am besten ungesalzene, geröstete Erdnüsse aus dem Supermarkt oder noch besser, spezielle Saat-Erdnüsse aus dem Fachhandel. Geröstete Erdnüsse aus dem Supermarkt können manchmal nicht keimen, aber es ist einen Versuch wert!
* Gartenboden: Erdnüsse lieben lockeren, sandigen Lehmboden. Schwere, lehmige Böden sind weniger geeignet, da die “Erdnadeln” (die Stängel, die die Erdnüsse in den Boden treiben) schwer durchkommen.
* Sonnenschein: Erdnüsse brauchen viel Sonne! Mindestens 6-8 Stunden pro Tag sind ideal.
* Wasser: Regelmäßige Bewässerung ist wichtig, besonders während der Blütezeit und der Entwicklung der Erdnüsse.
* Geduld: Erdnüsse brauchen Zeit! Rechnet mit etwa 4-5 Monaten von der Aussaat bis zur Ernte.
* Werkzeug: Eine Schaufel, eine Harke und eventuell ein paar Gartenhandschuhe.
Wann ist der richtige Zeitpunkt?
Der beste Zeitpunkt für die Aussaat ist, wenn die Bodentemperatur konstant über 18°C liegt. Das ist normalerweise im späten Frühjahr oder frühen Sommer, nachdem die Frostgefahr vorüber ist. In Deutschland ist das meistens ab Mitte Mai bis Juni.
Die Aussaat: So kommen die Erdnüsse in die Erde
Jetzt geht es ans Eingemachte! Hier ist eine detaillierte Anleitung, wie ihr eure Erdnüsse aussät:
1. Erdnüsse vorbereiten (optional): Um die Keimung zu beschleunigen, könnt ihr die Erdnüsse über Nacht in lauwarmem Wasser einweichen. Das ist aber kein Muss.
2. Boden vorbereiten: Lockert den Boden gründlich auf und entfernt Steine und Unkraut. Wenn euer Boden sehr lehmig ist, könnt ihr ihn mit Sand und Kompost verbessern.
3. Reihen ziehen: Zieht Reihen im Abstand von etwa 60-75 cm.
4. Erdnüsse säen: Legt die Erdnüsse in einem Abstand von etwa 15-20 cm in die Reihen. Die Erdnüsse sollten etwa 2-3 cm tief in der Erde liegen.
5. Zudecken: Bedeckt die Erdnüsse mit Erde und drückt sie leicht an.
6. Gießen: Gießt die Reihen gründlich an.
Die Pflege: Was ihr tun müsst, damit die Erdnüsse wachsen und gedeihen
Nach der Aussaat ist es wichtig, die Erdnusspflanzen gut zu pflegen. Hier sind ein paar Tipps:
* Bewässerung: Gießt die Pflanzen regelmäßig, besonders während trockener Perioden. Achtet darauf, dass der Boden nicht austrocknet, aber auch nicht zu nass ist.
* Unkrautbekämpfung: Haltet das Unkraut in Schach, indem ihr regelmäßig jätet. Unkraut konkurriert mit den Erdnusspflanzen um Nährstoffe und Wasser.
* Anhügeln: Wenn die Pflanzen etwa 15-20 cm hoch sind, könnt ihr sie leicht anhäufeln. Das fördert die Bildung der Erdnüsse.
* Düngen (optional): Wenn euer Boden sehr nährstoffarm ist, könnt ihr die Pflanzen mit einem organischen Dünger düngen. Achtet aber darauf, nicht zu viel zu düngen, da dies das Wachstum der Blätter auf Kosten der Erdnüsse fördern kann.
* Beobachtung: Achtet auf Schädlinge und Krankheiten. Erdnüsse können von Blattläusen, Spinnmilben oder Pilzkrankheiten befallen werden. Bei Bedarf könnt ihr biologische Schädlingsbekämpfungsmittel einsetzen.
Die Blüte und die “Erdnadeln”: Ein faszinierender Prozess
Erdnüsse sind etwas Besonderes, denn ihre Früchte entwickeln sich unter der Erde. Nach der Blüte bilden die Pflanzen sogenannte “Erdnadeln” aus. Das sind Stängel, die sich nach unten biegen und in den Boden eindringen. An den Enden dieser Erdnadeln entwickeln sich dann die Erdnüsse.
Wichtig: Achtet darauf, dass der Boden um die Pflanzen herum locker und feucht ist, damit die Erdnadeln leicht in den Boden eindringen können.
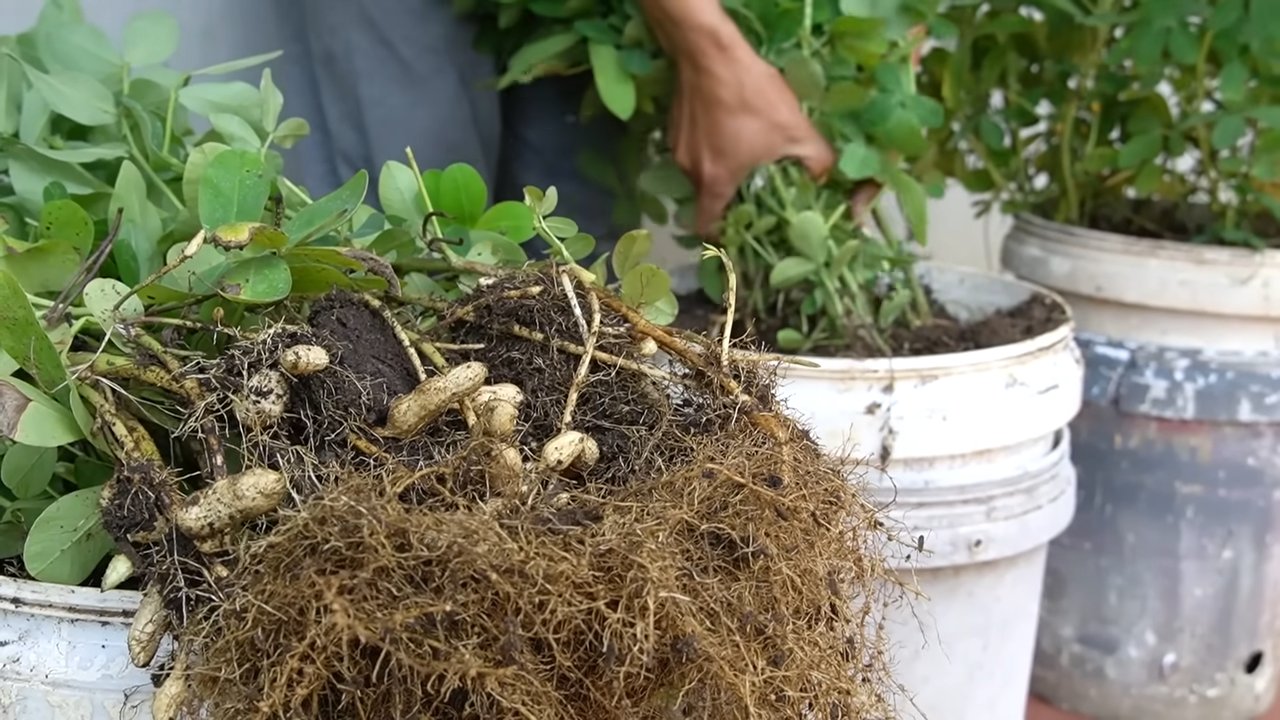
Die Ernte: Der Lohn der Mühe
Nach etwa 4-5 Monaten sind eure Erdnüsse reif für die Ernte. Hier sind ein paar Anzeichen, dass es so weit ist:
* Die Blätter der Pflanzen werden gelb und braun.
* Die Erdnüsse sind voll entwickelt und die Schalen sind hart.
So erntet ihr die Erdnüsse:
1. Pflanzen ausgraben: Grabt die Pflanzen vorsichtig mit einer Schaufel aus.
2. Erdnüsse abschütteln: Schüttelt die Erde von den Erdnüssen ab.
3. Trocknen: Legt die Erdnüsse zum Trocknen an einen warmen, trockenen und gut belüfteten Ort. Das kann zum Beispiel ein Dachboden oder ein Gewächshaus sein. Die Erdnüsse sollten etwa 2-3 Wochen trocknen.
4. Lagern: Nach dem Trocknen könnt ihr die Erdnüsse in einem luftdichten Behälter an einem kühlen, trockenen Ort lagern.
Häufige Probleme und Lösungen
Auch beim Erdnussanbau kann es zu Problemen kommen. Hier sind ein paar häufige Probleme und wie ihr sie lösen könnt:
* Schlechte Keimung: Wenn die Erdnüsse nicht keimen, kann das an schlechter Qualität der Erdnüsse, zu kalten Bodentemperaturen oder zu feuchtem Boden liegen. Achtet darauf, hochwertige Erdnüsse zu verwenden, den richtigen Zeitpunkt für die Aussaat abzuwarten und den Boden nicht zu überwässern.
* Schädlinge: Blattläuse und Spinnmilben können die Erdnusspflanzen befallen. Ihr könnt sie mit biologischen Schädlingsbekämpfungsmitteln bekämpfen.
* Pilzkrankheiten: Pilzkrankheiten können die Blätter und Stängel der Pflanzen befallen. Achtet auf eine gute Belüftung und vermeidet Staunässe. Bei Bedarf könnt ihr ein Fungizid einsetzen.
* Keine Erdnüsse: Wenn die Pflanzen zwar blühen, aber keine Erdnüsse bilden, kann das an zu wenig Sonne, zu trockenem Boden oder zu wenig Nährstoffen liegen. Achtet darauf, dass die Pflanzen genügend Sonne bekommen, regelmäßig gegossen werden und bei Bedarf gedüngt werden.
Zusätzliche Tipps für eine erfolgreiche Erdnussernte
* Sortenwahl: Es gibt verschiedene Erdnusssorten. Informiert euch, welche Sorte für euer Klima am besten geeignet ist.
* Fruchtfolge: Baut Erdnüsse nicht jedes Jahr am selben Standort an. Eine Fruchtfolge hilft, Krankheiten und Schädlinge zu vermeiden.
* Mulchen: Mulchen mit Stroh oder Heu kann helfen, den Boden feucht zu halten und Unkraut zu unterdrücken.
Ich hoffe, diese Anleitung hilft euch dabei, eure eigenen Erdnüsse im Garten anzubauen. Es ist ein tolles Gefühl, die eigenen Erdnüsse zu ernten und zu wissen, wo sie herkommen. Viel Spaß beim Gärtnern!

Conclusion
So, there you have it! Growing peanuts in your backyard isn’t just a fun gardening project; it’s a rewarding experience that connects you to your food in a profound way. From the initial planting to the satisfying harvest, every step is a testament to the magic of nature and the simple joy of cultivating your own food source.
Why is this DIY trick a must-try? Because it offers a unique blend of benefits that you simply can’t get from buying peanuts at the store. First and foremost, you’ll have access to the freshest, most flavorful peanuts imaginable. Imagine the taste difference between a commercially grown peanut that’s been sitting on a shelf for weeks and a peanut you just pulled from the ground, still warm from the sun. The flavor is incomparable!
Beyond the taste, growing your own peanuts allows you to control every aspect of the growing process. You can choose organic methods, avoiding harmful pesticides and herbicides, ensuring that your peanuts are as healthy and natural as possible. This is particularly important if you have children or are concerned about the environmental impact of your food choices.
Furthermore, growing peanuts is a fantastic educational opportunity. It’s a chance to learn about plant life cycles, soil science, and the importance of sustainable agriculture. It’s also a great way to get kids involved in gardening, teaching them valuable lessons about responsibility, patience, and the wonders of nature.
But the benefits don’t stop there. Growing peanuts can also be a cost-effective way to enjoy this delicious and nutritious snack. While there’s an initial investment in seeds and supplies, you’ll quickly recoup your costs with a bountiful harvest. Plus, you’ll have the satisfaction of knowing that you grew your own food, reducing your reliance on commercial agriculture.
Ready to take your peanut game to the next level? Consider these variations and suggestions:
* **Roasting:** Experiment with different roasting techniques to find your perfect peanut flavor. Try dry roasting in the oven, pan roasting on the stovetop, or even grilling your peanuts for a smoky twist.
* **Flavoring:** Get creative with your seasonings! Toss your roasted peanuts with salt, pepper, chili powder, garlic powder, or any other spices that tickle your fancy.
* **Peanut Butter:** Make your own homemade peanut butter! It’s surprisingly easy and tastes infinitely better than store-bought versions.
* **Peanut Brittle:** Indulge in a classic treat by making your own peanut brittle. It’s a perfect way to showcase the delicious flavor of your homegrown peanuts.
* **Companion Planting:** Maximize your garden space by planting peanuts alongside beneficial companion plants like marigolds (to deter nematodes) or corn (for shade and support).
So, what are you waiting for? Grab some peanut seeds, find a sunny spot in your backyard, and get ready to embark on a peanut-growing adventure! We’re confident that you’ll be amazed by the results. Don’t forget to document your journey and share your experiences with us. We’d love to hear about your successes, challenges, and any tips you discover along the way. Share your photos and stories on social media using #HomegrownPeanuts and let’s build a community of peanut-loving gardeners! Embrace the joy of **growing peanuts** and savor the delicious rewards of your hard work. Happy gardening!
Frequently Asked Questions (FAQ)
1. What kind of climate is best for growing peanuts?
Peanuts thrive in warm climates with a long growing season (at least 120 frost-free days). They need plenty of sunshine and well-drained soil. The ideal temperature range for peanut growth is between 68°F and 86°F (20°C and 30°C). If you live in a cooler climate, you can start your peanut plants indoors and transplant them outdoors once the weather warms up. Consider using raised beds or containers to provide better drainage and warmer soil temperatures.
2. What type of soil is best for growing peanuts?
Peanuts prefer sandy loam soil that is well-drained and rich in organic matter. Avoid heavy clay soils, as they can become waterlogged and hinder peanut development. The ideal soil pH for peanuts is between 6.0 and 6.5. Before planting, amend your soil with compost or other organic matter to improve drainage and fertility. You can also add gypsum to provide calcium, which is essential for peanut pod development.
3. How often should I water my peanut plants?
Peanuts need consistent moisture, especially during flowering and pod development. Water deeply and regularly, ensuring that the soil remains moist but not waterlogged. Avoid overhead watering, as this can promote fungal diseases. A good rule of thumb is to water your peanut plants when the top inch of soil feels dry to the touch. During periods of drought or extreme heat, you may need to water more frequently.
4. What are common pests and diseases that affect peanut plants, and how can I prevent them?
Peanuts can be susceptible to various pests and diseases, including aphids, spider mites, nematodes, and fungal diseases like leaf spot and white mold. To prevent these problems, practice good garden hygiene, such as removing weeds and debris that can harbor pests and diseases. Use organic pest control methods, such as insecticidal soap or neem oil, to control aphids and spider mites. Rotate your crops to prevent nematode infestations. Ensure good air circulation around your plants to reduce the risk of fungal diseases. Consider using disease-resistant peanut varieties.
5. How do I know when my peanuts are ready to harvest?
The best time to harvest peanuts is when the foliage begins to yellow and the pods are mature. This typically occurs about 120-150 days after planting. To check for maturity, dig up a few plants and examine the pods. The pods should be plump and full, with a distinct peanut aroma. The inside of the shell should be dark and the kernels should be well-formed. If the pods are still white or immature, wait a few more weeks before harvesting.
6. How do I harvest and cure my peanuts?
To harvest peanuts, carefully dig up the entire plant, being careful not to damage the pods. Shake off any excess soil and hang the plants upside down in a well-ventilated area to dry for several weeks. This process, known as curing, allows the peanuts to dry properly and develop their characteristic flavor. Once the plants are dry, you can remove the pods from the vines and store them in a cool, dry place.
7. Can I grow peanuts in containers?
Yes, you can successfully grow peanuts in containers, especially if you have limited garden space. Choose a large container (at least 18 inches in diameter) with good drainage holes. Fill the container with a well-draining potting mix and plant your peanut seeds according to the instructions. Water regularly and fertilize with a balanced fertilizer. Be sure to provide adequate support for the plants as they grow.
8. Are there different varieties of peanuts that I can grow?
Yes, there are several different varieties of peanuts, each with its own unique characteristics. Some popular varieties include Virginia peanuts (large kernels, often roasted), Spanish peanuts (small kernels, often used in candies), Runner peanuts (medium-sized kernels, often used in peanut butter), and Valencia peanuts (multiple kernels per pod, often boiled). Choose a variety that is well-suited to your climate and growing conditions.
9. How can I store my harvested peanuts?
Proper storage is essential to maintain the quality and flavor of your harvested peanuts. Store the peanuts in a cool, dry, and dark place, such as a pantry or basement. You can store them in airtight containers or bags. Shelled peanuts will last longer than unshelled peanuts. For long-term storage, you can freeze your peanuts.
10. Can I save seeds from my homegrown peanuts to plant next year?
Yes, you can save seeds from your homegrown peanuts to plant next year. Select the largest and healthiest pods from your harvest and store them in a cool, dry place. Before planting, crack open the pods and remove the kernels. Plant the kernels directly in the ground or start them indoors in seed trays. Keep in mind that peanuts are self-pollinating, so the seeds will generally produce plants that are similar to the parent plant. However, there may be some variation due to natural genetic variation.
Leave a Comment