
Growing sweet potatoes in containers might sound like a challenge, but trust me, it’s totally doable and incredibly rewarding! Forget those sprawling garden beds – we’re bringing the sweet potato party to your patio, balcony, or even your sunny windowsill.
For centuries, sweet potatoes have been a staple in diets around the world, from their origins in Central and South America to their widespread cultivation in Asia and Africa. They’re not just delicious; they’re packed with nutrients and represent a connection to agricultural traditions passed down through generations. But who says you need acres of land to enjoy this vibrant root vegetable?
In today’s world, where space is often a premium, and access to fresh, homegrown produce can be limited, learning how to grow your own food, even in small spaces, is more important than ever. That’s where this DIY guide comes in! I’m going to show you simple, effective tricks and hacks that will have you harvesting your own sweet potatoes from containers in no time. Imagine the satisfaction of digging into a pot and unearthing those beautiful, orange treasures you nurtured yourself. Plus, growing sweet potatoes in containers is a fantastic way to add a touch of green to your living space and impress your friends with your gardening prowess. Let’s get started!

Süßkartoffeln im Topf anbauen: Dein DIY-Guide für eine reiche Ernte
Hey Gärtnerfreunde! Habt ihr schon mal darüber nachgedacht, Süßkartoffeln im Topf anzubauen? Es ist einfacher als ihr denkt und ihr braucht keinen riesigen Garten dafür. Ich zeige euch, wie ihr mit ein paar einfachen Schritten eure eigenen Süßkartoffeln auf dem Balkon oder der Terrasse ziehen könnt. Los geht’s!
Was du brauchst: Die Materialliste
Bevor wir loslegen, hier eine Liste mit allem, was du für dein Süßkartoffel-Topf-Projekt benötigst:
* Süßkartoffel-Knollen: Am besten Bio-Süßkartoffeln, da diese weniger wahrscheinlich mit Wachstumsinhibitoren behandelt wurden.
* Große Töpfe: Mindestens 30 Liter Fassungsvermögen pro Pflanze. Je größer, desto besser!
* Hochwertige Blumenerde: Eine gut durchlässige Mischung ist ideal. Ich verwende gerne eine Mischung aus Blumenerde, Kompost und etwas Sand.
* Wasser: Zum Gießen, natürlich!
* Sonniger Standort: Süßkartoffeln lieben die Sonne.
* Optional: Flüssigdünger für Gemüse, Mulch (z.B. Stroh oder Holzhackschnitzel).
* Messer oder Zahnstocher: Für die Vorbereitung der Knollen.
* Gefäß mit Wasser: Für die Bewurzelung.
Phase 1: Die Vorbereitung – Süßkartoffel-Slips ziehen
Die Süßkartoffel selbst pflanzen? Nicht ganz! Wir ziehen zuerst sogenannte “Slips”. Das sind die Triebe, die aus der Süßkartoffel wachsen und die wir dann einpflanzen. Keine Sorge, es ist ganz einfach!
1. Die Süßkartoffel vorbereiten:
* Nimm deine Süßkartoffel und reinige sie vorsichtig mit Wasser.
* Schneide die Süßkartoffel entweder in der Mitte durch oder lasse sie ganz, je nachdem, wie groß sie ist. Wenn sie sehr groß ist, halbiere sie.
* Stecke Zahnstocher etwa in der Mitte der Süßkartoffel ein, sodass sie als Stütze dienen und die Süßkartoffel teilweise im Wasser hängt.
2. Bewurzelung starten:
* Fülle ein Glas oder eine Schale mit Wasser.
* Platziere die Süßkartoffel so, dass die untere Hälfte im Wasser ist. Die obere Hälfte sollte trocken bleiben.
* Stelle das Glas an einen warmen, hellen Ort, aber nicht in direktes Sonnenlicht.
3. Geduld ist gefragt:
* Wechsle das Wasser alle paar Tage, um es sauber zu halten.
* Nach etwa 2-4 Wochen sollten sich an der Süßkartoffel Wurzeln und kleine Triebe (die Slips) bilden.
4. Slips ernten:
* Sobald die Slips etwa 15-20 cm lang sind, kannst du sie vorsichtig von der Süßkartoffel abbrechen oder abschneiden. Achte darauf, dass du sie nicht beschädigst.
* Entferne die unteren Blätter der Slips, damit sie besser Wurzeln schlagen können.
5. Slips bewurzeln (optional, aber empfohlen):
* Stelle die Slips in ein Glas mit Wasser, sodass nur die Stängel im Wasser sind.
* Nach ein paar Tagen sollten sich kleine Wurzeln bilden. Das erhöht die Erfolgschance beim Einpflanzen.
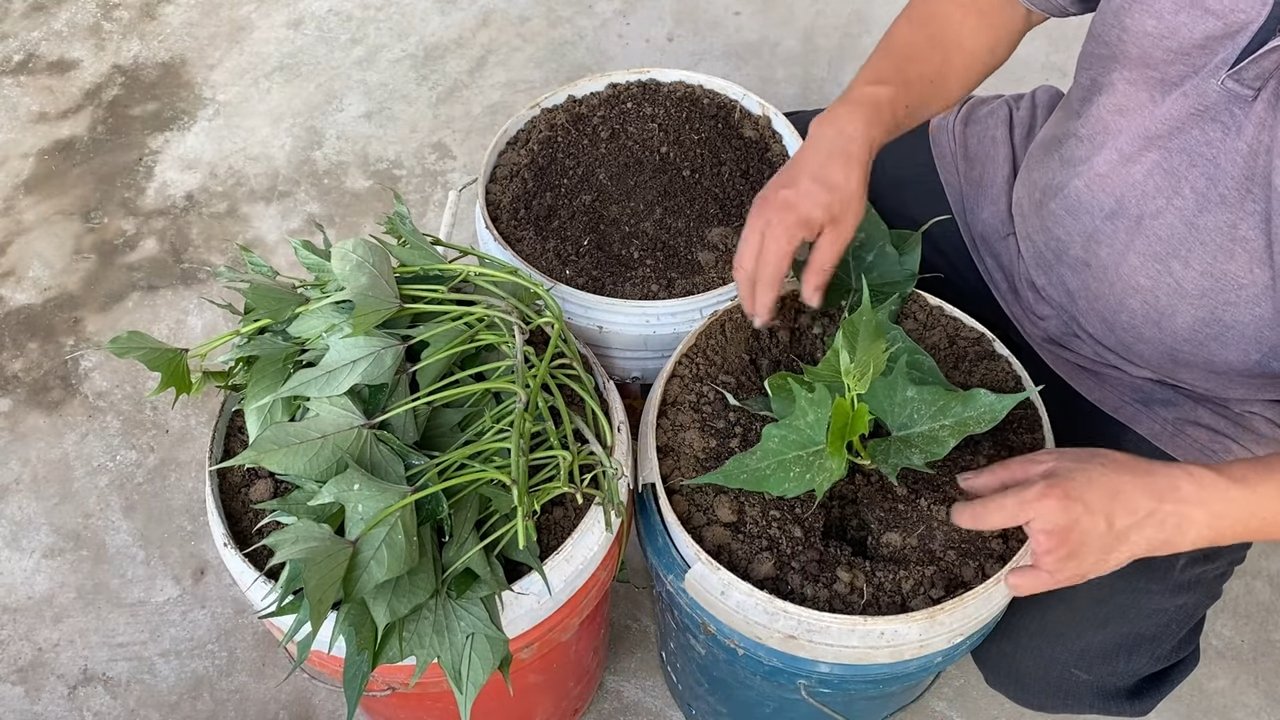
Phase 2: Einpflanzen der Slips in Töpfe
Jetzt, wo wir unsere Slips haben, können wir sie endlich in die Töpfe pflanzen!
1. Töpfe vorbereiten:
* Fülle die Töpfe mit der Blumenerde. Lass etwa 5 cm Platz bis zum Rand.
* Gieße die Erde gut an, sodass sie feucht, aber nicht nass ist.
2. Slips einpflanzen:
* Mache mit dem Finger oder einem kleinen Stock ein Loch in die Erde.
* Setze den Slip vorsichtig in das Loch und bedecke die Wurzeln mit Erde.
* Drücke die Erde leicht an.
* Pflanze mehrere Slips pro Topf, aber achte darauf, dass sie genügend Platz haben, um sich auszubreiten. Ich empfehle 3-4 Slips pro 30-Liter-Topf.
3. Angießen:
* Gieße die frisch gepflanzten Slips noch einmal vorsichtig an.
Phase 3: Pflege und Wachstum
Jetzt beginnt die eigentliche Arbeit: die Pflege deiner Süßkartoffelpflanzen!
1. Standort:
* Stelle die Töpfe an einen sonnigen Standort. Süßkartoffeln brauchen mindestens 6 Stunden Sonne pro Tag.
2. Gießen:
* Gieße regelmäßig, besonders während trockener Perioden. Die Erde sollte immer feucht, aber nicht nass sein. Vermeide Staunässe, da dies zu Wurzelfäule führen kann.
* Teste die Feuchtigkeit der Erde, indem du deinen Finger etwa 2-3 cm tief in die Erde steckst. Wenn sie sich trocken anfühlt, ist es Zeit zu gießen.
3. Düngen:
* Dünge die Pflanzen alle 2-3 Wochen mit einem Flüssigdünger für Gemüse. Befolge dabei die Anweisungen auf der Verpackung.
* Du kannst auch organischen Dünger wie Komposttee verwenden.
4. Mulchen (optional):
* Eine Schicht Mulch (z.B. Stroh oder Holzhackschnitzel) um die Pflanzen herum hilft, die Feuchtigkeit im Boden zu halten und Unkraut zu unterdrücken.
5. Rankhilfe (optional):
* Süßkartoffelpflanzen können lange Ranken bilden. Wenn du möchtest, kannst du ihnen eine Rankhilfe anbieten, z.B. einen kleinen Zaun oder ein Spalier. Das ist aber nicht unbedingt notwendig.
6. Schädlinge und Krankheiten:
* Achte auf Schädlinge wie Blattläuse oder Schnecken. Bei Bedarf kannst du biologische Schädlingsbekämpfungsmittel einsetzen.
* Süßkartoffeln sind relativ resistent gegen Krankheiten, aber achte auf Anzeichen von Pilzbefall, wie z.B. gelbe oder braune Flecken auf den Blättern.
Phase 4: Die Ernte – Der Lohn deiner Mühe
Nach etwa 3-4 Monaten (je nach Sorte und Wetterbedingungen) ist es endlich Zeit für die Ernte!
1. Erntezeitpunkt:
* Die Blätter der Pflanze beginnen gelb zu werden und abzusterben. Das ist ein Zeichen dafür, dass die Süßkartoffeln reif sind.
* Du kannst auch vorsichtig in die Erde graben und eine Süßkartoffel probeweise ernten. Wenn sie die gewünschte Größe hat, kannst du die restlichen ernten.
2. Erntemethode:
* Gieße die Erde vor der Ernte gut an.
* Lockere die Erde vorsichtig mit einer Grabegabel oder einem Spaten.
* Ziehe die Süßkartoffeln vorsichtig aus der Erde. Achte darauf, sie nicht zu beschädigen.
3. Trocknen und Lagern:
* Lasse die Süßkartoffeln nach der Ernte ein paar Tage an einem warmen, trockenen Ort trocknen. Das härtet die Schale und verlängert die Haltbarkeit.
* Lagere die Süßkartoffeln an einem kühlen, dunklen und trockenen Ort. Ideal ist eine Temperatur zwischen 12 und 15 Grad Celsius.
* Vermeide es, die Süßkartoffeln im Kühlschrank zu lagern, da dies ihren Geschmack beeinträchtigen kann.
Zusätzliche Tipps und Tricks
* Sortenwahl: Es gibt viele verschiedene Süßkartoffelsorten. Informiere dich, welche Sorten für den Anbau im Topf geeignet sind.
* Bodenverbesserung: Wenn du keinen Kompost zur Hand hast, kannst du die Blumenerde mit etwas Hornspänen oder Guano anreichern.
* Schutz vor Frost: Süßkartoffeln sind frostempfindlich. Wenn Frost droht, solltest du die Töpfe ins Haus holen oder mit Vlies abdecken.
*
Conclusion
So, there you have it! Growing sweet potatoes in containers is not only achievable, but it’s also a remarkably rewarding experience. We’ve walked through the process, from selecting the right container and soil to nurturing your plants and anticipating that glorious harvest. But why should you dedicate your time and effort to this particular gardening endeavor?
The answer lies in the unique advantages container gardening offers, especially when it comes to sweet potatoes. First and foremost, it provides accessibility. Whether you have a sprawling backyard or a small balcony, you can enjoy the satisfaction of growing your own food. Container gardening eliminates the need for extensive land preparation and allows you to control the growing environment more effectively. This is particularly beneficial for sweet potatoes, which thrive in warm conditions and well-drained soil.
Beyond accessibility, growing sweet potatoes in containers offers unparalleled control over soil quality. You can create the perfect growing medium, ensuring optimal drainage and nutrient availability. This is crucial for healthy root development and a bountiful harvest. Furthermore, container gardening simplifies pest control. By isolating your plants, you can minimize the risk of infestations and diseases.
But the benefits extend beyond practicality. There’s a certain magic in nurturing a plant from a small slip to a thriving vine laden with delicious sweet potatoes. It’s a connection to nature, a source of pride, and a tangible reward for your efforts. And let’s not forget the taste! Homegrown sweet potatoes are simply superior to store-bought varieties. They’re sweeter, more flavorful, and bursting with nutrients.
Ready to take your container gardening to the next level? Consider these variations to personalize your sweet potato growing experience:
* Vertical Gardening: Train your sweet potato vines to climb a trellis or support structure. This not only adds visual appeal but also maximizes space utilization.
* Companion Planting: Plant herbs like basil or rosemary alongside your sweet potatoes to deter pests and enhance flavor.
* Different Varieties: Experiment with different sweet potato varieties, such as Beauregard, Japanese, or Okinawan, to discover your favorite flavor and texture.
* Fertilizer Options: While we recommended a balanced fertilizer, you can also explore organic options like compost tea or fish emulsion.
Ultimately, growing sweet potatoes in containers is a journey of discovery. It’s an opportunity to learn, experiment, and connect with the natural world. So, grab a container, some soil, and a sweet potato slip, and embark on this exciting adventure. We are confident that you will find the process both enjoyable and rewarding.
We encourage you to try this DIY trick and share your experience with us! Post photos of your container gardens, share your tips and tricks, and let us know what varieties you’re growing. Together, we can create a community of passionate container gardeners, sharing knowledge and inspiring others to grow their own food. Happy gardening!
Frequently Asked Questions (FAQ)
What is the best size container for growing sweet potatoes?
The ideal container size for growing sweet potatoes is at least 10 gallons, but larger is generally better. A 15-20 gallon container will provide ample space for the roots to develop and produce a good yield. The container should also be at least 12 inches deep to accommodate the growing sweet potatoes. Remember, sweet potatoes grow underground, so they need plenty of room to expand. Using a smaller container may restrict root growth and result in smaller or fewer sweet potatoes. Consider using grow bags, large pots, or even repurposed containers like plastic storage bins with drainage holes.
What type of soil is best for growing sweet potatoes in containers?
Sweet potatoes thrive in well-draining, loose soil that is rich in organic matter. A good potting mix specifically formulated for vegetables is an excellent choice. You can also create your own mix by combining equal parts of compost, peat moss (or coconut coir), and perlite or vermiculite. Avoid using heavy clay soil, as it can become waterlogged and hinder root development. The soil pH should be slightly acidic, ideally between 5.5 and 6.5. Adding compost to your soil mix will not only improve drainage but also provide essential nutrients for healthy growth.
How often should I water my sweet potato plants in containers?
Water your sweet potato plants regularly, especially during hot and dry weather. The soil should be kept consistently moist, but not waterlogged. Check the soil moisture by sticking your finger about an inch deep into the soil. If it feels dry, it’s time to water. Water deeply, allowing the water to drain out of the bottom of the container. Avoid overhead watering, as it can promote fungal diseases. In general, you may need to water your plants daily or every other day, depending on the weather conditions and the size of your container.
How much sunlight do sweet potato plants need?
Sweet potato plants require at least 6-8 hours of direct sunlight per day to thrive. Choose a location that receives plenty of sunlight throughout the day. If you live in a particularly hot climate, you may need to provide some afternoon shade to prevent the plants from scorching. Insufficient sunlight can result in leggy growth, reduced yields, and smaller sweet potatoes. If you’re growing your plants indoors, you may need to supplement with grow lights to ensure they receive adequate light.
When is the best time to harvest sweet potatoes from containers?
Sweet potatoes are typically ready to harvest about 90-120 days after planting. The leaves will start to turn yellow and the vines may begin to die back, indicating that the sweet potatoes are mature. To harvest, gently tip the container over and carefully remove the sweet potatoes from the soil. Be careful not to damage the skins, as this can shorten their storage life. Cure the sweet potatoes by placing them in a warm, humid location (80-85°F and 85-90% humidity) for about 7-10 days. This process helps to heal any wounds and improve their flavor and storage life.
Can I grow sweet potatoes from store-bought sweet potatoes?
Yes, you can grow sweet potatoes from store-bought sweet potatoes, but it’s important to choose organic varieties to avoid any growth inhibitors that may have been applied. To sprout the sweet potato, suspend it halfway in a jar of water, using toothpicks to hold it in place. Place the jar in a warm, sunny location. After a few weeks, sprouts will begin to emerge from the sweet potato. Once the sprouts are several inches long, gently twist them off and place them in a glass of water to root. Once the roots are about an inch long, they are ready to be planted in your container.
What are some common pests and diseases that affect sweet potato plants in containers?
Some common pests that can affect sweet potato plants include aphids, spider mites, and sweet potato weevils. Aphids and spider mites can be controlled with insecticidal soap or neem oil. Sweet potato weevils are more difficult to control, so prevention is key. Use disease-free slips and practice good sanitation. Common diseases that can affect sweet potato plants include fungal diseases like fusarium wilt and black rot. To prevent these diseases, ensure good drainage, avoid overhead watering, and use disease-resistant varieties.
How do I store my harvested sweet potatoes?
After curing your sweet potatoes, store them in a cool, dry, and dark place with good ventilation. The ideal storage temperature is between 55-60°F. Avoid storing them in the refrigerator, as this can cause them to develop a hard core and lose their flavor. Properly cured and stored sweet potatoes can last for several months. Check them periodically for any signs of spoilage and discard any that are soft or moldy.
Can I reuse the soil from my sweet potato containers?
Yes, you can reuse the soil from your sweet potato containers, but it’s important to amend it with fresh compost and other organic matter to replenish the nutrients that were used by the plants. You may also want to sterilize the soil to kill any potential pests or diseases. This can be done by baking the soil in the oven at 200°F for 30 minutes or by solarizing it in a black plastic bag for several weeks.
Is growing sweet potatoes in containers organic?
Growing sweet potatoes in containers can absolutely be organic! By using organic potting mix, organic fertilizers, and natural pest control methods, you can ensure that your sweet potatoes are grown without the use of synthetic chemicals. Look for potting mixes that are certified organic and use organic fertilizers like compost tea, fish emulsion, or bone meal. For pest control, consider using insecticidal soap, neem oil, or introducing beneficial insects like ladybugs.
Leave a Comment