
Growing Mustard Greens in Bottles: Sounds unconventional, right? But trust me, this DIY project is about to revolutionize your small-space gardening game! Forget sprawling gardens and back-breaking labor; we’re bringing the farm to your windowsill, one recycled bottle at a time.
Mustard greens, with their peppery bite and vibrant color, have been a culinary staple for centuries. From ancient Roman banquets to Southern soul food traditions, these leafy greens have nourished and delighted palates across the globe. But what if I told you that you could cultivate this flavorful ingredient right in your own home, regardless of your outdoor space?
In today’s world, where access to fresh, healthy produce can be a challenge, and where many of us are living in apartments or smaller homes, innovative gardening solutions are more crucial than ever. That’s where this DIY trick comes in. Growing Mustard Greens in Bottles isn’t just a fun project; it’s a practical way to enjoy fresh, organic greens, reduce waste by repurposing plastic bottles, and connect with nature, even in the heart of the city. Plus, it’s incredibly rewarding to watch your little bottle garden flourish!
So, grab your scissors, some soil, and those empty plastic bottles – let’s embark on this exciting journey of urban gardening and discover the joy of growing your own delicious mustard greens!
Senfgrün im Upcycling-Stil: Anzucht in Plastikflaschen
Hey Leute! Habt ihr Lust auf frisches, würziges Grün direkt aus eurer Küche? Und das Ganze auch noch super nachhaltig? Dann seid ihr hier genau richtig! Ich zeige euch, wie ihr ganz einfach Senfgrün in Plastikflaschen anbauen könnt. Das ist nicht nur kinderleicht, sondern auch eine tolle Möglichkeit, Plastikmüll zu reduzieren und eure Küche mit einem grünen Hingucker zu verschönern. Los geht’s!
Was ihr braucht:
* Leere Plastikflaschen (am besten 1,5 oder 2 Liter)
* Ein scharfes Messer oder eine Schere
* Anzuchterde oder Blumenerde
* Senfsaat (gibt’s im Supermarkt oder Gartencenter)
* Sprühflasche mit Wasser
* Optional: Kieselsteine oder Blähton für die Drainage
* Optional: Permanentmarker zum Beschriften
Schritt-für-Schritt-Anleitung:
1. Flaschen vorbereiten: Zuerst müsst ihr eure Plastikflaschen vorbereiten. Spült sie gründlich aus, damit keine Rückstände von Getränken mehr vorhanden sind. Lasst sie gut trocknen.
2. Flaschen zuschneiden: Jetzt kommt der spannende Teil: das Zuschneiden der Flaschen. Ihr habt zwei Möglichkeiten:
* Variante 1: Horizontaler Schnitt: Schneidet die Flasche horizontal durch, etwa 10-15 cm vom Boden entfernt. Der untere Teil wird zum Topf, der obere Teil kann als Mini-Gewächshaus dienen.
* Variante 2: Vertikaler Schnitt: Schneidet die Flasche vertikal auf, aber nicht ganz durch. Lasst am Flaschenhals ein Stück ungeschnitten, sodass die Flasche wie ein aufklappbares Buch aussieht. Diese Variante eignet sich gut, um später das Senfgrün leichter zu ernten.
Wichtig: Seid vorsichtig beim Schneiden! Benutzt ein scharfes Messer oder eine Schere und achtet darauf, euch nicht zu verletzen.
3. Drainage vorbereiten (optional): Wenn ihr wollt, könnt ihr eine Drainage in eure “Töpfe” einbauen. Das verhindert Staunässe und sorgt dafür, dass die Wurzeln nicht faulen. Gebt dazu eine Schicht Kieselsteine oder Blähton auf den Boden der Flasche.
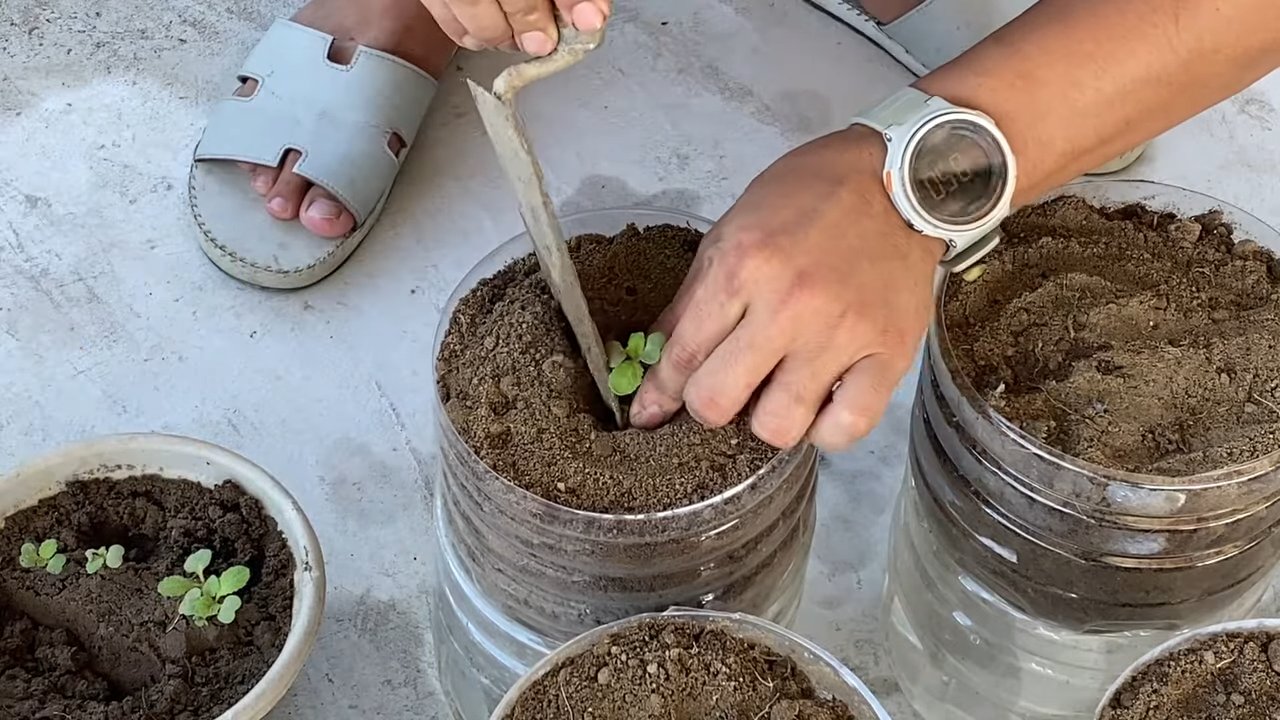
4. Erde einfüllen: Füllt die Flaschen mit Anzuchterde oder Blumenerde. Lasst etwa 2-3 cm Platz bis zum Rand. Drückt die Erde leicht an.
5. Senfsaat aussäen: Verteilt die Senfsaat gleichmäßig auf der Erde. Achtet darauf, dass die Samen nicht zu dicht liegen, damit sie genügend Platz zum Wachsen haben.
6. Samen bedecken: Bedeckt die Samen mit einer dünnen Schicht Erde.
7. Angießen: Befeuchtet die Erde vorsichtig mit einer Sprühflasche. Die Erde sollte feucht, aber nicht nass sein.
8. Mini-Gewächshaus (optional): Wenn ihr die Flaschen horizontal geschnitten habt, könnt ihr den oberen Teil als Mini-Gewächshaus über den unteren Teil stülpen. Das sorgt für ein feuchtwarmes Klima, das die Keimung beschleunigt.
9. Standort wählen: Stellt die Flaschen an einen hellen, warmen Ort. Ein Fensterbrett ist ideal. Vermeidet direkte Sonneneinstrahlung, da die zarten Keimlinge sonst verbrennen können.
10. Pflege: Haltet die Erde feucht, aber nicht nass. Besprüht die Erde regelmäßig mit Wasser. Lüftet das Mini-Gewächshaus (falls vorhanden) regelmäßig, um Schimmelbildung zu vermeiden.
Die ersten Tage: Keimung und Wachstum
In den nächsten Tagen werdet ihr sehen, wie die ersten Keimlinge aus der Erde sprießen. Das ist wirklich faszinierend! Achtet darauf, dass die Erde weiterhin feucht bleibt und die Pflanzen genügend Licht bekommen.
* Tag 1-3: Die Samen beginnen zu keimen.
* Tag 4-7: Die ersten Blättchen entwickeln sich.
* Tag 8-14: Das Senfgrün wächst schnell und wird immer dichter.
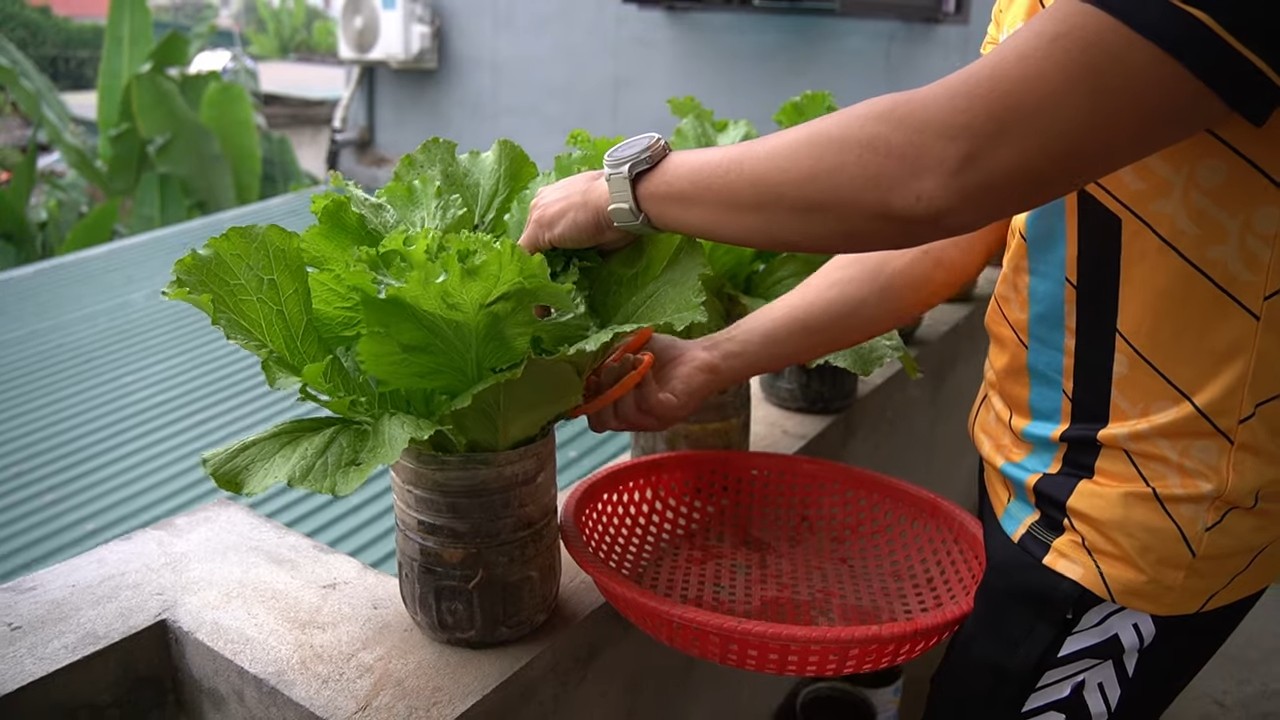
Erntezeit!
Nach etwa 2-3 Wochen könnt ihr euer selbstgezogenes Senfgrün ernten. Schneidet die Blätter einfach mit einer Schere ab. Lasst dabei die Wurzeln in der Erde, damit das Senfgrün weiterwachsen kann. Ihr könnt mehrmals ernten, bevor die Pflanzen erschöpft sind.
* Wann ernten? Erntet, wenn die Blätter eine Höhe von etwa 5-10 cm erreicht haben.
* Wie ernten? Schneidet die Blätter knapp über dem Boden ab.
* Wie oft ernten? Ihr könnt mehrmals ernten, bis die Pflanzen nicht mehr nachwachsen.
Tipps und Tricks für den erfolgreichen Anbau
* Die richtige Erde: Anzuchterde ist ideal für die Anzucht von Senfgrün, da sie locker und nährstoffarm ist. Blumenerde funktioniert aber auch.
* Der richtige Standort: Senfgrün braucht viel Licht, aber keine direkte Sonneneinstrahlung. Ein Fensterbrett ist perfekt.
* Die richtige Bewässerung: Haltet die Erde feucht, aber nicht nass. Vermeidet Staunässe.
* Schimmelbildung vermeiden: Lüftet das Mini-Gewächshaus regelmäßig, um Schimmelbildung zu vermeiden.
* Schädlinge: Senfgrün ist relativ resistent gegen Schädlinge. Sollten sich doch mal Blattläuse oder andere Schädlinge zeigen, könnt ihr sie mit einem Wasserstrahl abspülen oder mit einem biologischen Schädlingsbekämpfungsmittel behandeln.
* Sortenvielfalt: Es gibt verschiedene Sorten von Senfsaat, die sich im Geschmack unterscheiden. Probiert verschiedene Sorten aus, um euren Favoriten zu finden.
* Upcycling-Ideen: Ihr könnt nicht nur Plastikflaschen, sondern auch andere Behälter wie Joghurtbecher oder Konservendosen für die Anzucht von Senfgrün verwenden.
* Beschriftung: Beschriftet die Flaschen mit einem Permanentmarker, damit ihr wisst, was ihr angepflanzt habt.
* Düngen: Senfgrün braucht in der Regel keine zusätzliche Düngung. Wenn ihr aber das Gefühl habt, dass die Pflanzen nicht gut wachsen, könnt ihr sie mit einem organischen Flüssigdünger düngen.
Senfgrün in der Küche: Vielseitige Verwendungsmöglichkeiten
Senfgrün ist nicht nur lecker, sondern auch sehr gesund. Es ist reich an Vitaminen, Mineralstoffen und Senfölglykosiden, die eine antibakterielle und entzündungshemmende Wirkung haben.
* Salate: Senfgrün ist eine tolle Ergänzung für Salate. Es verleiht ihnen eine würzige Note.
* Smoothies: Gebt eine Handvoll Senfgrün in euren Smoothie, um ihn mit Vitaminen und Mineralstoffen anzureichern.
* Suppen: Senfgrün kann auch in Suppen verwendet werden. Gebt es kurz vor dem Servieren hinzu, damit es seine wertvollen Inhaltsstoffe behält.
* Pesto: Aus Senfgrün lässt sich auch ein leckeres Pesto zubereiten.
* Sandwiches: Belegt eure Sandwiches mit Senfgrün für eine extra Portion Geschmack und Vitamine.
* Garnitur: Senfgrün eignet sich auch hervorragend als Garnitur für verschiedene Gerichte.
Fazit
Ich hoffe, diese Anleitung hat euch gefallen und ihr habt jetzt Lust bekommen, euer eigenes Senfgrün in Plastikflaschen anzubauen. Es ist wirklich eine einfache und lohnende Möglichkeit, frisches Grün in eure Küche zu bringen und gleichzeitig etwas für die Umwelt zu tun. Viel Spaß beim Gärtnern! Und vergesst nicht: Experimentiert, probiert aus und habt Freude an der Natur!
Conclusion
So, there you have it! Growing mustard greens in bottles isn’t just a quirky gardening experiment; it’s a genuinely practical and rewarding way to enjoy fresh, peppery greens right at your fingertips. We’ve walked you through the simple steps, highlighting the benefits of this space-saving, eco-friendly method. From repurposing discarded plastic bottles to minimizing soil usage and maximizing yield, this DIY trick offers a sustainable and accessible approach to urban gardening.
But why is this a must-try? Beyond the sheer convenience of having fresh mustard greens readily available, this method empowers you to take control of your food source. You know exactly what goes into your greens – no pesticides, no hidden chemicals, just pure, homegrown goodness. Plus, it’s incredibly satisfying to watch those tiny seeds sprout and flourish into vibrant, edible leaves. It’s a tangible connection to nature, even in the heart of a bustling city.
This method is also incredibly adaptable. Feel free to experiment with different bottle sizes and shapes. Larger bottles will, of course, accommodate more soil and allow for a larger harvest. You can also try grouping multiple bottles together to create a mini vertical garden, adding a touch of greenery to your balcony or patio.
Consider exploring different varieties of mustard greens as well. Some are milder, while others pack a serious punch of flavor. ‘Florida Broadleaf’ is a classic choice, known for its robust flavor and large leaves. ‘Red Giant’ offers a beautiful visual contrast with its deep purple foliage and a slightly milder taste. ‘Osaka Purple’ is another excellent option for adding color and a unique flavor profile to your salads and stir-fries.
Don’t be afraid to get creative with your growing medium too. While we recommend a well-draining potting mix, you can also incorporate compost, perlite, or vermiculite to improve drainage and nutrient retention. Experiment with different combinations to find what works best for your specific environment and growing conditions.
Furthermore, think about the placement of your bottle garden. Mustard greens thrive in cool weather, so choose a location that receives partial shade during the hottest part of the day, especially in warmer climates. In cooler climates, a sunnier spot will help them grow faster.
The beauty of this DIY project lies in its simplicity and adaptability. It’s a fantastic way to introduce children to the wonders of gardening, teaching them about plant life cycles and the importance of sustainable practices. It’s also a great way to reduce waste and contribute to a more eco-conscious lifestyle.
We are confident that you’ll find growing mustard greens in bottles to be a surprisingly easy and rewarding experience. So, gather your supplies, follow our simple instructions, and get ready to enjoy a bounty of fresh, flavorful greens. We encourage you to try this DIY trick and share your experiences with us. Post pictures of your bottle gardens on social media using #BottleGreens and let us know what varieties you’re growing and any tips or tricks you’ve discovered along the way. We can’t wait to see your creations! Happy gardening!
Frequently Asked Questions (FAQ)
What kind of bottles are best for growing mustard greens?
Ideally, you should use clean, food-grade plastic bottles. Water bottles, soda bottles, and juice bottles all work well. Avoid using bottles that have contained harsh chemicals or pesticides. Make sure to thoroughly wash and rinse the bottles before using them to remove any residue. The size of the bottle will determine how many plants you can grow in each one. Larger bottles will allow for more root development and a larger harvest. Clear or translucent bottles are preferable as they allow you to monitor the soil moisture levels.
How often should I water my mustard greens growing in bottles?
The frequency of watering depends on several factors, including the size of the bottle, the type of soil you’re using, the temperature, and the humidity. As a general rule, you should water your mustard greens when the top inch of soil feels dry to the touch. Avoid overwatering, as this can lead to root rot. Ensure that the bottles have adequate drainage holes to prevent water from pooling at the bottom. During hot weather, you may need to water more frequently, perhaps even daily. In cooler weather, you may only need to water every few days. A good way to check is to lift the bottle; if it feels light, it’s likely time to water.
What kind of soil should I use for growing mustard greens in bottles?
A well-draining potting mix is essential for growing healthy mustard greens in bottles. Avoid using garden soil, as it can be too heavy and compact, hindering root growth. A good potting mix will provide adequate drainage and aeration, allowing the roots to breathe. You can also amend your potting mix with compost, perlite, or vermiculite to improve drainage and nutrient retention. Compost will add valuable nutrients to the soil, while perlite and vermiculite will improve drainage and aeration. A mix of equal parts potting mix, compost, and perlite or vermiculite is a good starting point.
How much sunlight do mustard greens need when grown in bottles?
Mustard greens thrive in cool weather and prefer partial shade, especially during the hottest part of the day. In warmer climates, provide them with at least 4-6 hours of sunlight per day, but avoid direct sunlight during the peak hours of the afternoon. In cooler climates, they can tolerate more sunlight. If you’re growing your mustard greens indoors, place them near a sunny window or use grow lights to supplement natural light. Insufficient sunlight can lead to leggy growth and reduced yields.
How long does it take for mustard greens to grow in bottles?
Mustard greens are relatively fast-growing, and you can typically start harvesting leaves within 3-4 weeks of planting. The exact time will depend on the variety of mustard greens, the growing conditions, and the amount of sunlight they receive. You can harvest individual leaves as needed, or you can harvest the entire plant at once. For continuous harvests, snip off the outer leaves, allowing the inner leaves to continue growing.
What are some common pests and diseases that affect mustard greens grown in bottles?
Common pests that can affect mustard greens include aphids, flea beetles, and cabbage worms. You can control these pests by handpicking them off the plants, using insecticidal soap, or introducing beneficial insects like ladybugs. Diseases that can affect mustard greens include downy mildew and white rust. To prevent these diseases, ensure good air circulation, avoid overwatering, and remove any infected leaves promptly. Using a well-draining potting mix and providing adequate sunlight can also help prevent diseases.
Can I grow other vegetables in bottles using the same method?
Yes, you can grow a variety of other vegetables in bottles using the same method. Some good options include lettuce, spinach, kale, and herbs like basil, parsley, and cilantro. Smaller varieties of tomatoes and peppers can also be grown in larger bottles. The key is to choose plants that have shallow root systems and don’t require a lot of space. Ensure that the bottles are large enough to accommodate the plant’s root system and that you provide adequate sunlight, water, and nutrients.
How do I harvest mustard greens from bottles?
Harvesting mustard greens from bottles is easy. You can either harvest individual leaves as needed or harvest the entire plant at once. To harvest individual leaves, snip off the outer leaves near the base of the plant, leaving the inner leaves to continue growing. This will allow you to enjoy a continuous harvest over several weeks. To harvest the entire plant, simply cut it off at the base.
How can I make my mustard greens taste less bitter?
The bitterness of mustard greens can vary depending on the variety and the growing conditions. To reduce bitterness, harvest the leaves when they are young and tender. Older leaves tend to be more bitter. You can also blanch the leaves in boiling water for a few seconds before cooking them. Adding a touch of acidity, such as lemon juice or vinegar, can also help to balance the bitterness.
Is growing mustard greens in bottles organic?
Growing mustard greens in bottles can be organic if you use organic potting mix, organic fertilizers, and avoid using synthetic pesticides or herbicides. Look for potting mixes that are certified organic and use organic fertilizers like compost tea or fish emulsion. Control pests and diseases using natural methods, such as handpicking, insecticidal soap, or beneficial insects. By following these practices, you can ensure that your mustard greens are grown organically and are free from harmful chemicals.
Leave a Comment