
Growing Bean Sprouts at Home is easier than you might think, and I’m here to show you how! Forget those expensive trips to the grocery store for a handful of sprouts – you can cultivate your own fresh, crunchy goodness right on your kitchen counter. Have you ever wondered about the origins of these nutritional powerhouses? Bean sprouts have been a staple in Asian cuisine for centuries, dating back to ancient China where they were valued for their health benefits and ability to provide fresh greens during the winter months.
But why should *you* bother with growing bean sprouts at home? Well, for starters, it’s incredibly cost-effective. Think about it: a small bag of dried beans can yield a *huge* amount of sprouts. Plus, you have complete control over the growing process, ensuring they’re free from pesticides and other unwanted chemicals. In today’s world, where healthy eating is a top priority, having a readily available source of fresh, nutrient-rich food is a game-changer.
This DIY guide will walk you through a simple, step-by-step method for growing bean sprouts at home, even if you don’t have a green thumb. I’ll share my favorite tricks and hacks to ensure a successful and bountiful harvest. Get ready to impress your friends and family with your newfound sprouting skills – and enjoy the delicious, healthy rewards!

Bohnensprossen selber ziehen: Ein kinderleichtes DIY-Projekt für frische Vitamine
Hallo liebe DIY-Freunde! Habt ihr Lust auf knackige, frische Sprossen, die ihr ganz einfach zu Hause ziehen könnt? Bohnensprossen sind nicht nur superlecker im Salat, im Wok oder auf dem Brot, sondern auch wahre Vitaminbomben. Und das Beste: Ihr braucht dafür kaum Material und es ist wirklich kinderleicht! Ich zeige euch, wie es geht.
Was ihr für euer Sprossen-Abenteuer braucht:
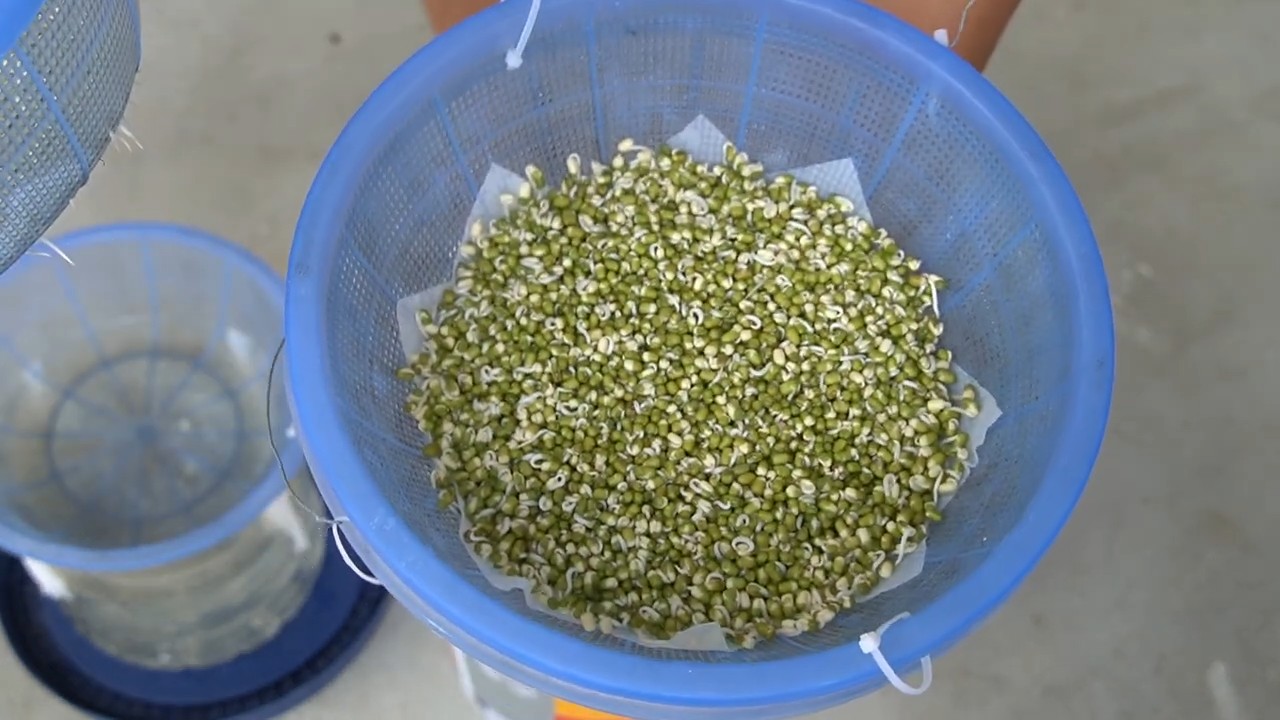
* Bohnen: Am besten eignen sich Mungbohnen, aber auch Adzukibohnen oder Sojabohnen funktionieren prima. Achtet darauf, dass die Bohnen unbehandelt und für den Verzehr geeignet sind. Bio-Qualität ist natürlich top!
* Ein Sprossenglas oder ein anderes geeignetes Gefäß: Ein Einmachglas mit einem Gitterdeckel oder einem Stück Mulltuch, das ihr mit einem Gummiband befestigt, ist ideal. Es gibt auch spezielle Sprossentürme, aber für den Anfang reicht ein einfaches Glas völlig aus.
* Wasser: Am besten gefiltertes Wasser oder abgekochtes, abgekühltes Leitungswasser.
* Ein dunkler Ort: Die Bohnen keimen am besten im Dunkeln. Ein Küchenschrank oder eine Schublade sind perfekt.
* Geduld: Bohnensprossen brauchen ein paar Tage, bis sie erntereif sind. Aber keine Sorge, die Zeit vergeht wie im Flug!
Schritt-für-Schritt-Anleitung: So gelingen eure Bohnensprossen garantiert
1. Die Bohnen vorbereiten: Gebt die Bohnen in euer Sprossenglas oder Gefäß. Ich nehme meistens so 2-3 Esslöffel Bohnen, das reicht für eine ordentliche Portion Sprossen. Spült die Bohnen gründlich unter fließendem Wasser ab, um Staub und eventuelle Verunreinigungen zu entfernen.
2. Einweichen: Füllt das Glas mit reichlich Wasser, sodass die Bohnen gut bedeckt sind. Lasst die Bohnen für 8-12 Stunden einweichen. Das ist wichtig, damit sie aufquellen und der Keimprozess in Gang kommt. Ich mache das meistens abends, dann können die Bohnen über Nacht einweichen.
3. Abgießen und spülen: Gießt das Einweichwasser ab und spült die Bohnen erneut gründlich unter fließendem Wasser ab. Achtet darauf, dass kein Wasser im Glas zurückbleibt, da dies zu Schimmelbildung führen kann.
4. Der dunkle Ort: Stellt das Sprossenglas an einen dunklen Ort. Wichtig ist, dass das Glas schräg steht, damit überschüssiges Wasser ablaufen kann. Ich stelle es meistens in eine Schüssel, falls doch noch etwas Wasser austritt.
5. Regelmäßiges Spülen: Spült die Bohnen 2-3 Mal täglich mit frischem Wasser. Das ist super wichtig, damit sie feucht bleiben und nicht austrocknen. Achtet darauf, dass ihr das Wasser jedes Mal gut abgießt.
6. Warten und beobachten: Nach ein paar Tagen werdet ihr sehen, wie die ersten kleinen Sprossen aus den Bohnen sprießen. Das ist total spannend zu beobachten! Je nach Temperatur und Bohnensorte dauert es 3-5 Tage, bis die Sprossen erntereif sind.
7. Ernten und genießen: Wenn die Sprossen die gewünschte Länge erreicht haben (ich mag sie am liebsten, wenn sie so 2-3 cm lang sind), könnt ihr sie ernten. Spült die Sprossen noch einmal gründlich ab und entfernt eventuelle Schalenreste.
8. Lagern: Die fertigen Sprossen könnt ihr im Kühlschrank in einem luftdichten Behälter für 2-3 Tage aufbewahren. Am besten schmecken sie aber frisch!
Tipps und Tricks für perfekte Bohnensprossen
* Hygiene ist das A und O: Achtet darauf, dass eure Hände, das Sprossenglas und alle verwendeten Utensilien sauber sind. Das minimiert das Risiko von Schimmelbildung.
* Die richtige Temperatur: Die ideale Temperatur für die Keimung liegt zwischen 18 und 22 Grad Celsius.
* Lüften: Sorgt für eine gute Belüftung, damit sich keine Staunässe bildet.
* Schimmel vermeiden: Wenn ihr Schimmel entdeckt, solltet ihr die Sprossen sofort entsorgen.
* Abwechslung: Probiert verschiedene Bohnensorten aus, um euren persönlichen Favoriten zu finden.
* Sprossen als Superfood: Bohnensprossen sind reich an Vitaminen, Mineralstoffen und Enzymen. Sie sind eine tolle Ergänzung für eine gesunde Ernährung.
* Sprossen im Winter: Gerade im Winter, wenn es wenig frisches Gemüse gibt, sind Sprossen eine tolle Möglichkeit, sich mit wichtigen Nährstoffen zu versorgen.
* Sprossen für Kinder: Kinder lieben es, beim Sprossen ziehen zuzusehen und mitzuhelfen. Es ist eine tolle Möglichkeit, ihnen die Natur näherzubringen.
* Sprossen im Salat: Bohnensprossen passen hervorragend in Salate. Sie verleihen dem Salat eine knackige Textur und einen frischen Geschmack.
* Sprossen im Wok: Auch im Wok sind Bohnensprossen eine tolle Zutat. Sie sind schnell gar und behalten ihren Biss.
* Sprossen auf dem Brot: Auf dem Brot sind Bohnensprossen eine leckere und gesunde Alternative zu Salatblättern.
* Sprossen als Deko: Bohnensprossen eignen sich auch hervorragend als Deko für Gerichte. Sie verleihen dem Gericht eine frische und lebendige Note.
Häufige Probleme und Lösungen
* Schimmelbildung: Wenn die Sprossen schimmeln, liegt das meistens an mangelnder Hygiene oder Staunässe. Achtet darauf, dass ihr die Sprossen regelmäßig spült und für eine gute Belüftung sorgt.
* Keine Keimung: Wenn die Bohnen nicht keimen, kann das an der Qualität der Bohnen liegen oder daran, dass sie zu alt sind. Verwendet frische Bohnen und achtet darauf, dass sie für den Verzehr geeignet sind.
* Austrocknung: Wenn die Sprossen austrocknen, spült sie öfter.
* Unangenehmer Geruch: Ein unangenehmer Geruch deutet auf Schimmelbildung hin. Entsorgt die Sprossen.
Bohnensprossen in der Küche: Vielseitige Verwendungsmöglichkeiten
Bohnensprossen sind unglaublich vielseitig und können in zahlreichen Gerichten verwendet werden. Hier ein paar Ideen:
* Salate: Gebt die Sprossen einfach zu eurem Lieblingssalat hinzu. Sie passen besonders gut zu asiatisch inspirierten Salaten mit Sojasauce, Sesamöl und Ingwer.
* Wok-Gerichte: Bohnensprossen sind ein Muss in jedem Wok-Gericht. Sie sind schnell gar und behalten ihren knackigen Biss.
* Frühlingsrollen: Füllt eure Frühlingsrollen mit Bohnensprossen, Gemüse und Reisnudeln.
* Suppen: Gebt die Sprossen kurz vor dem Servieren in eure Suppe. Sie verleihen der Suppe eine frische Note.
* Sandwiches und Wraps: Belegt eure Sandwiches und Wraps mit Bohnensprossen für einen extra Crunch.
* Smoothies: Ja, ihr habt richtig gelesen! Bohnensprossen können auch in Smoothies verwendet werden. Sie sind eine tolle Quelle für Vitamine und Mineralstoffe.
* Als Topping: Streut die Sprossen über eure Gerichte als dekoratives und gesundes Topping.
Fazit: Sprossen ziehen ist ein tolles Hobby
Ich hoffe, ich konnte euch mit dieser Anleitung dazu inspirieren, eure eigenen Bohnensprossen zu ziehen. Es ist wirklich ein tolles Hobby, das nicht nur Spaß macht, sondern auch noch supergesund ist. Probiert es aus und lasst es euch schmecken! Und vergesst nicht: Selbstgemacht schmeckt einfach am besten! Viel Spaß beim Sprossen ziehen!
Conclusion
So, there you have it! Growing bean sprouts at home is not only incredibly easy and cost-effective, but it also provides you with a continuous supply of fresh, nutritious greens right at your fingertips. Forget those limp, pre-packaged sprouts from the grocery store – with just a few simple steps and minimal effort, you can cultivate vibrant, crunchy bean sprouts bursting with flavor and goodness.
Why is this DIY trick a must-try? Because it empowers you to take control of your food source, ensuring you’re consuming the freshest possible ingredients. You’ll avoid the preservatives and potential contaminants often found in commercially produced sprouts. Plus, the satisfaction of nurturing something from seed to sprout is surprisingly rewarding. It’s a small act of self-sufficiency that connects you to the natural world, even in the midst of a busy urban life.
Beyond the basic mung bean sprout, don’t be afraid to experiment! Try sprouting other types of beans and seeds, such as adzuki beans, lentils, or even alfalfa seeds. Each variety offers a unique flavor profile and nutritional benefit. You can also play around with the sprouting time to achieve your desired level of crunchiness. Some people prefer their sprouts slightly longer and more developed, while others enjoy them when they’re still short and tender.
Consider adding your homemade bean sprouts to salads, sandwiches, stir-fries, or even as a topping for soups and noodles. They add a delightful textural contrast and a boost of vitamins and minerals to any dish. For a spicy kick, try adding a pinch of chili flakes to your sprouting jar. Or, for a more savory flavor, consider using a vegetable broth instead of water for rinsing.
We wholeheartedly encourage you to give this DIY project a try. It’s a simple, sustainable, and incredibly rewarding way to enhance your diet and connect with the food you eat. Once you experience the freshness and flavor of homegrown bean sprouts, you’ll never go back to store-bought again.
Don’t just take our word for it – embark on your own sprouting adventure and discover the joys of growing bean sprouts at home. We’re confident that you’ll be amazed by how easy and satisfying it is. And most importantly, we want to hear about your experience! Share your tips, tricks, and variations in the comments below. Let’s build a community of home sprouters and inspire others to embrace this simple yet powerful way to nourish themselves and their families. Let us know what kind of beans you tried, what recipes you used them in, and any challenges you encountered along the way. Your feedback is invaluable and will help us refine this guide for future sprouters. Happy sprouting!
Frequently Asked Questions (FAQ)
What types of beans can I sprout?
While mung beans are the most common and easiest to sprout, you can experiment with a variety of other beans and seeds. Adzuki beans, lentils, alfalfa seeds, radish seeds, broccoli seeds, and even some types of peas can be successfully sprouted at home. Keep in mind that different beans may require slightly different sprouting times and conditions. Always research the specific requirements for each type of bean before you begin. Avoid sprouting kidney beans, as they contain toxins that are only destroyed by thorough cooking.
How long does it take to grow bean sprouts?
The sprouting time varies depending on the type of bean and the environmental conditions. Generally, mung bean sprouts take about 3-5 days to reach a desirable length. Lentils and adzuki beans may take slightly longer, while alfalfa and radish seeds can sprout in as little as 2-3 days. Keep a close eye on your sprouts and adjust the sprouting time based on your preferences.
What is the best container to use for sprouting?
A wide-mouth jar, such as a mason jar, is an excellent choice for sprouting. The wide opening allows for easy rinsing and drainage. You can also use a sprouting tray or a specialized sprouting container. Regardless of the container you choose, ensure that it has adequate drainage to prevent the sprouts from becoming waterlogged.
How often should I rinse the sprouts?
Rinsing the sprouts is crucial for preventing mold and bacterial growth. Rinse them thoroughly with fresh, cool water at least twice a day, preferably three times a day, especially in warmer climates. Ensure that all the water drains out after each rinsing.
What if my sprouts start to smell bad?
A foul odor is a sign of bacterial contamination or mold growth. If your sprouts smell bad, discard them immediately. To prevent this, ensure that you are rinsing them frequently and thoroughly, and that the container has adequate drainage. Avoid overcrowding the container with too many beans.
Can I eat the bean sprout roots?
Yes, the roots of bean sprouts are perfectly edible. They are a natural part of the sprouting process and are safe to consume.
How do I store bean sprouts?
Once your bean sprouts have reached your desired length, rinse them thoroughly and drain them well. Store them in a sealed container in the refrigerator for up to a week. To maintain their freshness, line the container with a paper towel to absorb excess moisture.
Are there any health benefits to eating bean sprouts?
Yes, bean sprouts are a nutritional powerhouse. They are a good source of vitamins, minerals, and enzymes. They are also low in calories and high in fiber. Bean sprouts are particularly rich in vitamin C, vitamin K, and folate.
Can I grow bean sprouts in the dark?
While bean sprouts don’t require light to germinate, exposing them to indirect sunlight for the last day or two of sprouting can help them develop chlorophyll, which gives them a slightly greener color and enhances their nutritional value. However, avoid direct sunlight, as it can overheat the sprouts.
What if my bean sprouts aren’t sprouting?
Several factors can contribute to poor sprouting. Ensure that you are using fresh, high-quality beans. Old or damaged beans may not germinate properly. Also, make sure that the beans are not overcrowded in the container and that they are being rinsed frequently enough. The temperature may also be a factor; bean sprouts prefer a slightly warm environment (around 70-75°F).
Can I use tap water to sprout beans?
While tap water is generally safe to use, it’s best to use filtered water if your tap water contains high levels of chlorine or other chemicals. These chemicals can inhibit germination and affect the flavor of the sprouts.
How do I prevent mold growth on my bean sprouts?
The key to preventing mold growth is proper hygiene and ventilation. Rinse the sprouts thoroughly and frequently, ensure adequate drainage, and avoid overcrowding the container. If you live in a humid climate, consider using a fan to improve air circulation around the sprouts.
Are there any risks associated with eating raw bean sprouts?
While bean sprouts are generally safe to eat raw, there is a small risk of bacterial contamination, such as Salmonella or E. coli. To minimize this risk, purchase high-quality beans from a reputable source, rinse the sprouts thoroughly, and store them properly. If you are pregnant, elderly, or have a weakened immune system, it’s best to cook bean sprouts before eating them.
Can I grow bean sprouts without soil?
Yes, bean sprouts are typically grown without soil. They only require water and air to germinate and grow. This makes them a very easy and convenient crop to cultivate at home.
What are some creative ways to use bean sprouts in recipes?
Beyond the usual salads and stir-fries, bean sprouts can be incorporated into a variety of dishes. Try adding them to spring rolls, omelets, or even smoothies for a nutritional boost. They can also be used as a topping for tacos or as a filling for dumplings. Get creative and experiment with different flavor combinations to discover your favorite ways to enjoy bean sprouts.
Leave a Comment