
Hanging lettuce garden DIY projects are taking the gardening world by storm, and for good reason! Imagine fresh, crisp lettuce just an arm’s reach away, cascading beautifully from a hanging basket. Forget battling slugs and snails in your traditional garden bed; this DIY solution offers a stylish and practical way to grow your own greens, even if you’re short on space.
The concept of vertical gardening, which hanging gardens fall under, has roots stretching back to ancient civilizations, most famously the Hanging Gardens of Babylon, one of the Seven Wonders of the Ancient World. While we might not be building architectural marvels, we can certainly borrow the ingenuity and apply it to our modern lives. For centuries, people have sought creative ways to cultivate plants in limited spaces, and the hanging lettuce garden is a testament to that enduring spirit.
Why do you need this hanging lettuce garden DIY in your life? Well, beyond the sheer joy of growing your own food, it’s about convenience and control. Store-bought lettuce can be expensive and often wilts quickly. With a hanging garden, you harvest only what you need, ensuring peak freshness and minimizing waste. Plus, it’s a fantastic way to add a touch of greenery to balconies, patios, or even indoor spaces. I’m excited to share some simple and effective techniques that will have you enjoying homegrown salads in no time!
DIY Hänge-Salatgarten: Frischer Salat direkt von der Decke!
Hallo liebe Gartenfreunde! Habt ihr wenig Platz, aber trotzdem Lust auf frischen Salat aus dem eigenen Anbau? Dann habe ich genau das Richtige für euch: einen hängenden Salatgarten! Das ist nicht nur platzsparend, sondern auch ein echter Hingucker. Und das Beste: Es ist super einfach selbst zu machen! Lasst uns loslegen!
Was du brauchst:
* Mehrere Plastikflaschen (1,5 oder 2 Liter): Je nachdem, wie groß dein Garten werden soll. Achte darauf, dass sie sauber sind.
* Ein scharfes Messer oder eine Schere: Zum Zuschneiden der Flaschen.
* Eine Bohrmaschine oder ein Nagel und Hammer: Für die Löcher zum Aufhängen und zur Drainage.
* Starkes Seil oder Kette: Zum Aufhängen der Flaschen.
* Erde: Am besten Blumenerde oder spezielle Gemüseerde.
* Salatsamen oder Salatpflänzchen: Je nachdem, wie schnell du ernten möchtest.
* Gießkanne oder Sprühflasche: Zum Bewässern.
* Optional: Sprühfarbe oder Dekomaterial, um die Flaschen zu verschönern.
* Optional: Vlies oder Jute zum Auskleiden der Flaschen (verhindert das Austrocknen der Erde).
Schritt-für-Schritt-Anleitung:
1. Vorbereitung der Flaschen
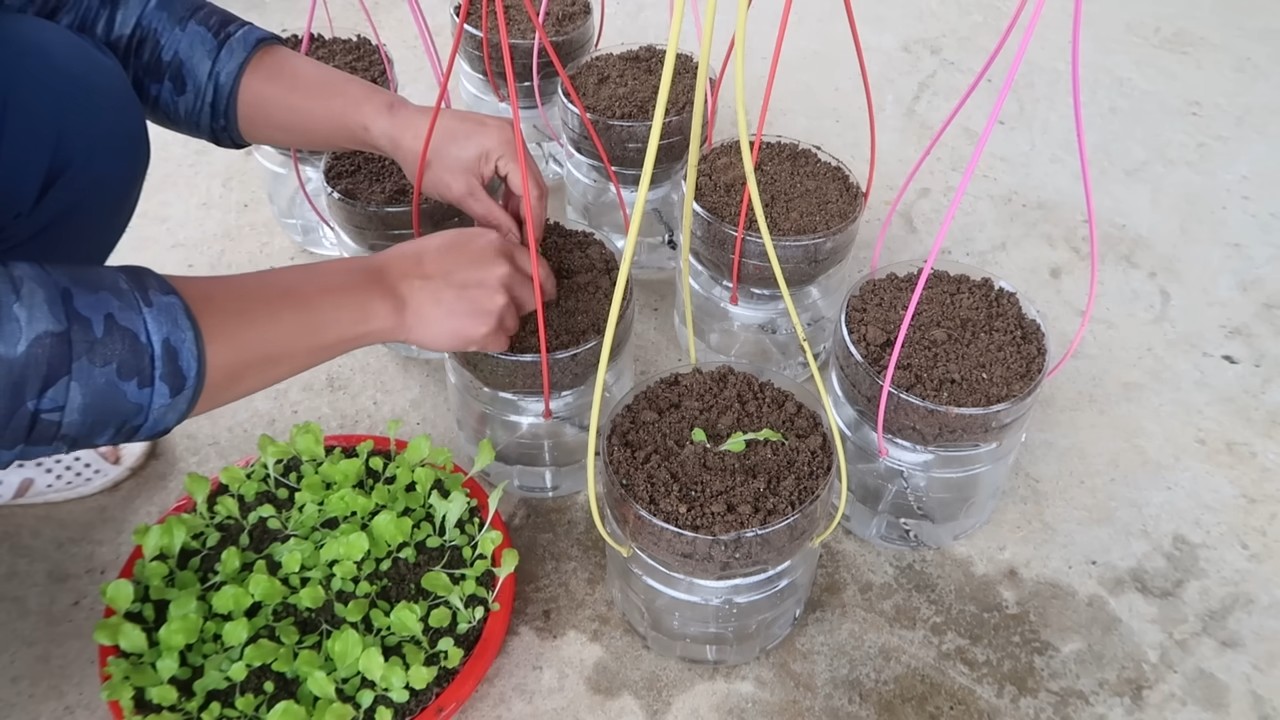
1. Reinigung: Zuerst müssen die Plastikflaschen gründlich gereinigt werden. Entferne alle Etiketten und spüle sie mit warmem Wasser und Spülmittel aus. Trockne sie anschließend gut ab.
2. Zuschneiden: Jetzt kommt der spannende Teil! Du hast zwei Möglichkeiten, die Flaschen zuzuschneiden:
* Variante 1 (Horizontal): Schneide die Flasche horizontal auf, etwa in der Mitte. Du erhältst zwei Hälften, die du als Pflanzgefäße nutzen kannst. Diese Variante ist ideal, wenn du größere Salatpflanzen setzen möchtest.
* Variante 2 (Rechteckig): Schneide ein rechteckiges Fenster in die Seite der Flasche. Lasse dabei den Boden und den oberen Teil der Flasche intakt. Diese Variante ist platzsparender und eignet sich gut für kleinere Salatpflanzen oder Salatsamen.
Ich persönlich bevorzuge die horizontale Variante, da sie mehr Platz für die Wurzeln bietet. Aber probiere einfach aus, was dir besser gefällt!
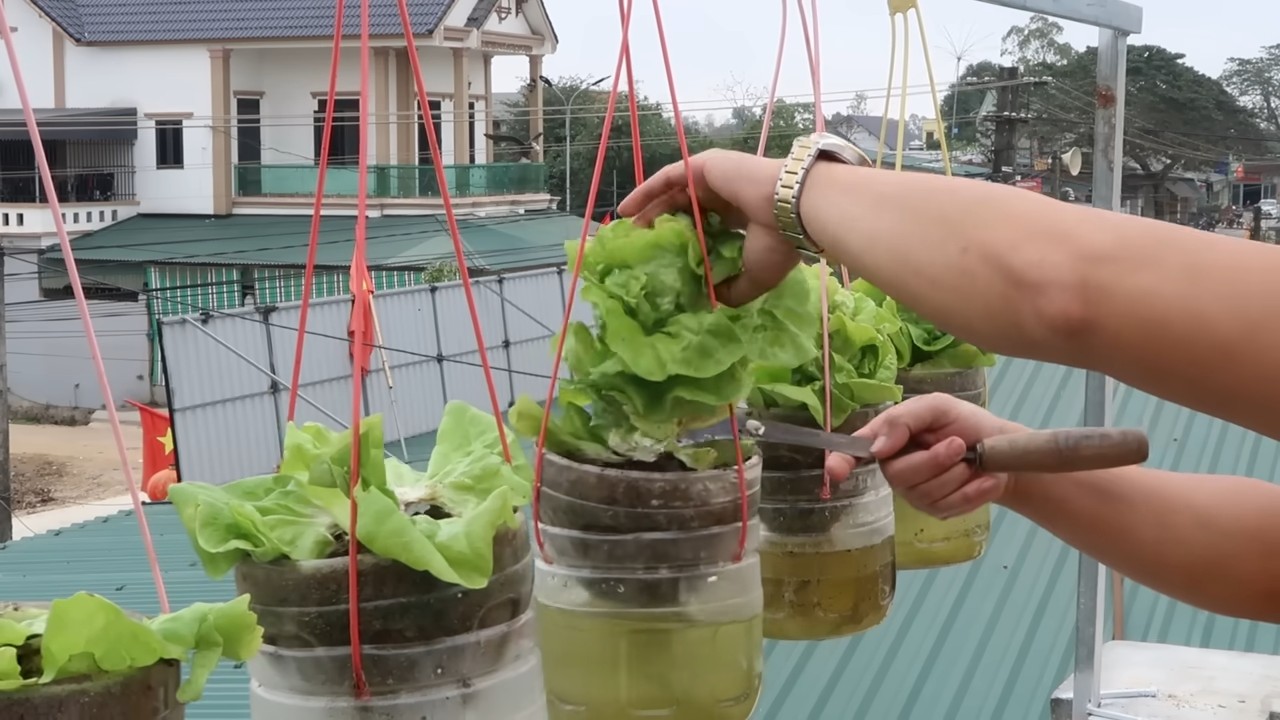
3. Drainagelöcher: Egal für welche Variante du dich entscheidest, du brauchst unbedingt Drainagelöcher! Bohre oder steche mit einem Nagel und Hammer mehrere kleine Löcher in den Boden der Flaschen. So kann überschüssiges Wasser ablaufen und Staunässe vermieden werden. Staunässe ist der Feind jeder Salatpflanze!
4. Aufhängelöcher: Jetzt kommen die Löcher zum Aufhängen. Bohre oder steche zwei Löcher an den oberen Rändern der Flaschen. Achte darauf, dass die Löcher stabil sind und das Gewicht der Erde und Pflanzen tragen können. Bei der horizontalen Variante bohre die Löcher am besten gegenüberliegend. Bei der rechteckigen Variante bohre sie an den oberen Ecken.
5. Optional: Verschönerung: Wenn du möchtest, kannst du die Flaschen jetzt noch verschönern. Sprüh sie mit Farbe an, beklebe sie mit Dekomaterial oder bemale sie mit Mustern. Deiner Kreativität sind keine Grenzen gesetzt! Ich habe meine Flaschen mit Tafelfarbe besprüht und mit Kreide beschriftet, welche Salatsorte darin wächst. Das sieht nicht nur gut aus, sondern ist auch praktisch!
2. Bepflanzung
1. Auskleiden (Optional): Wenn du möchtest, kannst du die Flaschen mit Vlies oder Jute auskleiden. Das verhindert, dass die Erde zu schnell austrocknet. Schneide das Vlies oder die Jute einfach passend zu und lege es in die Flaschen.
2. Befüllen mit Erde: Fülle die Flaschen mit Erde. Achte darauf, dass die Erde locker und luftig ist. Drücke sie nicht zu fest an, damit die Wurzeln gut wachsen können. Lass oben noch etwas Platz, damit du beim Gießen nicht alles überschwemmst.
3. Pflanzen oder Säen: Jetzt kommt der schönste Teil: das Pflanzen oder Säen!
* Salatpflänzchen: Wenn du Salatpflänzchen verwendest, grabe kleine Löcher in die Erde und setze die Pflänzchen vorsichtig hinein. Drücke die Erde leicht an und gieße sie gut an.
* Salatsamen: Wenn du Salatsamen verwendest, streue sie gleichmäßig auf die Erde und bedecke sie leicht mit Erde. Gieße die Erde vorsichtig an.
Ich persönlich mag es, beides zu kombinieren. Ich setze ein paar Salatpflänzchen und säe noch ein paar Samen aus. So habe ich schneller eine Ernte und kann später noch nachsäen.
4. Gießen: Gieße die Erde gut an, aber vermeide Staunässe. Die Erde sollte feucht, aber nicht nass sein.
3. Aufhängen
1. Seil oder Kette vorbereiten: Schneide das Seil oder die Kette in passende Stücke. Die Länge hängt davon ab, wie tief du deinen Salatgarten hängen möchtest.
2. Flaschen aufhängen: Fädele das Seil oder die Kette durch die Löcher in den Flaschen. Achte darauf, dass die Flaschen sicher hängen und nicht herunterfallen können.
3. Aufhängen: Hänge deinen Salatgarten an einem sonnigen Ort auf. Ein Balkon, eine Terrasse oder ein Fensterbrett sind ideal. Achte darauf, dass der Ort windgeschützt ist, damit die Flaschen nicht hin und her schwingen.
Pflege deines Hänge-Salatgartens
* Gießen: Gieße deinen Salatgarten regelmäßig, besonders an heißen Tagen. Die Erde sollte immer feucht sein, aber vermeide Staunässe.
* Düngen: Dünge deinen Salatgarten regelmäßig mit einem Flüssigdünger für Gemüse. So bekommen die Pflanzen alle Nährstoffe, die sie brauchen.
* Schädlinge: Kontrolliere deinen Salatgarten regelmäßig auf Schädlinge wie Schnecken oder Blattläuse. Bei Bedarf kannst du natürliche Schädlingsbekämpfungsmittel einsetzen.
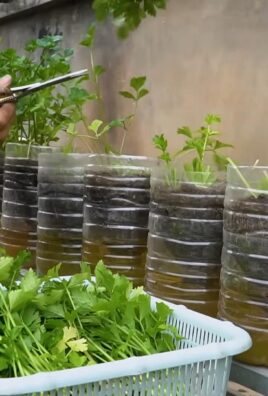
* Ernten: Ernte deinen Salat, sobald er groß genug ist. Schneide die Blätter einfach mit einem Messer ab. Die Pflanzen wachsen weiter und du kannst immer wieder ernten.
Tipps und Tricks
* Sortenvielfalt: Pflanze verschiedene Salatsorten an, um eine größere Vielfalt zu haben. Es gibt viele verschiedene Sorten, von Kopfsalat über Feldsalat bis hin zu Rucola.
* Kräuter: Du kannst auch Kräuter wie Petersilie, Schnittlauch oder Basilikum in deinen Hänge-Salatgarten pflanzen. Das sieht nicht nur gut aus, sondern schmeckt auch lecker!
* Sonnenschutz: An sehr heißen Tagen kann es sinnvoll sein, deinen Salatgarten mit einem Sonnensegel oder einer Plane zu beschatten. So verhinderst du, dass die Blätter verbrennen.
* Winterfest machen: Wenn du deinen Salatgarten auch im Winter nutzen möchtest, solltest du ihn an einen geschützten Ort stellen und mit Vlies abdecken.
* Upcycling: Verwende alte PET-Flaschen, um deinen Beitrag zum Umweltschutz zu leisten.
Häufige Fehler und wie du sie vermeidest
* Keine Drainagelöcher: Das führt zu Staunässe und die Wurzeln faulen. Unbedingt Drainagelöcher bohren!
* Zu wenig Sonne: Salat braucht viel Sonne, um gut zu wachsen. Wähle einen sonnigen Standort.
* Zu viel Gießen: Staunässe vermeiden! Die Erde sollte feucht, aber nicht nass sein.
* Kein Dünger: Salat braucht Nährstoffe, um zu wachsen. Regelmäßig düngen!
* Schädlinge ignorieren: Schädlinge können deinen Salatgarten zerstören. Regelmäßig kontrollieren und bei Bedarf bekämpfen.
Ich hoffe, diese Anleitung hilft dir dabei, deinen eigenen Hänge-Salatgarten zu bauen. Es ist wirklich ein tolles Projekt und es macht Spaß, seinen eigenen Salat zu ernten. Viel Erfolg und guten Appetit!
Conclusion
So, there you have it! Creating your own hanging lettuce garden isn’t just a fun project; it’s a game-changer for fresh, accessible greens. Forget those wilted, overpriced bags from the grocery store. Imagine stepping outside your door and snipping crisp, vibrant lettuce leaves for your salad, sandwich, or wrap, all grown with your own two hands. This DIY project is more than just a gardening endeavor; it’s an investment in your health, your wallet, and your connection to nature.
Why is this a must-try? Because it’s incredibly space-efficient, perfect for balconies, patios, or even small yards. It’s also a fantastic way to deter pests like slugs and snails, which often plague ground-level lettuce patches. Plus, let’s be honest, it looks fantastic! A hanging lettuce garden adds a touch of rustic charm and vibrant greenery to any outdoor space.
But the benefits don’t stop there. Growing your own lettuce allows you to control exactly what goes into your food. No more worrying about pesticides or herbicides. You can choose organic seeds and fertilizers, ensuring that your lettuce is as healthy and delicious as possible.
Looking for variations? Absolutely! Try experimenting with different types of lettuce. Romaine, butterhead, and loose-leaf varieties all thrive in hanging baskets. You can also add other herbs like parsley, chives, or basil to your hanging garden for a truly diverse and flavorful harvest. Consider using different types of containers too. While hanging baskets are a classic choice, you could also repurpose old buckets, plastic bottles, or even fabric grow bags. Just make sure your chosen container has adequate drainage.
Another fun variation is to create a tiered hanging garden. By stacking multiple baskets or containers at different levels, you can maximize your growing space and create a stunning visual display. This is a great option if you have a larger area to work with.
Don’t be afraid to get creative and personalize your hanging lettuce garden to suit your own tastes and preferences. Add decorative elements like painted pots, colorful ribbons, or even small garden gnomes to make it truly your own.
We wholeheartedly encourage you to give this DIY hanging lettuce garden a try. It’s a rewarding project that will bring you fresh, delicious lettuce all season long. And the best part? It’s easier than you think! With a few simple materials and a little bit of effort, you can create your own thriving vertical garden.
Once you’ve built your hanging lettuce garden, we’d love to hear about your experience! Share your photos, tips, and tricks with us in the comments below. Let’s create a community of hanging lettuce garden enthusiasts and inspire others to grow their own food. What lettuce varieties did you choose? What challenges did you face, and how did you overcome them? Your insights could be invaluable to other readers who are just starting out. So, get your hands dirty, embrace the joy of gardening, and enjoy the delicious rewards of your own homegrown lettuce! Remember, fresh, healthy, and delicious lettuce is just a hanging basket away!
Frequently Asked Questions (FAQ)
What type of lettuce grows best in a hanging garden?
Loose-leaf varieties like Black Seeded Simpson, Salad Bowl, and Red Sails are excellent choices for hanging gardens. They are relatively compact, easy to harvest, and produce a continuous supply of leaves. Butterhead lettuce, such as Buttercrunch, also performs well. Romaine lettuce can be grown, but it may require a larger container and more support as it matures. Avoid head lettuce varieties like iceberg, as they tend to be too large and heavy for hanging baskets. Consider a mix of different lettuce types for variety in flavor, texture, and color.
How often should I water my hanging lettuce garden?
Hanging baskets tend to dry out more quickly than ground-level gardens, so regular watering is crucial. Check the soil moisture daily, especially during hot or windy weather. Water thoroughly when the top inch of soil feels dry to the touch. Aim to keep the soil consistently moist but not waterlogged. Overwatering can lead to root rot, so ensure your containers have adequate drainage. A good rule of thumb is to water deeply until you see water draining from the bottom of the container. Consider using a watering can with a long spout to reach all areas of the basket evenly.
What kind of soil should I use for my hanging lettuce garden?
Use a high-quality potting mix specifically formulated for containers. Avoid using garden soil, as it can be too heavy and compact, hindering drainage and root growth. A good potting mix should be lightweight, well-draining, and rich in organic matter. You can also amend your potting mix with compost or other organic materials to improve its fertility and water retention. Consider adding a slow-release fertilizer to provide your lettuce plants with a steady supply of nutrients.
How much sunlight does my hanging lettuce garden need?
Lettuce thrives in full sun (6-8 hours of direct sunlight per day) but can also tolerate partial shade (4-6 hours of sunlight). In hotter climates, providing some afternoon shade can help prevent the leaves from wilting or becoming bitter. Observe your plants closely and adjust their location as needed to ensure they are receiving the optimal amount of sunlight. If you don’t have a sunny spot, you can supplement with grow lights.
How do I fertilize my hanging lettuce garden?
Lettuce is a relatively light feeder, but regular fertilization will help ensure healthy growth and abundant harvests. Use a balanced liquid fertilizer diluted to half strength every 2-3 weeks. Alternatively, you can use a slow-release fertilizer incorporated into the potting mix at planting time. Avoid over-fertilizing, as this can lead to leggy growth and bitter-tasting leaves. Organic fertilizers, such as compost tea or fish emulsion, are also excellent options.
How do I harvest lettuce from my hanging garden?
Harvesting lettuce from a hanging garden is easy and convenient. Simply snip off the outer leaves as needed, leaving the inner leaves to continue growing. This cut-and-come-again method allows you to harvest lettuce continuously throughout the growing season. Harvest in the morning when the leaves are crisp and hydrated. Avoid harvesting during the hottest part of the day, as the leaves may be wilted and less flavorful.
How do I protect my hanging lettuce garden from pests?
Hanging gardens are naturally less susceptible to ground-dwelling pests like slugs and snails. However, aphids, whiteflies, and other flying insects can still be a problem. Inspect your plants regularly for signs of infestation. You can control aphids and whiteflies by spraying them with a strong stream of water or by using insecticidal soap. Companion planting with herbs like basil or marigolds can also help deter pests. Consider using netting to protect your plants from birds and other larger pests.
Can I grow lettuce in a hanging garden year-round?
Whether you can grow lettuce year-round depends on your climate. Lettuce is a cool-season crop that prefers temperatures between 60°F and 70°F. In mild climates, you may be able to grow lettuce throughout the year. In colder climates, you can extend the growing season by starting seeds indoors and transplanting them outdoors in the spring. You can also use cold frames or row covers to protect your plants from frost. In hot climates, you can grow lettuce during the cooler months of fall and winter. Choose heat-tolerant varieties and provide shade during the hottest part of the day.
What containers are best for a hanging lettuce garden?
Hanging baskets are the most common choice, but you can also use other types of containers, such as repurposed buckets, plastic bottles, or fabric grow bags. Choose containers that are at least 8-10 inches deep to provide adequate space for root growth. Ensure your containers have drainage holes to prevent waterlogging. Consider the weight of the container when filled with soil and plants, and choose a sturdy hanging mechanism that can support the weight.
How do I prevent my hanging lettuce garden from drying out?
Hanging baskets dry out quickly, so it’s important to take steps to prevent them from becoming too dry. Use a potting mix that retains moisture well. Add water-retaining crystals to the potting mix to help absorb and release water. Mulch the surface of the soil with straw or shredded bark to help reduce evaporation. Water deeply and thoroughly, and check the soil moisture regularly. Consider using a self-watering hanging basket or adding a drip irrigation system to automate watering.
Leave a Comment