
Growing spinach in plastic bottles might sound like something out of a sci-fi movie, but trust me, it’s a super cool and surprisingly effective way to cultivate your own leafy greens, even if you’re short on space or gardening experience! Have you ever dreamed of snipping fresh, vibrant spinach right from your windowsill, ready to toss into a salad or smoothie? This DIY project makes that dream a reality, and it’s easier than you think.
The concept of container gardening, of which this is a clever variation, has roots stretching back centuries. From the Hanging Gardens of Babylon to the humble window boxes of Victorian England, people have always found creative ways to bring nature closer, regardless of their living situation. Today, with increasing urbanization and a renewed focus on sustainable living, the need for innovative gardening solutions is greater than ever.
Let’s be honest, buying organic spinach at the grocery store can be expensive, and sometimes it’s wilted before you even get it home! Growing spinach in plastic bottles not only saves you money but also ensures you have access to fresh, healthy greens whenever you want them. Plus, it’s a fantastic way to recycle those plastic bottles that might otherwise end up in a landfill. This DIY project is a win-win for your wallet, your health, and the environment. So, grab those empty bottles, and let’s get started on this fun and rewarding gardening adventure!
Spinat Anbauen in Plastikflaschen: Ein DIY-Gartenprojekt für Jedermann
Hallo Gartenfreunde! Habt ihr Lust auf frischen Spinat, aber wenig Platz? Oder wollt ihr einfach nur eine nachhaltige und kostengünstige Möglichkeit finden, euer eigenes Gemüse anzubauen? Dann seid ihr hier genau richtig! Ich zeige euch, wie ihr in wenigen Schritten Spinat in Plastikflaschen ziehen könnt. Das ist nicht nur super einfach, sondern auch eine tolle Möglichkeit, Plastikmüll zu recyceln und gleichzeitig euren grünen Daumen zu beweisen. Lasst uns loslegen!
Was ihr braucht:
* Plastikflaschen: Am besten eignen sich 1,5-Liter- oder 2-Liter-Flaschen. Je größer, desto besser, da der Spinat mehr Platz zum Wachsen hat. Achtet darauf, dass die Flaschen sauber und leer sind.
* Spinatsamen: Wählt eine Spinatsorte, die euch schmeckt und die für euren Standort geeignet ist. Es gibt verschiedene Sorten, die sich in Geschmack, Größe und Wachstumszeit unterscheiden.
* Erde: Verwendet am besten hochwertige Pflanzerde oder eine Mischung aus Gartenerde, Kompost und Sand. Die Erde sollte locker und gut durchlässig sein.
* Messer oder Schere: Zum Zuschneiden der Plastikflaschen.
* Bohrer oder Nagel: Zum Anbringen von Drainagelöchern.
* Gießkanne oder Sprühflasche: Zum Bewässern der Spinatpflanzen.
* Optional: Kieselsteine oder Tonscherben für die Drainage.
* Optional: Etiketten und Stift zum Beschriften der Flaschen.
Vorbereitung der Plastikflaschen
1. Reinigung: Zuerst müsst ihr die Plastikflaschen gründlich reinigen. Entfernt alle Etiketten und spült die Flaschen mit warmem Wasser und Spülmittel aus. Achtet darauf, dass keine Spülmittelreste zurückbleiben. Lasst die Flaschen anschließend gut trocknen.
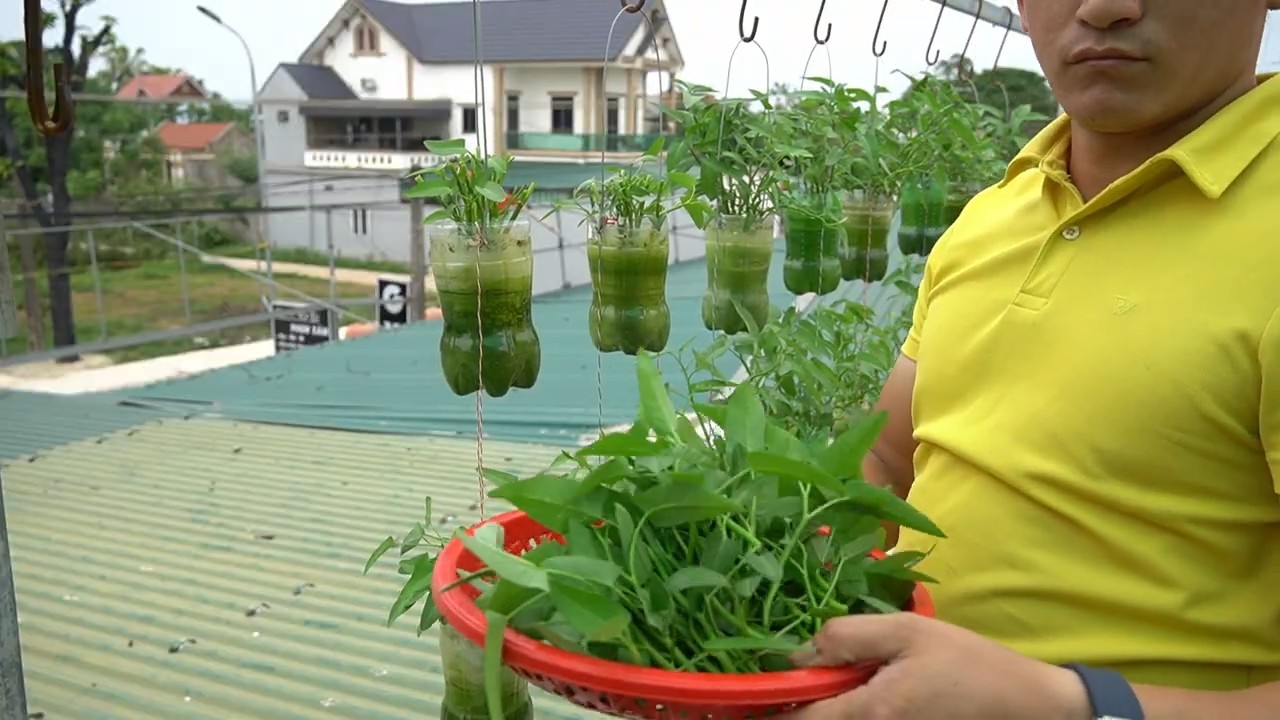
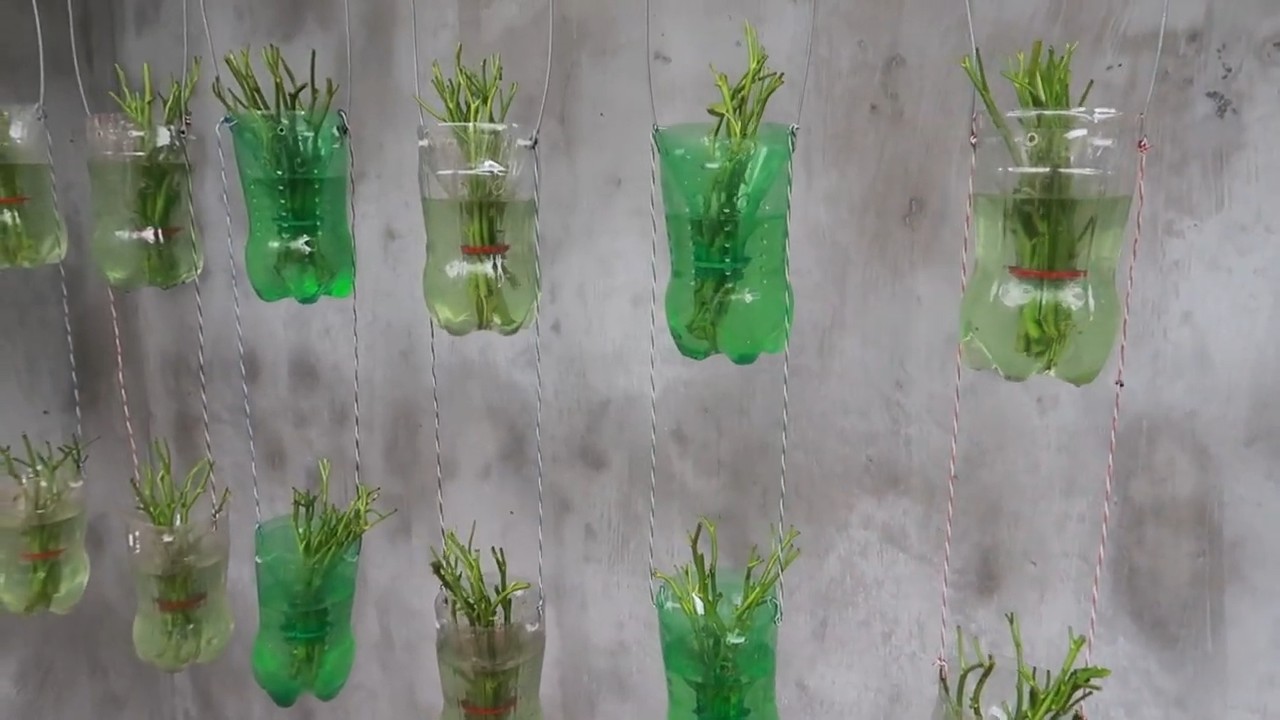
2. Zuschneiden: Jetzt kommt der spaßige Teil! Nehmt euer Messer oder eure Schere und schneidet die Plastikflaschen in der Mitte durch. Ihr könnt die Flaschen entweder komplett halbieren oder nur den oberen Teil abschneiden, sodass ein tieferer Behälter entsteht. Ich persönlich bevorzuge es, die Flaschen komplett zu halbieren, da ich so zwei separate Behälter erhalte und mehr Spinat anbauen kann.
3. Drainagelöcher: Damit das Wasser gut ablaufen kann und Staunässe vermieden wird, müsst ihr Drainagelöcher in den Boden der Flaschen bohren oder stechen. Verwendet dafür einen Bohrer oder einen Nagel. Macht etwa 4-5 Löcher pro Flaschenhälfte. Achtet darauf, dass die Löcher nicht zu groß sind, damit die Erde nicht herausfällt.
4. Optional: Drainage-Schicht: Um die Drainage zusätzlich zu verbessern, könnt ihr eine Schicht Kieselsteine oder Tonscherben auf den Boden der Flaschen geben, bevor ihr die Erde einfüllt. Diese Schicht hilft, das Wasser besser abzuleiten und verhindert, dass die Wurzeln im Wasser stehen.
Aussaat des Spinats
1. Erde einfüllen: Füllt die vorbereiteten Plastikflaschen mit Erde. Lasst etwa 2-3 cm Platz bis zum Rand, damit das Wasser beim Gießen nicht überläuft. Drückt die Erde leicht an.
2. Samen säen: Verteilt die Spinatsamen gleichmäßig auf der Erde. Achtet darauf, dass die Samen nicht zu dicht beieinander liegen, da die Pflanzen sonst zu wenig Platz zum Wachsen haben. Ich säe meistens etwa 5-6 Samen pro Flaschenhälfte.
3. Mit Erde bedecken: Bedeckt die Samen mit einer dünnen Schicht Erde (etwa 0,5 cm). Drückt die Erde leicht an.
4. Bewässern: Gießt die Erde vorsichtig mit einer Gießkanne oder Sprühflasche. Die Erde sollte gut durchfeuchtet sein, aber nicht durchnässt.
5. Standort wählen: Stellt die bepflanzten Plastikflaschen an einen sonnigen oder halbschattigen Standort. Spinat benötigt mindestens 4-6 Stunden Sonnenlicht pro Tag, um gut zu wachsen. Achtet darauf, dass der Standort windgeschützt ist, da die Pflanzen sonst leicht umknicken können.
Pflege des Spinats
1. Bewässerung: Haltet die Erde feucht, aber nicht nass. Gießt den Spinat regelmäßig, besonders an heißen Tagen. Überprüft die Feuchtigkeit der Erde, indem ihr mit dem Finger in die Erde stecht. Wenn sich die Erde trocken anfühlt, ist es Zeit zu gießen.
2. Düngen: Spinat benötigt nicht viel Dünger. Wenn ihr möchtet, könnt ihr die Pflanzen alle paar Wochen mit einem organischen Flüssigdünger düngen. Achtet darauf, die Dosierungsanleitung auf der Verpackung zu beachten.
3. Unkraut entfernen: Entfernt regelmäßig Unkraut, das in den Plastikflaschen wächst. Unkraut kann dem Spinat Nährstoffe und Wasser entziehen.
4. Schutz vor Schädlingen: Spinat kann von verschiedenen Schädlingen befallen werden, wie z.B. Blattläusen oder Schnecken. Kontrolliert die Pflanzen regelmäßig auf Schädlinge und entfernt sie gegebenenfalls. Ihr könnt auch natürliche Schädlingsbekämpfungsmittel verwenden, wie z.B. Neemöl oder eine Seifenlösung.
5. Ausdünnen: Wenn die Spinatpflanzen zu dicht beieinander wachsen, müsst ihr sie ausdünnen. Entfernt die schwächsten Pflanzen, damit die stärkeren Pflanzen mehr Platz zum Wachsen haben.
Ernte des Spinats
1. Erntezeitpunkt: Spinat kann geerntet werden, sobald die Blätter groß genug sind (etwa 10-15 cm). Die Erntezeit hängt von der Spinatsorte und den Wachstumsbedingungen ab.
2. Erntemethode: Schneidet die äußeren Blätter des Spinats ab. Lasst die inneren Blätter stehen, damit die Pflanze weiterwachsen kann. Ihr könnt den Spinat mehrmals ernten.
3. Lagerung: Spinat ist nicht lange haltbar. Am besten verarbeitet ihr ihn sofort nach der Ernte. Wenn ihr den Spinat lagern möchtet, wickelt ihn in ein feuchtes Tuch und bewahrt ihn im Kühlschrank auf.
Zusätzliche Tipps und Tricks
* Sortenwahl: Wählt eine Spinatsorte, die für euren Standort und eure Bedürfnisse geeignet ist. Es gibt verschiedene Sorten, die sich in Geschmack, Größe und Wachstumszeit unterscheiden.
* Fruchtfolge: Baut Spinat nicht jedes Jahr am selben Standort an. Wechselt die Anbaufläche, um Krankheiten und Schädlingen vorzubeugen.
* Mulchen: Mulcht die Erde um die Spinatpflanzen mit Stroh oder Rasenschnitt. Das Mulchen hilft, die Feuchtigkeit im Boden zu halten und Unkraut zu unterdrücken.
* Vertikaler Garten: Wenn ihr wenig Platz habt, könnt ihr die Plastikflaschen auch vertikal an einer Wand oder einem Zaun befestigen. So könnt ihr einen vertikalen Garten anlegen und noch mehr Spinat anbauen.
* Beschriftung: Beschriftet die Plastikflaschen mit dem Namen der Spinatsorte und dem Aussaatdatum. So behaltet ihr den Überblick über eure Pflanzen.
* Kreativität: Seid kreativ und gestaltet eure Plastikflaschen individuell. Bemalt sie mit Farben oder beklebt sie mit Aufklebern. So wird euer DIY-Gartenprojekt zu einem echten Hingucker.
Häufige Probleme und Lösungen
* Gelbe Blätter: Gelbe Blätter können ein Zeichen für Nährstoffmangel sein. Düngt die Pflanzen mit einem organischen Flüssigdünger.
* Blattläuse: Blattläuse können den Spinat befallen und die Blätter aussaugen. Bekämpft die Blattläuse mit einer Seifenlösung oder Neemöl.
* Schnecken: Schnecken können die Blätter des Spinats anfressen. Sammelt die Schnecken ab oder verwendet Schneckenkorn.
* Staunässe: Staunässe kann zu Wurzelfäule führen. Achtet darauf, dass die Erde gut durchlässig ist und die Drainagelöcher nicht verstopft sind.
Ich hoffe, diese Anleitung hilft euch dabei, euren eigenen
Conclusion
So, there you have it! Growing spinach in plastic bottles isn’t just a quirky gardening experiment; it’s a game-changer for anyone looking to enjoy fresh, homegrown greens, regardless of space constraints or gardening experience. We’ve explored how this method transforms discarded plastic into a thriving vertical garden, offering a sustainable and efficient way to cultivate your own delicious spinach.
The beauty of this DIY project lies in its simplicity and adaptability. It’s a fantastic way to recycle, reduce waste, and connect with nature, all while reaping the rewards of fresh, nutritious spinach. Imagine stepping outside your door and harvesting crisp, vibrant leaves for your salads, smoothies, or stir-fries – all thanks to a few repurposed plastic bottles.
But the benefits extend beyond mere convenience. Growing spinach in plastic bottles offers superior drainage compared to traditional garden beds, minimizing the risk of root rot and ensuring healthier plants. The elevated position also helps protect your precious greens from ground-dwelling pests and diseases, leading to a more bountiful harvest.
Why is this a must-try? Because it democratizes gardening. It empowers even those with limited space, time, or resources to cultivate their own food. It’s a tangible way to contribute to a more sustainable lifestyle and enjoy the unparalleled flavor of homegrown produce. Plus, it’s incredibly satisfying to witness the transformation of discarded materials into a flourishing garden.
Looking to take your bottle garden to the next level? Consider these variations:
* Experiment with different bottle sizes: Smaller bottles are perfect for starting seedlings, while larger bottles can accommodate more mature plants.
* Create a tiered system: Stack multiple bottle gardens on top of each other to maximize vertical space and create a visually stunning display.
* Add companion plants: Interplant your spinach with herbs like basil or chamomile to deter pests and enhance flavor.
* Get creative with decoration: Paint your bottles, add decorative labels, or create unique designs to personalize your garden.
The possibilities are endless! The key is to embrace the spirit of experimentation and adapt the method to suit your specific needs and preferences.
We wholeheartedly encourage you to try this DIY trick and experience the joy of growing your own spinach in plastic bottles. It’s a rewarding and sustainable way to connect with nature, enjoy fresh produce, and reduce your environmental footprint.
Don’t just take our word for it – give it a try and see for yourself! We’re confident that you’ll be amazed by the results. And most importantly, we want to hear about your experience! Share your photos, tips, and stories with us in the comments below. Let’s build a community of bottle gardeners and inspire others to embrace this innovative and sustainable approach to growing fresh, delicious spinach. Let us know what worked for you, what challenges you faced, and any creative adaptations you made along the way. Your feedback will help us refine this method and empower even more people to enjoy the benefits of homegrown spinach.
Frequently Asked Questions (FAQ)
What kind of plastic bottles are best for growing spinach?
Ideally, you should use food-grade plastic bottles, such as those used for water, juice, or soda. These are generally considered safe for growing edible plants. Avoid using bottles that have contained harsh chemicals or cleaning products, as these could contaminate your soil and plants. PET (Polyethylene Terephthalate) bottles, commonly used for water and soda, are a good choice. Make sure to thoroughly clean the bottles with soap and water before using them.
How do I prepare the plastic bottles for planting?
The preparation process is crucial for proper drainage and plant support. First, thoroughly clean the bottles to remove any residue. Then, cut a rectangular opening in the side of each bottle, large enough to accommodate the spinach plants. Be sure to leave enough of the bottle intact to provide structural support. Drill or poke drainage holes in the bottom of the bottle to prevent waterlogging. You can also add a layer of gravel or small stones to the bottom of the bottle to further improve drainage.
What type of soil should I use for growing spinach in plastic bottles?
Spinach thrives in well-draining, nutrient-rich soil. A good option is a mix of potting soil, compost, and perlite or vermiculite. The potting soil provides a base for the plants to grow, while the compost adds essential nutrients. Perlite or vermiculite improves drainage and aeration, preventing the soil from becoming compacted. You can also add a slow-release fertilizer to provide a steady supply of nutrients to the spinach plants.
How often should I water my spinach plants in plastic bottles?
The watering frequency will depend on the climate, the size of the bottles, and the type of soil you’re using. Generally, you should water your spinach plants when the top inch of soil feels dry to the touch. Avoid overwatering, as this can lead to root rot. Water thoroughly, ensuring that the water drains out of the drainage holes. During hot weather, you may need to water more frequently.
How much sunlight do spinach plants need when grown in plastic bottles?
Spinach prefers partial shade, especially during the hottest part of the day. Aim for at least 4-6 hours of sunlight per day. If you’re growing your spinach in a very sunny location, consider providing some shade during the afternoon to prevent the leaves from scorching. You can use shade cloth or move the bottles to a shadier spot.
How do I fertilize my spinach plants in plastic bottles?
Spinach is a heavy feeder, so it’s important to provide regular fertilization. You can use a liquid fertilizer diluted to half strength every 2-3 weeks. Alternatively, you can add a slow-release fertilizer to the soil at planting time. Look for a fertilizer that is high in nitrogen, as this promotes leafy growth. Avoid over-fertilizing, as this can burn the roots and leaves.
How do I protect my spinach plants from pests and diseases?
Growing spinach in plastic bottles can help reduce the risk of pests and diseases, but it’s still important to take precautions. Regularly inspect your plants for signs of pests, such as aphids, spider mites, or slugs. You can remove these pests by hand or use an insecticidal soap. To prevent diseases, ensure good air circulation and avoid overwatering. If you notice any signs of disease, such as yellowing or wilting leaves, remove the affected plants immediately.
When is the best time to harvest my spinach?
You can start harvesting spinach leaves when they are about 4-6 inches long. Simply snip off the outer leaves, leaving the inner leaves to continue growing. This will allow you to harvest spinach continuously over a period of several weeks. Harvest in the morning, when the leaves are crisp and fresh.
Can I grow other vegetables in plastic bottles using this method?
Yes, this method can be used to grow a variety of other vegetables, herbs, and flowers. Some good options include lettuce, kale, chard, herbs like basil and mint, and small flowering plants like petunias and pansies. The key is to choose plants that are well-suited to container gardening and that have similar growing requirements.
How do I overwinter my spinach plants in plastic bottles?
Spinach is a cool-season crop and can tolerate light frost. In mild climates, you may be able to overwinter your spinach plants by providing some protection from the cold. You can move the bottles to a sheltered location, such as a greenhouse or garage, or cover them with a frost blanket. In colder climates, it’s best to start new spinach plants in the spring.


Leave a Comment