
Mogra Jasmine Propagation at Home: Ever dreamt of filling your garden with the intoxicating fragrance of Mogra Jasmine? Imagine stepping outside and being greeted by the sweet, heady scent that instantly transports you to a tranquil paradise. Well, dream no more! This isn’t just a dream; it’s an achievable reality, and I’m here to guide you through a simple, rewarding DIY project that will have you propagating Mogra Jasmine like a pro.
For centuries, Mogra Jasmine has been cherished in many cultures, particularly in India, where it’s deeply intertwined with traditions, religious ceremonies, and even perfumery. Its delicate beauty and captivating aroma have made it a symbol of love, purity, and devotion. Now, you can bring a piece of this rich heritage into your own backyard.
But why bother with propagation? Why not just buy a plant? Well, propagating your own Mogra Jasmine is not only incredibly satisfying, but it’s also a budget-friendly way to expand your collection or share the joy with friends and family. Plus, it’s a fantastic way to connect with nature and learn more about the fascinating world of plants. Many people struggle with the cost of buying multiple plants, or simply want to share their love of gardening with others. This DIY guide on Mogra Jasmine Propagation at Home will empower you to create new plants from existing ones, saving you money and fostering a deeper appreciation for the natural world. Let’s get started!

Mogra Jasmin Vermehrung zu Hause: Dein DIY-Leitfaden für duftende Blüten
Hallo Pflanzenfreunde! Ich liebe den betörenden Duft von Mogra Jasmin (Jasminum sambac). Es ist einfach unschlagbar! Und was noch besser ist: Man kann diese wunderschöne Pflanze ganz einfach zu Hause vermehren. Ich zeige dir, wie es geht. Keine Angst, es ist einfacher als du denkst!
Was du brauchst: Deine Werkzeugkiste für den Erfolg
Bevor wir loslegen, stelle sicher, dass du alles griffbereit hast. Das spart Zeit und Frust. Hier ist deine Checkliste:
* Mutterpflanze: Eine gesunde, etablierte Mogra Jasmin Pflanze, von der du Stecklinge nehmen kannst. Achte darauf, dass sie frei von Krankheiten und Schädlingen ist.
* Scharfe Gartenschere oder Messer: Ein sauberes, scharfes Werkzeug ist entscheidend, um die Stecklinge sauber zu schneiden und die Mutterpflanze nicht zu beschädigen. Ich empfehle, die Klinge vor Gebrauch mit Alkohol zu desinfizieren.
* Bewurzelungshormon (optional): Bewurzelungshormon ist kein Muss, aber es kann die Bewurzelung beschleunigen und die Erfolgsrate erhöhen. Es ist in Pulver- oder Gelform erhältlich.
* Anzuchttöpfe oder Behälter: Kleine Töpfe mit Drainagelöchern sind ideal. Du kannst auch recycelte Joghurtbecher oder ähnliches verwenden, solange sie Löcher haben, damit das Wasser ablaufen kann.
* Anzuchterde: Eine leichte, gut durchlässige Anzuchterde ist wichtig. Du kannst eine spezielle Anzuchterde kaufen oder eine Mischung aus Torfmoos, Perlit und Vermiculit selbst herstellen.
* Sprühflasche: Zum Befeuchten der Stecklinge und der Erde.
* Plastiktüte oder Mini-Gewächshaus (optional): Um eine hohe Luftfeuchtigkeit zu erzeugen, was die Bewurzelung fördert.
* Etiketten und Stift: Um die Stecklinge zu beschriften, damit du weißt, wann du sie geschnitten hast und welche Sorte es ist (falls du verschiedene Jasminarten hast).
Die beste Zeit für die Vermehrung: Timing ist alles
Der beste Zeitpunkt für die Mogra Jasmin Vermehrung ist im Frühjahr oder Sommer, wenn die Pflanze aktiv wächst. Die wärmeren Temperaturen und längeren Tage fördern die Bewurzelung. Ich habe aber auch schon im Herbst erfolgreich Stecklinge gezogen, also lass dich nicht entmutigen, wenn du es außerhalb der “idealen” Zeit versuchst.
Schritt-für-Schritt-Anleitung: So ziehst du deine eigenen Mogra Jasmin Pflanzen
Jetzt geht’s ans Eingemachte! Folge diesen Schritten, um deine eigenen Mogra Jasmin Pflanzen zu ziehen:
1. Stecklinge vorbereiten:
* Wähle gesunde, kräftige Triebe von der Mutterpflanze aus. Sie sollten etwa 10-15 cm lang sein.
* Schneide die Triebe direkt unterhalb eines Blattknotens (der Stelle, an der ein Blatt aus dem Stiel wächst) mit deiner scharfen Gartenschere oder deinem Messer ab.
* Entferne die unteren Blätter von den unteren 5-7 cm des Stecklings. Das verhindert, dass die Blätter im Boden verrotten und fördert die Bewurzelung. Lass die oberen 2-3 Blattpaare dran.
* Wenn die verbleibenden Blätter sehr groß sind, kannst du sie halbieren, um die Verdunstung zu reduzieren.
2. Bewurzelungshormon auftragen (optional):
* Wenn du Bewurzelungshormon verwendest, befeuchte das untere Ende des Stecklings leicht mit Wasser.
* Tauche das feuchte Ende in das Bewurzelungshormonpulver oder -gel.
* Schüttle überschüssiges Hormon ab.
3. Stecklinge einpflanzen:
* Fülle deine Anzuchttöpfe mit Anzuchterde.
* Mache mit einem Bleistift oder Finger ein Loch in die Erde. Das verhindert, dass das Bewurzelungshormon abgewischt wird, wenn du den Steckling einpflanzt.
* Setze den Steckling in das Loch und drücke die Erde vorsichtig um den Stiel herum fest.
* Achte darauf, dass die unteren Blattknoten, von denen du die Blätter entfernt hast, unter der Erde liegen.
4. Bewässerung und Luftfeuchtigkeit:
* Gieße die Stecklinge vorsichtig, bis die Erde feucht, aber nicht durchnässt ist.
* Besprühe die Blätter mit Wasser, um die Luftfeuchtigkeit zu erhöhen.
* Stelle die Töpfe an einen warmen, hellen Ort, aber vermeide direkte Sonneneinstrahlung.
* Um die Luftfeuchtigkeit weiter zu erhöhen, kannst du die Töpfe mit einer Plastiktüte abdecken oder in ein Mini-Gewächshaus stellen. Achte darauf, dass die Tüte oder das Gewächshaus belüftet wird, um Schimmelbildung zu vermeiden. Ich lüfte meine Stecklinge einmal täglich für etwa 15 Minuten.
5. Geduld ist gefragt:
* Halte die Erde feucht, aber nicht nass. Gieße, wenn sich die oberste Schicht der Erde trocken anfühlt.
* Besprühe die Blätter regelmäßig mit Wasser, um die Luftfeuchtigkeit hoch zu halten.
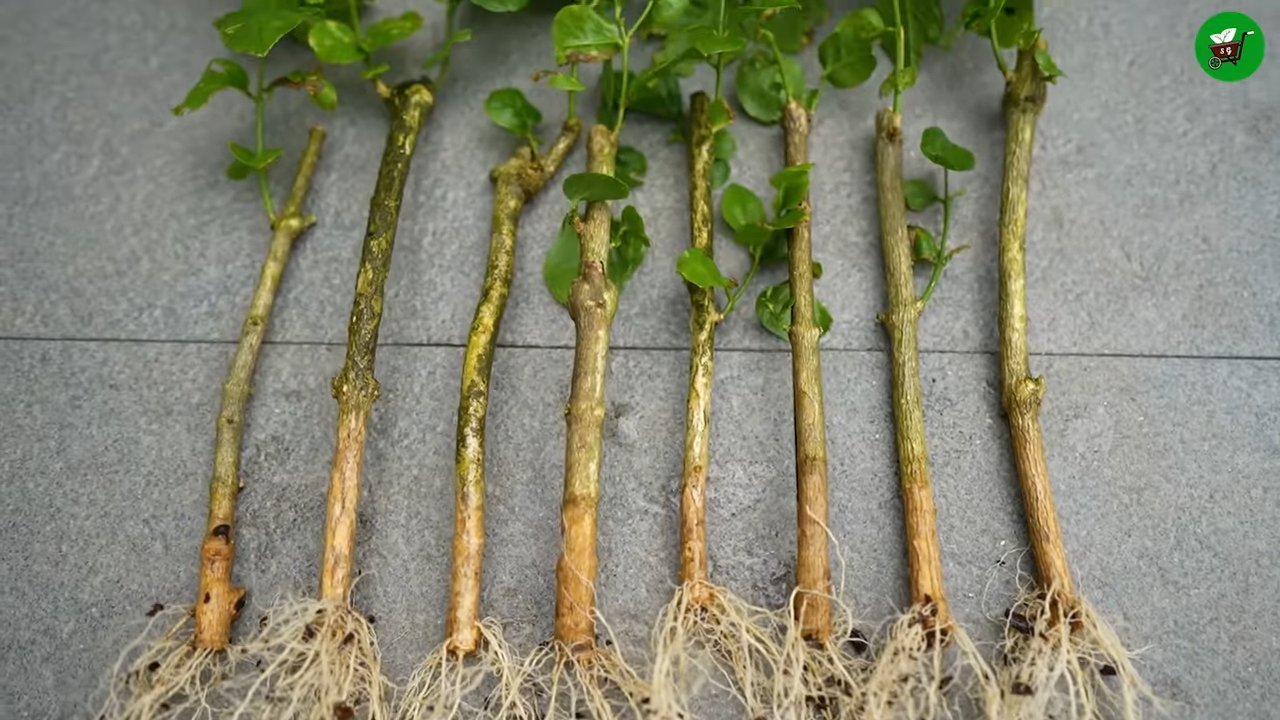
* Nach etwa 4-8 Wochen sollten sich Wurzeln bilden. Du kannst vorsichtig an dem Steckling ziehen, um zu prüfen, ob er Widerstand leistet. Wenn ja, dann hat er Wurzeln geschlagen!
6. Umpflanzen:
* Sobald die Stecklinge gut bewurzelt sind, kannst du sie in größere Töpfe mit normaler Blumenerde umpflanzen.
* Wähle einen Topf, der etwas größer ist als der vorherige.
* Gieße die Pflanzen nach dem Umpflanzen gut.
Pflege deiner jungen Mogra Jasmin Pflanzen: Damit sie prächtig gedeihen
Nachdem du deine Mogra Jasmin Pflanzen erfolgreich vermehrt hast, ist es wichtig, sie richtig zu pflegen, damit sie gesund wachsen und blühen.
* Standort: Mogra Jasmin liebt die Sonne! Stelle deine Pflanzen an einen sonnigen Standort mit mindestens 6 Stunden direkter Sonneneinstrahlung pro Tag.
* Bewässerung: Gieße deine Pflanzen regelmäßig, besonders während der Wachstumsperiode. Die Erde sollte feucht, aber nicht durchnässt sein. Vermeide Staunässe, da dies zu Wurzelfäule führen kann.
* Düngung: Dünge deine Mogra Jasmin Pflanzen während der Wachstumsperiode (Frühjahr und Sommer) alle 2-3 Wochen mit einem ausgewogenen Flüssigdünger.
* Schnitt: Schneide deine Mogra Jasmin Pflanzen regelmäßig, um sie in Form zu halten und die Blütenbildung zu fördern. Entferne abgestorbene oder beschädigte Zweige. Du kannst die Pflanzen auch nach der Blüte leicht zurückschneiden.
* Überwinterung: Mogra Jasmin ist nicht winterhart. Wenn du in einer Region mit kalten Wintern lebst, musst du deine Pflanzen ins Haus holen, bevor der erste Frost kommt. Stelle sie an einen hellen, kühlen Ort und reduziere die Bewässerung.
Häufige Probleme und Lösungen: Was tun, wenn etwas schief geht
Auch bei der besten Vorbereitung kann es manchmal zu Problemen kommen. Hier sind einige häufige Probleme und wie du sie lösen kannst:
* Stecklinge verrotten: Das kann passieren, wenn die Erde zu nass ist oder die Luftfeuchtigkeit zu hoch ist. Reduziere die Bewässerung und sorge für eine bessere Belüftung.
* Stecklinge bilden keine Wurzeln: Das kann verschiedene Ursachen haben, z. B. zu wenig Licht, zu niedrige Temperaturen oder schlechte Qualität der Stecklinge. Stelle die Stecklinge an einen helleren Ort, erhöhe die Temperatur und verwende frische, gesunde Stecklinge.
* Schädlinge: Mogra Jasmin kann von Schädlingen wie Blattläusen, Spinnmilben oder Wollläusen befallen werden. Behandle die Pflanzen mit einem geeigneten Insektizid oder einer Lösung aus Wasser und Spülmittel.
Zusätzliche Tipps und Tricks: Für noch mehr Erfolg
Hier sind noch ein paar zusätzliche Tipps, die dir helfen können, deine Mogra
Conclusion
If you’re a lover of fragrant blooms and the intoxicating scent of jasmine, then mastering Mogra Jasmine propagation at home is an absolute must-try. This isn’t just about saving money on buying new plants; it’s about connecting with nature, nurturing life, and experiencing the profound satisfaction of creating something beautiful with your own hands. The process, while requiring patience, is surprisingly straightforward and yields incredible results. Imagine your garden, balcony, or even your indoor space filled with the sweet, heady aroma of Mogra Jasmine, all thanks to your own efforts.
What makes this DIY propagation trick so compelling? Firstly, it allows you to expand your collection of Mogra Jasmine plants without incurring significant costs. Secondly, it gives you complete control over the health and quality of your new plants, ensuring they are well-suited to your specific growing conditions. And thirdly, it’s an incredibly rewarding experience that fosters a deeper appreciation for the natural world.
But the beauty of Mogra Jasmine propagation doesn’t stop there. There are several exciting variations you can explore to tailor the process to your preferences and resources. For instance, you can experiment with different rooting mediums, such as perlite, vermiculite, or a combination of peat moss and sand. You can also try using rooting hormones to accelerate the rooting process, although this is not always necessary. Another variation involves propagating from stem cuttings taken at different times of the year, observing how the season affects rooting success. Some gardeners even have success with air layering, a technique where roots are encouraged to form on a stem while it is still attached to the parent plant.
Don’t be intimidated by the prospect of propagating Mogra Jasmine. With a little patience, attention to detail, and the right guidance, you can achieve remarkable success. The key is to provide the cuttings with a warm, humid environment and to keep the rooting medium consistently moist but not waterlogged. Remember to choose healthy, disease-free stems from a vigorous parent plant for the best results.
We wholeheartedly encourage you to embark on this rewarding journey of Mogra Jasmine propagation at home. It’s a simple yet profound way to connect with nature, expand your garden, and enjoy the intoxicating fragrance of jasmine for years to come. Once you’ve successfully propagated your own Mogra Jasmine plants, we’d love to hear about your experience! Share your tips, tricks, and photos in the comments below. Let’s create a community of Mogra Jasmine enthusiasts and inspire others to discover the joys of propagation. Your insights could be invaluable to fellow gardeners and help them achieve their own propagation success. So, grab your pruning shears, gather your supplies, and get ready to experience the magic of Mogra Jasmine propagation!
Frequently Asked Questions (FAQ)
Q: What is the best time of year to propagate Mogra Jasmine?
A: The ideal time to propagate Mogra Jasmine is during the spring or early summer. This is when the plant is actively growing, and the cuttings are more likely to root successfully. The warmer temperatures and longer daylight hours provide optimal conditions for root development. However, you can also attempt propagation at other times of the year, although the success rate may be lower. If propagating during the fall or winter, ensure the cuttings are kept in a warm, protected environment.
Q: What type of stem cuttings should I use for propagation?
A: Use semi-hardwood cuttings for propagation. These are stems that are neither too soft and green nor too hard and woody. Look for stems that are about 4-6 inches long and have several leaves. Remove the lower leaves to prevent them from rotting in the rooting medium. The ideal cutting should be healthy, disease-free, and taken from a vigorous parent plant. Avoid using stems that are flowering or have flower buds, as the plant will prioritize flower production over root development.
Q: What is the best rooting medium for Mogra Jasmine cuttings?
A: Several rooting mediums can be used successfully for Mogra Jasmine propagation. A popular choice is a mixture of peat moss and perlite or vermiculite. This combination provides good drainage and aeration, which are essential for root development. You can also use a commercial rooting mix specifically designed for cuttings. Another option is to use coarse sand or a mixture of sand and compost. The key is to choose a medium that is well-draining and retains some moisture.
Q: How do I prepare the Mogra Jasmine cuttings for planting?
A: After taking the stem cuttings, remove the lower leaves to prevent them from rotting. You can also gently scrape the bottom inch of the stem to encourage root formation. Dip the cut end of the stem in a rooting hormone powder or liquid, if desired. This can help to accelerate the rooting process, but it is not always necessary. Prepare your rooting container by filling it with the chosen rooting medium and moistening it thoroughly. Make a small hole in the medium and insert the cutting, ensuring that the lower nodes are buried. Gently firm the medium around the cutting to provide support.
Q: How often should I water the Mogra Jasmine cuttings?
A: Keep the rooting medium consistently moist but not waterlogged. Water the cuttings whenever the top inch of the medium feels dry to the touch. Avoid overwatering, as this can lead to root rot. You can also mist the cuttings regularly to increase humidity. A humidity dome or plastic bag can be used to create a humid environment around the cuttings.
Q: How long does it take for Mogra Jasmine cuttings to root?
A: The time it takes for Mogra Jasmine cuttings to root can vary depending on the environmental conditions and the health of the cuttings. Generally, it takes about 4-8 weeks for roots to develop. You can check for root development by gently tugging on the cutting. If you feel resistance, it indicates that roots have formed. You can also carefully remove the cutting from the medium to inspect the roots.
Q: What do I do after the Mogra Jasmine cuttings have rooted?
A: Once the cuttings have developed a healthy root system, they can be transplanted into individual pots filled with a well-draining potting mix. Gradually acclimate the new plants to outdoor conditions before planting them in the garden. Choose a sunny location with well-drained soil. Water the newly transplanted plants regularly and fertilize them with a balanced fertilizer.
Q: Can I propagate Mogra Jasmine from seeds?
A: While it is possible to propagate Mogra Jasmine from seeds, it is a more challenging and time-consuming process than propagating from cuttings. Seeds may take longer to germinate, and the resulting plants may not be true to type, meaning they may not have the same characteristics as the parent plant. Propagation from cuttings is generally the preferred method for Mogra Jasmine.
Q: My Mogra Jasmine cuttings are wilting. What should I do?
A: Wilting cuttings are often a sign of insufficient humidity or moisture. Ensure that the rooting medium is consistently moist and that the cuttings are kept in a humid environment. You can mist the cuttings regularly or use a humidity dome to increase humidity. Also, make sure the cuttings are not exposed to direct sunlight, which can cause them to dry out. If the wilting persists, check for signs of root rot and remove any affected cuttings.
Q: My Mogra Jasmine cuttings are not rooting. What could be the problem?
A: There are several reasons why Mogra Jasmine cuttings may not root. The most common causes include:
* **Insufficient moisture:** Ensure that the rooting medium is consistently moist but not waterlogged.
* **Low humidity:** Increase humidity by misting the cuttings regularly or using a humidity dome.
* **Poor drainage:** Use a well-draining rooting medium to prevent root rot.
* **Unhealthy cuttings:** Use healthy, disease-free stems from a vigorous parent plant.
* **Incorrect timing:** Propagate during the spring or early summer when the plant is actively growing.
* **Lack of rooting hormone:** Consider using a rooting hormone to accelerate the rooting process.
* **Temperature:** Ensure the cuttings are kept in a warm environment.
By addressing these potential issues, you can increase your chances of successful Mogra Jasmine propagation.
Leave a Comment