
Cucumber garden harvest time is a moment every home gardener eagerly anticipates! Imagine biting into a crisp, juicy cucumber, bursting with flavor, knowing you nurtured it from seed to table. There’s a unique satisfaction in harvesting your own produce, a connection to nature that’s deeply rewarding.
For centuries, cucumbers have been cultivated across the globe, with evidence suggesting their origins trace back to India thousands of years ago. From ancient civilizations to modern-day gardens, the cucumber’s refreshing qualities have made it a staple in diets and cultures worldwide. Think of the classic Greek salad, the refreshing Japanese sunomono, or the simple pleasure of a cucumber sandwich – all testaments to its versatility.
But let’s be honest, sometimes that cucumber garden harvest can be a bit… underwhelming. Maybe you’re battling pests, dealing with misshapen fruits, or simply not getting the yield you hoped for. That’s where these DIY tricks and hacks come in! I’m going to share some simple, effective strategies to maximize your cucumber harvest, ensuring you’re enjoying a bounty of delicious cucumbers all season long. Whether you’re a seasoned gardener or just starting out, these tips will help you overcome common challenges and unlock the full potential of your cucumber patch. Get ready to transform your gardening game and enjoy the fruits (or rather, vegetables!) of your labor!
Gurken-Ernte-Hack: So maximierst du deine Ausbeute!
Hallo liebe Gartenfreunde! Ich liebe es, frische Gurken aus meinem eigenen Garten zu ernten. Es gibt einfach nichts Besseres als den knackigen Geschmack einer selbstgezogenen Gurke. Aber manchmal ist es frustrierend, wenn die Ernte nicht so üppig ausfällt, wie man es sich wünscht. Deshalb möchte ich euch heute meine besten Tipps und Tricks verraten, wie ihr eure Gurken-Ernte maximieren könnt. Keine Sorge, es ist einfacher als du denkst!
Die Grundlagen für eine reiche Gurken-Ernte
Bevor wir uns den eigentlichen Ernte-Hacks widmen, ist es wichtig, die Grundlagen für ein gesundes Gurkenwachstum zu verstehen. Denn nur gesunde Pflanzen können auch reichlich Früchte tragen.
* Der richtige Standort: Gurken lieben die Sonne! Wähle einen Standort, der mindestens 6-8 Stunden direkte Sonneneinstrahlung pro Tag erhält.
* Der perfekte Boden: Der Boden sollte locker, gut durchlässig und reich an organischen Stoffen sein. Kompost oder gut verrotteter Mist sind hier Gold wert.
* Regelmäßige Bewässerung: Gurken brauchen viel Wasser, besonders während der Fruchtbildung. Achte darauf, den Boden gleichmäßig feucht zu halten, aber vermeide Staunässe.
* Die richtige Düngung: Gurken sind Starkzehrer und benötigen regelmäßige Düngergaben. Ein ausgewogener Gemüsedünger oder ein spezieller Gurkendünger ist ideal.
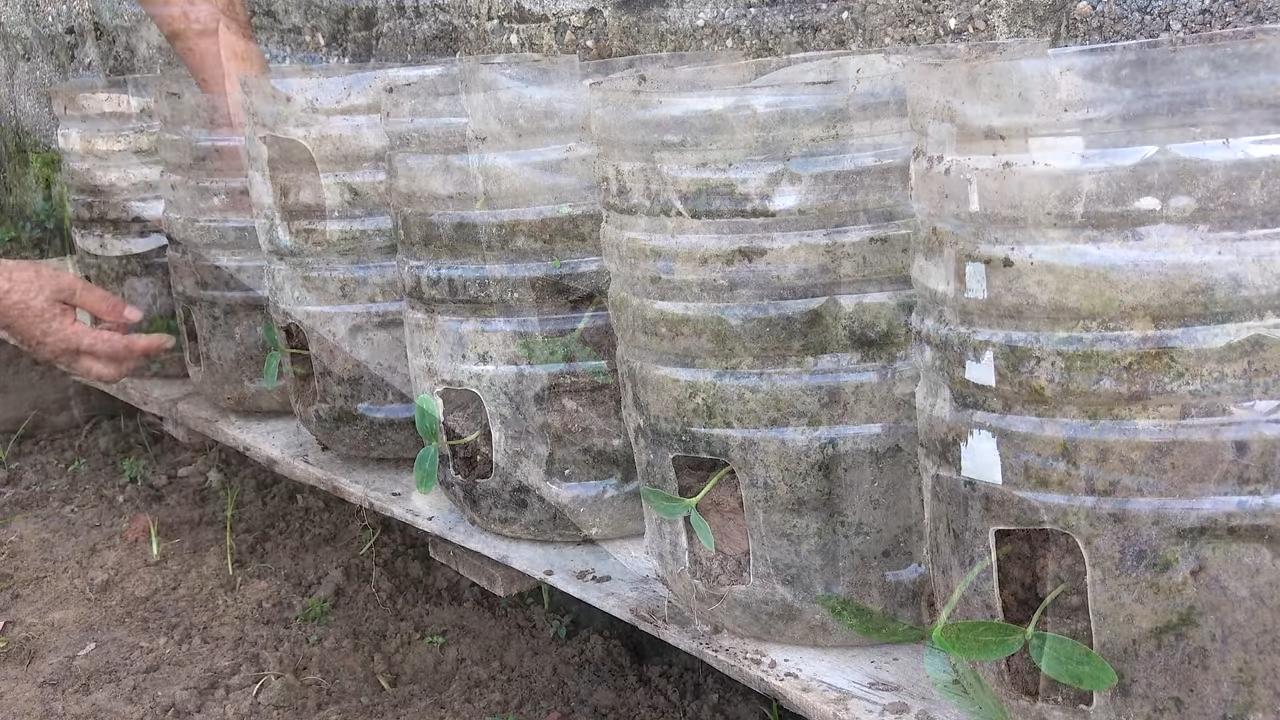
* Unterstützung beim Klettern: Viele Gurkensorten sind Kletterpflanzen und benötigen eine Rankhilfe. Das kann ein Zaun, ein Spalier oder ein selbstgebautes Gerüst sein.
Der richtige Zeitpunkt für die Gurken-Ernte
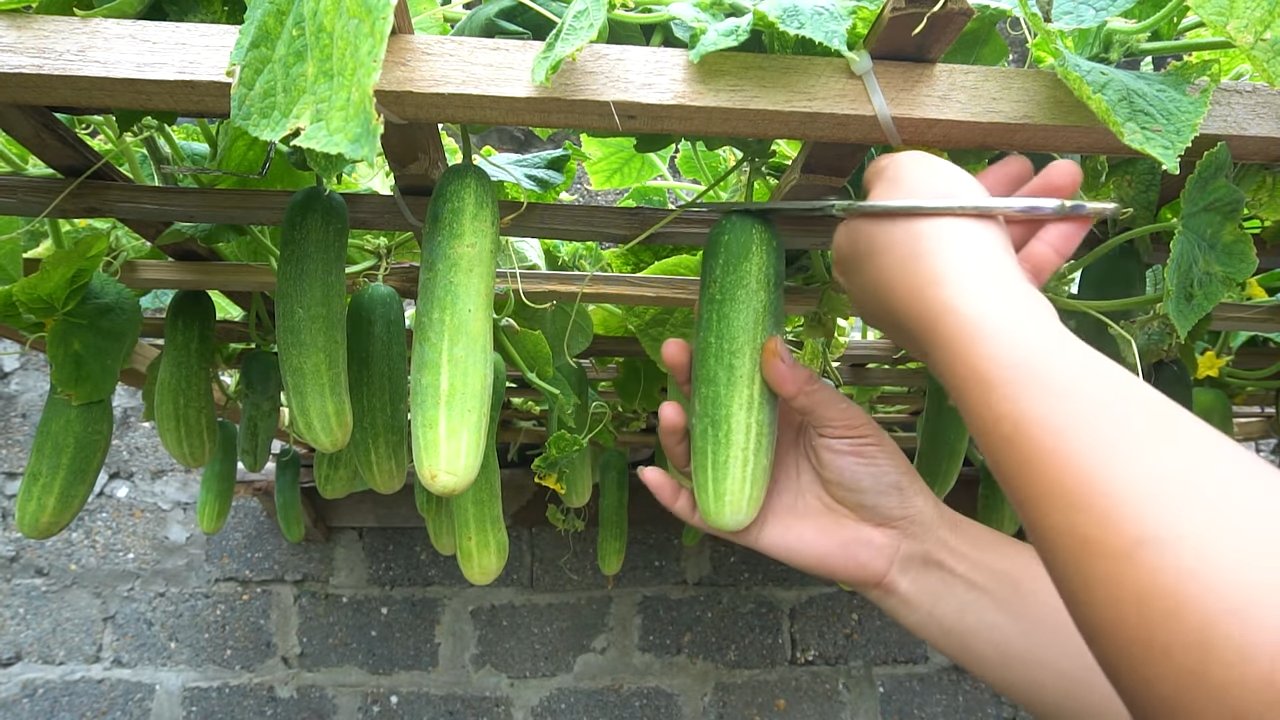
Der Zeitpunkt der Ernte ist entscheidend für den Geschmack und die Qualität der Gurken. Zu früh geerntete Gurken sind oft klein und geschmacklos, während zu spät geerntete Gurken bitter und überreif werden können.
* Die Größe beachten: Die ideale Größe hängt von der jeweiligen Gurkensorte ab. Informiere dich, welche Größe für deine Sorte optimal ist.
* Die Farbe prüfen: Reife Gurken haben eine gleichmäßige, leuchtend grüne Farbe. Gelbliche oder bräunliche Stellen deuten auf Überreife hin.
* Die Festigkeit testen: Die Gurke sollte sich fest anfühlen und nicht weich oder schwammig sein.
* Der Stielansatz: Der Stielansatz sollte sich leicht vom Stiel lösen lassen.
Der ultimative Gurken-Ernte-Hack: So geht’s!
Jetzt kommen wir zum eigentlichen Hack, der deine Gurken-Ernte auf ein neues Level heben wird. Es geht darum, die Pflanzen regelmäßig zu “ernten”, auch wenn die Gurken noch nicht ganz die ideale Größe erreicht haben.
Warum das funktioniert:
Indem du regelmäßig Gurken erntest, signalisierst du der Pflanze, dass sie neue Früchte produzieren soll. Wenn du die Gurken zu lange an der Pflanze lässt, verlangsamt sich die Produktion neuer Früchte, da die Pflanze ihre Energie in die Reifung der bereits vorhandenen Gurken steckt.
Schritt-für-Schritt-Anleitung:
1. Tägliche Kontrolle: Gehe am besten täglich durch deinen Gurken-Garten und inspiziere die Pflanzen. Achte auf Gurken, die fast die ideale Größe erreicht haben.
2. Frühzeitige Ernte: Ernte die Gurken, auch wenn sie noch etwas kleiner sind als die empfohlene Größe. Keine Sorge, sie werden trotzdem lecker sein!
3. Schnitttechnik: Verwende ein scharfes Messer oder eine Gartenschere, um die Gurke vom Stiel zu trennen. Schneide den Stielansatz etwa 1-2 cm von der Gurke entfernt ab.
4. Schonende Behandlung: Behandle die geernteten Gurken vorsichtig, um Druckstellen zu vermeiden.
5. Lagerung: Lagere die Gurken im Kühlschrank, um ihre Frische zu erhalten. Am besten in einem Gemüsefach oder in einer perforierten Plastiktüte.
Zusätzliche Tipps für eine maximale Gurken-Ernte
Hier sind noch ein paar zusätzliche Tipps, die dir helfen werden, deine Gurken-Ernte zu maximieren:
* Regelmäßiges Ausgeizen: Entferne regelmäßig Seitentriebe und Blätter, die die Belüftung behindern oder die Früchte beschatten. Das fördert die Fruchtbildung und beugt Krankheiten vor.
* Mulchen: Eine Mulchschicht aus Stroh oder Rasenschnitt hilft, den Boden feucht zu halten, Unkraut zu unterdrücken und die Bodentemperatur zu regulieren.
* Bestäubung fördern: Gurken sind auf die Bestäubung durch Bienen und andere Insekten angewiesen. Pflanze bienenfreundliche Blumen in der Nähe deines Gurken-Gartens, um die Bestäubung zu fördern. Du kannst auch die Blüten von Hand bestäuben, wenn du sicherstellen möchtest, dass alle Blüten bestäubt werden.
* Krankheiten und Schädlinge bekämpfen: Achte auf Anzeichen von Krankheiten oder Schädlingen und bekämpfe sie frühzeitig. Natürliche Schädlingsbekämpfungsmittel wie Neemöl oder Brennnesseljauche sind oft ausreichend.
* Sortenwahl: Wähle Gurkensorten, die für dein Klima und deine Anbaubedingungen geeignet sind. Es gibt viele verschiedene Sorten, die sich in Größe, Geschmack und Ertrag unterscheiden.
* Fruchtfolge beachten: Baue Gurken nicht jedes Jahr am selben Standort an, um Krankheiten und Schädlingen vorzubeugen. Wechsle die Anbaufläche regelmäßig mit anderen Gemüsearten ab.
* Regelmäßige Kontrolle auf versteckte Gurken: Gurken können sich gut verstecken! Manchmal übersieht man sie einfach. Gehe regelmäßig durch deinen Garten und suche auch unter den Blättern nach reifen Gurken.
* Ernte auch “krumme” Gurken: Nicht jede Gurke wächst perfekt gerade. Auch krumme oder unförmige Gurken sind essbar und schmecken genauso gut wie gerade Gurken. Lass dich nicht von ihrem Aussehen täuschen!
* Verwende eine scharfe Schere/Messer: Ein sauberes Werkzeug verhindert, dass du die Pflanze unnötig verletzt und minimiert das Risiko von Krankheiten.
* Beobachte das Wetter: Bei sehr heißem Wetter können Gurken schneller reifen. Kontrolliere deine Pflanzen in solchen Perioden besonders häufig.
* Ernte am Morgen: Gurken schmecken am besten, wenn sie am Morgen geerntet werden, da sie dann noch kühl und knackig sind.
* Nicht zu viele auf einmal: Wenn du zu viele Gurken auf einmal erntest, kann es schwierig sein, sie alle zu verarbeiten. Ernte lieber regelmäßig kleinere Mengen, um sicherzustellen, dass du sie frisch verarbeiten kannst.
* Experimentiere mit verschiedenen Sorten: Probiere verschiedene Gurkensorten aus, um herauszufinden, welche dir am besten schmecken und welche in deinem Garten am besten wachsen.
* Kompostiere Gurkenreste: Gurkenreste wie Schalen und Enden können kompostiert werden und tragen so zur Verbesserung deines Bodens bei.
* Teile deine Ernte: Wenn du eine besonders reiche Ernte hast, teile deine Gurken mit Freunden, Nachbarn oder deiner Familie. So können auch andere den Geschmack frischer, selbstgezogener Gurken genießen.
Gurken richtig lagern
Nach der Ernte ist die richtige Lagerung entscheidend, um die Frische und den Geschmack der Gurken zu erhalten.
* Kühlschrank: Gurken halten sich am besten im Kühlschrank. Wickle sie in ein feuchtes Tuch oder lege sie in eine perforierte Plastiktüte, um sie vor dem Austrocknen zu schützen.
* Nicht zu kalt: Vermeide es, Gurken zu lange im Kühlschrank zu lagern, da sie sonst an Geschmack verlieren können.
* Getrennt von Äpfeln und Bananen: Lagere Gurken nicht in der Nähe von Äpfeln und Bananen, da diese Ethylen absondern, was die Reifung beschleunigt und die Gurken schneller verderben lässt.
* Eingefrieren: Gurken können auch eingefroren werden, allerdings verlieren sie dabei ihre knackige Konsistenz. Sie eignen sich dann eher für Suppen oder Smoothies.
* Einlegen: Eine beliebte Methode, um Gurken haltbar zu machen, ist das Einlegen
Conclusion
So, there you have it! Transforming your abundant cucumber garden harvest into delicious, long-lasting pickles is not only achievable but surprisingly simple. We’ve walked you through the process, demystifying each step and providing you with the knowledge to confidently create your own batch of crisp, tangy, homemade pickles.
Why is this DIY trick a must-try? Because it’s about more than just preserving cucumbers; it’s about capturing the essence of your garden’s bounty and enjoying it throughout the year. Store-bought pickles simply can’t compare to the fresh, vibrant flavor you achieve when you control every ingredient and process. Plus, it’s incredibly satisfying to know you’ve created something delicious from scratch, minimizing food waste and maximizing the fruits (or rather, vegetables) of your labor.
But the best part? This recipe is just a starting point. Feel free to experiment with different spices and herbs to create your own signature pickle blend. Want a spicier kick? Add a few dried chili flakes or a sliced jalapeño to the brine. Prefer a sweeter pickle? Increase the sugar slightly. Craving a more savory flavor? Incorporate a bay leaf or a few sprigs of fresh dill. The possibilities are endless!
Consider these variations to personalize your pickle-making experience:
* **Garlic Dill Pickles:** Add several cloves of crushed garlic and a generous amount of fresh dill to each jar.
* **Spicy Pickles:** Include sliced jalapeños or a pinch of red pepper flakes in the brine.
* **Sweet Pickles:** Increase the sugar in the brine by a tablespoon or two.
* **Bread and Butter Pickles:** Use a sweeter brine with turmeric and mustard seeds.
* **Refrigerator Pickles:** For a quicker option, skip the canning process and store the pickles in the refrigerator for up to two weeks. These pickles won’t have the same shelf life as canned pickles, but they’re a great way to enjoy your cucumber harvest quickly.
Don’t be intimidated by the canning process. With a little preparation and attention to detail, you can safely and easily preserve your cucumbers for months to come. Remember to follow the instructions carefully, ensuring proper sterilization and processing times to prevent spoilage.
We truly believe that making your own pickles from your cucumber garden harvest is a rewarding and delicious experience. It’s a chance to connect with your food, reduce waste, and enjoy the fruits (or vegetables!) of your labor all year round.
So, what are you waiting for? Gather your cucumbers, your spices, and your jars, and get pickling! We’re confident that you’ll be amazed by the results. And most importantly, we want to hear about your experience! Share your photos, your variations, and your tips in the comments below. Let’s build a community of pickle-loving gardeners and inspire each other to make the most of our harvests. Happy pickling!
Frequently Asked Questions (FAQ)
What kind of cucumbers are best for pickling?
The best cucumbers for pickling are those specifically labeled as “pickling cucumbers.” These varieties, such as Kirby cucumbers, are smaller, firmer, and have thinner skins than slicing cucumbers. This makes them ideal for absorbing the brine and maintaining their crispness during the pickling process. However, if you only have slicing cucumbers available, you can still use them, but be aware that they may become slightly softer during pickling. Avoid using cucumbers that are overly ripe or have blemishes, as these can affect the quality of the finished product.
How do I prevent my pickles from becoming soft?
Several factors can contribute to soft pickles. First, ensure you’re using fresh, firm cucumbers. Soaking the cucumbers in ice water for a few hours before pickling can also help to maintain their crispness. Adding a source of calcium, such as calcium chloride (Pickle Crisp) or a grape leaf to each jar, can also help to firm the pickles. Avoid over-processing the pickles, as this can also lead to softening. Finally, make sure your brine has the correct ratio of vinegar to water, as vinegar helps to preserve the cucumbers and maintain their texture.
Can I reuse pickle brine?
It is generally not recommended to reuse pickle brine for canning. The brine’s acidity and salt content may have decreased during the first pickling process, which could compromise the safety and preservation of the new batch of pickles. Reusing brine can also affect the flavor and texture of the pickles. It’s always best to make a fresh batch of brine for each canning session to ensure the best results and prevent spoilage. However, you can reuse leftover brine for other culinary purposes, such as marinating meats or adding flavor to salads.
How long do homemade pickles last?
Properly canned pickles can last for up to two years in a cool, dark place. Once opened, they should be refrigerated and consumed within a few weeks. Refrigerator pickles, which are not canned, will last for about two weeks in the refrigerator. Always check for signs of spoilage, such as a bulging lid, unusual odor, or mold, before consuming any homemade pickles.
What if my lids don’t seal properly?
If your lids don’t seal properly after processing, it means that a vacuum didn’t form inside the jar. This can happen for several reasons, such as insufficient headspace, a damaged jar rim, or improper processing time. If a lid doesn’t seal within 24 hours, you have a few options. You can reprocess the pickles with a new lid, ensuring proper headspace and processing time. Alternatively, you can store the pickles in the refrigerator and consume them within a few weeks. It’s important to note that unsealed jars are not shelf-stable and must be refrigerated to prevent spoilage.
Can I use different types of vinegar?
While white vinegar is the most commonly used vinegar for pickling due to its clear color and neutral flavor, you can experiment with other types of vinegar. Apple cider vinegar will impart a slightly sweeter and more complex flavor to your pickles. Distilled white vinegar with 5% acidity is the best choice for pickling. Avoid using vinegars with lower acidity levels, as they may not provide adequate preservation.
What is the importance of headspace?
Headspace refers to the empty space between the top of the food and the lid of the jar. Proper headspace is crucial for creating a vacuum seal during the canning process. Insufficient headspace can cause the food to expand and push the lid off during processing, while excessive headspace can prevent a proper vacuum from forming. The recommended headspace for pickles is typically ½ inch.
How do I adjust the recipe for a larger or smaller batch?
You can easily adjust the recipe to accommodate a larger or smaller batch of cucumbers. Simply multiply or divide all the ingredients proportionally. However, it’s important to maintain the correct ratio of vinegar to water to ensure proper preservation. When adjusting the recipe, make sure to use accurate measurements to avoid compromising the quality and safety of your pickles.
Can I add other vegetables to my pickles?
Absolutely! Pickling is a great way to preserve other vegetables as well. You can add onions, carrots, bell peppers, or even green beans to your pickle jars. Just make sure to wash and prepare the vegetables properly before adding them to the brine. Keep in mind that different vegetables may require different processing times, so it’s best to research the recommended processing times for each vegetable before canning.
Is it safe to can pickles at home?
Yes, it is safe to can pickles at home as long as you follow proper canning procedures. This includes using sterilized jars and lids, maintaining proper headspace, processing the jars for the recommended time, and checking for a proper seal after processing. Following these guidelines will help to ensure that your pickles are safe to eat and will last for an extended period of time. If you are new to canning, it’s always a good idea to consult a reliable canning resource, such as the USDA Complete Guide to Home Canning, for detailed instructions and safety information.
Leave a Comment