
Growing water spinach easily is simpler than you might think, and I’m here to show you how! Forget those expensive grocery store trips for fresh greens; imagine stepping right outside your door and harvesting your own vibrant, delicious water spinach. This DIY guide is packed with tricks and hacks that will transform even the most novice gardener into a water spinach-growing pro.
Water spinach, also known as Ong Choy, has a rich history, deeply rooted in Asian cuisine and culture. For centuries, it’s been a staple in dishes across Southeast Asia, prized for its mild flavor and impressive nutritional benefits. But you don’t need to travel to experience this culinary delight.
Why should you learn these DIY tricks? Well, for starters, growing water spinach easily at home means you control exactly what goes into your food – no pesticides, no hidden chemicals, just pure, homegrown goodness. Plus, it’s incredibly rewarding to nurture a plant from seed to table. In this article, I’ll share my favorite tips and tricks, from choosing the right container to ensuring a bountiful harvest. Get ready to unlock the secrets to successful water spinach cultivation and enjoy fresh, healthy greens all season long!
Wasserspinat (Ong Choy) ganz einfach selbst anbauen: Eine DIY-Anleitung
Hallo liebe Gartenfreunde! Ich liebe Wasserspinat, auch bekannt als Ong Choy oder Morning Glory, und habe herausgefunden, dass es super einfach ist, ihn zu Hause anzubauen. Er wächst schnell, ist unglaublich lecker und eine tolle Ergänzung für jedes Gericht. In diesem Artikel zeige ich euch, wie ihr das auch schaffen könnt – Schritt für Schritt und ganz ohne komplizierte Ausrüstung. Los geht’s!
Was du brauchst: Die Materialliste
Bevor wir loslegen, solltest du sicherstellen, dass du alles griffbereit hast. Hier ist eine Liste der Dinge, die du benötigst:
* Wasserspinat-Samen oder Stecklinge: Du kannst Samen online oder in einem gut sortierten Gartencenter kaufen. Stecklinge sind auch eine tolle Option, wenn du bereits Zugang zu einer Pflanze hast.
* Ein Gefäß: Ein großer Eimer, eine Wanne oder sogar ein alter Wäschekorb (mit Löchern für die Drainage, falls du ihn nicht im Wasser stehen lassen willst) funktioniert prima. Die Größe hängt davon ab, wie viel Wasserspinat du anbauen möchtest.
* Erde oder Substrat: Normale Blumenerde, Kokosfaser oder eine Mischung aus beidem sind ideal. Du kannst auch hydroponisch anbauen, aber wir konzentrieren uns hier auf die erdgebundene Methode.
* Wasser: Klares, sauberes Wasser ist essentiell. Leitungswasser ist in den meisten Fällen in Ordnung, aber lass es am besten ein paar Stunden stehen, damit das Chlor verdunsten kann.
* Dünger (optional): Ein wasserlöslicher Dünger für Blattgemüse kann das Wachstum beschleunigen, ist aber nicht unbedingt notwendig.
* Ein sonniger Standort: Wasserspinat liebt die Sonne! Ein Platz mit mindestens 6 Stunden direkter Sonneneinstrahlung pro Tag ist ideal.
* Geduld: Wasserspinat wächst zwar schnell, aber ein bisschen Geduld braucht man trotzdem.
Die Vorbereitung: Alles für den Start
Bevor wir mit dem Pflanzen beginnen, müssen wir ein paar Vorbereitungen treffen.
1. Das Gefäß vorbereiten: Reinige dein Gefäß gründlich, um sicherzustellen, dass keine schädlichen Bakterien oder Pilze vorhanden sind. Wenn du einen Eimer oder eine Wanne verwendest, bohre Löcher in den Boden, um eine gute Drainage zu gewährleisten, falls du nicht hydroponisch anbaust.
2. Die Erde vorbereiten: Fülle das Gefäß mit Erde oder Substrat. Lass oben ein paar Zentimeter Platz. Befeuchte die Erde gut, aber vermeide Staunässe. Sie sollte feucht, aber nicht triefend nass sein.
3. Die Samen vorbereiten (optional): Um die Keimung zu beschleunigen, kannst du die Samen vor dem Pflanzen 24 Stunden in lauwarmem Wasser einweichen. Das hilft, die harte Samenschale aufzuweichen.
Die Aussaat: Samen in die Erde bringen
Jetzt kommt der spannende Teil: Das Pflanzen der Samen!
1. Die Samen aussäen: Verteile die Samen gleichmäßig auf der Oberfläche der Erde. Drücke sie leicht an, sodass sie guten Kontakt zur Erde haben.
2. Mit Erde bedecken: Bedecke die Samen mit einer dünnen Schicht Erde (ca. 0,5 cm).
3. Gießen: Gieße die Erde vorsichtig, um die Samen nicht wegzuschwemmen. Verwende am besten eine Sprühflasche oder eine Gießkanne mit Brauseaufsatz.
4. Feuchtigkeit halten: Decke das Gefäß mit einer Plastikfolie oder einem durchsichtigen Deckel ab, um die Luftfeuchtigkeit zu erhöhen. Das fördert die Keimung. Stelle das Gefäß an einen warmen, sonnigen Ort.
5. Warten und beobachten: Nach ein paar Tagen (in der Regel 5-10 Tage) sollten die ersten Keimlinge erscheinen. Sobald die Keimlinge sichtbar sind, kannst du die Plastikfolie oder den Deckel entfernen.
Die Aufzucht: Pflege für kräftige Pflanzen
Sobald die Pflanzen gekeimt sind, ist es wichtig, sie gut zu pflegen, damit sie kräftig wachsen.
1. Gießen: Wasserspinat liebt Feuchtigkeit. Gieße die Pflanzen regelmäßig, sodass die Erde immer feucht ist. An heißen Tagen musst du möglicherweise mehrmals täglich gießen. Wenn du hydroponisch anbaust, achte darauf, dass die Wurzeln immer im Wasser stehen.
2. Düngen (optional): Wenn du möchtest, kannst du die Pflanzen alle zwei Wochen mit einem wasserlöslichen Dünger für Blattgemüse düngen. Befolge dabei die Anweisungen auf der Verpackung.
3. Sonnenlicht: Stelle sicher, dass die Pflanzen genügend Sonnenlicht bekommen. Mindestens 6 Stunden direkte Sonneneinstrahlung pro Tag sind ideal.
4. Schädlinge kontrollieren: Überprüfe die Pflanzen regelmäßig auf Schädlinge wie Blattläuse oder Spinnmilben. Bei Bedarf kannst du biologische Schädlingsbekämpfungsmittel verwenden.
5. Rankhilfe (optional): Wasserspinat ist eine Kletterpflanze. Wenn du möchtest, kannst du den Pflanzen eine Rankhilfe anbieten, z.B. einen kleinen Bambusstab oder ein Gitter.
Die Ernte: Endlich ernten und genießen!
Nach etwa 4-6 Wochen kannst du mit der Ernte beginnen!
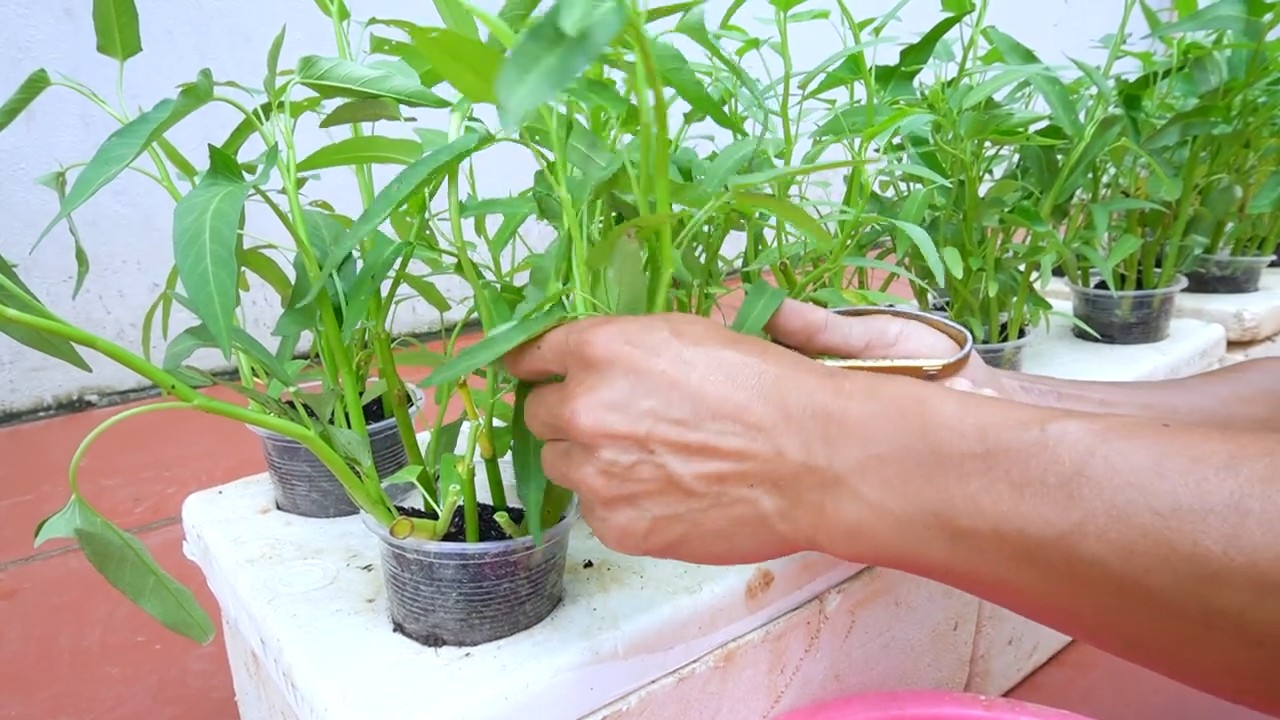
1. Ernten: Schneide die Stängel mit einem scharfen Messer oder einer Schere ab. Du kannst entweder die ganze Pflanze ernten oder nur einzelne Stängel. Wenn du nur einzelne Stängel erntest, wird die Pflanze weiterwachsen und du kannst mehrmals ernten.
2. Waschen: Wasche den Wasserspinat gründlich, um Erde oder Schmutz zu entfernen.
3. Genießen: Wasserspinat ist vielseitig einsetzbar. Du kannst ihn roh in Salaten essen, dünsten, braten oder in Suppen und Currys verwenden. Er schmeckt leicht nussig und hat eine angenehme Textur.
Anbau mit Stecklingen: Eine Alternative zur Aussaat
Wenn du bereits eine Wasserspinatpflanze hast, kannst du sie ganz einfach durch Stecklinge vermehren. Das ist eine schnelle und einfache Methode, um neue Pflanzen zu gewinnen.
1. Stecklinge schneiden: Schneide gesunde Stängel von der Mutterpflanze ab. Die Stecklinge sollten etwa 10-15 cm lang sein und mindestens 2-3 Blattknoten haben.
2. Blätter entfernen: Entferne die unteren Blätter von den Stecklingen, sodass nur noch die oberen Blätter übrig bleiben.
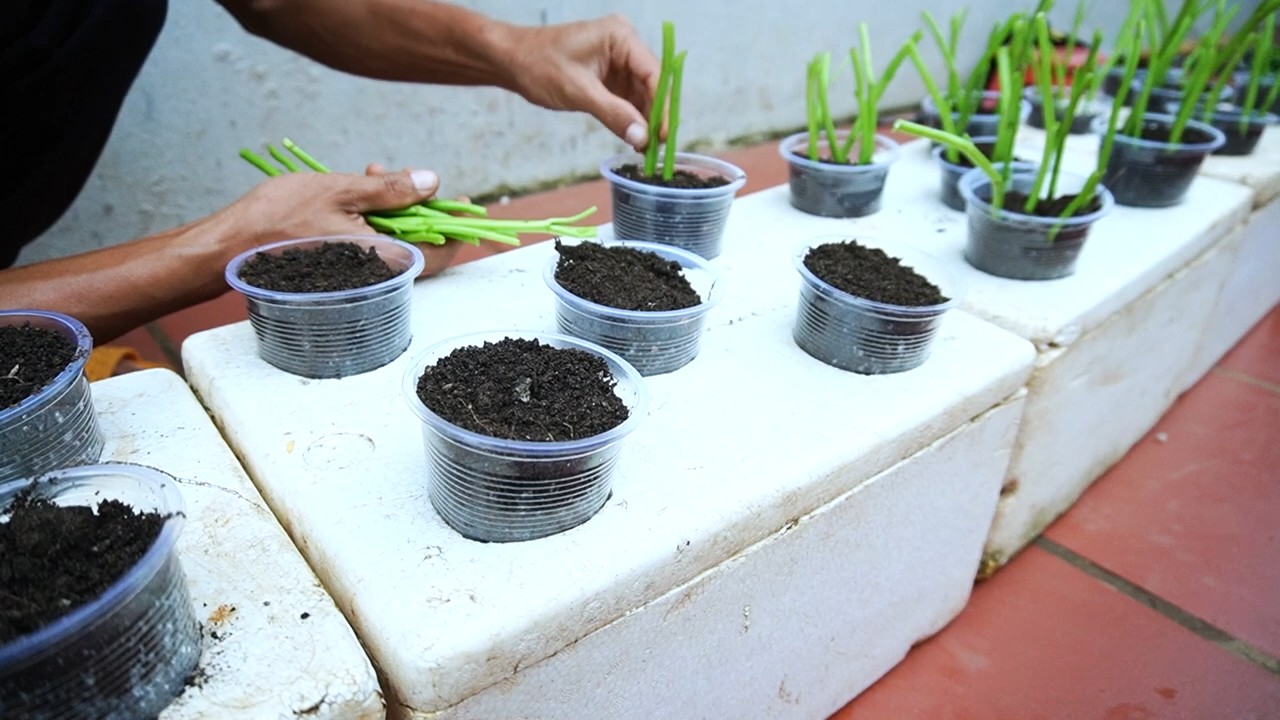
3. Bewurzeln: Stelle die Stecklinge in ein Glas mit Wasser. Achte darauf, dass die Blattknoten unter Wasser sind. Stelle das Glas an einen hellen, aber nicht direkten Sonnenplatz.
4. Wurzeln bilden: Nach ein paar Tagen sollten sich die ersten Wurzeln bilden. Sobald die Wurzeln etwa 2-3 cm lang sind, kannst du die Stecklinge in Erde oder Substrat pflanzen.
5. Einpflanzen: Pflanze die bewurzelten Stecklinge in ein Gefäß mit Erde oder Substrat. Gieße sie gut an und pflege sie wie oben beschrieben.
Hydroponischer Anbau: Wasserspinat ohne Erde
Wenn du keinen Platz für Erde hast oder einfach etwas Neues ausprobieren möchtest, kannst du Wasserspinat auch hydroponisch anbauen. Das bedeutet, dass die Pflanzen in Wasser mit Nährstoffen wachsen, ohne Erde zu benötigen.
1. System vorbereiten: Du benötigst ein hydroponisches System. Es gibt viele verschiedene Arten von Systemen, von einfachen DIY-Lösungen bis hin zu komplexen kommerziellen Systemen. Ein einfaches System besteht aus einem Behälter mit Wasser und einem Netztopf, in dem die Pflanze sitzt.
2. Nährlösung vorbereiten: Bereite eine Nährlösung für hydroponische Systeme vor. Du kannst fertige Nährlösungen kaufen oder sie selbst mischen. Achte darauf, dass die Nährlösung alle wichtigen Nährstoffe enthält, die die Pflanzen zum Wachsen benötigen.
3. Pflanzen einsetzen: Setze die Wasserspinatpflanzen in die Netztopfe und stelle sie in das hydroponische System. Achte darauf, dass die Wurzeln in die Nährlösung eintauchen.
4. Pflege: Überprüfe regelmäßig den pH-Wert und die Nährstoffkonzentration der Nährlösung und passe sie bei Bedarf an. Stelle sicher, dass die
Conclusion
So, there you have it! Growing water spinach easily at home is not only achievable but also incredibly rewarding. We’ve walked through the simple steps, from sourcing your seeds or cuttings to providing the ideal environment for these leafy greens to thrive. Forget expensive grocery store prices and questionable freshness; with a little effort, you can have a constant supply of crisp, delicious water spinach right at your fingertips.
But why is this DIY trick a must-try? Beyond the cost savings and guaranteed freshness, growing your own water spinach connects you to your food in a meaningful way. You control the growing conditions, ensuring that your vegetables are free from harmful pesticides and herbicides. Plus, there’s a unique satisfaction in nurturing a plant from seed (or cutting) to harvest. It’s a small act of self-sufficiency that can have a big impact on your diet and your connection to nature.
Variations and Suggestions:
Don’t be afraid to experiment! While we’ve focused on growing water spinach in containers, you can also try growing it in a small pond or even a large tub filled with water. Just ensure the water is regularly changed to prevent stagnation.
* Vertical Gardening: If you’re short on space, consider a vertical gardening system. Water spinach can be trained to grow upwards, maximizing your yield in a small area.
* Hydroponics: For the more adventurous gardener, hydroponic systems offer a soilless alternative that can lead to faster growth and higher yields.
* Companion Planting: Consider planting basil or mint nearby to deter pests naturally.
* Different Varieties: Explore different varieties of water spinach. Some are more heat-tolerant, while others have slightly different leaf shapes and flavors.
A Call to Action:
We wholeheartedly encourage you to give this DIY trick a try. Growing water spinach easily is a project that’s suitable for gardeners of all skill levels, from beginners to seasoned pros. It’s a fun, educational, and ultimately delicious experience.
Once you’ve harvested your first batch of homegrown water spinach, we’d love to hear about your experience! Share your photos, tips, and recipes in the comments below. Let’s build a community of water spinach enthusiasts and inspire others to embrace the joys of homegrown food. What are you waiting for? Get planting!
Frequently Asked Questions (FAQ)
What is the best time of year to start growing water spinach?
Water spinach thrives in warm weather, so the best time to start growing it is during the late spring or early summer, after the last frost has passed. The ideal temperature range for growth is between 75°F and 95°F (24°C and 35°C). If you live in a region with mild winters, you may be able to grow it year-round. However, growth will slow down significantly in cooler temperatures. If you are starting from seeds, you can start them indoors a few weeks before the last expected frost to get a head start.
How much sunlight does water spinach need?
Water spinach needs at least 6 hours of direct sunlight per day to thrive. The more sunlight it receives, the faster it will grow and the more abundant your harvest will be. If you are growing it indoors, supplement with grow lights to ensure it gets enough light. Insufficient sunlight can lead to leggy growth and reduced yields.
What kind of soil is best for growing water spinach?
Water spinach prefers moist, fertile soil that is rich in organic matter. A well-draining potting mix amended with compost or aged manure is ideal. The soil pH should be slightly acidic to neutral, around 6.0 to 7.0. If you are growing it in a container, make sure the container has drainage holes to prevent waterlogging.
So, there you have it! Growing water spinach easily at home is not only achievable but also incredibly rewarding. We’ve walked through the simple steps, from sourcing your seeds or cuttings to providing the ideal environment for these leafy greens to thrive. Forget expensive grocery store prices and questionable freshness; with a little effort, you can have a constant supply of crisp, delicious water spinach right at your fingertips.
But why is this DIY trick a must-try? Beyond the cost savings and guaranteed freshness, growing your own water spinach connects you to your food in a meaningful way. You control the growing conditions, ensuring that your vegetables are free from harmful pesticides and herbicides. Plus, there’s a unique satisfaction in nurturing a plant from seed (or cutting) to harvest. It’s a small act of self-sufficiency that can have a big impact on your diet and your connection to nature.
Variations and Suggestions:
Don’t be afraid to experiment! While we’ve focused on growing water spinach in containers, you can also try growing it in a small pond or even a large tub filled with water. Just ensure the water is regularly changed to prevent stagnation.
* Vertical Gardening: If you’re short on space, consider a vertical gardening system. Water spinach can be trained to grow upwards, maximizing your yield in a small area.
* Hydroponics: For the more adventurous gardener, hydroponic systems offer a soilless alternative that can lead to faster growth and higher yields.
* Companion Planting: Consider planting basil or mint nearby to deter pests naturally.
* Different Varieties: Explore different varieties of water spinach. Some are more heat-tolerant, while others have slightly different leaf shapes and flavors.
A Call to Action:
We wholeheartedly encourage you to give this DIY trick a try. Growing water spinach easily is a project that’s suitable for gardeners of all skill levels, from beginners to seasoned pros. It’s a fun, educational, and ultimately delicious experience.
Once you’ve harvested your first batch of homegrown water spinach, we’d love to hear about your experience! Share your photos, tips, and recipes in the comments below. Let’s build a community of water spinach enthusiasts and inspire others to embrace the joys of homegrown food. What are you waiting for? Get planting!
Frequently Asked Questions (FAQ)
What is the best time of year to start growing water spinach?
Water spinach thrives in warm weather, so the best time to start growing it is during the late spring or early summer, after the last frost has passed. The ideal temperature range for growth is between 75°F and 95°F (24°C and 35°C). If you live in a region with mild winters, you may be able to grow it year-round. However, growth will slow down significantly in cooler temperatures. If you are starting from seeds, you can start them indoors a few weeks before the last expected frost to get a head start.
How much sunlight does water spinach need?
Water spinach needs at least 6 hours of direct sunlight per day to thrive. The more sunlight it receives, the faster it will grow and the more abundant your harvest will be. If you are growing it indoors, supplement with grow lights to ensure it gets enough light. Insufficient sunlight can lead to leggy growth and reduced yields.
What kind of soil is best for growing water spinach?
Water spinach prefers moist, fertile soil that is rich in organic matter. A well-draining potting mix amended with compost or aged manure is ideal. The soil pH should be slightly acidic to neutral, around 6.0 to 7.0. If you are growing it in a container, make sure the container has drainage holes to prevent waterlogging. Water spinach can also be grown hydroponically, which eliminates the need for soil altogether.
How often should I water water spinach?
Water spinach needs consistently moist soil, so water it regularly, especially during hot and dry weather. The soil should never be allowed to dry out completely. Check the soil moisture daily and water when the top inch feels dry to the touch. If you are growing it in a container, you may need to water it more frequently than if you are growing it in the ground. Water spinach also benefits from occasional foliar feeding, which involves spraying the leaves with a diluted liquid fertilizer.
How do I fertilize water spinach?
Water spinach is a heavy feeder and benefits from regular fertilization. Use a balanced fertilizer, such as a 10-10-10 or 20-20-20, according to the package directions. You can also use organic fertilizers, such as compost tea or fish emulsion. Fertilize every 2-3 weeks during the growing season. Avoid over-fertilizing, as this can lead to excessive vegetative growth and reduced yields.
When and how do I harvest water spinach?
You can start harvesting water spinach about 4-6 weeks after planting, when the stems are about 8-12 inches long. To harvest, simply cut the stems a few inches above the soil line. The plant will regrow from the cut stems, allowing you to harvest multiple times. Harvest regularly to encourage continued growth and prevent the stems from becoming tough and fibrous. The best time to harvest is in the morning, when the leaves are crisp and fresh.
What are some common pests and diseases that affect water spinach?
Water spinach is relatively pest-resistant, but it can be susceptible to aphids, spider mites, and whiteflies. These pests can be controlled with insecticidal soap or neem oil. Diseases are less common, but water spinach can be affected by fungal diseases such as powdery mildew and leaf spot. These diseases can be prevented by providing good air circulation and avoiding overhead watering. If diseases do occur, treat them with a fungicide.
Can I grow water spinach indoors?
Yes, you can grow water spinach indoors, but it requires a bright, sunny location or supplemental grow lights. Provide at least 6 hours of direct light per day. Use a well-draining potting mix and water regularly to keep the soil moist. Fertilize every 2-3 weeks. Indoor-grown water spinach may not grow as quickly or produce as much as outdoor-grown water spinach, but it is still a viable option for those who live in colder climates or have limited outdoor space.
Is water spinach safe to eat?
Yes, water spinach is generally safe to eat, but it is important to wash it thoroughly before consuming it. Water spinach can accumulate nitrates from the soil, so it is best to grow it in soil that is not heavily fertilized with nitrogen. People with kidney problems should consume water spinach in moderation, as it contains oxalates.
Can I grow water spinach from cuttings?
Yes, growing water spinach from cuttings is a very easy and effective method. Simply take a cutting that is about 6-8 inches long and remove the leaves from the bottom 2 inches. Place the cutting in a glass of water, making sure that the bottom nodes are submerged. Roots will typically start to form within a week or two. Once the roots are about an inch long, you can transplant the cutting into a pot or directly into the ground. This method is often faster than starting from seeds.


Leave a Comment