
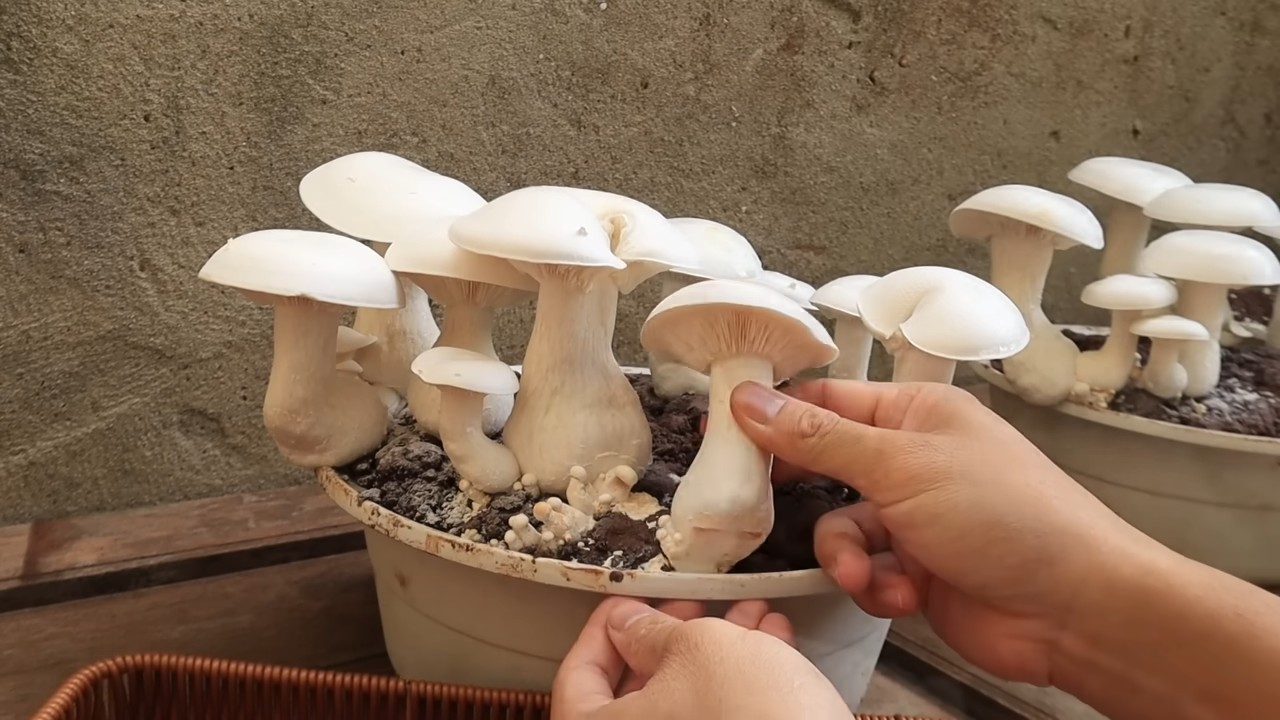
Grow mushrooms in a bowl? Absolutely! Imagine harvesting fresh, delicious mushrooms right from your kitchen counter. It sounds like something out of a fairytale, doesn’t it? But trust me, it’s easier than you think, and this DIY guide will show you exactly how to make it happen.
For centuries, mushrooms have been revered across cultures, not just for their unique flavor but also for their medicinal properties. From ancient Roman feasts to traditional Chinese medicine, these fascinating fungi have held a special place in human history. Now, you can bring a piece of that history into your own home.
Why should you learn to grow mushrooms in a bowl? Well, for starters, it’s incredibly rewarding to cultivate your own food. Plus, store-bought mushrooms can be expensive and sometimes lack that fresh, earthy flavor. With this simple DIY trick, you’ll have a constant supply of organic, homegrown mushrooms at your fingertips. It’s also a fantastic way to reduce your carbon footprint and connect with nature, even in a small apartment. So, let’s dive in and discover the secrets to successful indoor mushroom cultivation!
Pilze züchten in einer Schüssel: Dein DIY-Guide für zu Hause
Hallo Pilzfreunde! Hast du dich jemals gefragt, wie es wäre, deine eigenen köstlichen Pilze zu Hause zu züchten? Es ist einfacher, als du denkst! Mit diesem DIY-Guide zeige ich dir, wie du in einer einfachen Schüssel deine eigenen Pilze ziehen kannst. Keine Angst, es ist ein super spannendes Projekt und du wirst bald mit frischen, selbst gezüchteten Pilzen belohnt!
Was du brauchst: Deine Einkaufsliste
Bevor wir loslegen, lass uns sicherstellen, dass du alles hast, was du brauchst. Hier ist eine Liste der Materialien und Werkzeuge, die wir verwenden werden:
* Eine Schüssel: Eine mittelgroße Schüssel (ca. 20-25 cm Durchmesser) ist ideal. Sie sollte sauber und desinfiziert sein.
* Substrat: Das ist das “Futter” für deine Pilze. Du kannst verschiedene Substrate verwenden, aber Kaffeesatz ist eine super nachhaltige und einfache Option für den Anfang. Alternativ kannst du auch Stroh, Sägemehl oder eine Mischung aus beidem verwenden.
* Pilzbrut (Spawn): Das ist das “Saatgut” für deine Pilze. Du kannst Pilzbrut online oder in Gartencentern kaufen. Austernpilze (Pleurotus ostreatus) sind eine gute Wahl für Anfänger, da sie relativ einfach zu züchten sind.
* Vermiculit oder Perlit: Diese Materialien helfen, die Feuchtigkeit im Substrat zu halten und die Belüftung zu verbessern.
* Sprühflasche: Zum Befeuchten des Substrats.
* Plastikfolie oder Frischhaltefolie: Um die Schüssel abzudecken und eine feuchte Umgebung zu schaffen.
* Alkohol (70% Isopropylalkohol): Zum Desinfizieren deiner Hände und Werkzeuge.
* Handschuhe (optional): Um Kontamination zu vermeiden.
Schritt-für-Schritt-Anleitung: So geht’s!
Jetzt, wo wir alles haben, können wir mit dem spannenden Teil beginnen: dem Ansetzen deiner eigenen Pilzzucht!
Phase 1: Vorbereitung des Substrats
1. Desinfektion ist das A und O: Bevor du irgendetwas berührst, wasche deine Hände gründlich mit Seife und Wasser. Desinfiziere die Schüssel und alle Werkzeuge, die du verwenden wirst, mit Alkohol. Das ist super wichtig, um zu verhindern, dass unerwünschte Bakterien oder Schimmelpilze deine Pilzzucht ruinieren.
2. Kaffeesatz vorbereiten (wenn du ihn verwendest): Wenn du Kaffeesatz verwendest, stelle sicher, dass er abgekühlt ist. Frischer Kaffeesatz ist heiß und kann die Pilzbrut abtöten. Du kannst den Kaffeesatz auch pasteurisieren, indem du ihn für 1-2 Stunden in einem Ofen bei niedriger Temperatur (ca. 80°C) erhitzt. Das tötet eventuelle Schädlinge ab.
3. Substrat mischen: Mische den Kaffeesatz (oder dein gewähltes Substrat) mit Vermiculit oder Perlit. Das Verhältnis sollte etwa 90% Substrat und 10% Vermiculit/Perlit sein. Das Vermiculit/Perlit hilft, die Feuchtigkeit zu halten und die Belüftung zu verbessern.
4. Feuchtigkeit testen: Das Substrat sollte feucht, aber nicht nass sein. Drücke eine Handvoll Substrat zusammen. Es sollte sich feucht anfühlen, aber kein Wasser austreten. Wenn es zu trocken ist, sprühe etwas Wasser darauf und mische es gut durch. Wenn es zu nass ist, füge etwas trockenes Substrat hinzu.
Phase 2: Beimpfen des Substrats mit Pilzbrut
1. Pilzbrut vorbereiten: Brich die Pilzbrut vorsichtig auf, so dass sie locker und krümelig ist.
2. Schichtweise vorgehen: Fülle die Schüssel mit einer Schicht Substrat (ca. 2-3 cm dick). Verteile dann eine Schicht Pilzbrut darüber. Wiederhole diesen Vorgang, bis die Schüssel fast voll ist. Die oberste Schicht sollte aus Substrat bestehen.
3. Sanft andrücken: Drücke das Substrat leicht an, so dass es kompakt ist. Aber nicht zu fest, die Pilze brauchen noch Luft zum Atmen!
Phase 3: Inkubation und Pflege
1. Abdecken und schützen: Decke die Schüssel mit Plastikfolie oder Frischhaltefolie ab. Steche ein paar kleine Löcher in die Folie, um die Belüftung zu gewährleisten.
2. Der richtige Standort: Stelle die Schüssel an einen dunklen, kühlen Ort (ca. 18-24°C). Ein Keller, ein Schrank oder eine Speisekammer sind ideal. Vermeide direkte Sonneneinstrahlung, da diese die Pilzbrut austrocknen kann.
3. Feuchtigkeit kontrollieren: Überprüfe das Substrat regelmäßig. Es sollte immer feucht sein. Wenn es trocken aussieht, sprühe es mit Wasser ein. Achte darauf, dass es nicht zu nass wird.
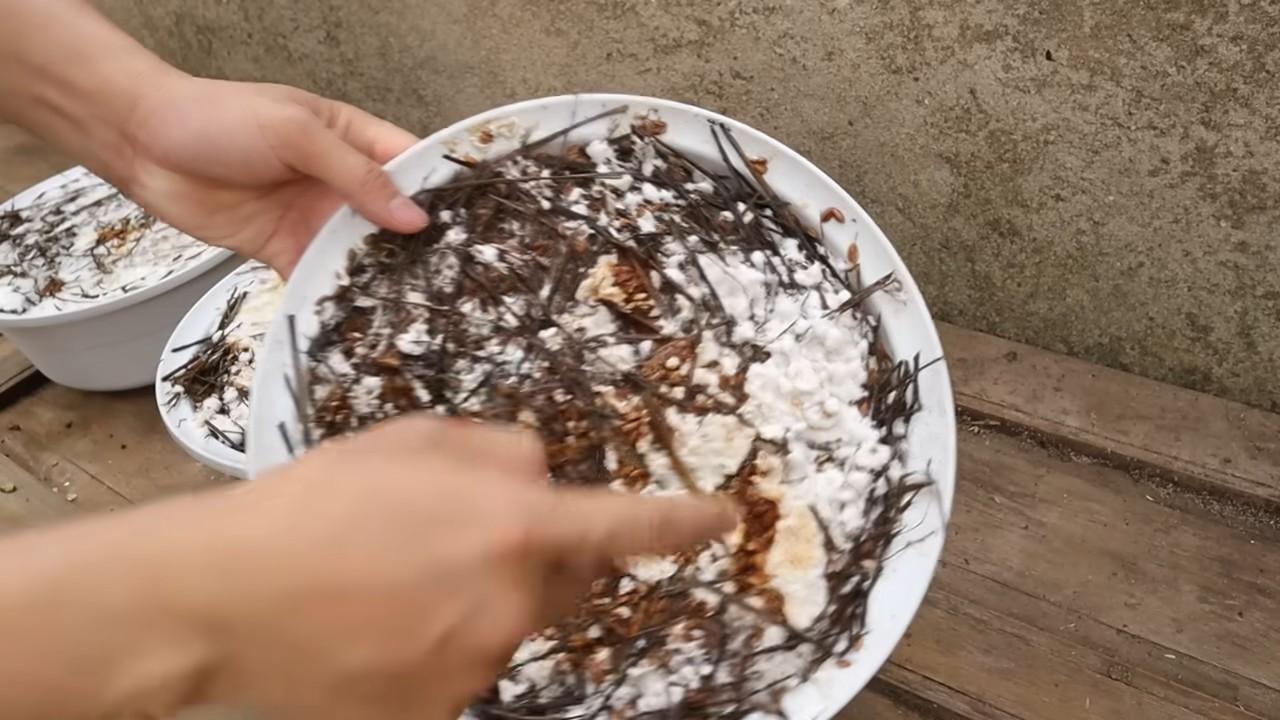
4. Geduld ist gefragt: Jetzt heißt es warten! Es kann einige Wochen dauern, bis das Myzel (das Pilzgeflecht) das Substrat durchwachsen hat. Du wirst sehen, wie sich weiße, flaumige Fäden auf dem Substrat ausbreiten. Das ist ein gutes Zeichen!
Phase 4: Fruchtung und Ernte
1. Licht ins Dunkel bringen: Sobald das Substrat vollständig mit Myzel bedeckt ist, ist es Zeit, die Schüssel an einen helleren Ort zu stellen. Vermeide aber immer noch direkte Sonneneinstrahlung.
2. Die richtige Temperatur: Die ideale Temperatur für die Fruchtung liegt bei etwa 15-21°C.
3. Luftfeuchtigkeit erhöhen: Erhöhe die Luftfeuchtigkeit, indem du die Schüssel regelmäßig mit Wasser besprühst. Du kannst auch einen Luftbefeuchter in der Nähe aufstellen.
4. Die ersten Pilze: Nach einigen Tagen oder Wochen wirst du die ersten kleinen Pilze sehen, die aus dem Substrat sprießen. Das ist der aufregendste Teil!
5. Erntezeit: Ernte die Pilze, wenn sie ihre volle Größe erreicht haben, aber bevor sie anfangen, Sporen abzuwerfen. Du kannst sie einfach mit einem Messer abschneiden oder vorsichtig abdrehen.
6. Mehrere Ernten: Du kannst in der Regel mehrere Ernten aus derselben Schüssel erzielen. Nach der ersten Ernte gieße das Substrat gut und stelle die Schüssel wieder an ihren Platz.
Zusätzliche Tipps und Tricks für eine erfolgreiche Pilzzucht
* Sauberkeit ist entscheidend: Achte immer auf Sauberkeit, um Kontaminationen zu vermeiden. Desinfiziere deine Hände und Werkzeuge regelmäßig.
* Die richtige Pilzart wählen: Austernpilze sind eine gute Wahl für Anfänger, aber es gibt viele andere Pilzarten, die du ausprobieren kannst. Informiere dich über die spezifischen Bedürfnisse der jeweiligen Pilzart.
* Experimentiere mit verschiedenen Substraten: Kaffeesatz ist eine gute Option, aber du kannst auch Stroh, Sägemehl oder eine Mischung aus beidem verwenden. Jedes Substrat hat seine eigenen Vor- und Nachteile.
* Beobachte deine Pilze: Beobachte deine Pilze regelmäßig und passe die Bedingungen entsprechend an. Wenn sie nicht gut wachsen, kann es sein, dass sie zu viel oder zu wenig Feuchtigkeit, Licht oder Temperatur haben.
* Nicht aufgeben: Die Pilzzucht kann manchmal eine Herausforderung sein, aber lass dich nicht entmutigen! Mit etwas Übung und Geduld wirst du bald deine eigenen köstlichen Pilze ernten können.
Häufige Probleme und Lösungen
* Schimmelbefall: Wenn du Schimmel auf dem Substrat entdeckst, ist es wichtig, schnell zu handeln. Entferne den befallenen Bereich vorsichtig mit einem sauberen Werkzeug. Stelle sicher, dass die Belüftung ausreichend ist und die Luftfeuchtigkeit nicht zu hoch ist.
* Austrocknung: Wenn das Substrat zu trocken ist, sprühe es regelmäßig mit Wasser ein. Du kannst auch eine Plastiktüte über die Schüssel stülpen, um die Luftfeuchtigkeit zu erhöhen.
* Zu wenig Licht: Wenn die Pilze blass und langgezogen sind, brauchen sie mehr Licht
Conclusion
So, there you have it! Growing mushrooms in a bowl isn’t just a fun experiment; it’s a gateway to fresh, flavorful fungi right in your own kitchen. Forget those expensive, pre-packaged mushrooms from the grocery store. With a little patience and this simple DIY trick, you can cultivate your own supply of deliciousness.
Why is this a must-try? Because it’s accessible, sustainable, and incredibly rewarding. You don’t need a sprawling garden or specialized equipment. A simple bowl, some substrate, and mushroom spawn are all you need to embark on this mycological adventure. Plus, you’ll be reducing your carbon footprint by cutting down on transportation and packaging waste. And let’s be honest, there’s something deeply satisfying about nurturing life and harvesting your own food.
But the best part? The possibilities are endless! Once you’ve mastered the basic technique, you can experiment with different types of mushrooms. Try oyster mushrooms for their delicate flavor and velvety texture, or shiitake mushrooms for their rich, umami taste. You can even explore different substrates, like coffee grounds or straw, to see how they affect the growth and flavor of your mushrooms.
Don’t be afraid to get creative! Consider adding a layer of vermiculite to help retain moisture, or experimenting with different lighting conditions to see how they impact the growth rate. You can even try inoculating multiple bowls with different types of mushrooms to create a diverse and flavorful harvest.
This DIY mushroom growing method is more than just a recipe; it’s an invitation to connect with nature, learn about the fascinating world of fungi, and enjoy the fruits (or rather, the mushrooms) of your labor.
We wholeheartedly encourage you to give this DIY trick a try. It’s a fantastic project for beginners and experienced gardeners alike. And once you’ve harvested your first batch of homegrown mushrooms, be sure to share your experience with us! We’d love to see your photos, hear your tips, and learn from your successes (and even your failures). Let’s build a community of mushroom enthusiasts and spread the word about this simple, sustainable, and delicious way to grow your own food.
So, grab a bowl, some spawn, and get ready to embark on your mushroom growing journey. You won’t regret it! This is a fantastic way to enjoy fresh, organic mushrooms without ever leaving your home.
Frequently Asked Questions (FAQ)
What type of mushrooms are best for growing in a bowl?
Oyster mushrooms are generally considered the easiest and most forgiving for beginners. They are fast-growing, tolerate a wider range of conditions, and produce a good yield. Shiitake mushrooms are another popular choice, but they require a bit more patience and attention. Button mushrooms, the kind you typically find in grocery stores, are more challenging to grow at home and require specific conditions that are difficult to replicate in a bowl. Lion’s mane mushrooms are also gaining popularity for home cultivation, but they may require a slightly different substrate and more humidity. Ultimately, the best type of mushroom for you will depend on your experience level, the resources available to you, and your personal taste preferences. Research different varieties and choose one that aligns with your goals.
What kind of substrate should I use?
The ideal substrate depends on the type of mushroom you’re growing. Oyster mushrooms thrive on a variety of substrates, including straw, coffee grounds, and even cardboard. Shiitake mushrooms prefer hardwood sawdust or wood chips. When choosing a substrate, make sure it’s clean and free of contaminants. Pasteurizing or sterilizing the substrate is crucial to kill off any competing organisms that could hinder mushroom growth. You can pasteurize straw by soaking it in hot water for several hours. For sawdust or wood chips, sterilization in a pressure cooker is recommended. Coffee grounds are naturally pasteurized during the brewing process, making them a convenient and readily available option.
How long does it take to grow mushrooms in a bowl?
The time it takes to grow mushrooms in a bowl varies depending on the type of mushroom, the substrate used, and the environmental conditions. Oyster mushrooms are typically the fastest, often fruiting within 2-3 weeks of inoculation. Shiitake mushrooms can take several months to fruit. Maintaining optimal temperature and humidity levels is crucial for faster growth. Keep the bowl in a cool, dark place with high humidity. Misting the substrate regularly will help maintain the necessary moisture levels. Patience is key! Don’t be discouraged if you don’t see results immediately.
How do I maintain the humidity levels?
Maintaining adequate humidity is essential for successful mushroom cultivation. Mushrooms need a humid environment to thrive. You can increase humidity by covering the bowl with a plastic bag or dome, creating a mini-greenhouse effect. Make sure to leave some ventilation to prevent the buildup of excess moisture, which can lead to mold growth. Misting the substrate regularly with a spray bottle will also help maintain humidity. You can also place the bowl on a tray filled with water and pebbles. As the water evaporates, it will increase the humidity around the bowl.
What do I do if I see mold growing in my bowl?
Mold is a common problem in mushroom cultivation, especially if the substrate is not properly pasteurized or sterilized. If you see mold growing in your bowl, it’s important to take action immediately to prevent it from spreading. Remove the affected area with a clean spoon or knife. You can also try spraying the mold with a diluted hydrogen peroxide solution. Make sure to improve ventilation to reduce humidity levels, which can contribute to mold growth. If the mold infestation is severe, it may be necessary to discard the entire batch and start over with fresh substrate.
How do I harvest the mushrooms?
Harvesting mushrooms at the right time is crucial for optimal flavor and texture. Harvest oyster mushrooms when the caps are fully formed but before they start to release spores. Shiitake mushrooms should be harvested when the caps are slightly curled and the gills are visible. To harvest, gently twist or cut the mushrooms from the base of the stem. Avoid pulling them out, as this can damage the substrate and prevent future flushes.
Can I get multiple harvests from the same bowl?
Yes, you can often get multiple harvests, or flushes, from the same bowl. After harvesting the first flush, allow the substrate to rest for a few days. Mist the substrate regularly to maintain humidity. You may need to add some fresh water to the bowl to replenish moisture levels. After a week or two, you should see new mushrooms starting to form. You can typically get 2-3 flushes from the same bowl before the substrate is depleted of nutrients.
Where can I buy mushroom spawn?
Mushroom spawn can be purchased online from reputable suppliers specializing in mushroom cultivation. You can also find it at some garden centers or nurseries. When buying spawn, make sure it’s fresh and from a reliable source. Look for spawn that is labeled with the type of mushroom and the date of production.
Is growing mushrooms in a bowl safe?
Growing edible mushrooms in a bowl is generally safe, but it’s important to take precautions to avoid consuming poisonous mushrooms. Only grow mushrooms that you can positively identify as edible. Never eat wild mushrooms unless you are an experienced forager and can confidently identify them. If you are unsure about the identity of a mushroom, it’s best to err on the side of caution and discard it.

Leave a Comment