
Growing Kale in Soil Bags: Unlock the secrets to a bountiful harvest, even without a traditional garden! Have you ever dreamt of fresh, vibrant kale gracing your dinner table, but felt limited by space or soil conditions? Well, dream no more! This DIY guide will empower you to cultivate your own kale haven using a surprisingly simple and effective method: soil bags.
For centuries, humans have sought innovative ways to cultivate food, adapting to diverse environments and limited resources. From ancient terrace farming to modern hydroponics, the spirit of ingenuity has always driven agricultural practices. Growing kale in soil bags is a testament to this enduring spirit, offering a practical and accessible solution for urban gardeners, apartment dwellers, and anyone seeking a sustainable food source.
Why should you embrace this DIY trick? Because it’s a game-changer! It eliminates the need for extensive digging, weeding, and soil preparation. Plus, it’s incredibly cost-effective and allows you to control the growing environment, ensuring your kale thrives. I’m excited to share my tips and tricks for growing kale in soil bags, so you can enjoy fresh, nutritious greens right outside your door. Let’s get started and transform those humble bags into flourishing kale gardens!
Kohl Anbauen in Pflanzsäcken: Eine einfache DIY-Anleitung
Ich liebe es, frisches Gemüse direkt aus meinem Garten zu ernten, und Grünkohl ist da keine Ausnahme! Aber nicht jeder hat den Platz für ein großes Beet. Deshalb zeige ich euch heute, wie ihr Grünkohl ganz einfach in Pflanzsäcken anbauen könnt. Das ist platzsparend, superpraktisch und funktioniert auch auf Balkonen oder kleinen Terrassen wunderbar. Los geht’s!
Was du brauchst:
* Pflanzsäcke (aus Jute, Filz oder Plastik – je nach Vorliebe)
* Hochwertige Pflanzerde
* Grünkohl-Samen oder Jungpflanzen
* Gießkanne oder Gartenschlauch
* Optional: Langzeitdünger oder Kompost
* Optional: Mulch (z.B. Stroh oder Holzhackschnitzel)
* Optional: Eine Schere oder ein Messer (zum Anpassen der Pflanzsäcke)
Vorbereitung ist alles: Die Pflanzsäcke vorbereiten
1. Den richtigen Pflanzsack auswählen: Zuerst musst du dich für einen Pflanzsack entscheiden. Jute- und Filzsäcke sind atmungsaktiv und verhindern Staunässe, was super für Grünkohl ist. Plastiksäcke sind günstiger, aber du musst unbedingt auf eine gute Drainage achten. Ich persönlich mag Filzsäcke am liebsten, weil sie auch noch gut aussehen.
2. Drainage checken (und ggf. verbessern): Egal für welchen Sack du dich entscheidest, überprüfe, ob er ausreichend Drainagelöcher hat. Wenn nicht, kannst du mit einer Schere oder einem Messer vorsichtig ein paar zusätzliche Löcher in den Boden schneiden. Staunässe ist der Feind des Grünkohls!
3. Den Standort festlegen: Grünkohl liebt die Sonne! Wähle einen Standort, der mindestens 6 Stunden Sonnenlicht pro Tag bekommt. Denk auch daran, dass die Säcke, wenn sie befüllt sind, schwer werden. Stell sie also am besten gleich an den endgültigen Platz.
4. Die Säcke befüllen: Jetzt kommt die Erde rein! Fülle die Pflanzsäcke mit hochwertiger Pflanzerde. Ich mische gerne noch etwas Kompost unter, um den Grünkohl mit zusätzlichen Nährstoffen zu versorgen. Lass oben etwa 5-10 cm Platz, damit du später gut gießen kannst.
Aussaat oder Einpflanzen: Der Grünkohl kommt in die Erde
Hier hast du zwei Möglichkeiten: Entweder du ziehst deinen Grünkohl aus Samen vor oder du kaufst direkt Jungpflanzen. Ich persönlich finde beides gut, je nachdem, wie viel Zeit ich habe.
Aussaat aus Samen:
1. Die Samen vorbereiten: Wenn du Samen verwendest, solltest du sie vor dem Aussäen etwa 24 Stunden in lauwarmem Wasser einweichen. Das beschleunigt die Keimung.
2. Aussaat: Mach mit dem Finger kleine Mulden in die Erde (etwa 1 cm tief). Lege in jede Mulde 2-3 Samen und bedecke sie leicht mit Erde.
3. Gießen: Gieße die Erde vorsichtig an, sodass sie feucht, aber nicht nass ist.
4. Geduld haben: Jetzt heißt es warten! Die Keimung dauert in der Regel 5-10 Tage. Halte die Erde währenddessen feucht.
5. Pikieren: Sobald die Keimlinge ein paar Blätter haben, kannst du sie pikieren. Das bedeutet, dass du die schwächeren Pflanzen entfernst, sodass nur die stärksten übrig bleiben.
Einpflanzen von Jungpflanzen:
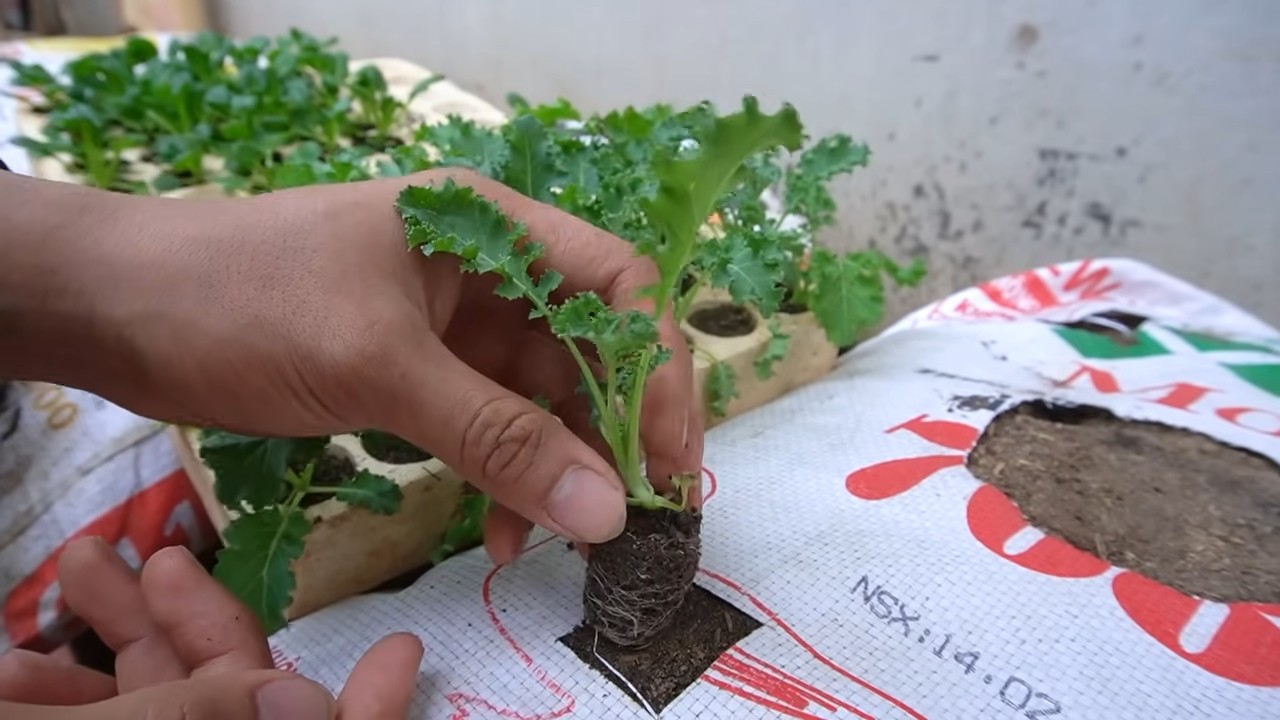
1. Die Jungpflanzen vorbereiten: Bevor du die Jungpflanzen in die Pflanzsäcke setzt, tauche die Wurzelballen in Wasser, bis sie gut durchfeuchtet sind.
2. Einpflanzen: Mach mit der Hand ein Loch in die Erde, das groß genug für den Wurzelballen ist. Setze die Pflanze hinein und fülle das Loch mit Erde auf. Achte darauf, dass der Wurzelballen vollständig bedeckt ist.
3. Gießen: Gieße die Pflanzen nach dem Einpflanzen gründlich an.
Pflege: Damit dein Grünkohl prächtig gedeiht
1. Gießen: Grünkohl braucht regelmäßig Wasser, besonders an heißen Tagen. Die Erde sollte immer leicht feucht sein, aber nicht nass. Mach am besten die Fingerprobe: Wenn sich die oberste Erdschicht trocken anfühlt, ist es Zeit zum Gießen.
2. Düngen: Grünkohl ist ein Starkzehrer, das heißt, er braucht viele Nährstoffe. Du kannst entweder von Anfang an Langzeitdünger in die Erde mischen oder regelmäßig flüssigen Dünger ins Gießwasser geben. Ich dünge meinen Grünkohl alle 2-3 Wochen mit einem organischen Gemüsedünger. Kompost ist auch eine tolle natürliche Düngemethode.
3. Schutz vor Schädlingen: Grünkohl kann von verschiedenen Schädlingen befallen werden, wie z.B. Kohlweißlingen oder Blattläusen. Kontrolliere deine Pflanzen regelmäßig und entferne Schädlinge gegebenenfalls von Hand. Bei starkem Befall kannst du auch biologische Schädlingsbekämpfungsmittel einsetzen. Ein Netz über den Pflanzen kann auch helfen, Kohlweißlinge fernzuhalten.
4. Mulchen: Eine Mulchschicht aus Stroh oder Holzhackschnitzeln hilft, die Feuchtigkeit im Boden zu halten und Unkraut zu unterdrücken. Außerdem schützt sie die Erde vor Erosion.
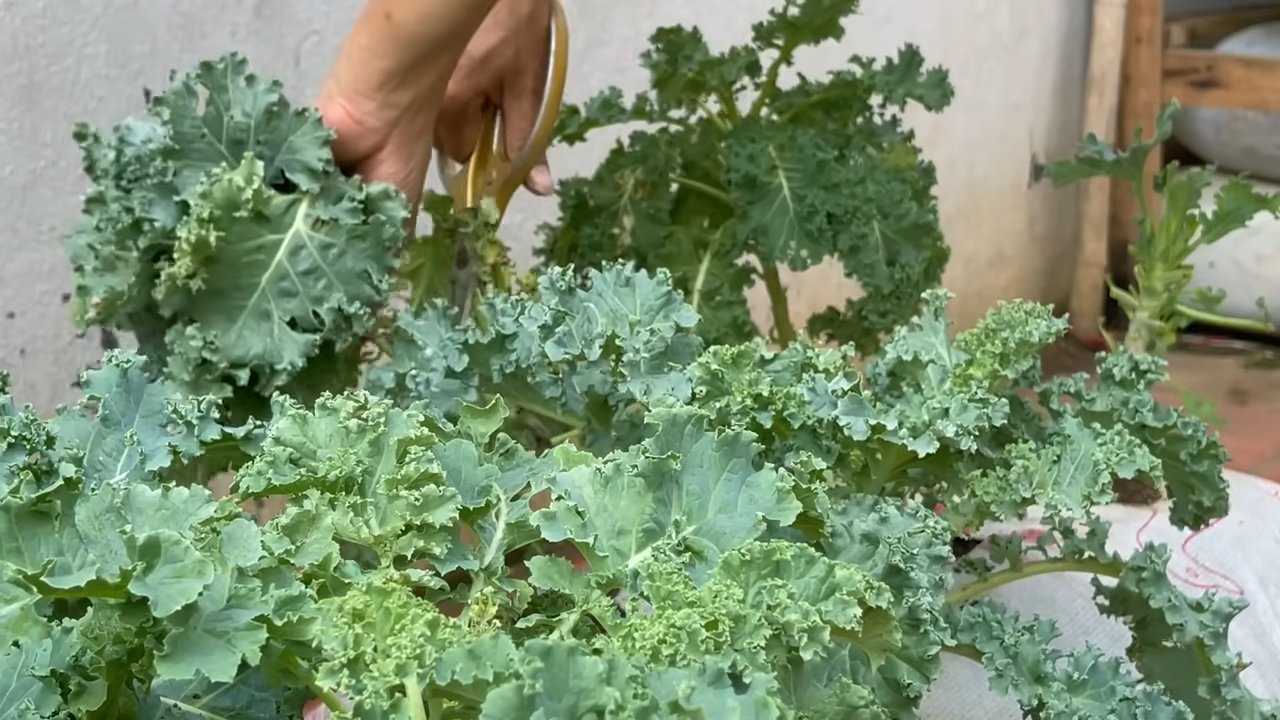
5. Regelmäßiges Ernten: Das Ernten der äußeren Blätter fördert das Wachstum der Pflanze. Beginne mit den unteren Blättern und arbeite dich nach oben vor. Lass das Herz der Pflanze stehen, damit sie weiterwachsen kann.
Erntezeit: Endlich frischer Grünkohl!
Je nach Sorte und Aussaatzeitpunkt kannst du deinen Grünkohl etwa 2-3 Monate nach der Aussaat ernten. Die Blätter sollten schön kräftig und grün sein. Ernte am besten morgens, dann sind die Blätter am knackigsten.
Sortenempfehlungen: Welcher Grünkohl passt zu dir?
Es gibt viele verschiedene Grünkohlsorten, die sich in Geschmack, Aussehen und Frosthärte unterscheiden. Hier sind ein paar meiner Favoriten:
* ‘Nero di Toscana’ (Palmkohl): Dieser Grünkohl hat lange, schmale, fast schwarze Blätter und einen milden, leicht süßlichen Geschmack. Er ist sehr frosthart und sieht auch noch toll aus.
* ‘Halbhoher Grüner Krauser’: Eine klassische Sorte mit gekrausten, grünen Blättern. Sie ist sehr robust und ertragreich.
* ‘Red Russian’: Dieser Grünkohl hat rötlich-grüne, farnartige Blätter und einen leicht pfeffrigen Geschmack. Er ist ebenfalls sehr frosthart.
* ‘Scarlet’: Eine dekorative Sorte mit violetten, gekrausten Blättern. Sie ist nicht ganz so frosthart wie die anderen Sorten, aber trotzdem sehr lecker.
Zusätzliche Tipps und Tricks:
* Grünkohl im Winter: Grünkohl ist sehr frosthart und kann auch im Winter geerntet werden. Durch den Frost wird er sogar noch süßer.
* Grünkohl als Gründüngung: Wenn du deinen Grünkohl nicht essen möchtest, kannst du ihn auch als Gründüngung verwenden. Schneide die Pflanzen nach der Ernte ab und arbeite sie in den Boden ein. Das verbessert die Bodenstruktur und versorgt den Boden mit Nährstoffen.
* Kombination mit anderen Pflanzen: Grünkohl verträgt sich gut mit vielen anderen Pflanzen, wie z.B. Ringelblumen, Kapuzinerkresse oder Knoblauch. Diese Pflanzen können Schädlinge abwehren und das Wachstum des Grünkohls fördern.
* Pflanzsäcke wiederverwenden: Wenn du deine Pflanzsäcke gut pflegst, kannst du sie mehrere Jahre lang verwenden. Reinige sie nach der Ernte gründlich und lagere sie trocken.
Ich hoffe, diese Anleitung hilft dir dabei, deinen eigenen Grünkohl in Pflanzsäcken anzubauen. Es ist wirklich einfacher als man denkt und das Ergebnis ist einfach unschlagbar: Frischer, selbst angebauter Grünkohl, der super schmeckt und gesund ist! Viel Spaß beim Gärtnern!
Conclusion
So, there you have it! Growing kale in soil bags is not just a gardening hack; it’s a game-changer for anyone looking to enjoy fresh, nutritious greens with minimal effort and maximum yield. We’ve walked you through the simple steps, highlighting the benefits of this method – from its space-saving nature and improved drainage to its portability and ability to extend your growing season.
Why is this DIY trick a must-try? Because it democratizes gardening. You don’t need acres of land or a green thumb passed down through generations. All you need is a soil bag, some kale seeds or seedlings, a sunny spot, and a little bit of enthusiasm. It’s an accessible, affordable, and rewarding way to connect with your food and enjoy the unparalleled flavor of homegrown kale.
But the beauty of this method lies in its adaptability. Feel free to experiment! Try different varieties of kale – from the classic curly kale to the vibrant Lacinato or the frilly Red Russian. Consider companion planting. Tuck in some marigolds to deter pests or some basil to enhance the flavor of your kale. You could even create a tiered system by stacking multiple soil bags, maximizing your vertical growing space and creating a stunning visual display.
For those in colder climates, consider using dark-colored soil bags to absorb more heat and extend your growing season further into the fall. You can also move the bags indoors during particularly harsh weather, giving your kale a fighting chance against the elements. If you live in a hot climate, consider using lighter-colored bags to reflect sunlight and prevent the soil from overheating.
Don’t be afraid to get creative with your watering schedule. While kale prefers consistently moist soil, it doesn’t like to be waterlogged. Monitor the moisture levels regularly and adjust your watering accordingly. You can also add a layer of mulch to the top of the soil bag to help retain moisture and suppress weeds.
Ultimately, the best way to learn is by doing. So, grab a soil bag, some kale seeds, and get started! We’re confident that you’ll be amazed by the results. And once you’ve harvested your first batch of homegrown kale, don’t forget to share your experience with us! We’d love to hear your tips, tricks, and triumphs. Post photos of your soil bag kale gardens on social media using #SoilBagKale and inspire others to join the movement. Let’s cultivate a community of thriving soil bag gardeners! This method of growing kale is truly a rewarding experience.
Frequently Asked Questions (FAQ)
What kind of soil bag should I use?
The ideal soil bag is a heavy-duty, UV-resistant polypropylene bag. These bags are designed to withstand the elements and hold a significant amount of weight. Look for bags that are specifically marketed for gardening or landscaping purposes. The size of the bag will depend on how much kale you want to grow. A standard 2-cubic-foot bag is a good starting point for a few kale plants. You can also repurpose large feed bags or grain bags, but make sure they are thoroughly cleaned before use to remove any residue that could harm your plants. Ensure the bag is dark in color to help retain heat, especially in cooler climates.
How do I prepare the soil bag for planting?
First, lay the soil bag flat on a level surface in a sunny location. Then, using a sharp knife or box cutter, carefully cut several drainage holes in the bottom of the bag. This is crucial to prevent waterlogging, which can lead to root rot. Next, cut several X-shaped slits in the top of the bag, spaced about 12-18 inches apart. These slits will be where you plant your kale seedlings or sow your seeds. Before planting, gently loosen the soil inside the bag by massaging it with your hands. This will help improve aeration and drainage.
What kind of soil should I use?
A well-draining, nutrient-rich potting mix is ideal for growing kale in soil bags. Avoid using garden soil, as it can be too heavy and compact, hindering root growth. Look for a potting mix that contains a blend of peat moss, perlite, and vermiculite. You can also amend the potting mix with compost or aged manure to provide additional nutrients. Consider adding a slow-release fertilizer to the soil bag at planting time to ensure a steady supply of nutrients throughout the growing season.
How often should I water my kale plants in soil bags?
The watering frequency will depend on the weather conditions and the type of soil you’re using. Generally, you should water your kale plants whenever the top inch of soil feels dry to the touch. Water deeply, ensuring that the water drains out of the drainage holes in the bottom of the bag. Avoid overwatering, as this can lead to root rot. During hot, dry weather, you may need to water your plants daily. In cooler, wetter weather, you may only need to water them every few days. A good rule of thumb is to check the soil moisture regularly and adjust your watering accordingly.
How much sunlight do kale plants need?
Kale thrives in full sun, which means at least 6 hours of direct sunlight per day. However, it can also tolerate partial shade, especially in hot climates. If you live in a particularly sunny area, consider providing your kale plants with some afternoon shade to prevent them from scorching. If you’re growing kale indoors, you’ll need to supplement with artificial light, such as grow lights.
How do I fertilize my kale plants in soil bags?
Kale is a heavy feeder, so it’s important to fertilize it regularly. You can use a balanced liquid fertilizer, such as a 10-10-10 or a 20-20-20, diluted according to the package instructions. Apply the fertilizer every 2-3 weeks throughout the growing season. You can also side-dress your kale plants with compost or aged manure. This will provide a slow-release source of nutrients. Avoid over-fertilizing, as this can lead to excessive leaf growth and reduced flavor.
How do I protect my kale plants from pests and diseases?
Kale is susceptible to a variety of pests and diseases, including aphids, cabbage worms, flea beetles, and powdery mildew. To prevent pest infestations, inspect your plants regularly and remove any pests by hand. You can also use insecticidal soap or neem oil to control pests. To prevent diseases, ensure that your plants have good air circulation and avoid overwatering. If you notice any signs of disease, remove the affected leaves immediately. Consider using organic fungicides if the problem persists. Companion planting with herbs like rosemary and thyme can also help deter pests.
When and how do I harvest my kale?
You can start harvesting kale leaves as soon as they are large enough to eat, typically when they are about 4-6 inches long. Harvest the outer leaves first, leaving the inner leaves to continue growing. To harvest, simply cut the leaves off at the base of the stem with a sharp knife or scissors. Avoid tearing the leaves, as this can damage the plant. Kale leaves are best eaten fresh, but they can also be stored in the refrigerator for up to a week.
Can I grow other vegetables in soil bags besides kale?
Absolutely! Soil bags are a versatile growing medium and can be used to grow a wide variety of vegetables, herbs, and flowers. Some other popular choices include tomatoes, peppers, lettuce, spinach, and strawberries. The key is to choose plants that are well-suited to the size of the soil bag and the amount of sunlight available.
What do I do with the soil bag at the end of the growing season?
At the end of the growing season, you can either discard the soil bag or reuse it for another crop. If you choose to reuse it, be sure to amend the soil with fresh compost or aged manure to replenish the nutrients. You can also rotate the crops you grow in the soil bag each year to prevent soilborne diseases. If the soil bag is damaged or worn out, you can recycle the plastic or use it for other purposes, such as lining garden beds or creating weed barriers.


Leave a Comment