
Grow Celery at Home, you say? Absolutely! Imagine stepping out into your own backyard and snipping fresh, crisp celery stalks for your salads, soups, or even just a healthy snack. No more limp, store-bought celery that’s been sitting on the shelf for days! This DIY guide will unlock the secrets to cultivating this surprisingly easy-to-grow vegetable right in your own garden.
Celery has a rich history, dating back to ancient times where it was valued for its medicinal properties. While it wasn’t always the crunchy snack we know and love today, its journey from a bitter, wild plant to a cultivated garden staple is fascinating. For centuries, celery has been a symbol of health and vitality, and now, you can bring that tradition into your own home.
Why should you learn to grow celery at home? Well, for starters, it’s incredibly rewarding! Plus, homegrown celery tastes significantly better than anything you can buy in the supermarket. But more importantly, in today’s world, knowing how to grow your own food is becoming increasingly important. It’s a sustainable way to reduce your carbon footprint, save money, and ensure you have access to fresh, healthy produce. I’m excited to share these simple, yet effective, DIY tricks and hacks that will have you harvesting your own celery in no time. Let’s get started!
Zieh dein eigenes Staudensellerie zu Hause: Ein umfassender DIY-Leitfaden
Hey Gartenfreunde! Habt ihr euch jemals gefragt, wie ihr frischen, knackigen Staudensellerie direkt aus eurem eigenen Garten oder sogar von eurer Fensterbank ernten könnt? Ich zeige euch, wie das geht! Es ist einfacher, als ihr denkt, und super befriedigend. Lasst uns gemeinsam in die Welt des Staudensellerie-Anbaus eintauchen.
Was du brauchst: Die richtige Ausrüstung und Materialien
Bevor wir loslegen, stellen wir sicher, dass wir alles Nötige zur Hand haben. Hier ist eine Liste der Dinge, die wir brauchen:
* Ein Staudensellerie-Strunk: Am besten einen frischen, aus dem Supermarkt oder vom Markt. Achtet darauf, dass er eine gesunde Basis hat, aus der neue Wurzeln wachsen können.
* Ein Glas oder eine Schale: Groß genug, um die Basis des Selleriestrunks aufzunehmen.
* Wasser: Leitungswasser ist völlig ausreichend.
* Ein Messer: Zum sauberen Abschneiden des Selleriestrunks.
* Blumenerde: Hochwertige Blumenerde für den späteren Umzug in einen Topf.
* Ein Topf: Mit ausreichend Platz für das Wurzelwachstum.
* Optional: Flüssigdünger: Für eine zusätzliche Nährstoffversorgung.
* Ein sonniger Standort: Sellerie liebt Licht!
Phase 1: Das Nachziehen des Selleries im Wasser
Dieser erste Schritt ist entscheidend, um dem Sellerie einen guten Start zu ermöglichen. Wir wollen, dass er neue Wurzeln bildet, bevor wir ihn in die Erde pflanzen.
1. Den Selleriestrunk vorbereiten: Nehmt euer Messer und schneidet den Staudensellerie etwa 5-7 cm vom unteren Ende ab. Achtet darauf, dass ihr den Strunk nicht zu kurz schneidet, da wir die Basis zum Nachziehen benötigen. Die oberen Stangen könnt ihr natürlich für Suppen, Salate oder zum Knabbern verwenden!
2. Den Strunk ins Wasser stellen: Füllt euer Glas oder eure Schale mit Wasser, sodass der Strunk etwa 2-3 cm tief im Wasser steht. Achtet darauf, dass nur die untere Schnittfläche im Wasser ist und die oberen Teile trocken bleiben, um Fäulnis zu vermeiden.
3. Der richtige Standort: Stellt das Glas mit dem Selleriestrunk an einen hellen, warmen Ort, aber nicht in die pralle Sonne. Ein Fensterbrett ist ideal.
4. Wasserwechsel: Wechselt das Wasser alle ein bis zwei Tage, um es frisch zu halten und die Bildung von Bakterien zu verhindern.
5. Geduld ist gefragt: Nach etwa 5-7 Tagen solltet ihr erste Wurzeln sehen. Lasst den Sellerie so lange im Wasser, bis die Wurzeln etwa 5-7 cm lang sind. Das kann bis zu zwei Wochen dauern.
Phase 2: Das Einpflanzen in Erde
Sobald der Sellerie ausreichend Wurzeln gebildet hat, ist es Zeit, ihn in Erde zu pflanzen.
1. Den Topf vorbereiten: Füllt euren Topf mit Blumenerde. Lasst etwa 2-3 cm Platz bis zum Rand.
2. Ein Pflanzloch graben: Macht mit eurem Finger oder einem kleinen Löffel ein Loch in die Erde, das groß genug ist, um den Selleriestrunk aufzunehmen.
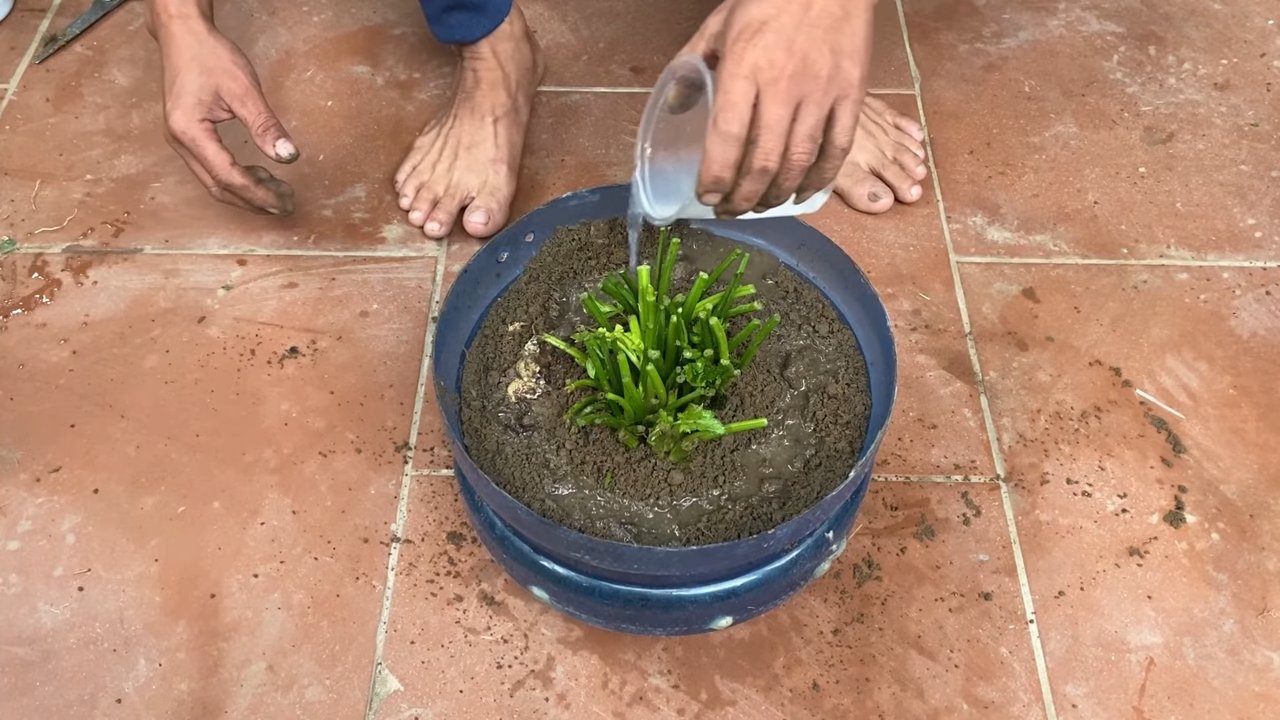
3. Den Sellerie einpflanzen: Setzt den Selleriestrunk vorsichtig in das Loch und bedeckt die Wurzeln mit Erde. Achtet darauf, dass der Strunk nicht zu tief in der Erde sitzt. Die Basis sollte gerade so mit Erde bedeckt sein.
4. Angießen: Gießt den Sellerie nach dem Einpflanzen gründlich an. Das hilft der Erde, sich um die Wurzeln zu setzen.
Phase 3: Die Pflege des Staudensellerie
Jetzt, wo der Sellerie in der Erde ist, ist die richtige Pflege entscheidend für ein gesundes Wachstum.
1. Der richtige Standort: Stellt den Topf an einen sonnigen Standort. Sellerie benötigt mindestens 6 Stunden Sonnenlicht pro Tag.
2. Gießen: Haltet die Erde feucht, aber nicht nass. Gießt den Sellerie regelmäßig, besonders an heißen Tagen. Vermeidet Staunässe, da dies zu Wurzelfäule führen kann.
3. Düngen: Optional könnt ihr den Sellerie alle zwei Wochen mit einem Flüssigdünger düngen. Das fördert das Wachstum und die Entwicklung der Stangen. Achtet darauf, die Anweisungen auf der Düngerpackung zu befolgen.
4. Schädlinge und Krankheiten: Achtet auf Anzeichen von Schädlingen oder Krankheiten. Blattläuse und Schnecken können ein Problem sein. Bei Bedarf könnt ihr natürliche Schädlingsbekämpfungsmittel verwenden.
5. Ernte: Nach etwa 80-100 Tagen könnt ihr die ersten Stangen ernten. Schneidet die äußeren Stangen ab, wenn sie die gewünschte Größe erreicht haben. Der Sellerie wird weiterwachsen und neue Stangen bilden.
Zusätzliche Tipps und Tricks für den erfolgreichen Sellerie-Anbau
* Sellerie bleichen: Um hellere und mildere Stangen zu erhalten, könnt ihr den Sellerie bleichen. Das bedeutet, dass ihr die Stangen etwa zwei Wochen vor der Ernte mit Erde oder speziellem Bleichmaterial abdeckt, um sie vor Sonnenlicht zu schützen.
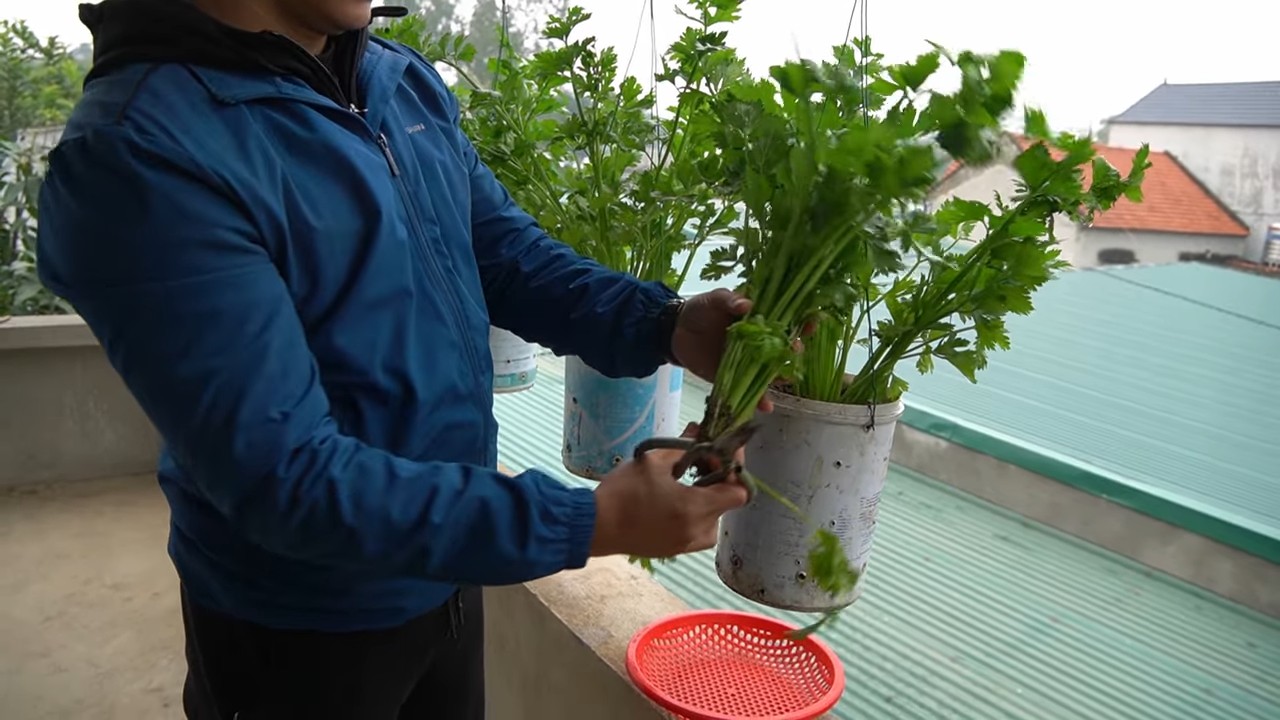
* Sellerie im Topf: Wenn ihr keinen Garten habt, könnt ihr Sellerie auch problemlos im Topf auf dem Balkon oder der Terrasse anbauen. Wählt einen ausreichend großen Topf (mindestens 20 Liter) und verwendet hochwertige Blumenerde.
* Sellerie überwintern: In milden Klimazonen kann Sellerie überwintert werden. Schneidet die Stangen im Herbst zurück und deckt die Pflanze mit Stroh oder Laub ab, um sie vor Frost zu schützen.
* Sellerie aus Samen ziehen: Ihr könnt Sellerie auch aus Samen ziehen. Das ist etwas aufwendiger, aber es ermöglicht euch, verschiedene Sorten anzubauen. Die Samen sollten im Frühjahr vorgezogen werden.
* Beipflanzung: Sellerie verträgt sich gut mit anderen Gemüsesorten wie Tomaten, Kohl und Zwiebeln.
Häufige Probleme und Lösungen
* Gelbe Blätter: Gelbe Blätter können ein Zeichen für Nährstoffmangel oder Überwässerung sein. Überprüft die Bewässerung und düngt den Sellerie bei Bedarf.
* Schlechte Wurzelbildung: Wenn der Sellerie im Wasser keine Wurzeln bildet, kann das am Wasser liegen. Verwendet frisches Wasser und stellt sicher, dass der Strunk nicht zu tief im Wasser steht.
* Schädlinge: Blattläuse und Schnecken können ein Problem sein. Verwendet natürliche Schädlingsbekämpfungsmittel oder sammelt die Schädlinge von Hand ab.
Ich hoffe, dieser Leitfaden hilft euch dabei, euren eigenen Staudensellerie zu Hause anzubauen. Es ist ein lohnendes Projekt, das euch mit frischem, gesundem Gemüse belohnt. Viel Spaß beim Gärtnern!
Conclusion
So, there you have it! Growing celery at home from scraps isn’t just a fun experiment; it’s a sustainable way to reduce food waste, enjoy fresh, crisp celery, and even impress your friends and family. Forget those limp, store-bought stalks that have traveled miles – imagine the satisfaction of harvesting your own, bursting with flavor and nutrients, right from your kitchen counter or garden.
This DIY trick is a must-try for several reasons. Firstly, it’s incredibly easy and requires minimal effort. You’re essentially giving a new lease on life to something that would otherwise end up in the compost bin. Secondly, it’s a fantastic way to introduce children to the wonders of gardening and the life cycle of plants. They’ll be amazed to see a seemingly dead celery base sprout and flourish. Thirdly, it’s a budget-friendly way to have a constant supply of celery for your soups, salads, smoothies, and snacks.
But the benefits don’t stop there. Growing your own celery allows you to control the growing environment, ensuring that your celery is free from harmful pesticides and chemicals. You can choose organic potting mix and fertilizers, giving you peace of mind knowing that you’re consuming a healthy and wholesome product.
Looking for variations? Absolutely! Once your celery has established roots, you can transplant it into a larger pot or directly into your garden. Experiment with different soil types and fertilizers to see what works best in your climate. You can also try growing different varieties of celery, such as Pascal celery or Golden Self-Blanching celery, for a unique flavor and texture. Consider companion planting with other vegetables like onions, garlic, and tomatoes, which can help deter pests and improve the overall health of your celery plants.
Don’t be afraid to get creative! You can even use your homegrown celery leaves to make a delicious and flavorful celery salt. Simply dehydrate the leaves in a low oven or dehydrator, then grind them into a fine powder and mix with sea salt. This homemade celery salt is a fantastic addition to soups, stews, and even popcorn.
We wholeheartedly encourage you to give this DIY trick a try. It’s a rewarding experience that will not only provide you with fresh celery but also connect you with the natural world. Remember to be patient, as it may take a few weeks for your celery to fully regrow. But trust us, the wait is well worth it.
And most importantly, we want to hear about your experiences! Share your photos, tips, and tricks on social media using #HomegrownCelery and let us know how your celery growing journey is going. We’re excited to see your success stories and learn from your experiences. Let’s build a community of home gardeners who are passionate about sustainable living and fresh, flavorful food. So, grab that celery base, get your hands dirty, and start growing your own celery today! You’ll be amazed at what you can achieve with a little bit of water, sunlight, and patience. This simple **grow celery at home** method is a game changer!
Frequently Asked Questions (FAQ)
How long does it take for celery to regrow from a base?
The time it takes for celery to regrow from a base can vary depending on several factors, including the temperature, sunlight, and the overall health of the celery base. Generally, you can expect to see new growth within 5-7 days. However, it may take several weeks for the celery to fully regrow and be ready for harvest. Be patient and continue to provide the celery base with fresh water and plenty of sunlight.
What kind of water should I use?
Tap water is generally fine for regrowing celery. However, if your tap water is heavily chlorinated, it’s best to let it sit out for 24 hours before using it to allow the chlorine to dissipate. Alternatively, you can use filtered water or rainwater. Avoid using distilled water, as it lacks the minerals that plants need to thrive.
How much sunlight does the celery base need?
Celery needs plenty of sunlight to grow properly. Aim for at least 6-8 hours of direct sunlight per day. If you’re growing your celery indoors, place it near a sunny window or use a grow light to supplement the natural light. Insufficient sunlight can result in leggy, weak growth.
When should I transplant the celery to soil?
Once the celery base has developed a good root system and new leaves have started to emerge, it’s time to transplant it to soil. This usually takes about 1-2 weeks. Choose a pot that is at least 6 inches in diameter and fill it with a well-draining potting mix. Gently remove the celery base from the water and plant it in the pot, making sure to cover the roots with soil. Water thoroughly after transplanting.
What kind of soil is best for growing celery?
Celery prefers a rich, well-draining soil that is high in organic matter. A good potting mix for celery should contain a blend of peat moss, perlite, and vermiculite. You can also amend your soil with compost or aged manure to improve its fertility and drainage. Avoid using heavy clay soils, as they can become waterlogged and prevent the celery roots from getting enough oxygen.
How often should I water the celery after transplanting?
After transplanting, water the celery regularly to keep the soil moist but not soggy. Check the soil moisture level daily and water when the top inch of soil feels dry to the touch. Avoid overwatering, as this can lead to root rot. During hot weather, you may need to water more frequently.
What kind of fertilizer should I use?
Celery is a heavy feeder and benefits from regular fertilization. Use a balanced fertilizer that is specifically formulated for vegetables. Follow the instructions on the fertilizer package for application rates. You can also use organic fertilizers, such as compost tea or fish emulsion, to provide your celery with the nutrients it needs.
Are there any pests or diseases that affect celery?
Celery can be susceptible to several pests and diseases, including aphids, celery leaf tiers, and fungal diseases like early blight and late blight. Inspect your celery plants regularly for signs of pests or diseases. If you notice any problems, take action immediately to prevent them from spreading. You can use insecticidal soap or neem oil to control pests, and fungicides to control fungal diseases.
Can I grow celery indoors year-round?
Yes, you can grow celery indoors year-round, provided that you can provide it with enough light and warmth. Place your celery plants near a sunny window or use a grow light to supplement the natural light. Keep the temperature between 60-70°F (15-21°C). With proper care, you can enjoy fresh, homegrown celery all year long.
How do I harvest the celery?
You can harvest the celery when the stalks are at least 6 inches long. To harvest, simply cut the stalks off at the base of the plant with a sharp knife. You can harvest individual stalks as needed, or you can harvest the entire plant at once. After harvesting, store the celery in the refrigerator to keep it fresh.

Leave a Comment