
Growing peanuts at home might sound like a whimsical dream reserved for sprawling farms, but I’m here to tell you it’s totally achievable, even in a small garden or on a sunny balcony! Forget trekking to the store for your peanut butter fix; imagine the satisfaction of harvesting your own homegrown peanuts, bursting with fresh, earthy flavor.
Peanuts, also known as groundnuts, have a fascinating history, dating back thousands of years in South America. They weren’t just a tasty snack; they were a vital source of protein and oil for ancient civilizations. Over time, their popularity spread across the globe, becoming a staple in cuisines worldwide. Now, you can be a part of that history by cultivating your own peanut patch!
Why should you try this DIY project? Well, for starters, it’s incredibly rewarding to nurture a plant from seed to harvest. Plus, growing peanuts at home is a fantastic way to connect with nature, learn about plant life cycles, and enjoy a truly unique gardening experience. In a world increasingly focused on sustainability and knowing where our food comes from, this is a small step towards a more self-sufficient and fulfilling lifestyle. And let’s be honest, who wouldn’t want to impress their friends and family with homegrown peanuts?
This article will guide you through every step of the process, from selecting the right seeds to harvesting your bounty. Get ready to roll up your sleeves and discover the joy of growing your own peanuts – it’s easier than you think!
Erdnüsse zu Hause anbauen: Dein DIY-Leitfaden für eine erfolgreiche Ernte
Hey Gartenfreunde! Habt ihr euch jemals gefragt, wie Erdnüsse eigentlich wachsen? Und noch besser, habt ihr schon mal darüber nachgedacht, sie selbst anzubauen? Ich kann euch sagen, es ist ein super spannendes Projekt und mit ein bisschen Geduld und den richtigen Schritten könnt ihr bald eure eigenen, frisch geernteten Erdnüsse genießen. Keine Sorge, es ist einfacher als ihr denkt! Lasst uns gemeinsam in die Welt des Erdnussanbaus eintauchen.
Was du für den Erdnussanbau brauchst
Bevor wir loslegen, hier eine Liste mit allem, was du brauchst. Keine Panik, die meisten Sachen hast du wahrscheinlich schon zu Hause oder kannst sie leicht besorgen:
* Erdnüsse: Am besten ungeröstete, unbehandelte Erdnüsse aus dem Bioladen oder Gartencenter. Achte darauf, dass sie noch in der Schale sind.
* Töpfe oder ein Beet: Erdnüsse brauchen Platz, also wähle große Töpfe (mindestens 30 cm Durchmesser) oder ein sonniges Beet mit lockerem Boden.
* Gute Erde: Eine Mischung aus Gartenerde, Kompost und Sand ist ideal. Die Erde sollte gut durchlässig sein.
* Wasser: Regelmäßiges Gießen ist wichtig, besonders während der Blütezeit.
* Sonnenlicht: Erdnüsse lieben die Sonne! Wähle einen Standort, der mindestens 6-8 Stunden Sonne pro Tag bekommt.
* Geduld: Erdnüsse brauchen Zeit, um zu reifen. Sei geduldig und lass dich nicht entmutigen, wenn es nicht sofort klappt.
* Optional: Dünger (speziell für Hülsenfrüchte), Mulch, Vogelschutznetz (wenn Vögel ein Problem sind).
Schritt-für-Schritt-Anleitung: So pflanzt du deine Erdnüsse
Jetzt geht’s ans Eingemachte! Hier ist eine detaillierte Anleitung, wie du deine Erdnüsse pflanzt und pflegst:
1. Erdnüsse vorbereiten:
* Breche die Erdnussschalen vorsichtig auf, ohne die Erdnüsse selbst zu beschädigen.
* Weiche die Erdnüsse über Nacht in lauwarmem Wasser ein. Das hilft ihnen, schneller zu keimen.
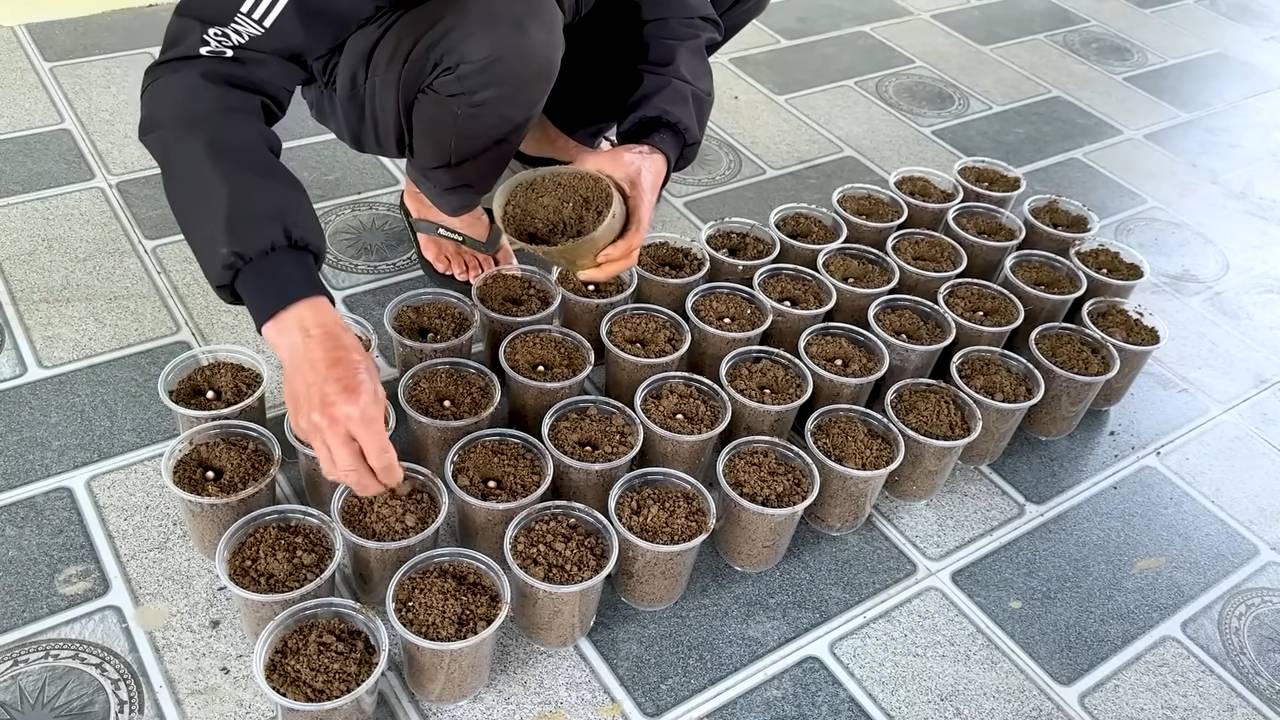
2. Aussaat:
* Fülle deine Töpfe oder dein Beet mit der vorbereiteten Erde.
* Mache kleine Löcher (ca. 2-3 cm tief) im Abstand von etwa 15-20 cm.
* Lege in jedes Loch 2-3 Erdnüsse. Das erhöht die Wahrscheinlichkeit, dass mindestens eine keimt.
* Bedecke die Erdnüsse mit Erde und drücke sie leicht an.
* Gieße die Erde vorsichtig an, sodass sie feucht, aber nicht nass ist.
3. Keimung:
* Stelle die Töpfe an einen warmen, sonnigen Ort.
* Halte die Erde feucht, aber vermeide Staunässe.
* Die Keimung dauert in der Regel 7-14 Tage. Hab Geduld!
4. Pflege:
* Sobald die Erdnusspflanzen gekeimt sind, dünne sie aus, sodass nur die stärkste Pflanze pro Loch übrig bleibt.
* Gieße die Pflanzen regelmäßig, besonders während der Blütezeit.
* Dünge die Pflanzen alle paar Wochen mit einem speziellen Dünger für Hülsenfrüchte.
* Entferne regelmäßig Unkraut, um die Konkurrenz um Nährstoffe zu minimieren.
* Achte auf Schädlinge wie Blattläuse oder Schnecken und bekämpfe sie gegebenenfalls.
Die Blütezeit: Ein besonderes Ereignis
Die Blütezeit ist ein ganz besonderer Moment im Leben deiner Erdnusspflanzen. Die kleinen, gelben Blüten sind nicht nur hübsch anzusehen, sondern auch entscheidend für die Ernte.
* Die Blüten: Erdnusspflanzen blühen etwa 40 Tage nach der Aussaat. Die Blüten sind klein und gelb und öffnen sich nur für kurze Zeit.
* Der “Peg”: Nach der Befruchtung bildet sich ein sogenannter “Peg”. Das ist ein Stiel, der sich nach unten in die Erde bohrt. An der Spitze des Pegs entwickeln sich dann die Erdnüsse.
* Das Anhäufeln: Wenn die Pegs sich bilden, ist es wichtig, die Erde um die Pflanzen herum anzuhäufeln. Das erleichtert es den Pegs, in die Erde einzudringen und die Erdnüsse zu bilden.
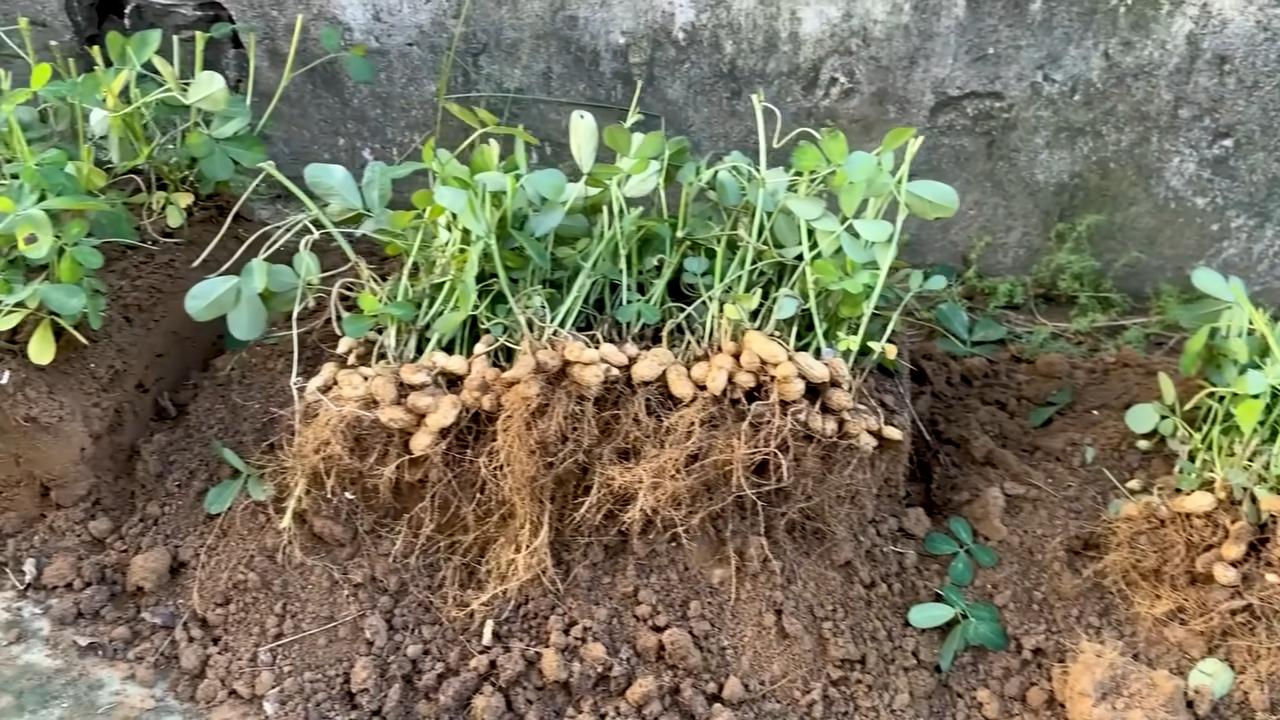
Die Ernte: Der Lohn für deine Mühe
Nach etwa 4-5 Monaten ist es endlich soweit: Die Ernte steht vor der Tür! Aber wie erkennst du, dass die Erdnüsse reif sind?
* Die Anzeichen: Die Blätter der Erdnusspflanzen werden gelb und beginnen zu welken. Die Erdnussschalen sind hart und die Erdnüsse im Inneren sind prall gefüllt.
* Die Ernte: Grabe die Erdnusspflanzen vorsichtig aus. Schüttle die Erde ab und lass die Pflanzen mit den Erdnüssen an einem trockenen, luftigen Ort trocknen.
* Das Trocknen: Das Trocknen dauert etwa 2-3 Wochen. Die Erdnüsse sind fertig getrocknet, wenn die Schalen brüchig sind und die Erdnüsse im Inneren knacken, wenn man sie schüttelt.
Tipps und Tricks für eine erfolgreiche Erdnussernte
Hier sind noch ein paar zusätzliche Tipps, die dir helfen können, deine Erdnussernte zu optimieren:
* Wähle die richtige Sorte: Es gibt verschiedene Erdnusssorten. Informiere dich, welche Sorte am besten für dein Klima geeignet ist.
* Verbessere den Boden: Erdnüsse bevorzugen lockeren, gut durchlässigen Boden. Verbessere den Boden mit Kompost und Sand, um die Drainage zu verbessern.
* Schütze die Pflanzen vor Vögeln: Vögel lieben Erdnüsse! Schütze deine Pflanzen mit einem Vogelschutznetz, besonders während der Keimung und der Reifezeit.
* Sei geduldig: Erdnüsse brauchen Zeit, um zu reifen. Sei geduldig und lass dich nicht entmutigen, wenn es nicht sofort klappt.
* Experimentiere: Probiere verschiedene Anbaumethoden aus, um herauszufinden, was für dich am besten funktioniert.
Häufige Probleme und Lösungen
Auch beim Erdnussanbau können Probleme auftreten. Hier sind einige häufige Probleme und wie du sie lösen kannst:
* Schlechte Keimung: Stelle sicher, dass die Erdnüsse frisch sind und nicht behandelt wurden. Weiche die Erdnüsse vor der Aussaat ein und halte die Erde feucht.
* Gelbe Blätter: Gelbe Blätter können ein Zeichen für Nährstoffmangel sein. Dünge die Pflanzen mit einem speziellen Dünger für Hülsenfrüchte.
* Schädlinge: Achte auf Schädlinge wie Blattläuse oder Schnecken und bekämpfe sie gegebenenfalls mit natürlichen Mitteln.
* Fäulnis: Staunässe kann zu Fäulnis führen. Stelle sicher, dass die Erde gut durchlässig ist und gieße die Pflanzen nicht zu viel.
Erdnüsse rösten: So machst du deine eigenen Snacks
Nach der Ernte kannst du deine Erdnüsse rösten und als leckeren Snack genießen.
1. Erdnüsse vorbereiten: Wasche die Erdnüsse und trockne sie gründlich ab.
2. Rösten im Ofen: Verteile die Erdnüsse auf einem Backblech und röste sie bei 175°C für etwa 15-20 Minuten. Wende die Erdnüsse regelmäßig, damit sie gleichmäßig bräunen.
3. Rösten in der Pfanne: Erhitze eine Pfanne ohne Öl und röste die Erdnüsse bei mittlerer Hitze für etwa 10-15 Minuten. Rühre die Erdnüsse regelmäßig um, damit sie nicht anbrennen.
4. Abkühlen lassen: Lasse die gerösteten Erdnüsse abkühlen, bevor du sie schälst und genießt.
Ich hoffe, dieser Leitfaden hat dir geholfen und dich inspiriert, deine eigenen Erdnüsse anzubauen. Es ist ein
Conclusion
So, there you have it! Growing peanuts at home is not only achievable, but it’s also a deeply rewarding experience that connects you to the source of your food in a tangible way. Forget the store-bought varieties that often lack the fresh, earthy flavor of homegrown peanuts. This DIY trick transforms your garden, or even a large container on your patio, into a peanut-producing powerhouse.
Why is this a must-try? Because it’s more than just growing a snack; it’s about understanding the life cycle of a plant, appreciating the effort that goes into food production, and enjoying the unparalleled taste of freshly harvested peanuts. Plus, it’s a fantastic conversation starter and a fun project to involve kids in, teaching them valuable lessons about nature and sustainability.
But the fun doesn’t stop there! Once you’ve mastered the basics, you can experiment with different peanut varieties. Try growing Virginia peanuts for their large size and classic flavor, or go for Spanish peanuts, known for their smaller kernels and slightly sweeter taste. You can even explore runner peanuts, which are commonly used in peanut butter.
Consider adding companion plants to your peanut patch to enhance growth and deter pests. Marigolds, for example, are known to repel nematodes, while basil can help attract beneficial insects.
And once you’ve harvested your bounty, the possibilities are endless! Roast them for a classic snack, grind them into homemade peanut butter, or incorporate them into your favorite recipes, from savory stir-fries to decadent desserts. Imagine the satisfaction of using peanuts you grew yourself in a batch of homemade peanut brittle or a creamy peanut sauce.
Don’t be intimidated by the process. While it requires some patience and attention, growing peanuts at home is surprisingly straightforward. With the right conditions and a little bit of love, you’ll be enjoying a harvest of delicious, homegrown peanuts in no time.
We wholeheartedly encourage you to give this DIY trick a try. It’s a fantastic way to connect with nature, learn new skills, and enjoy the unparalleled taste of homegrown goodness. And most importantly, we want to hear about your experience! Share your tips, successes, and even your challenges in the comments below. Let’s build a community of home peanut growers and learn from each other. What variety did you try? What challenges did you face? What was your yield? Your insights could help other aspiring peanut farmers achieve their own homegrown success. So, get your hands dirty, plant those seeds, and get ready to enjoy the fruits (or rather, the nuts) of your labor! Happy growing!
Frequently Asked Questions (FAQ)
1. What is the best time of year to plant peanuts?
The ideal time to plant peanuts is in the spring, after the last frost has passed and the soil has warmed up to at least 65 degrees Fahrenheit (around 18 degrees Celsius). Peanuts need a long growing season of at least 120-150 days to mature properly. In warmer climates, you may be able to plant peanuts earlier in the spring or even in the late winter. Check your local weather conditions and planting guides for the most accurate timing for your region.
2. What kind of soil is best for growing peanuts?
Peanuts thrive in well-drained, sandy loam soil. This type of soil allows the developing peanut pods to easily penetrate the ground. Avoid heavy clay soils, as they can compact and hinder pod development. The soil should also be slightly acidic to neutral, with a pH between 6.0 and 7.0. Before planting, consider amending your soil with compost or other organic matter to improve drainage and fertility.
3. How much sunlight do peanuts need?
Peanuts require at least 6-8 hours of direct sunlight per day to grow and produce a good yield. Choose a planting location that receives plenty of sunlight throughout the day. If you are growing peanuts in containers, make sure to place them in a sunny spot. Insufficient sunlight can lead to stunted growth and reduced peanut production.
4. How often should I water my peanut plants?
Peanuts need consistent moisture, especially during the flowering and pod development stages. Water deeply and regularly, aiming to keep the soil consistently moist but not waterlogged. Avoid overhead watering, as this can increase the risk of fungal diseases. A good rule of thumb is to water when the top inch of soil feels dry to the touch. During periods of drought or extreme heat, you may need to water more frequently.
5. What are the common pests and diseases that affect peanut plants?
Some common pests that can affect peanut plants include aphids, spider mites, and nematodes. Diseases such as leaf spot and white mold can also be problematic. Regularly inspect your plants for signs of pests or diseases. Use organic pest control methods, such as insecticidal soap or neem oil, to control pests. Ensure good air circulation around your plants to prevent fungal diseases. Crop rotation and using disease-resistant peanut varieties can also help minimize disease problems.
6. How do I know when my peanuts are ready to harvest?
The best way to determine when your peanuts are ready to harvest is to check the maturity of the pods. About 120-150 days after planting, dig up a few plants and examine the pods. The inside of the peanut shells should be dark and veined, and the kernels should be plump and fully developed. If the shells are still white or the kernels are small, the peanuts are not yet ready to harvest. Another indicator is the yellowing and browning of the foliage.
7. How do I harvest and cure peanuts?
To harvest peanuts, carefully dig up the entire plant, being careful not to damage the pods. Shake off any excess soil and allow the plants to dry in the sun for a few days. This process, called curing, helps to reduce moisture content and improve the flavor of the peanuts. After curing, you can remove the peanuts from the vines and store them in a cool, dry place.
8. Can I grow peanuts in containers?
Yes, you can successfully grow peanuts in containers, especially if you have limited garden space. Choose a large container that is at least 18 inches deep and wide to allow for proper root and pod development. Use a well-draining potting mix and ensure that the container has drainage holes. Water regularly and fertilize as needed. Container-grown peanuts may require more frequent watering and fertilization than those grown in the ground.
9. What are some creative ways to use my homegrown peanuts?
The possibilities are endless! You can roast them for a classic snack, grind them into homemade peanut butter, add them to salads or stir-fries, or use them in baking. Consider making peanut brittle, peanut cookies, or peanut sauce. You can also use them to make peanut oil or peanut flour. Get creative and experiment with different recipes to discover your favorite ways to enjoy your homegrown peanuts.
10. Are there any specific peanut varieties that are better suited for home growing?
While most peanut varieties can be grown at home, some are particularly well-suited for smaller gardens or container growing. Spanish peanuts, such as Early Spanish or Star, are known for their shorter growing season and compact size. Virginia peanuts, such as Virginia Jumbo or Virginia Bunch, produce large peanuts but may require more space. Runner peanuts, such as Georgia Green or Sunrunner, are commonly used for peanut butter and are also a good option for home growing. Consider your climate, space constraints, and desired peanut size when choosing a variety.

Leave a Comment