
Container gardening cauliflower broccoli might sound intimidating, but trust me, it’s easier than you think! Have you ever dreamed of harvesting your own fresh, crisp cauliflower and broccoli right from your patio or balcony? Imagine the satisfaction of knowing exactly where your food comes from and enjoying the unparalleled flavor of homegrown vegetables. For centuries, people have cultivated gardens in limited spaces, from the hanging gardens of Babylon to the intricate courtyard gardens of ancient Rome. This tradition continues today, driven by a desire for fresh, healthy food and a connection to nature, even in the heart of the city.
But why should you try container gardening cauliflower broccoli? Well, store-bought vegetables can be expensive and often lack the vibrant taste of freshly picked produce. Plus, growing your own allows you to avoid harmful pesticides and herbicides. This DIY guide will provide you with simple, step-by-step instructions and clever hacks to successfully grow these nutritious vegetables in containers, regardless of your experience level. I’ll share my best tips and tricks to ensure you have a bountiful harvest, even in a small space. Get ready to transform your balcony, patio, or even a sunny windowsill into a thriving vegetable garden!
Kohl und Brokkoli im Topf: Dein DIY-Gartenprojekt für Balkon und Terrasse
Hey Gartenfreunde! Habt ihr auch nur einen kleinen Balkon oder eine Terrasse, aber trotzdem Lust auf frisches Gemüse aus dem eigenen Anbau? Dann seid ihr hier genau richtig! Ich zeige euch, wie ihr kinderleicht Kohl und Brokkoli im Topf anbauen könnt. Keine Angst, es ist einfacher als ihr denkt und macht riesigen Spaß!
Warum Kohl und Brokkoli im Topf?
Kohl und Brokkoli sind nicht nur super gesund, sondern auch überraschend einfach im Topf zu ziehen. Hier sind ein paar Gründe, warum ich diese Gemüsesorten für den Anbau im Container so liebe:
* Platzsparend: Perfekt für kleine Gärten, Balkone und Terrassen.
* Kontrollierbare Bedingungen: Du hast die volle Kontrolle über die Erde, Bewässerung und Düngung.
* Schutz vor Schädlingen: Im Topf sind deine Pflanzen weniger anfällig für Schädlinge als im Beet.
* Frische Ernte: Genieße knackiges Gemüse direkt vom Balkon!
* Dekorativ: Mit ihren großen, grünen Blättern sind Kohl und Brokkoli auch optisch ein Hingucker.
Was du brauchst: Die Materialliste
Bevor wir loslegen, hier eine Liste mit allem, was du für dein Kohl- und Brokkoli-Topfgarten-Projekt benötigst:
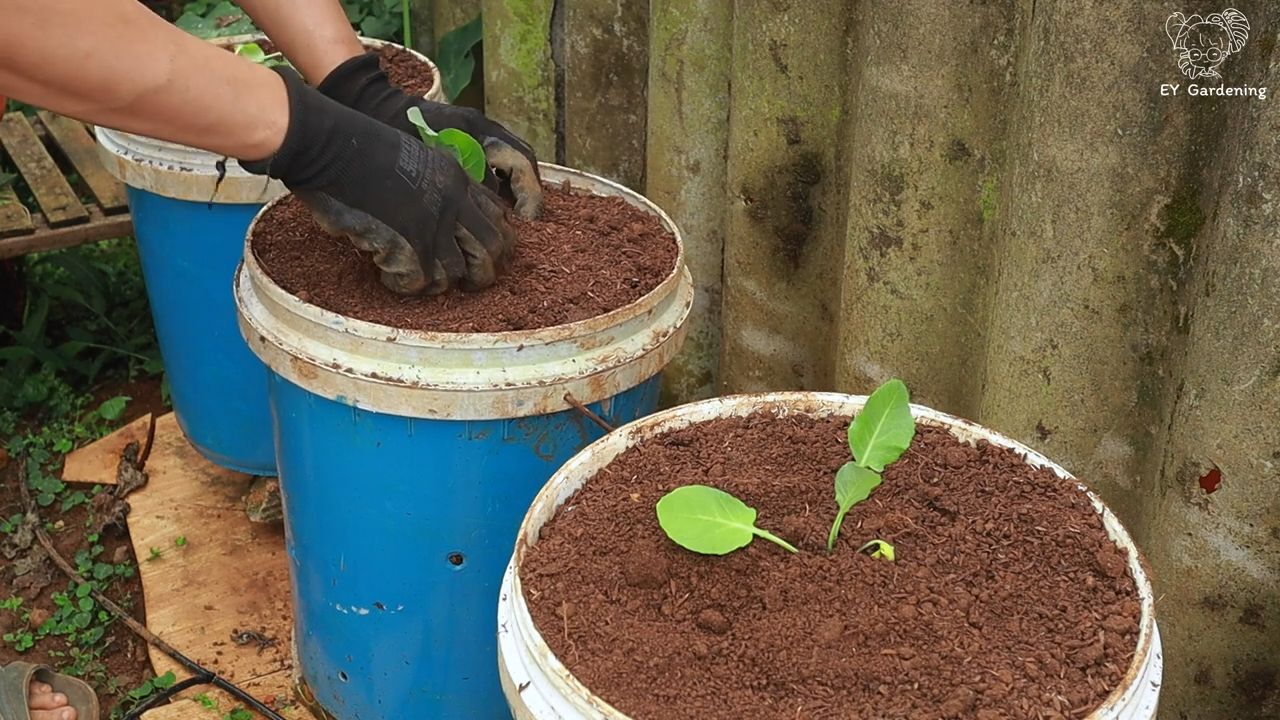
* Töpfe: Wähle große Töpfe mit einem Durchmesser von mindestens 30 cm und einem Volumen von 20 Litern. Größer ist besser, da Kohl und Brokkoli viel Platz für ihre Wurzeln brauchen.
* Erde: Verwende hochwertige Gemüseerde oder mische deine eigene Mischung aus Gartenerde, Kompost und Sand. Eine gute Drainage ist wichtig!
* Saatgut oder Jungpflanzen: Du kannst Kohl und Brokkoli entweder aus Samen ziehen oder Jungpflanzen im Gartencenter kaufen. Jungpflanzen sind einfacher, aber Samen sind günstiger.
* Dünger: Ein organischer Gemüsedünger ist ideal, um deine Pflanzen mit allen wichtigen Nährstoffen zu versorgen.
* Gießkanne oder Schlauch: Zum regelmäßigen Gießen.
* Pflanzschaufel: Zum Einpflanzen der Samen oder Jungpflanzen.
* Mulch: Stroh oder Holzhackschnitzel helfen, die Feuchtigkeit im Boden zu halten und Unkraut zu unterdrücken.
* Pflanzstäbe (optional): Für größere Brokkolipflanzen, um sie zu stützen.
* Schneckenkorn (optional): Wenn du in einer Gegend mit vielen Schnecken wohnst.
Schritt-für-Schritt-Anleitung: So gelingt dein Kohl- und Brokkoli-Topfgarten
Jetzt geht’s ans Eingemachte! Folge diesen Schritten, um deinen eigenen Kohl- und Brokkoli-Topfgarten anzulegen:
1. Die Vorbereitung: Töpfe und Erde
1. Töpfe vorbereiten: Stelle sicher, dass deine Töpfe Abzugslöcher haben, damit überschüssiges Wasser ablaufen kann. Lege eine Schicht Tonscherben oder Kies auf den Boden des Topfes, um die Drainage zu verbessern.
2. Erde einfüllen: Fülle die Töpfe mit deiner Gemüseerde-Mischung. Lasse etwa 5 cm Platz bis zum Rand des Topfes.
3. Erde anfeuchten: Gieße die Erde gründlich an, bevor du die Samen oder Jungpflanzen einpflanzt.
2. Aussaat oder Einpflanzen: Der Grundstein für deine Ernte
Aussaat (wenn du Samen verwendest):
1. Saatrillen ziehen: Ziehe mit dem Finger oder einem Stäbchen kleine Rillen in die Erde, etwa 1 cm tief.
2. Samen aussäen: Lege die Samen in die Rillen, mit einem Abstand von etwa 5 cm zueinander.
3. Mit Erde bedecken: Bedecke die Samen mit einer dünnen Schicht Erde und drücke sie leicht an.
4. Angießen: Gieße die Erde vorsichtig an, um die Samen nicht wegzuschwemmen.
5. Warm stellen: Stelle die Töpfe an einen warmen, hellen Ort. Die Keimung dauert in der Regel 5-10 Tage.
Einpflanzen (wenn du Jungpflanzen verwendest):
1. Pflanzlöcher graben: Grabe mit der Pflanzschaufel Löcher in die Erde, die groß genug sind, um die Wurzelballen der Jungpflanzen aufzunehmen.
2. Pflanzen einsetzen: Nimm die Jungpflanzen vorsichtig aus ihren Töpfen und setze sie in die Pflanzlöcher. Achte darauf, dass die Oberseite des Wurzelballens mit der Erdoberfläche abschließt.
3. Mit Erde auffüllen: Fülle die Pflanzlöcher mit Erde auf und drücke sie leicht an.
4. Angießen: Gieße die Pflanzen gründlich an.
3. Die Pflege: Gießen, Düngen und mehr
1. Gießen: Kohl und Brokkoli brauchen viel Wasser, besonders während der Wachstumsphase. Gieße regelmäßig, am besten morgens oder abends, wenn die Sonne nicht scheint. Die Erde sollte immer feucht, aber nicht nass sein. Vermeide Staunässe!
2. Düngen: Dünge deine Pflanzen alle 2-3 Wochen mit einem organischen Gemüsedünger. Befolge dabei die Anweisungen auf der Verpackung.
3. Mulchen: Bedecke die Erde um die Pflanzen mit einer Schicht Mulch. Das hilft, die Feuchtigkeit im Boden zu halten, Unkraut zu unterdrücken und die Bodentemperatur zu regulieren.
4. Schädlinge bekämpfen: Kontrolliere deine Pflanzen regelmäßig auf Schädlinge wie Kohlweißlinge, Blattläuse oder Schnecken. Bei Bedarf kannst du biologische Schädlingsbekämpfungsmittel einsetzen. Schneckenkorn kann helfen, Schnecken fernzuhalten.
5. Stützen: Größere Brokkolipflanzen können unter dem Gewicht der Blütenstände umknicken. Stütze sie bei Bedarf mit Pflanzstäben.
6. Verwelkte Blätter entfernen: Entferne regelmäßig verwelkte oder gelbe Blätter, um Krankheiten vorzubeugen.
4. Die Ernte: Der Lohn deiner Mühe
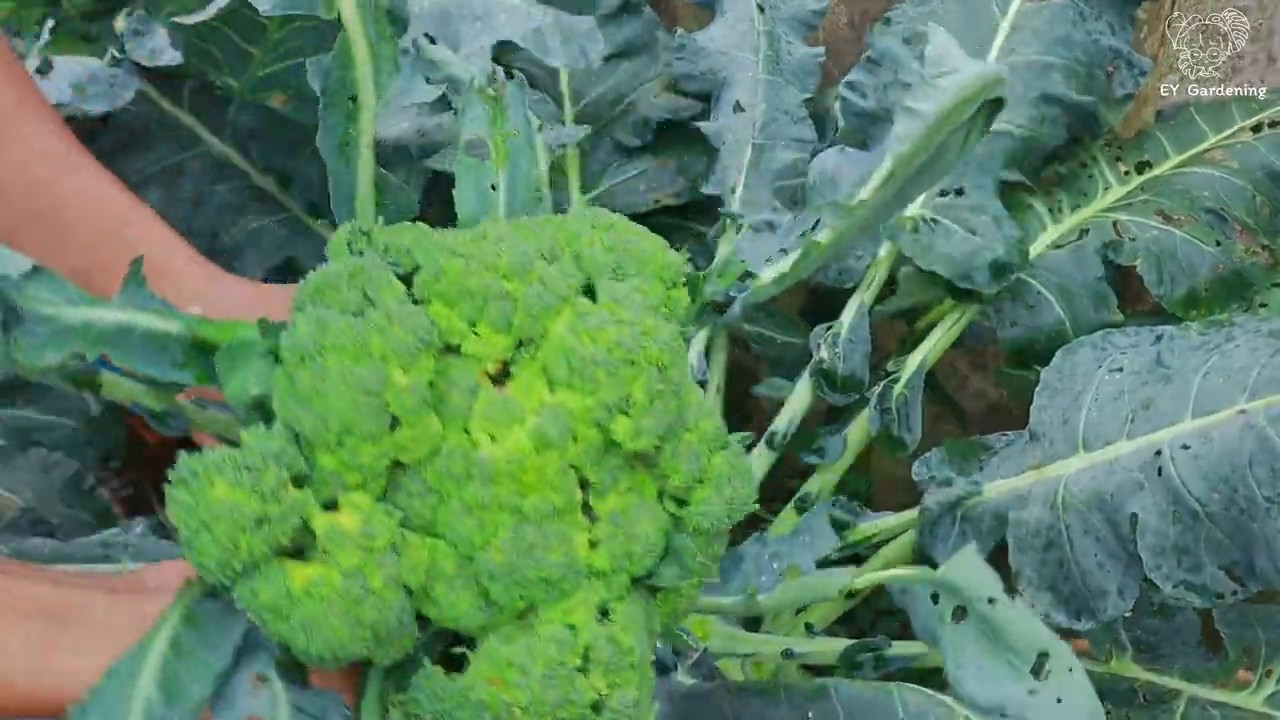
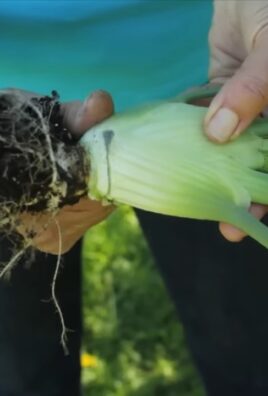
1. Kohl ernten: Kohlköpfe sind erntereif, wenn sie fest und geschlossen sind. Schneide den Kopf mit einem scharfen Messer ab.
2. Brokkoli ernten: Brokkoli ist erntereif, wenn die Blütenknospen fest und grün sind. Schneide den Haupttrieb mit einem scharfen Messer ab. Die Seitentriebe können später geerntet werden.
3. Regelmäßig ernten: Ernte dein Gemüse regelmäßig, um die Produktion neuer Blütenstände oder Köpfe anzuregen.
Zusätzliche Tipps und Tricks für deinen Topfgarten
* Sonniger Standort: Kohl und Brokkoli brauchen mindestens 6 Stunden Sonne pro Tag.
* Windschutz: Schütze deine Pflanzen vor starkem Wind, der sie beschädigen kann.
* Fruchtfolge: Baue Kohl und Brokkoli nicht jedes Jahr am selben Standort an, um Krankheiten vorzubeugen.
* Sortenwahl: Wähle Sorten, die für den Anbau im Topf geeignet sind. Es gibt viele Zwergsorten, die sich besonders gut eignen.
* Beipflanzung: Pflanze Ringelblumen oder Kapuzinerkresse neben Kohl und Brokkoli, um Schädlinge abzuhalten.
* Geduld: Hab Geduld! Es dauert einige Zeit, bis deine Pflanzen wachsen und du ernten kannst. Aber es lohnt sich!
Häufige Probleme und Lösungen
* Gelbe Blätter: Können ein Zeichen für Nährstoffmangel oder Überwässerung sein. Dünge deine Pflanzen und achte auf eine gute Drainage.
* Blattläuse: Bekämpfe Blattläuse mit einem Wasserstrahl oder mit biologischen Schädlingsbekämpfungsmitteln.
* Kohlweißlinge: Schütze deine Pflanzen mit einem Netz vor Kohlweißlingen.
* Schnecken: Sammle Schnecken ab oder verwende Schneckenkorn.
* Krankheiten: Entferne befall
Conclusion
So, there you have it! Transforming your balcony or patio into a thriving vegetable garden with container gardening for cauliflower and broccoli is not only achievable but incredibly rewarding. We’ve walked you through the essential steps, from selecting the right containers and soil to nurturing your plants for a bountiful harvest. But why is this DIY trick a must-try?
Firstly, it democratizes fresh produce. No longer do you need acres of land to enjoy the crisp, clean taste of homegrown cauliflower and broccoli. Container gardening brings the farm to your doorstep, allowing even apartment dwellers to savor the fruits (or rather, vegetables) of their labor. Imagine stepping outside and harvesting your own organic, pesticide-free cauliflower for a creamy gratin or snipping off some tender broccoli florets for a quick stir-fry. The taste difference alone is worth the effort.
Secondly, it’s a fantastic way to connect with nature and de-stress. Gardening is a therapeutic activity, proven to reduce anxiety and improve mental well-being. The simple act of tending to your plants, watching them grow, and nurturing them to maturity is incredibly fulfilling. Plus, it’s a great way to get some fresh air and sunshine.
Thirdly, it’s a sustainable and eco-friendly choice. By growing your own vegetables, you’re reducing your carbon footprint by minimizing transportation and packaging. You’re also in control of the chemicals used (or not used!) in your garden, ensuring that your produce is healthy and environmentally friendly.
But the beauty of container gardening lies in its adaptability. Feel free to experiment with different varieties of cauliflower and broccoli. Try growing purple cauliflower for a vibrant addition to your meals, or explore sprouting broccoli for a quicker harvest. You can also companion plant herbs like rosemary or thyme in the same container to deter pests and add flavor to your cooking. Consider adding marigolds around the base of your plants; they are known to repel many common garden pests.
Don’t be afraid to get creative with your containers! Upcycle old buckets, baskets, or even tires into unique planters. Just make sure they have adequate drainage. You can also explore vertical gardening techniques to maximize space, especially if you’re working with a small balcony or patio.
We strongly encourage you to give this DIY container gardening trick a try. It’s easier than you think, and the rewards are immeasurable. Start small, learn as you go, and don’t be discouraged by initial setbacks. Gardening is a journey, not a destination.
And most importantly, we want to hear about your experience! Share your photos, tips, and challenges with us in the comments below. Let’s create a community of container gardening enthusiasts and inspire others to grow their own food. What varieties did you choose? What challenges did you face, and how did you overcome them? Your insights could be invaluable to other aspiring gardeners. So, grab your gloves, get your hands dirty, and start growing your own delicious cauliflower and broccoli today!
Frequently Asked Questions (FAQ)
What are the best cauliflower and broccoli varieties for container gardening?
Choosing the right varieties is crucial for success in container gardening. For cauliflower, consider compact varieties like ‘Snow Crown’ or ‘Early White Hybrid.’ These varieties are bred to produce smaller heads, making them well-suited for containers. For broccoli, ‘Waltham 29’ and ‘Packman’ are excellent choices. They are known for their good yields and relatively compact growth habits. Look for varieties specifically labeled as “dwarf” or “compact” for the best results. Remember to check the “days to maturity” on the seed packet and choose varieties that fit your growing season.
What size container do I need for cauliflower and broccoli?
A general rule of thumb is to provide at least 5 gallons of soil per plant. A 5-gallon bucket or a similarly sized container is a good starting point. However, larger is generally better, as it provides more room for the roots to grow and helps retain moisture. A 10-gallon container would be even better, especially if you plan to grow multiple plants in the same container. Ensure the container has adequate drainage holes to prevent waterlogging, which can lead to root rot.
What type of soil is best for container gardening cauliflower and broccoli?
Cauliflower and broccoli are heavy feeders, meaning they require nutrient-rich soil. A well-draining potting mix amended with compost is ideal. Avoid using garden soil, as it can become compacted in containers and hinder drainage. Look for a potting mix that contains ingredients like peat moss, perlite, and vermiculite. Adding compost provides essential nutrients and improves soil structure. You can also incorporate slow-release fertilizer into the potting mix to provide a steady supply of nutrients throughout the growing season.
How often should I water my container-grown cauliflower and broccoli?
Watering frequency depends on several factors, including the weather, the size of the container, and the type of soil. Generally, you should water when the top inch of soil feels dry to the touch. Water deeply, ensuring that the water drains out of the drainage holes. Avoid overwatering, as this can lead to root rot. During hot, dry weather, you may need to water daily. Mulching around the base of the plants can help retain moisture and reduce the need for frequent watering.
How much sunlight do cauliflower and broccoli need?
Cauliflower and broccoli require at least 6 hours of direct sunlight per day. Choose a location that receives ample sunlight throughout the day. If you live in a particularly hot climate, providing some afternoon shade can help prevent the plants from overheating. If you don’t have access to a sunny location, you can supplement with grow lights.
How do I fertilize my container-grown cauliflower and broccoli?
As mentioned earlier, cauliflower and broccoli are heavy feeders and benefit from regular fertilization. Start by incorporating slow-release fertilizer into the potting mix at planting time. Then, supplement with liquid fertilizer every 2-3 weeks. Use a balanced fertilizer with an NPK ratio (nitrogen, phosphorus, potassium) of around 10-10-10. You can also use organic fertilizers like fish emulsion or seaweed extract. Avoid over-fertilizing, as this can lead to excessive foliage growth at the expense of head development.
What are some common pests and diseases that affect cauliflower and broccoli, and how can I prevent them?
Common pests include cabbage worms, aphids, and flea beetles. Diseases include clubroot and black rot. To prevent pests, consider using row covers to protect your plants. You can also handpick pests off the plants or use insecticidal soap. To prevent diseases, ensure good air circulation and avoid overwatering. Rotate your crops each year to prevent soilborne diseases from building up. If you notice signs of disease, remove the affected leaves or plants immediately.
Can I grow cauliflower and broccoli together in the same container?
While technically possible, it’s generally not recommended to grow cauliflower and broccoli together in the same container, especially if the container is small. Both plants require a significant amount of space and nutrients. Growing them together can lead to competition for resources and reduced yields. If you do decide to grow them together, choose a very large container (at least 15 gallons) and space the plants adequately.
How do I know when my cauliflower and broccoli are ready to harvest?
Cauliflower is ready to harvest when the head is firm, compact, and white (or the color of the variety you’re growing). The head should be about 6-8 inches in diameter. Broccoli is ready to harvest when the florets are tight and green. Harvest the main head first, and the plant will continue to produce smaller side shoots. Cut the heads with a sharp knife, leaving a few inches of stem attached.
Can I grow cauliflower and broccoli in containers during the winter?
In mild climates, you can grow cauliflower and broccoli in containers during the winter. However, in colder climates, you may need to provide protection from frost. You can use row covers, cold frames, or greenhouses to extend the growing season. Choose varieties that are cold-hardy and mature quickly.
Leave a Comment