
Sweet Potato Tower DIY: Unleash Your Inner Gardener! Ever dreamed of harvesting a mountain of sweet potatoes from a tiny space? I know I have! Forget sprawling vines taking over your yard; we’re going vertical! This DIY project is your ticket to maximizing your yield and adding a touch of rustic charm to your garden.
The concept of vertical gardening isn’t new. Cultures around the world, from the Hanging Gardens of Babylon to the ingenious terrace farming of the Incas, have long understood the power of growing upwards. But applying this principle to sweet potatoes? That’s where the magic happens! Sweet potatoes, a staple in many diets and a symbol of abundance, are surprisingly well-suited to this method.
Why do you need this sweet potato tower DIY in your life? Well, if you’re short on space, tired of battling weeds in sprawling rows, or simply looking for a fun and rewarding gardening project, this is it! Imagine the satisfaction of harvesting a bountiful crop of delicious, homegrown sweet potatoes right from your own backyard (or even balcony!). Plus, this sweet potato tower DIY is a fantastic conversation starter and a beautiful addition to any outdoor space. Let’s get our hands dirty and build something amazing!
DIY Süßkartoffel-Turm: Maximiere deine Ernte auf kleinem Raum!
Hallo liebe Gartenfreunde! Habt ihr auch das Problem, dass ihr zwar Lust auf eine reiche Ernte habt, aber der Platz im Garten begrenzt ist? Keine Sorge, ich habe da eine geniale Lösung für euch: einen Süßkartoffel-Turm! Mit diesem vertikalen Gartenprojekt könnt ihr auf kleinstem Raum eine beeindruckende Menge Süßkartoffeln anbauen. Und das Beste daran? Es ist super einfach und macht richtig Spaß!
Hier ist eine detaillierte Anleitung, wie ihr euren eigenen Süßkartoffel-Turm bauen könnt:
Was du brauchst:
* Drahtgitter: Am besten Maschendraht oder ähnliches, etwa 1,5 bis 2 Meter hoch und ausreichend lang, um einen Zylinder zu formen. Die Maschen sollten nicht zu groß sein, damit die Erde nicht herausfällt.
* Stroh oder Heu: Zum Auskleiden des Drahtgitters und zum Schutz der Erde.
* Pflanzerde: Hochwertige Pflanzerde, idealerweise angereichert mit Kompost.
* Süßkartoffel-Setzlinge: Gesunde Setzlinge von einer Süßkartoffelsorte deiner Wahl. Ich empfehle Sorten, die gut in Containern wachsen.
* Gießkanne oder Schlauch: Zum Bewässern deiner Süßkartoffeln.
* Gartenschere: Zum Zuschneiden des Drahtgitters und eventuell zum Entfernen von unerwünschten Trieben.
* Handschuhe: Zum Schutz deiner Hände.
* Optional: Kompost, Wurmhumus oder anderer organischer Dünger zur Bodenverbesserung.
* Optional: Eine alte Palette oder ein stabiler Untergrund, um den Turm darauf zu platzieren. Das erleichtert die Bewässerung und verhindert, dass der Turm direkt auf dem Boden steht.
Schritt-für-Schritt-Anleitung:
1. Vorbereitung des Drahtgitters:
1. Zuschneiden: Schneide das Drahtgitter mit der Gartenschere auf die gewünschte Länge zu. Bedenke, dass du einen Zylinder formen musst, also sollte die Länge ausreichend sein, um einen Durchmesser von etwa 60-80 cm zu erreichen.
2. Formen: Biege das Drahtgitter vorsichtig zu einem Zylinder. Achte darauf, dass die Enden gut überlappen, damit der Turm stabil ist.
3. Verbinden: Verbinde die Enden des Drahtgitters mit Draht oder Kabelbindern, um den Zylinder zu fixieren. Stelle sicher, dass die Verbindung fest ist, damit der Turm nicht auseinanderfällt.
2. Auskleiden des Drahtgitters:
1. Stroh oder Heu vorbereiten: Lockere das Stroh oder Heu auf und befeuchte es leicht. Das macht es flexibler und einfacher zu verarbeiten.
2. Auskleiden: Lege das Stroh oder Heu an die Innenseite des Drahtgitters. Achte darauf, dass es dicht genug ist, um die Erde zurückzuhalten, aber gleichzeitig noch Luft und Wasser durchlässt.
3. Fixieren: Fixiere das Stroh oder Heu mit Draht oder Kabelbindern am Drahtgitter. Besonders wichtig ist das am unteren Rand, damit die Erde nicht herausfällt. Du kannst auch mehrere Schichten Stroh oder Heu verwenden, um eine stabilere Auskleidung zu erhalten.
3. Befüllen des Turms mit Erde:
1. Erste Schicht: Fülle den Turm mit einer ersten Schicht Pflanzerde. Achte darauf, dass die Erde gut verteilt ist und keine Hohlräume entstehen.
2. Bodenverbesserung: Mische Kompost, Wurmhumus oder anderen organischen Dünger unter die Erde, um die Nährstoffversorgung der Süßkartoffeln zu verbessern.
3. Weitere Schichten: Fülle den Turm schichtweise mit Erde, bis er fast voll ist. Lasse oben einen kleinen Rand frei, um das Gießen zu erleichtern.
4. Andrücken: Drücke die Erde leicht an, um sie zu verdichten und zu verhindern, dass sie beim Gießen zusammensackt.
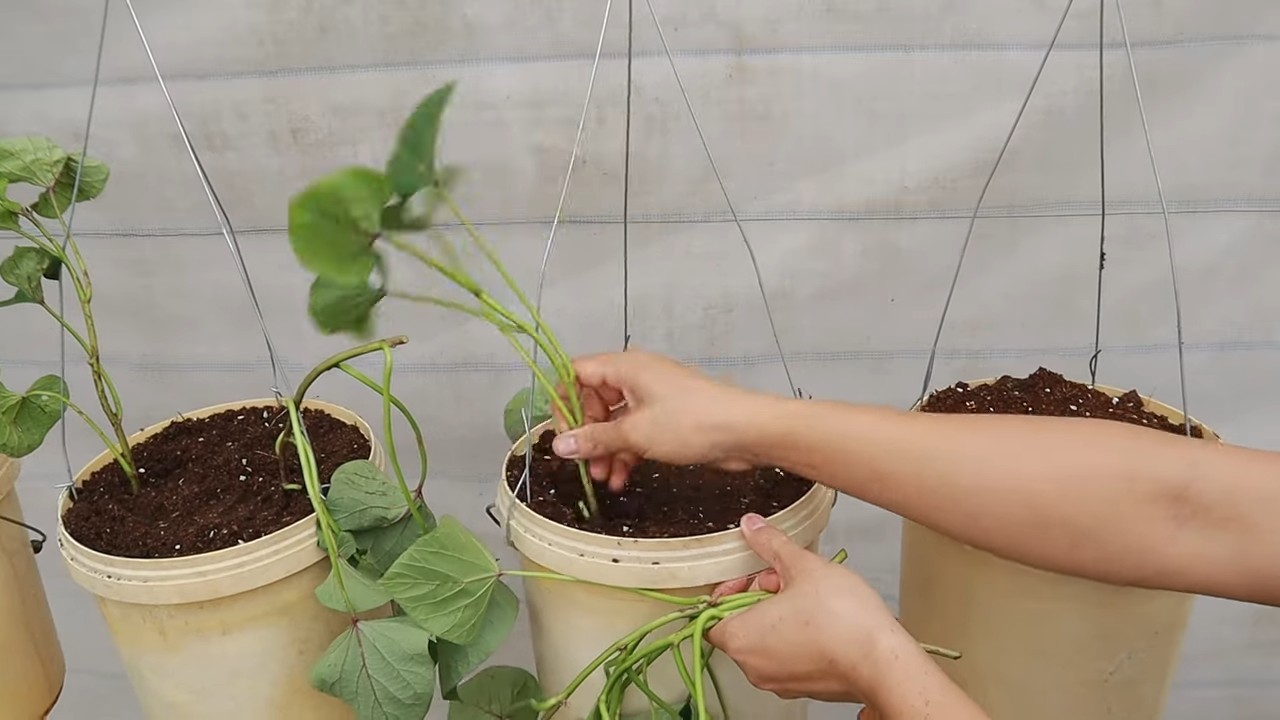
4. Pflanzen der Süßkartoffel-Setzlinge:
1. Löcher vorbereiten: Grabe mit den Fingern oder einem kleinen Spaten Löcher in die Erde. Die Löcher sollten groß genug sein, um die Wurzeln der Setzlinge aufzunehmen.
2. Pflanzen: Setze die Süßkartoffel-Setzlinge in die Löcher. Achte darauf, dass die Wurzeln gut bedeckt sind und die Blätter frei liegen.
3. Abstand: Pflanze die Setzlinge in einem Abstand von etwa 20-30 cm zueinander. So haben sie genügend Platz zum Wachsen.
4. Gießen: Gieße die Setzlinge nach dem Pflanzen gründlich an. Das hilft ihnen, sich im neuen Boden zu etablieren.
5. Pflege des Süßkartoffel-Turms:
1. Bewässerung: Gieße den Turm regelmäßig, besonders in trockenen Perioden. Süßkartoffeln mögen es feucht, aber nicht nass. Achte darauf, dass das Wasser gut abfließen kann, um Staunässe zu vermeiden.
2. Düngung: Dünge die Süßkartoffeln regelmäßig mit einem organischen Dünger. Das fördert das Wachstum und die Knollenbildung.
3. Unkraut entfernen: Entferne regelmäßig Unkraut, das im Turm wächst. Unkraut konkurriert mit den Süßkartoffeln um Nährstoffe und Wasser.
4. Ranken leiten: Süßkartoffeln bilden lange Ranken. Leite die Ranken um den Turm herum oder lasse sie herunterhängen. Das sieht nicht nur schön aus, sondern fördert auch die Luftzirkulation.
5. Schutz vor Schädlingen: Kontrolliere die Pflanzen regelmäßig auf Schädlinge wie Blattläuse oder Kartoffelkäfer. Bei Bedarf kannst du biologische Schädlingsbekämpfungsmittel einsetzen.
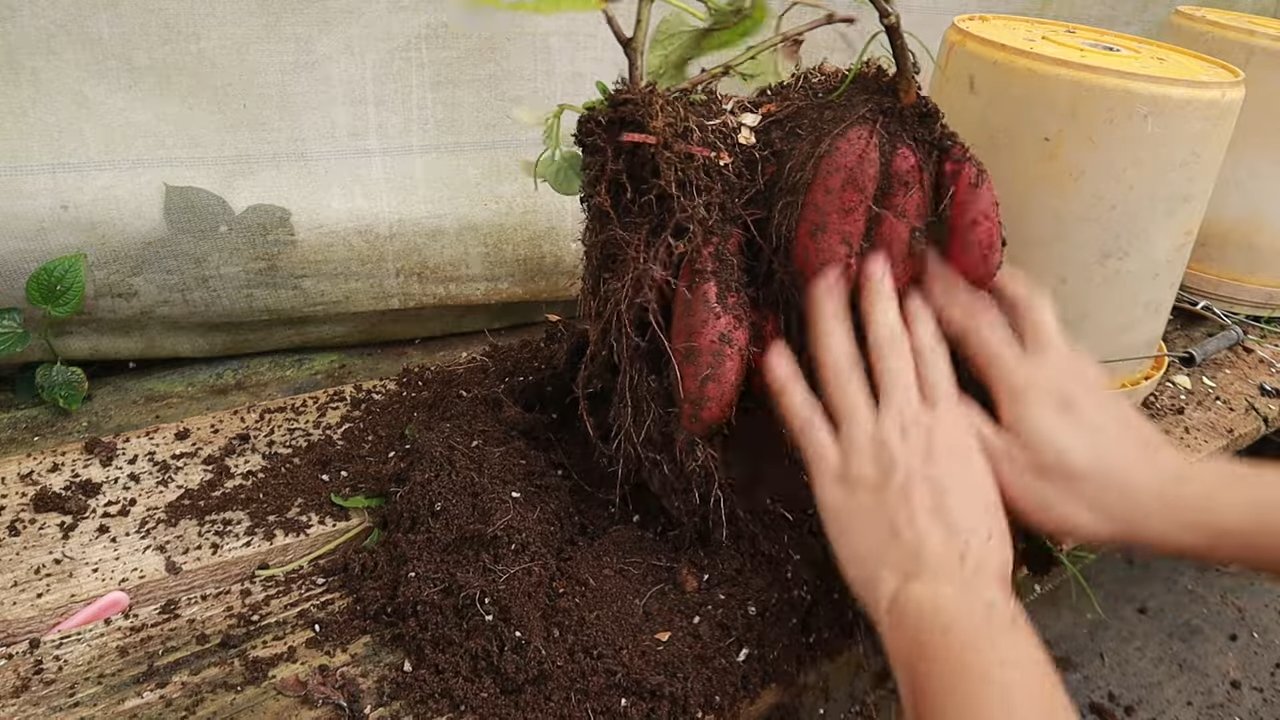
6. Ernte der Süßkartoffeln:
1. Erntezeitpunkt: Süßkartoffeln sind erntereif, wenn die Blätter gelb werden und absterben. Das ist in der Regel im Herbst, kurz vor dem ersten Frost.
2. Ernten: Grabe die Süßkartoffeln vorsichtig aus dem Turm. Achte darauf, die Knollen nicht zu beschädigen.
3. Trocknen: Lasse die Süßkartoffeln nach der Ernte einige Tage an einem warmen und trockenen Ort trocknen. Das verbessert die Lagerfähigkeit.
4. Lagern: Lagere die Süßkartoffeln an einem kühlen, dunklen und trockenen Ort. So halten sie sich mehrere Monate.
Zusätzliche Tipps und Tricks:
* Standort: Wähle einen sonnigen Standort für deinen Süßkartoffel-Turm. Süßkartoffeln brauchen viel Sonne, um gut zu wachsen.
* Boden: Süßkartoffeln bevorzugen einen lockeren, gut durchlässigen Boden. Wenn dein Boden sehr lehmig ist, kannst du ihn mit Sand und Kompost verbessern.
* Sortenwahl: Wähle eine Süßkartoffelsorte, die gut in Containern wächst und an deinem Standort gut gedeiht. Informiere dich im Fachhandel oder im Internet über geeignete Sorten.
* Bewässerungssystem: Wenn du keine Zeit hast, den Turm regelmäßig zu gießen, kannst du ein automatisches Bewässerungssystem installieren.
* Mulchen: Mulche die Erde um die Süßkartoffeln herum mit Stroh oder Heu. Das hält die Feuchtigkeit im Boden und unterdrückt Unkraut.
* Dekoration: Du kannst den Süßkartoffel-Turm mit Blumen oder anderen Pflanzen dekorieren. Das macht ihn zu einem echten Hingucker in deinem Garten.
* Upcycling: Verwende recycelte Materialien für den Bau deines Süßkartoffel-Turms. Zum Beispiel kannst du alte Paletten als Untergrund verwenden oder alte Stoffreste zum Auskleiden des Drahtgitters.
Häufige Fehler und wie man sie vermeidet:
* Zu wenig Sonne: Süßkartoffeln brauchen mindestens 6 Stunden Sonne pro Tag. Wähle einen sonnigen Standort für deinen Tur
Conclusion
So, there you have it! Creating your own sweet potato tower is more than just a gardening project; it’s an investment in fresh, homegrown produce, a sustainable practice, and a visually stunning addition to your outdoor space. We’ve walked you through the steps, highlighting the simplicity and cost-effectiveness of this method. But why is this DIY trick a must-try?
Firstly, a sweet potato tower maximizes your yield in a minimal footprint. If you’re short on garden space, this vertical gardening solution is a game-changer. You can grow a substantial amount of sweet potatoes in a relatively small area, making it perfect for urban gardeners, apartment dwellers with balconies, or anyone looking to optimize their garden’s productivity.
Secondly, it’s incredibly rewarding. There’s nothing quite like harvesting your own sweet potatoes, knowing you nurtured them from slips to fully grown tubers. The satisfaction of digging into the tower and unearthing a bounty of sweet potatoes is unparalleled. Plus, you control the growing environment, ensuring your sweet potatoes are free from harmful pesticides and chemicals.
Thirdly, it’s a fantastic conversation starter! A sweet potato tower is a unique and eye-catching feature that will undoubtedly draw attention and spark curiosity. Be prepared to share your gardening secrets with friends, neighbors, and fellow gardening enthusiasts.
But the possibilities don’t end here! Feel free to experiment with variations to personalize your sweet potato tower. Consider using different types of containers, such as repurposed tires or wooden pallets, to create a more rustic or eco-friendly aesthetic. You can also incorporate companion plants, like marigolds or basil, to deter pests and attract beneficial insects. Another variation is to use different types of soil mixes to see which one works best for your local climate and sweet potato variety. Some gardeners have even successfully integrated a simple irrigation system into their towers for more efficient watering.
Don’t be afraid to get creative and adapt the method to suit your specific needs and preferences. The key is to provide your sweet potato plants with ample sunlight, well-draining soil, and consistent moisture.
We strongly encourage you to try this sweet potato tower DIY project. It’s a fun, educational, and ultimately delicious way to grow your own food. Once you’ve built your tower and harvested your sweet potatoes, we’d love to hear about your experience! Share your photos, tips, and any modifications you made on social media using #SweetPotatoTowerDIY. Let’s build a community of sweet potato tower enthusiasts and inspire others to embrace the joys of homegrown produce. Happy gardening!
Frequently Asked Questions (FAQ)
What type of sweet potato slips should I use?
The best type of sweet potato slips to use depends on your personal preference and local climate. Beauregard is a popular and reliable variety known for its high yields and disease resistance. Other excellent choices include Georgia Jet, which matures quickly and produces large, reddish-skinned sweet potatoes, and Covington, a newer variety with a vibrant orange flesh and excellent flavor. Consider your local growing season and choose a variety that is well-suited to your climate. Experimenting with different varieties can also be a fun way to discover your favorite sweet potato flavor and texture.
How often should I water my sweet potato tower?
Watering frequency depends on several factors, including the weather, the type of soil you’re using, and the size of your tower. Generally, you should water your sweet potato tower whenever the top inch of soil feels dry to the touch. During hot, dry weather, you may need to water daily, while during cooler, wetter periods, you can reduce the frequency. Ensure the water drains freely from the bottom of the tower to prevent waterlogging, which can lead to root rot. A good rule of thumb is to water deeply and less frequently, rather than shallowly and often. Consider using a moisture meter to accurately gauge the soil’s moisture level.
What kind of soil is best for a sweet potato tower?
Sweet potatoes thrive in well-draining, sandy loam soil that is rich in organic matter. A good soil mix for a sweet potato tower would consist of equal parts garden soil, compost, and sand or perlite. The garden soil provides essential nutrients, the compost improves drainage and adds organic matter, and the sand or perlite enhances aeration and prevents compaction. Avoid using heavy clay soil, as it can retain too much moisture and hinder root development. You can also amend your soil with a slow-release fertilizer to provide a steady supply of nutrients throughout the growing season.
How much sunlight does a sweet potato tower need?
Sweet potatoes require at least 6-8 hours of direct sunlight per day to produce a good yield. Choose a location for your sweet potato tower that receives ample sunlight throughout the day. If you live in a particularly hot climate, providing some afternoon shade can help prevent the plants from overheating. Monitor your plants closely and adjust their position if necessary to ensure they are receiving adequate sunlight. Insufficient sunlight can result in stunted growth and reduced tuber production.
How do I harvest sweet potatoes from a tower?
Harvesting sweet potatoes from a tower is relatively easy. Typically, sweet potatoes are ready to harvest about 90-120 days after planting, or when the foliage begins to yellow and die back. To harvest, gently remove the soil from around the base of the tower, starting from the top and working your way down. Carefully loosen the soil around the sweet potatoes and lift them out. Avoid damaging the tubers during the harvesting process. Cure the harvested sweet potatoes for 7-10 days in a warm, humid place to allow the skins to harden and the starches to convert to sugars, resulting in a sweeter flavor.
Can I grow other vegetables in a sweet potato tower?
While the primary purpose of a sweet potato tower is to grow sweet potatoes, you can certainly incorporate other compatible plants. Companion plants like marigolds, basil, and nasturtiums can help deter pests and attract beneficial insects. Avoid planting aggressive or sprawling plants that could compete with the sweet potatoes for resources. Consider planting herbs or flowers that have shallow root systems and won’t interfere with the sweet potato tubers.
How do I prevent pests and diseases in my sweet potato tower?
Preventing pests and diseases is crucial for a successful sweet potato harvest. Regularly inspect your plants for signs of pests or diseases, such as aphids, flea beetles, or fungal infections. Use organic pest control methods, such as insecticidal soap or neem oil, to control pests. Ensure good air circulation around the plants to prevent fungal diseases. Rotate your crops each year to prevent soilborne diseases from building up. Choose disease-resistant sweet potato varieties whenever possible.
Can I reuse the soil from my sweet potato tower?
Yes, you can reuse the soil from your sweet potato tower, but it’s important to amend it with fresh compost and nutrients before replanting. Sweet potatoes can deplete the soil of essential nutrients, so replenishing them is crucial for future growth. Consider adding a slow-release fertilizer or organic amendments like bone meal or kelp meal to provide a balanced supply of nutrients. You can also sterilize the soil by baking it in the oven or solarizing it to kill any potential pests or diseases.
What do I do with the sweet potato vines after harvesting?
After harvesting your sweet potatoes, you can compost the vines or use them as mulch in your garden. Sweet potato vines are rich in nutrients and can help improve soil fertility. Alternatively, you can feed the vines to livestock, such as chickens or goats. Some people even eat the young, tender leaves of sweet potato vines, which are a good source of vitamins and minerals.
How tall should my sweet potato tower be?
The ideal height for your sweet potato tower depends on the type of container you’re using and your personal preference. A tower that is 3-4 feet tall is generally a good starting point. This height allows for ample root development and tuber production while still being manageable to water and harvest. You can adjust the height based on your available space and the size of your sweet potato plants. Remember to provide adequate support for the tower to prevent it from tipping over.


Leave a Comment