
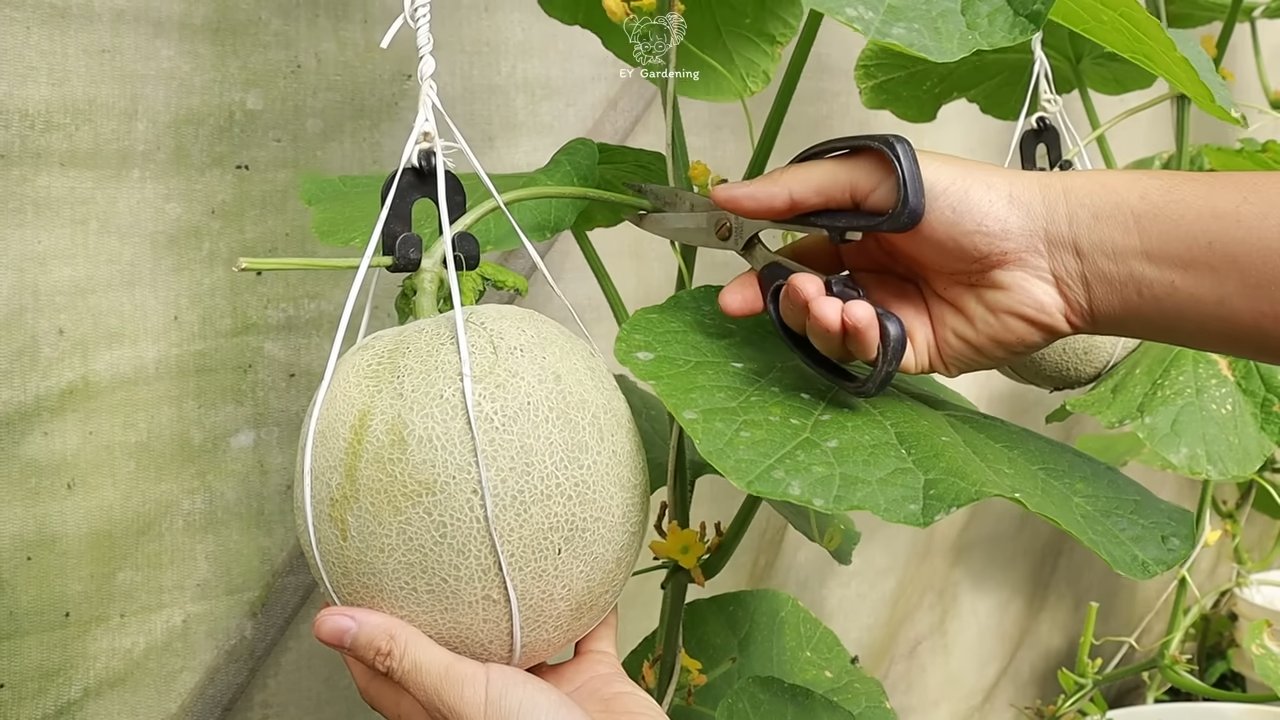
Hanging Melon Support DIY: Are your prized melons sprawling all over your garden, threatening to take over everything in their path? Or worse, are they succumbing to rot from resting on the damp ground? I know the feeling! Growing melons can be incredibly rewarding, but the sheer weight of those juicy fruits can present a real challenge.
For centuries, gardeners have been devising clever ways to support their precious melons. From simple slings made of old cloth to elaborate trellising systems, the quest to keep these heavyweights off the ground is a tale as old as agriculture itself. Think about it – melons were prized possessions, symbols of abundance and prosperity! Protecting them was crucial.
That’s where this Hanging Melon Support DIY guide comes in! You might be thinking, “Why bother with DIY when I can buy something?” Well, store-bought supports can be expensive and often aren’t quite the right size or shape for your specific melon variety. Plus, there’s something incredibly satisfying about creating a solution with your own two hands, using materials you might already have lying around. This simple, effective, and budget-friendly project will not only save your melons from damage and rot but also add a touch of rustic charm to your garden. Let’s get started and give those melons the support they deserve!
DIY Hängematte für Melonen: So rettest du deine Ernte!
Hallo liebe Gartenfreunde! Habt ihr auch das Problem, dass eure Melonenpflanzen unter dem Gewicht der Früchte leiden? Die Ranken knicken ab, die Melonen liegen auf dem feuchten Boden und faulen? Keine Sorge, ich habe die Lösung! Mit dieser DIY-Hängematte für Melonen könnt ihr eure Ernte retten und euch über gesunde, pralle Melonen freuen. Und das Beste: Es ist super einfach und kostengünstig!
Was du brauchst:
* Alte T-Shirts oder Stoffreste: Am besten eignen sich robuste Stoffe wie Baumwolle oder Leinen. Je nach Größe der Melonen, die du unterstützen möchtest, brauchst du unterschiedlich viel Stoff.
* Schere: Eine scharfe Schere ist unerlässlich für saubere Schnitte.
* Nähmaschine (optional): Eine Nähmaschine erleichtert das Zusammennähen der Stoffteile, aber es geht auch per Hand.
* Nadel und Faden: Für die Handnaht oder für kleine Reparaturen.
* Stabile Schnur oder Kordel: Zum Aufhängen der Hängematte an der Rankhilfe.
* Maßband oder Lineal: Zum Abmessen der Stoffstücke.
* Sicherheitsnadeln (optional): Zum Fixieren der Stoffteile vor dem Nähen.
Vorbereitung: Stoff zuschneiden
1. Stoff auswählen und vorbereiten: Sucht euch eure alten T-Shirts oder Stoffreste heraus. Wascht sie am besten einmal durch, damit sie sauber und formstabil sind.
2. Maße nehmen: Messt den Durchmesser der größten Melone, die ihr voraussichtlich ernten werdet. Addiert zu diesem Wert noch ca. 10-15 cm für den Komfort und die Bewegungsfreiheit der Melone. Das ist der Durchmesser eurer Hängematte.
3. Stoff zuschneiden: Schneidet zwei Kreise aus dem Stoff zu. Der Durchmesser der Kreise sollte dem zuvor ermittelten Wert entsprechen. Ihr könnt auch Quadrate zuschneiden und diese später zu Kreisen formen.
4. Optional: Verstärkung: Wenn ihr dünnen Stoff verwendet, könnt ihr die Kreise mit einem weiteren Stoffstück verstärken. Schneidet dazu einfach einen weiteren Kreis in der gleichen Größe zu und legt ihn unter einen der beiden Hauptkreise.
Hängematte nähen: Schritt für Schritt
1. Kreise zusammenlegen: Legt die beiden Stoffkreise (oder Quadrate) rechts auf rechts aufeinander. Das bedeutet, die “schönen” Seiten des Stoffes zeigen zueinander.
2. Ränder abstecken: Fixiert die Ränder mit Sicherheitsnadeln, damit die Stoffteile beim Nähen nicht verrutschen.
3. Ränder nähen: Näht die Ränder der Kreise (oder Quadrate) zusammen, lasst aber eine Öffnung von ca. 10-15 cm. Diese Öffnung brauchen wir, um die Hängematte zu wenden.
4. Ecken abschneiden (optional): Wenn ihr Quadrate verwendet habt, schneidet die Ecken ab, um eine rundere Form zu erhalten.
5. Hängematte wenden: Wendet die Hängematte durch die Öffnung, sodass die “schönen” Seiten des Stoffes nach außen zeigen.
6. Ränder ausformen: Formt die Ränder sorgfältig aus, sodass sie schön glatt sind.
7. Öffnung schließen: Schließt die Öffnung entweder mit der Nähmaschine oder per Hand mit einem unsichtbaren Stich.
8. Schlaufen anbringen: Schneidet vier gleich lange Stücke von der Schnur oder Kordel ab. Diese werden die Aufhängungen für die Hängematte.
9. Schlaufen befestigen: Befestigt die Schnüre an den Rändern der Hängematte. Achtet darauf, dass sie gleichmäßig verteilt sind und die Hängematte später gut ausbalanciert ist. Ihr könnt die Schnüre entweder annähen oder mit stabilen Knoten befestigen. Ich empfehle, die Schnüre zusätzlich mit ein paar Stichen zu sichern, damit sie auch bei schweren Melonen halten.
Alternative Methode: Hängematte ohne Nähen
Keine Nähmaschine zur Hand oder einfach keine Lust zu nähen? Kein Problem! Diese Methode ist super einfach und schnell.
1. Stoff auswählen und vorbereiten: Wie oben, wählt robuste Stoffreste oder alte T-Shirts aus.
2. Stoff zuschneiden: Schneidet ein quadratisches oder rechteckiges Stück Stoff zu. Die Größe hängt von der Größe der Melone ab, die ihr unterstützen möchtet. Plant genügend Stoff ein, damit die Melone bequem darin Platz hat.
3. Ecken zusammenbinden: Schneidet an jeder Ecke des Stoffstücks einen kleinen Schlitz. Fädelt durch jeden Schlitz ein Stück Schnur oder Kordel.
4. Knoten machen: Verknotet die Schnüre fest miteinander. Achtet darauf, dass die Knoten stabil sind und die Hängematte halten.
5. Fertig! Die Hängematte ist fertig und kann aufgehängt werden.
Hängematte anbringen: So geht’s
1. Geeigneten Platz suchen: Sucht euch einen stabilen Ast oder eine Rankhilfe in der Nähe der Melonenpflanze.
2. Hängematte aufhängen: Befestigt die Hängematte mit den Schnüren an dem Ast oder der Rankhilfe. Achtet darauf, dass die Hängematte stabil hängt und die Melone gut gestützt wird.
3. Melone platzieren: Hebt die Melone vorsichtig an und platziert sie in der Hängematte. Achtet darauf, dass die Melone nicht gequetscht wird und genügend Platz hat.
4. Anpassen: Passt die Höhe der Hängematte gegebenenfalls an, damit die Melone nicht auf dem Boden aufliegt.
Zusätzliche Tipps und Tricks:
* Materialwahl: Achtet bei der Wahl des Materials darauf, dass es atmungsaktiv ist, damit sich keine Feuchtigkeit in der Hängematte staut.
* Größe anpassen: Die Größe der Hängematte sollte immer an die Größe der Melone angepasst werden. Eine zu kleine Hängematte kann die Melone quetschen, eine zu große Hängematte bietet nicht genügend Halt.
* Regelmäßige Kontrolle: Kontrolliert die Hängematte regelmäßig auf Beschädigungen und repariert sie gegebenenfalls.
* Alternative Materialien: Anstelle von Stoff könnt ihr auch alte Netze oder Jutesäcke verwenden.
* Dekoration: Verziert die Hängematte mit bunten Bändern oder Stoffresten, um sie zu einem Hingucker in eurem Garten zu machen.
Warum eine Hängematte für Melonen?
* Schutz vor Fäulnis: Die Hängematte hält die Melonen vom feuchten Boden fern und verhindert so Fäulnis.
* Bessere Luftzirkulation: Die Hängematte sorgt für eine bessere Luftzirkulation um die Melone, was das Wachstum fördert.
* Schutz vor Schädlingen: Die Hängematte erschwert es Schädlingen, an die Melone zu gelangen.
* Entlastung der Ranken: Die Hängematte entlastet die Ranken der Melonenpflanze und verhindert so, dass sie abknicken.
* Schönere Ernte: Mit der Hängematte könnt ihr euch über gesunde, pralle Melonen freuen.
Fazit
Mit dieser einfachen DIY-Hängematte für Melonen könnt ihr eure Ernte retten und euch über gesunde, pralle Melonen freuen. Es ist ein super einfaches und kostengünstiges Projekt, das sich wirklich lohnt. Also, ran an die Stoffreste und los geht’s! Ich wünsche euch viel Spaß beim Basteln und eine reiche Melonenernte!
Conclusion
So, there you have it! Creating your own hanging melon support DIY isn’t just a fun project; it’s a game-changer for your melon patch. We’ve walked you through the simple steps, highlighting how this method can protect your precious fruits from ground pests, diseases, and the dreaded bottom rot. Think about it: no more sacrificing perfectly good melons to the elements or creepy crawlies. This is about maximizing your yield and enjoying the fruits (literally!) of your labor.
But the benefits extend beyond just protection. By suspending your melons, you’re also improving air circulation around the fruit, which further reduces the risk of fungal diseases. Plus, let’s be honest, a garden filled with gracefully hanging melons is a sight to behold! It adds a touch of whimsy and visual interest that you just can’t get any other way.
Don’t be afraid to get creative with your hanging melon support DIY. Experiment with different materials. Instead of pantyhose, consider using old t-shirts cut into strips or even repurposed burlap sacks for a more rustic look. Just ensure whatever material you choose is strong enough to support the weight of your growing melon and allows for adequate airflow. You can also adjust the size and shape of the support to accommodate different melon varieties. For smaller melons like cantaloupes, a simple sling might suffice. For larger watermelons, you might need a more robust hammock-style support.
Consider the placement of your supports as well. If you’re growing melons in a greenhouse, you might be able to suspend them directly from the rafters. In an outdoor garden, you’ll need to ensure your supports are securely anchored to sturdy stakes or trellises. Think about the mature size of your melon plants and plan accordingly to avoid overcrowding.
This isn’t just about building a support; it’s about fostering a healthier, more productive garden. It’s about taking control of your harvest and enjoying the satisfaction of knowing you’ve done everything you can to nurture your plants. It’s about embracing a more sustainable and resourceful approach to gardening.
We truly believe that this hanging melon support DIY is a must-try for any melon enthusiast. It’s easy, affordable, and incredibly effective. So, gather your materials, get your hands dirty, and prepare to be amazed by the results.
We’re eager to hear about your experiences! Did you try this DIY trick? What materials did you use? Did you encounter any challenges? What kind of melons did you grow? Share your photos, tips, and stories in the comments below. Let’s create a community of melon-loving gardeners who are passionate about sharing their knowledge and inspiring others. Your insights could be invaluable to someone else who’s just starting out. Let’s grow together!
Frequently Asked Questions (FAQ)
What types of melons are best suited for hanging supports?
Almost any type of melon can benefit from hanging supports, but some are better suited than others. Smaller melons like cantaloupes, honeydews, and smaller watermelons are generally easier to support. Larger watermelon varieties may require more robust and carefully constructed supports. Consider the mature weight of your chosen melon variety when designing your support system. Even Armenian cucumbers, which are technically melons, benefit from being hung.
How do I know when my melon is ready to be harvested if it’s hanging?
Determining ripeness for hanging melons is similar to those grown on the ground, but you’ll need to rely more on visual and olfactory cues. Look for changes in color and the development of a sweet aroma near the stem. The tendril closest to the melon should be dry and brown. You can also gently tap the melon; a ripe melon will often sound hollow. Be careful not to damage the melon while checking for ripeness.
What if my melon is too heavy for the support I built?
If you notice your melon support sagging or showing signs of strain, it’s crucial to reinforce it immediately. You can add additional layers of material to the support itself or provide extra support from below using stakes or props. Consider redistributing the weight by using a wider support or adding multiple supports. In extreme cases, you might need to harvest the melon prematurely to prevent the support from failing completely.
Can I reuse the hanging melon supports for multiple seasons?
Yes, you can definitely reuse your hanging melon supports, but it’s essential to inspect them thoroughly before each season. Check for any signs of wear and tear, such as fraying, tearing, or weakening of the material. Wash the supports with soap and water to remove any dirt or debris. If you used natural materials, consider treating them with a preservative to extend their lifespan. Store the supports in a dry place during the off-season to prevent mold and mildew growth.
Will hanging my melons affect their flavor or sweetness?
Hanging melons shouldn’t directly affect their flavor or sweetness. However, by improving air circulation and reducing the risk of disease, you’re creating a healthier growing environment, which can indirectly lead to better-tasting melons. Proper watering and fertilization are also crucial for optimal flavor development.
What are the benefits of using pantyhose for hanging melon support?
Pantyhose are a popular choice for hanging melon supports because they are readily available, inexpensive, and surprisingly strong. The stretchy material conforms to the shape of the melon as it grows, providing even support. The breathable fabric allows for good air circulation, which helps prevent fungal diseases. Plus, pantyhose are lightweight and easy to work with.
How do I prevent pests from climbing up the supports and attacking my melons?
To deter pests from climbing up your melon supports, you can apply a sticky barrier around the base of the support structure. Diatomaceous earth can also be sprinkled around the base of the plants to create a barrier against crawling insects. Regularly inspect your plants for signs of pests and take appropriate action, such as hand-picking insects or using organic pest control methods.
What if my melon plant doesn’t naturally produce a strong enough stem to support the hanging melon?
Some melon varieties have weaker stems that may not be able to support the weight of a hanging melon. In these cases, you can provide additional support to the stem by tying it loosely to the support structure. Use soft twine or plant ties to avoid damaging the stem. Be sure to monitor the stem regularly and adjust the ties as needed to accommodate the growing melon.
Is it necessary to rotate the hanging melons periodically?
While not strictly necessary, rotating your hanging melons periodically can help ensure even ripening and prevent flat spots from developing. Gently rotate the melon a quarter turn every few days. Be careful not to damage the stem or the support structure while rotating the melon.
Can I use this method for other vining crops besides melons?
Absolutely! The hanging support method can be adapted for other vining crops such as cucumbers, squash, and even some types of tomatoes. The key is to adjust the size and strength of the support to accommodate the specific needs of each crop. Experiment and see what works best for your garden!

Leave a Comment