
Strawberry harvest tips are essential for anyone dreaming of a bountiful, ruby-red harvest right in their backyard! Imagine sinking your teeth into a perfectly ripe, sun-warmed strawberry, bursting with flavor – a taste far superior to anything you can find in a grocery store. That’s the magic of home gardening, and with the right knowledge, you can unlock this delicious potential.
Growing your own strawberries isn’t just a modern trend; cultivating these sweet berries has a rich history. From ancient Roman gardens to medieval monastery plots, strawberries have been cherished for their flavor and medicinal properties. Today, the joy of picking your own strawberries connects us to that long tradition, offering a tangible link to the earth and a satisfying sense of accomplishment.
But let’s be honest, knowing when and how to harvest your strawberries can be tricky. Pick them too early, and they’ll be sour and disappointing. Wait too long, and they might become overripe or attract unwanted pests. That’s where these DIY strawberry harvest tips come in! I’m going to share my tried-and-true methods for ensuring you get the sweetest, juiciest strawberries possible. This article will guide you through everything from identifying the perfect ripeness to proper picking techniques, so you can maximize your yield and enjoy a truly rewarding strawberry season. Get ready to transform your garden into a strawberry paradise!
DIY Strawberry Propagation: From One Plant to a Patch of Sweetness!
Hey there, fellow garden enthusiasts! Ever wish you could magically multiply your strawberry plants? Well, guess what? You practically can! Strawberry propagation is surprisingly easy and incredibly rewarding. I’m going to walk you through a couple of simple methods that will have you swimming in strawberries in no time. Get ready to expand your strawberry patch without spending a fortune!
Understanding Strawberry Runners
Before we dive in, let’s talk about runners. These are the little horizontal stems that strawberry plants send out. They’re basically the plant’s way of naturally cloning itself. Each runner will develop a new plantlet at its tip, complete with roots. Our goal is to help these plantlets take root and become independent strawberry plants.
Method 1: Rooting Runners in Pots
This is my favorite method because it’s super controlled and gives the new plants a great head start.
What You’ll Need:
* Healthy strawberry plants with runners
* Small pots (3-4 inch diameter is perfect)
* Potting mix
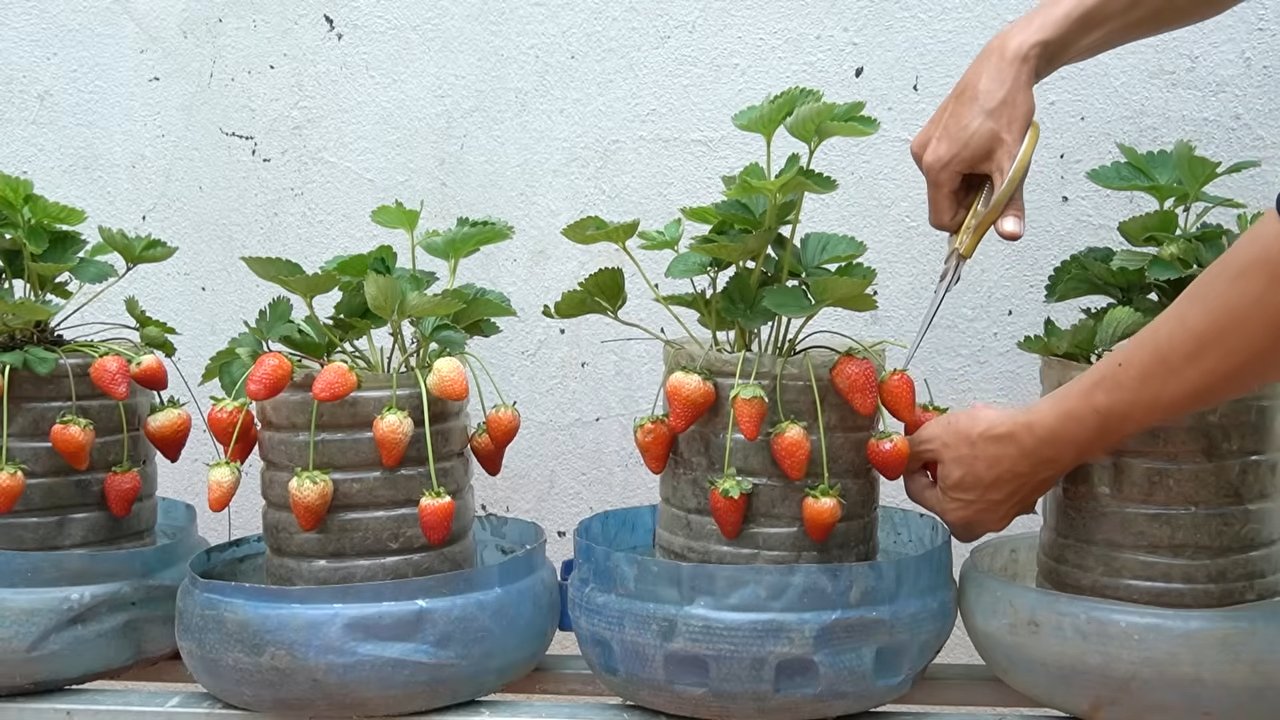
* Scissors or pruning shears
* Watering can or hose
* Optional: Rooting hormone (can speed things up, but not essential)
* Small rocks or weights (to hold runners in place)
Step-by-Step Instructions:
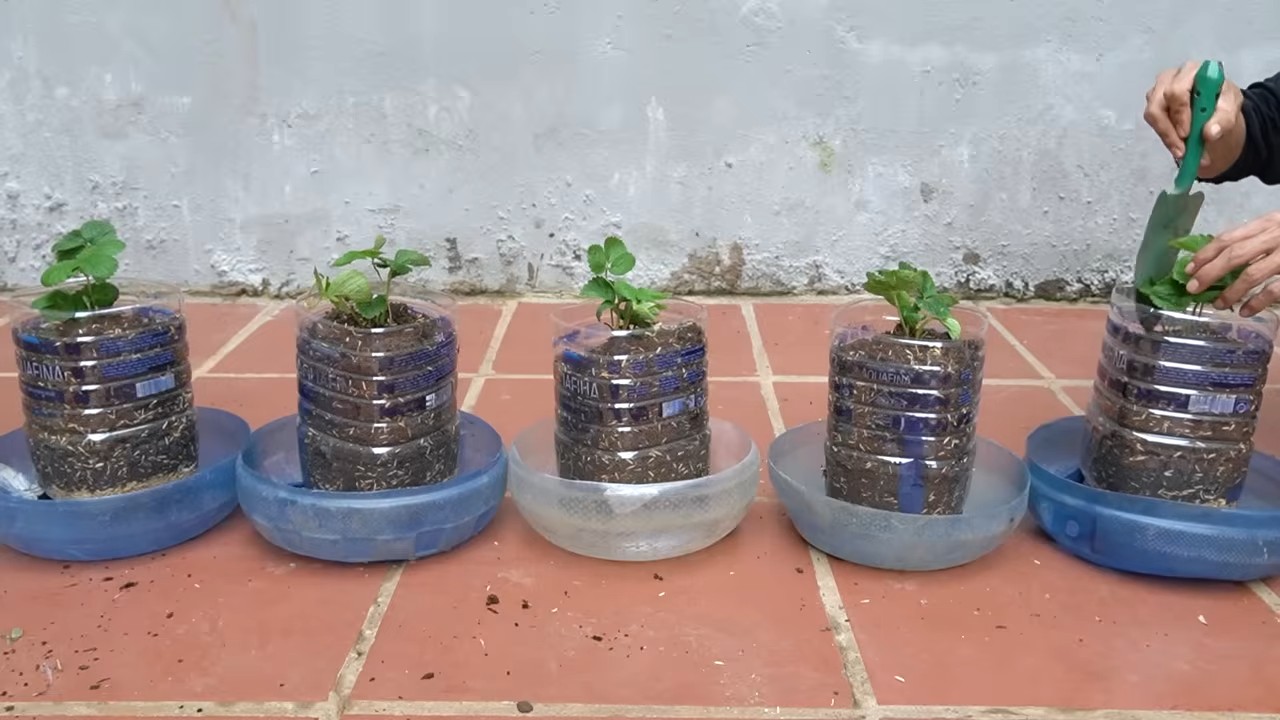
1. Prepare Your Pots: Fill your small pots with potting mix, leaving about an inch of space at the top. Water the soil thoroughly until it’s evenly moist but not soggy.
2. Select Healthy Runners: Look for runners that have already started to develop small plantlets with tiny leaves. These are the prime candidates for propagation. Avoid runners that look damaged or diseased.
3. Position the Plantlet: Gently place a plantlet on top of the soil in one of your prepared pots. Make sure the leaves are facing upwards and the base of the plantlet is in contact with the soil.
4. Secure the Plantlet: This is crucial! You need to keep the plantlet in contact with the soil so it can root. Use a small rock, a piece of wire bent into a U-shape, or even a clothespin to gently hold the plantlet in place. Don’t bury the plantlet; just secure it to the surface.
5. Optional: Rooting Hormone: If you’re using rooting hormone, dip the base of the plantlet in the hormone powder or liquid before placing it on the soil. This can encourage faster root development. I usually skip this step, but it can be helpful if you’re propagating later in the season when rooting might be slower.
6. Repeat: Repeat steps 3-5 for each plantlet you want to propagate. You can often get several plantlets from a single runner, so make the most of it!
7. Water Regularly: Keep the soil in the pots consistently moist. Water gently to avoid dislodging the plantlets. I like to use a watering can with a rose head to provide a gentle shower.
8. Provide Sunlight: Place the pots in a location that receives bright, indirect sunlight. Avoid direct sunlight, which can scorch the delicate plantlets.
9. Wait for Roots to Develop: This is the patience part! It usually takes about 2-3 weeks for the plantlets to develop a strong root system. You can gently tug on the plantlet to check for resistance. If it feels firmly anchored in the soil, it’s likely rooted.
10. Sever the Runner: Once the plantlet has a good root system, use scissors or pruning shears to cut the runner connecting the new plant to the mother plant. Congratulations, you’ve created a new strawberry plant!
11. Harden Off: Before transplanting your new strawberry plants into the garden, you’ll need to “harden them off.” This means gradually exposing them to outdoor conditions over a period of about a week. Start by placing them in a sheltered location for a few hours each day, gradually increasing the amount of time they spend outdoors. This will help them acclimate to the sun, wind, and temperature changes.
12. Transplant: After hardening off, your new strawberry plants are ready to be transplanted into your garden or into larger containers. Choose a sunny location with well-drained soil. Space the plants about 12-18 inches apart. Water them thoroughly after planting.
Method 2: Rooting Runners Directly in the Ground
This method is a bit more hands-off, but it requires a bit more space in your garden.
What You’ll Need:
* Healthy strawberry plants with runners
* Soil amendment (compost or well-rotted manure)
* Scissors or pruning shears
* Watering can or hose
* Small rocks or weights (to hold runners in place)
Step-by-Step Instructions:
1. Prepare the Soil: Choose a spot in your garden where you want to plant your new strawberry plants. Amend the soil with compost or well-rotted manure to improve drainage and fertility.
2. Select Healthy Runners: As with the first method, look for runners that have already started to develop small plantlets with tiny leaves.
3. Position the Plantlet: Gently place a plantlet on top of the prepared soil. Make sure the leaves are facing upwards and the base of the plantlet is in contact with the soil.
4. Secure the Plantlet: Use a small rock, a piece of wire bent into a U-shape, or even a clothespin to gently hold the plantlet in place. This is essential to ensure the plantlet stays in contact with the soil and can root.
5. Water Regularly: Keep the soil around the plantlet consistently moist. Water gently to avoid dislodging the plantlet.
6. Wait for Roots to Develop: It usually takes about 2-3 weeks for the plantlets to develop a strong root system. You can gently tug on the plantlet to check for resistance. If it feels firmly anchored in the soil, it’s likely rooted.
7. Sever the Runner: Once the plantlet has a good root system, use scissors or pruning shears to cut the runner connecting the new plant to the mother plant.
8. Monitor and Water: Continue to monitor your new strawberry plant and water it regularly, especially during dry periods.
Tips for Success
* Choose the Right Time: The best time to propagate strawberries is in late summer or early fall, after the plants have finished fruiting. This gives the new plants plenty of time to establish themselves before winter.
* Keep the Soil Moist: Consistent moisture is crucial for successful rooting. Check the soil regularly and water as needed.
* Avoid Overwatering: While moisture is important, avoid overwatering, which can lead to root rot. Make sure the soil is well-drained.
* Fertilize Sparingly: Avoid fertilizing the new plants until they have established a strong root system. Once they are growing well, you can fertilize them with a balanced fertilizer.
* Protect from Pests: Keep an eye out for pests such as slugs and snails, which can damage the young plants. Use appropriate pest control methods if necessary.
* Be Patient: Strawberry propagation takes time and patience. Don’t get discouraged if some of your plantlets don’t root. Just keep trying!
Troubleshooting
* Plantlets Not Rooting: If your plantlets aren’t rooting, make sure they are in contact with the soil and that the soil is consistently moist. You can also try using rooting hormone to encourage root development.
* Plantlets Turning Yellow or Brown: This could be a sign of overwatering or underwatering. Adjust your watering schedule accordingly. It could also be a sign of disease. Remove any affected plantlets.
* Pests Attacking Plantlets: Protect your plantlets from pests by using appropriate pest control methods.
Enjoy Your Expanded Strawberry Patch!
That’s it! With a little patience and effort, you can easily propagate your strawberry plants and create a thriving strawberry patch. Imagine all the delicious strawberries you’ll be able to harvest! Happy gardening! I hope you found this guide helpful, and I can’t wait to hear about your strawberry propagation success stories!
Conclusion
So, there you have it! Mastering these simple yet effective strawberry harvest tips can truly transform your berry-picking experience and ensure you reap the sweetest, juiciest rewards from your garden. No more bruised berries, no more wasted harvests, just a bounty of deliciousness ready for your favorite recipes.
Why is this a must-try? Because it’s about more than just picking strawberries; it’s about respecting the plant, maximizing your yield, and savoring the fruits (literally!) of your labor. By understanding the signs of ripeness, employing the gentle twist-and-pull technique, and handling your precious berries with care, you’re not only extending their shelf life but also preventing damage to the plant, allowing it to continue producing throughout the season.
Think of the possibilities! Imagine perfectly ripe strawberries adorning your morning yogurt, blended into refreshing smoothies, or transformed into delectable jams and pies. And the best part? You’ll know that each berry was harvested with love and care, resulting in a flavor that’s simply unmatched.
Variations and Suggestions:
* Harvesting Time Experiment: Try harvesting some berries in the early morning when they are still cool and compare their shelf life to those harvested in the afternoon. You might be surprised by the difference!
* Berry Basket Upgrade: Consider using a shallow basket lined with a soft cloth to further protect your harvested strawberries from bruising.
* Kid-Friendly Harvesting: Make it a family affair! Teach your children these strawberry harvest tips and let them experience the joy of picking their own food. Just be sure to supervise them closely and emphasize the importance of gentle handling.
* Beyond the Berry: Don’t forget the strawberry leaves! They can be used to make a refreshing and healthy tea. Just be sure to wash them thoroughly before steeping.
* Preserving Your Bounty: If you have a particularly large harvest, consider freezing some of your strawberries for later use. Simply wash, hull, and slice them before placing them in a freezer-safe bag or container.
We wholeheartedly encourage you to put these strawberry harvest tips into practice this season. Whether you’re a seasoned gardener or a complete beginner, you’ll be amazed at the difference they can make.
Don’t just take our word for it – try it yourself! We’re confident that you’ll be delighted with the results. And once you’ve experienced the joy of harvesting perfectly ripe, unbruised strawberries, we’d love to hear about it. Share your experiences, tips, and photos with us in the comments below. Let’s create a community of strawberry-loving gardeners who are passionate about maximizing their harvests and enjoying the sweet rewards of their labor. Happy harvesting!
Frequently Asked Questions (FAQ)
Q: How do I know when a strawberry is ripe enough to pick?
A: The best indicator of ripeness is color. A ripe strawberry will be a deep, vibrant red all over, including the area around the stem. Avoid picking berries that are still white or green, as they will not ripen further after being picked. The berry should also have a slight sheen and feel firm to the touch, but not hard. A soft berry is overripe.
Q: What is the best time of day to harvest strawberries?
A: The ideal time to harvest strawberries is in the early morning, after the dew has dried but before the sun has had a chance to heat them up. Berries picked in the cool morning hours tend to be firmer and have a longer shelf life. Avoid harvesting during the hottest part of the day, as the berries will be more susceptible to bruising and spoilage.
Q: What is the correct way to pick a strawberry without damaging the plant?
A: The best technique is to gently grasp the stem of the strawberry just above the berry, about half an inch to an inch above the fruit. Use a gentle twisting and pulling motion to detach the berry from the plant. Avoid pulling directly on the berry itself, as this can damage the fruit and the plant. If the berry is ripe, it should come away easily. If it resists, it’s likely not quite ripe yet.
Q: How should I store my freshly harvested strawberries?
A: To maximize the shelf life of your strawberries, avoid washing them until just before you’re ready to eat them. Washing them introduces moisture, which can promote mold growth. Store them in a single layer in a shallow container lined with paper towels to absorb any excess moisture. Place the container in the refrigerator. Properly stored strawberries can last for several days.
Q: Can I harvest strawberries after it rains?
A: It’s best to avoid harvesting strawberries immediately after it rains, as they will be waterlogged and more prone to bruising and spoilage. If you must harvest after rain, allow the berries to dry as much as possible before picking them. Handle them with extra care, as they will be more delicate.
Q: What if I accidentally pick a strawberry that isn’t fully ripe? Will it ripen off the vine?
A: Unfortunately, strawberries do not ripen further after being picked. Once a strawberry is detached from the plant, it will no longer develop its full sweetness and flavor. It’s best to leave unripe berries on the plant until they are fully ripe.
Q: How often should I harvest my strawberry plants?
A: Strawberry plants will produce berries over a period of several weeks, so it’s important to check them regularly, ideally every day or two. Harvest ripe berries as soon as you see them to encourage the plant to continue producing.
Q: What can I do with overripe strawberries?
A: Overripe strawberries are still perfectly good to eat, but they may be too soft for some uses. They are ideal for making jams, sauces, smoothies, or baked goods. You can also freeze them for later use.
Q: My strawberries are being eaten by birds and other pests. What can I do to protect them?
A: There are several ways to protect your strawberries from pests. Netting is a popular and effective option. Cover your plants with netting to prevent birds and other animals from reaching the berries. You can also try using scarecrows, reflective tape, or other deterrents. Regularly inspect your plants for signs of pests and take appropriate action to control them.
Q: Can I grow strawberries in containers?
A: Yes, strawberries grow very well in containers. Choose a container that is at least 12 inches in diameter and has good drainage. Use a high-quality potting mix and provide your plants with plenty of sunlight and water. Container-grown strawberries are a great option for people with limited space.

Leave a Comment