
Chili plant propagation easy way – ever dreamt of having an endless supply of fiery chilies right at your fingertips? Imagine never having to run to the store for that crucial ingredient to spice up your favorite dish! Well, dream no more! This DIY guide is your passport to a thriving chili garden, and I’m here to show you how incredibly simple it can be to multiply your chili plants.
For centuries, chilies have been more than just a spice; they’ve been woven into the fabric of cultures worldwide. From the ancient Aztecs using them in rituals to the vibrant curries of India, chilies have held a place of honor. Now, you can continue that tradition in your own backyard! But, let’s be honest, buying chili plants can get expensive, and sometimes, the selection at your local nursery is limited. That’s where this chili plant propagation easy way comes in.
This DIY trick is a game-changer because it empowers you to take control of your chili supply. You can clone your favorite varieties, experiment with different flavors, and even share your bounty with friends and family. Plus, it’s incredibly rewarding to watch a tiny cutting transform into a flourishing plant, laden with peppers. So, grab your gardening gloves, and let’s dive into the secrets of easy chili plant propagation! I promise, you’ll be amazed at how simple and satisfying it is.
Propagating Chili Plants: A Beginner-Friendly Guide
Hey there, fellow chili enthusiasts! Ever wished you could magically multiply your favorite chili plant? Well, guess what? You practically can! Propagating chili plants is surprisingly easy, and I’m here to walk you through a simple method that even beginners can master. Get ready to expand your chili garden without breaking the bank!
What You’ll Need
Before we dive in, let’s gather our supplies. This is a low-cost project, so you probably have most of these items already:
* A healthy chili plant (obviously!). Look for one with strong stems and no signs of disease.
* Sharp, clean scissors or a knife. Sterilize them with rubbing alcohol to prevent infection.
* Rooting hormone (optional, but highly recommended). This will significantly increase your success rate. I personally love using a powdered rooting hormone.
* Small pots or containers. Seedling trays work great too!
* Seed starting mix or well-draining potting soil. Avoid using garden soil, as it can be too heavy and may contain pests or diseases.
* A clear plastic bag or humidity dome. This helps create a humid environment for the cuttings.
* Spray bottle filled with water.
* A warm, bright location (but not direct sunlight).
Choosing the Right Cuttings
The key to successful propagation lies in selecting the right cuttings. Here’s what to look for:
* Stem Cuttings: These are the most common type of cutting for chili plants. Choose stems that are healthy, green, and about 4-6 inches long.
* Non-Flowering Stems: Avoid stems with flowers or buds. The plant will focus its energy on producing flowers instead of roots.
* Node Location: Look for stems with nodes (the points where leaves emerge). Roots will typically grow from these nodes.
* Healthy Leaves: Choose stems with healthy, undamaged leaves.
Taking the Cuttings
Alright, let’s get our hands dirty! This is where the magic begins.
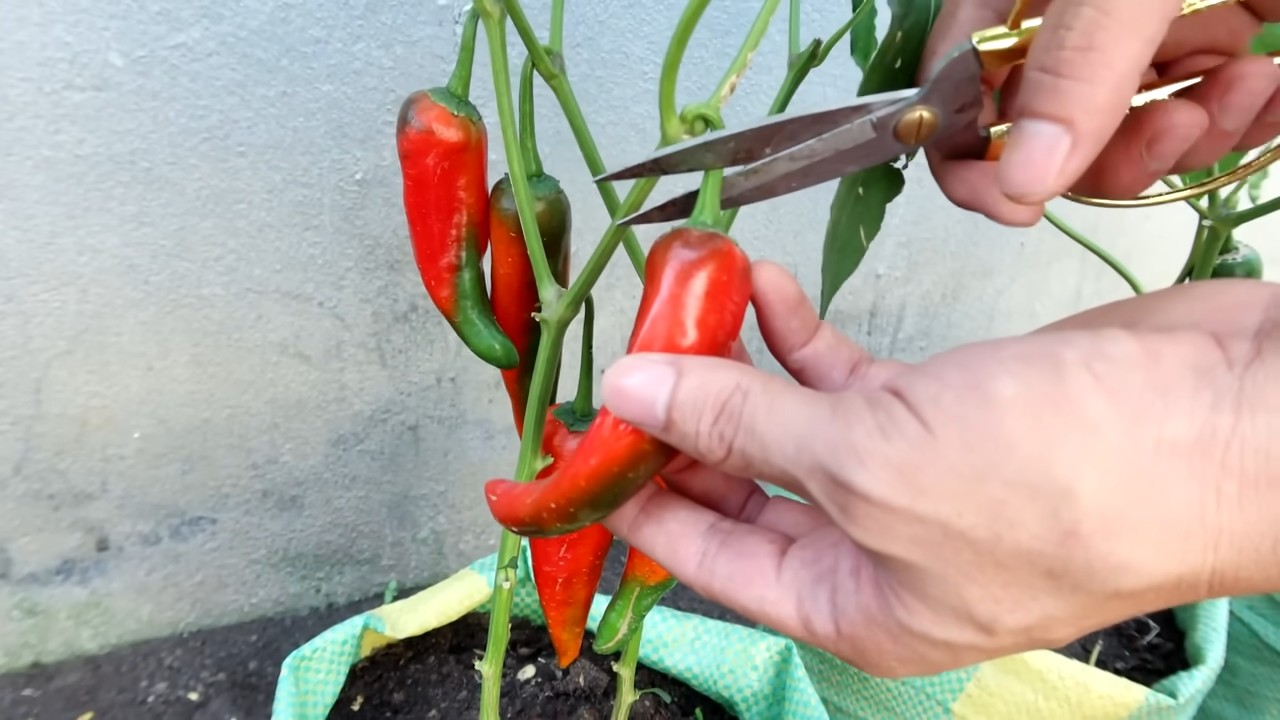
1. Prepare Your Tools: Sterilize your scissors or knife with rubbing alcohol. This is crucial to prevent diseases from infecting your cuttings.
2. Select a Stem: Choose a healthy, non-flowering stem that’s about 4-6 inches long.
3. Make the Cut: Using your sterilized scissors or knife, make a clean cut just below a node. A 45-degree angle cut is ideal, as it increases the surface area for root development.
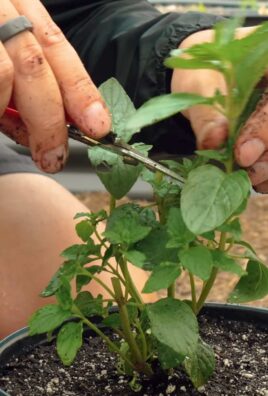
4. Remove Lower Leaves: Remove the leaves from the bottom 1-2 inches of the cutting. This prevents the leaves from rotting when they’re buried in the soil.
5. Optional: Dip in Rooting Hormone: If you’re using rooting hormone, moisten the cut end of the stem and dip it into the powder. Tap off any excess. This step isn’t mandatory, but it significantly increases your chances of success.
Planting the Cuttings
Now that we have our cuttings, it’s time to plant them!
1. Prepare Your Pots: Fill your small pots or seedling trays with seed starting mix or well-draining potting soil. Moisten the soil thoroughly.
2. Make a Hole: Use a pencil or your finger to create a small hole in the soil, deep enough to accommodate the bottom 1-2 inches of the cutting.
3. Insert the Cutting: Gently insert the cutting into the hole, making sure the node where you removed the leaves is buried in the soil.
4. Firm the Soil: Gently firm the soil around the cutting to provide support.
5. Water Gently: Water the cutting gently to settle the soil. Avoid overwatering, as this can lead to rot.
Creating a Humid Environment
Chili plant cuttings thrive in a humid environment. Here’s how to create one:
1. Cover with Plastic Bag or Humidity Dome: Place a clear plastic bag over the pot, or use a humidity dome if you have one. This will trap moisture and create a humid environment. Make sure the bag doesn’t touch the leaves, as this can cause them to rot. You can use skewers or chopsticks to prop up the bag.
2. Ventilation: Open the bag or dome for a few minutes each day to allow for ventilation. This will prevent the buildup of mold and mildew.
Caring for Your Cuttings
Patience is key! It takes time for roots to develop.
1. Location: Place the cuttings in a warm, bright location, but avoid direct sunlight. Direct sunlight can scorch the leaves.
2. Watering: Keep the soil consistently moist, but not soggy. Water when the top inch of soil feels dry to the touch. Use a spray bottle to mist the cuttings regularly.
3. Humidity: Maintain a high humidity level by keeping the cuttings covered with a plastic bag or humidity dome.
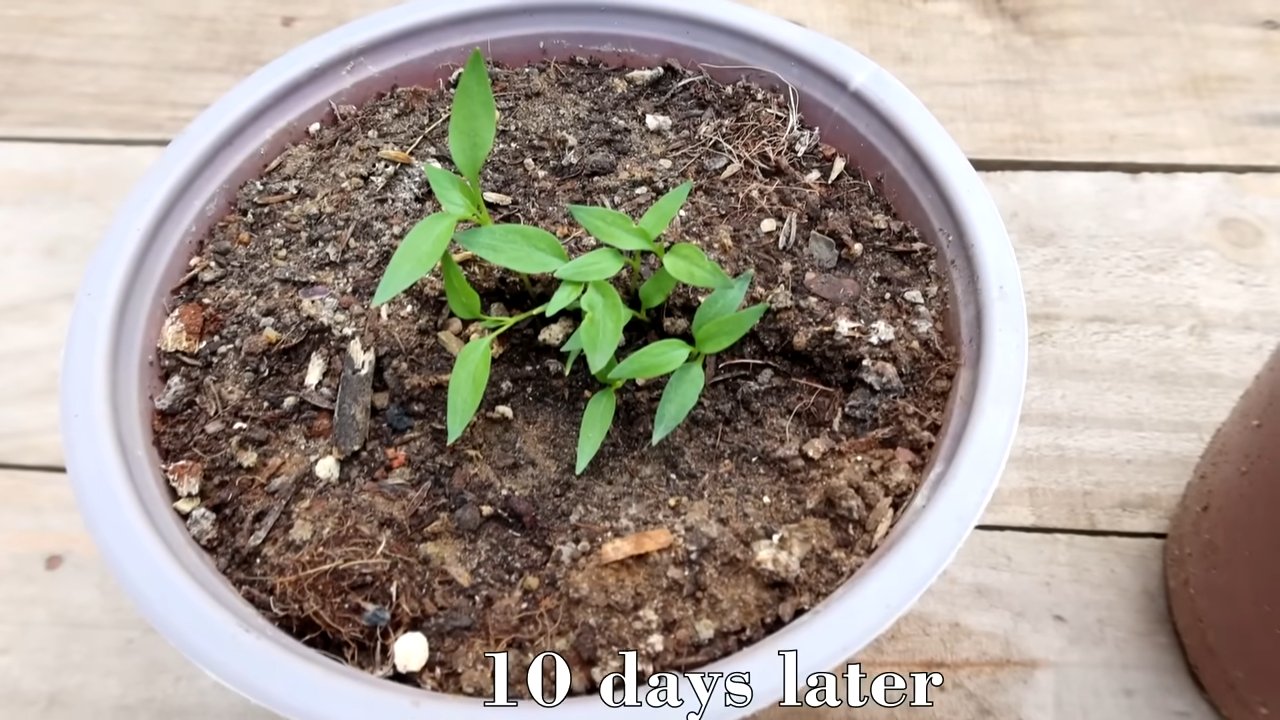
4. Check for Roots: After a few weeks (usually 2-4 weeks), gently tug on the cuttings. If you feel resistance, it means roots have developed! You can also gently remove a cutting from the pot to check for root growth.
Transplanting Your Rooted Cuttings
Once your cuttings have developed a good root system, it’s time to transplant them into larger pots.
1. Choose a Larger Pot: Select a pot that’s at least 4-6 inches in diameter.
2. Prepare the Potting Mix: Fill the pot with well-draining potting mix.
3. Gently Remove the Cutting: Carefully remove the rooted cutting from its original pot. Be gentle to avoid damaging the roots.
4. Plant the Cutting: Plant the cutting in the larger pot, making sure the top of the root ball is level with the soil surface.
5. Water Thoroughly: Water the newly transplanted cutting thoroughly.
6. Acclimatize: Gradually acclimatize the plant to outdoor conditions by placing it in a sheltered location for a few hours each day, gradually increasing the amount of sunlight it receives.
Troubleshooting
Sometimes, things don’t go as planned. Here are some common problems and how to fix them:
* Cuttings Rotting: This is usually caused by overwatering or poor ventilation. Make sure the soil is well-draining and that you’re not overwatering. Increase ventilation by opening the plastic bag or humidity dome more frequently.
* Cuttings Wilting: This is usually caused by lack of humidity. Make sure the cuttings are covered with a plastic bag or humidity dome. Mist the cuttings regularly.
* No Root Development: This could be due to several factors, including poor cutting selection, lack of rooting hormone, or improper environmental conditions. Try again with fresh cuttings, using rooting hormone, and ensuring a warm, humid environment.
Tips for Success
Here are a few extra tips to increase your chances of success:
* Take Multiple Cuttings: Not all cuttings will root, so take several cuttings to increase your odds.
* Use a Heat Mat: A heat mat can help speed up root development.
* Be Patient: Rooting can take several weeks, so be patient and don’t give up!
* Experiment: Try different methods and see what works best for you.
Enjoy Your New Chili Plants!
Congratulations! You’ve successfully propagated your own chili plants. Now you can enjoy a bountiful harvest of delicious chilies. Happy gardening! I hope this guide has been helpful. Remember, practice makes perfect, so don’t be discouraged if your first attempt isn’t successful. Keep trying, and you’ll be propagating chili plants like a pro in no time! And don’t forget to share your success stories (and failures!) in the comments below. I’d love to hear about your experiences.
Conclusion
So, there you have it! This simple, yet incredibly effective method for chili plant propagation is a game-changer for any chili enthusiast, whether you’re a seasoned gardener or just starting out. Forget spending a fortune on new seedlings every year. With this DIY trick, you can multiply your chili plants from your existing favorites, ensuring a continuous supply of fiery goodness for all your culinary adventures.
Why is this a must-try? Because it’s economical, sustainable, and incredibly rewarding. Imagine the satisfaction of nurturing new chili plants from cuttings, knowing you’ve bypassed the expense and potential variability of store-bought seedlings. Plus, you’re directly preserving the genetics of your best-performing plants, guaranteeing consistent flavor and heat levels in your future harvests.
But the benefits don’t stop there. This method is also surprisingly easy. You don’t need any fancy equipment or specialized knowledge. Just a few simple tools, some patience, and a little bit of love, and you’ll be well on your way to a thriving chili garden.
Looking for variations? Absolutely! While we’ve outlined a straightforward water propagation method, you can experiment with other rooting mediums like perlite, vermiculite, or even a well-draining potting mix. Some gardeners also find success using rooting hormones to accelerate the process, although it’s not strictly necessary. Consider trying different types of chili cuttings – stem cuttings, leaf cuttings, or even sucker cuttings – to see which works best for your particular chili variety. Remember to always use clean tools to prevent the spread of disease.
Another exciting variation is to graft your propagated chili plants onto more robust rootstocks. This technique, while more advanced, can significantly improve disease resistance and overall plant vigor. Research compatible rootstocks for your chili variety and explore the world of grafting for even greater success.
We encourage you to embrace this DIY chili plant propagation method and experience the joy of expanding your chili garden. It’s a fantastic way to connect with nature, learn new skills, and, most importantly, enjoy a bountiful harvest of delicious, homegrown chilies.
Don’t be afraid to experiment and adapt the technique to suit your specific environment and preferences. Every garden is unique, and what works for one person may not work for another. The key is to observe your plants closely, learn from your successes and failures, and never stop exploring.
We are confident that you will find this method to be a valuable addition to your gardening toolkit. So, grab your pruning shears, select your healthiest chili plants, and get ready to embark on a rewarding journey of chili plant propagation.
We’d love to hear about your experiences! Share your successes, challenges, and any variations you’ve tried in the comments below. Let’s build a community of chili enthusiasts who are passionate about growing their own fiery delights. Happy growing!
Frequently Asked Questions (FAQ)
Q: What is the best time of year to propagate chili plants?
A: The ideal time for chili plant propagation is during the spring or early summer. This is when the plants are actively growing and the weather is warm and conducive to root development. However, with proper care and environmental control (like grow lights and a heated propagation mat), you can propagate chili plants at other times of the year as well. Avoid propagating during the coldest winter months when plant growth is naturally slowed.
Q: How long does it take for chili plant cuttings to root?
A: Rooting time can vary depending on the chili variety, environmental conditions, and the specific propagation method used. Generally, you can expect to see roots developing within 2-4 weeks. Keep a close eye on your cuttings and be patient. Once the roots are about an inch long, they are ready to be transplanted into soil.
Q: What kind of water should I use for propagation?
A: It’s best to use filtered or distilled water for propagating chili plants. Tap water can contain chlorine and other chemicals that can inhibit root growth. If you only have access to tap water, let it sit out in an open container for 24 hours to allow the chlorine to dissipate.
Q: Do I need to use rooting hormone?
A: While rooting hormone can accelerate the rooting process, it’s not strictly necessary for chili plant propagation. Many chili varieties root readily without it. If you choose to use rooting hormone, follow the instructions on the product label carefully.
Q: What type of soil should I use when transplanting the rooted cuttings?
A: Use a well-draining potting mix that is specifically formulated for seedlings or vegetables. Avoid using garden soil, as it can be too heavy and may contain pests or diseases. A good potting mix will provide adequate drainage and aeration for the developing roots.
Q: How often should I water the transplanted cuttings?
A: Keep the soil consistently moist, but not waterlogged. Water when the top inch of soil feels dry to the touch. Overwatering can lead to root rot, so it’s important to allow the soil to drain properly.
Q: What kind of light do the cuttings need?
A: Chili plant cuttings need bright, indirect light. Avoid placing them in direct sunlight, as this can scorch the leaves. A location near a window with filtered sunlight is ideal. If you don’t have access to natural light, you can use a grow light to provide supplemental lighting.
Q: How do I prevent damping off?
A: Damping off is a fungal disease that can affect seedlings and cuttings. To prevent damping off, use a sterile potting mix, provide good ventilation, and avoid overwatering. You can also treat the soil with a fungicide if necessary.
Q: Can I propagate chili plants from seeds instead of cuttings?
A: Yes, you can propagate chili plants from seeds. However, propagating from cuttings allows you to clone your existing plants, preserving their specific characteristics. Seed-grown plants may exhibit variations in flavor, heat level, and growth habit.
Q: My cuttings are wilting. What should I do?
A: Wilting can be a sign that the cuttings are not getting enough moisture or that the humidity is too low. Try misting the cuttings regularly with water to increase humidity. You can also cover them with a plastic bag or dome to create a mini-greenhouse effect. Make sure the bag or dome has ventilation to prevent the buildup of excess moisture. If the wilting persists, check the roots for signs of rot.
Q: How do I harden off the rooted cuttings before planting them outdoors?
A: Hardening off is the process of gradually acclimating the rooted cuttings to outdoor conditions. Start by placing them outdoors in a sheltered location for a few hours each day, gradually increasing the amount of time they spend outside. Protect them from direct sunlight and strong winds. After about a week, they should be ready to be transplanted into their final location in the garden.
Q: What are some common problems I might encounter during chili plant propagation?
A: Some common problems include root rot, damping off, wilting, and pest infestations. Regularly inspect your cuttings for signs of these problems and take appropriate action to address them. Proper sanitation, good ventilation, and careful watering practices can help prevent many of these issues.
Q: Can I use this method to propagate other types of plants?
A: While this method is specifically tailored for chili plants, the basic principles of water propagation can be applied to other types of plants as well. However, the success rate may vary depending on the plant species. Research the specific propagation requirements of the plant you are trying to propagate.
Q: What if my chili plant cutting doesn’t root?
A: Not all cuttings will root successfully. If a cutting doesn’t root after a reasonable amount of time (4-6 weeks), it’s likely that it won’t root at all. Don’t be discouraged! Simply discard the cutting and try again with a fresh one. Practice makes perfect!

Leave a Comment