
Container Cantaloupe Growing: Imagine biting into a juicy, sun-ripened cantaloupe that you grew yourself, right on your patio! Forget those bland, store-bought melons – with a little know-how, you can cultivate your own sweet, fragrant cantaloupes even if you don’t have a sprawling garden. For centuries, cantaloupes have been cherished for their refreshing taste and nutritional benefits, enjoyed by cultures around the globe. From ancient Egypt to modern-day picnics, this melon has always been a symbol of summer’s bounty.
But let’s face it, growing cantaloupes can seem intimidating. They’re often perceived as space-hungry plants best left to experienced gardeners. That’s where this DIY guide comes in! I’m going to share my favorite tricks and hacks for successful container cantaloupe growing. We’ll debunk the myths, simplify the process, and show you how to maximize your yield, even in a limited space.
Why do you need these DIY tricks? Because everyone deserves the pleasure of homegrown cantaloupe! Plus, growing your own food is incredibly rewarding, reduces your carbon footprint, and ensures you know exactly what’s going into your body. So, grab your gardening gloves, and let’s get started on this exciting journey to delicious, homegrown cantaloupes!
Cantaloupe im Topf ziehen: Dein eigener süßer Sommergenuss
Hey Gartenfreunde! Hast du auch nicht so viel Platz, aber trotzdem Lust auf frische, selbstgezogene Cantaloupe-Melonen? Kein Problem! Ich zeige dir, wie du diese leckeren Früchte ganz einfach im Topf anbauen kannst. Es ist einfacher als du denkst und der Geschmack ist unschlagbar!
Was du brauchst: Die Zutaten für deinen Melonen-Erfolg
Bevor wir loslegen, lass uns sicherstellen, dass wir alles beisammen haben. Hier ist eine Liste der Dinge, die du für dein Cantaloupe-Topfprojekt benötigst:
* **Cantaloupe-Samen:** Am besten wählst du eine Sorte, die für den Anbau im Topf geeignet ist. Kleinere Sorten wie “Minnesota Midget” oder “Bush Star” sind ideal. Du findest sie in jedem guten Gartencenter oder online.
* **Großer Topf:** Cantaloupe-Melonen brauchen Platz! Wähle einen Topf mit mindestens 45-50 cm Durchmesser und Tiefe. Je größer, desto besser!
* **Hochwertige Blumenerde:** Verwende eine gut durchlässige Blumenerde, die reich an Nährstoffen ist. Du kannst auch etwas Kompost untermischen, um die Erde noch weiter aufzuwerten.
* **Kompost:** Wie gesagt, Kompost ist ein super Dünger und verbessert die Bodenstruktur.
* **Langzeitdünger:** Ein Langzeitdünger versorgt deine Melone über einen längeren Zeitraum mit wichtigen Nährstoffen.
* **Rankhilfe:** Cantaloupe-Melonen sind Kletterpflanzen. Eine Rankhilfe, wie ein Spalier oder ein Rankgitter, hilft ihnen beim Wachsen und verhindert, dass die Früchte auf dem Boden liegen.
* **Gießkanne oder Schlauch:** Zum regelmäßigen Gießen.
* **Gartenschere:** Zum Ausgeizen und Entfernen von abgestorbenen Blättern.
* **Mulch:** Mulch hilft, die Feuchtigkeit im Boden zu halten und Unkraut zu unterdrücken. Stroh oder Holzhackschnitzel sind gute Optionen.
* **Sonniger Standort:** Cantaloupe-Melonen lieben die Sonne! Wähle einen Standort, der mindestens 6-8 Stunden Sonne pro Tag bekommt.
* **Geduld:** Melonen brauchen Zeit, um zu reifen. Hab Geduld und lass dich nicht entmutigen, wenn es nicht sofort klappt!
Aussaat und Keimung: Der Start in ein süßes Leben
Jetzt geht’s ans Eingemachte! Die Aussaat ist der erste Schritt zu deiner eigenen Cantaloupe-Ernte.
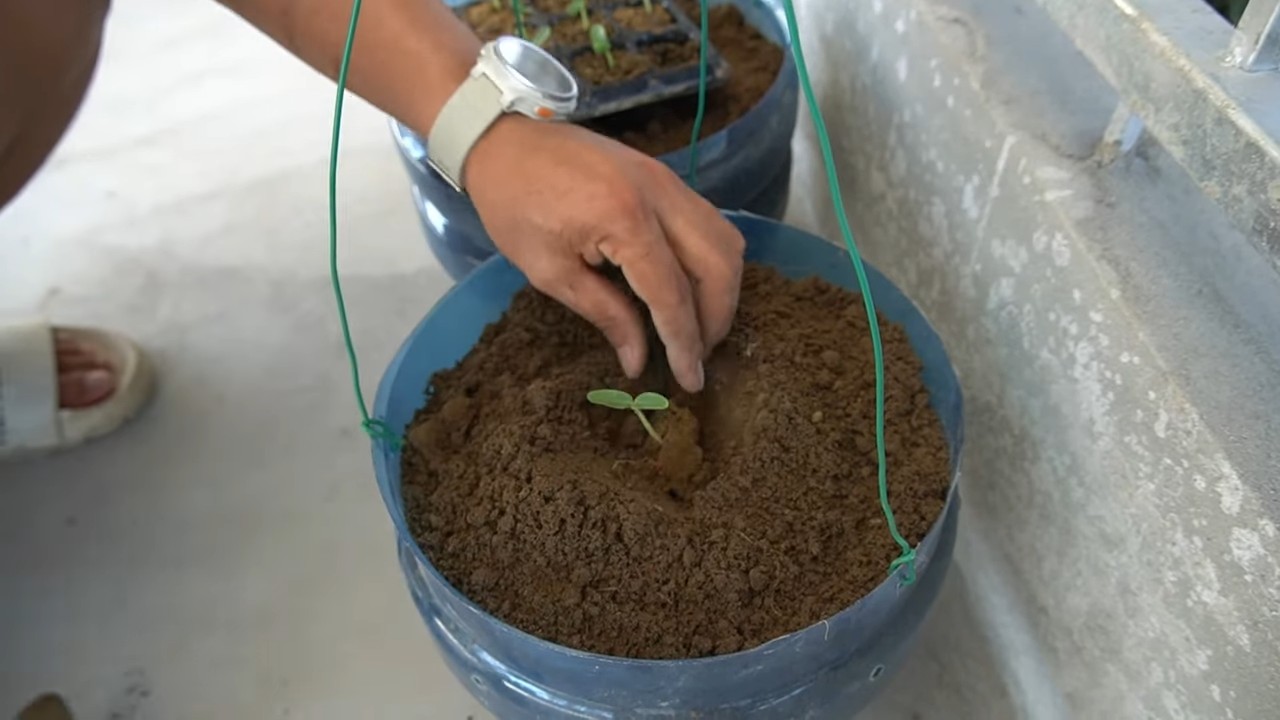
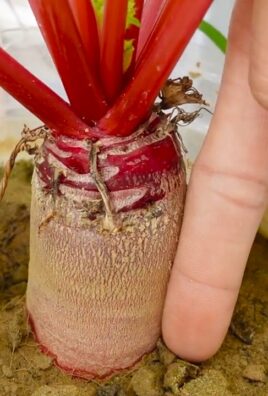
1. **Vorkultur (optional):** Ich empfehle, die Samen im Haus vorzuziehen, besonders wenn du in einer Region mit kurzem Sommer lebst. Das gibt den Pflanzen einen Vorsprung. Fülle kleine Anzuchttöpfe mit Anzuchterde und säe 2-3 Samen pro Topf, etwa 1-2 cm tief.
2. **Direktsaat (möglich):** Wenn du in einer Region mit warmem Klima lebst, kannst du die Samen auch direkt in den Topf säen. Warte aber, bis keine Frostgefahr mehr besteht und die Bodentemperatur mindestens 18°C beträgt.
3. **Gießen und warm stellen:** Gieße die Erde vorsichtig an und stelle die Töpfe an einen warmen, hellen Ort. Eine Temperatur von 20-25°C ist ideal für die Keimung.
4. **Geduld haben:** Die Keimung dauert in der Regel 7-14 Tage. Halte die Erde feucht, aber nicht nass.
5. **Pikieren (bei Vorkultur):** Sobald die Sämlinge 2-3 echte Blätter haben, kannst du sie pikieren. Das bedeutet, dass du den stärksten Sämling pro Topf behältst und die anderen entfernst.
Einpflanzen und Pflegen: Damit deine Melone sich wohlfühlt
Sobald die Sämlinge stark genug sind oder die Direktsaat aufgegangen ist, ist es Zeit, sie in den großen Topf umzupflanzen.
1. **Topf vorbereiten:** Fülle den großen Topf mit Blumenerde und mische etwas Kompost und Langzeitdünger unter.
2. **Pflanzen:** Hebe ein Loch in die Erde, das groß genug für den Wurzelballen des Sämlings ist. Setze den Sämling vorsichtig ein und fülle das Loch mit Erde auf. Drücke die Erde leicht an.
3. **Rankhilfe installieren:** Stecke die Rankhilfe in den Topf, bevor die Pflanze zu groß wird.
4. **Gießen:** Gieße die Pflanze gründlich an.
5. **Mulchen:** Verteile eine Schicht Mulch um die Pflanze, um die Feuchtigkeit im Boden zu halten und Unkraut zu unterdrücken.
6. **Standort:** Stelle den Topf an einen sonnigen Standort.
Die richtige Pflege: Gießen, Düngen und Ausgeizen
Damit deine Cantaloupe-Melone prächtig gedeiht, ist die richtige Pflege entscheidend.
* **Gießen:** Cantaloupe-Melonen brauchen viel Wasser, besonders während der Fruchtbildung. Gieße regelmäßig, aber vermeide Staunässe. Am besten gießt du morgens, damit die Blätter über den Tag abtrocknen können.
* **Düngen:** Dünge deine Melone regelmäßig mit einem Flüssigdünger für Gemüse oder einem speziellen Melonendünger. Befolge dabei die Anweisungen auf der Verpackung.
* **Ausgeizen:** Cantaloupe-Melonen bilden viele Seitentriebe. Um die Fruchtbildung zu fördern, solltest du die Seitentriebe regelmäßig ausgeizen. Entferne dazu die Triebe, die aus den Blattachseln wachsen. Lasse aber einige Triebe stehen, da an ihnen die weiblichen Blüten entstehen, aus denen sich die Früchte entwickeln.
* **Bestäubung:** Cantaloupe-Melonen haben männliche und weibliche Blüten. Die weiblichen Blüten erkennst du an dem kleinen Fruchtansatz unterhalb der Blüte. Wenn du sichergehen willst, dass die Bestäubung erfolgreich ist, kannst du die Blüten auch von Hand bestäuben. Übertrage dazu mit einem Pinsel Pollen von einer männlichen Blüte auf eine weibliche Blüte.
* **Schutz vor Schädlingen und Krankheiten:** Achte auf Schädlinge wie Blattläuse oder Spinnmilben. Bei Bedarf kannst du biologische Schädlingsbekämpfungsmittel einsetzen. Achte auch auf Anzeichen von Krankheiten wie Mehltau. Entferne befallene Blätter sofort.
Fruchtbildung und Ernte: Der Lohn deiner Mühe
Wenn alles gut läuft, bilden sich bald die ersten kleinen Cantaloupe-Früchte.
1. **Fruchtansatz:** Beobachte die Pflanze genau. An den weiblichen Blüten bilden sich kleine Fruchtansätze.
2. **Fruchtentwicklung:** Die Früchte wachsen langsam heran.
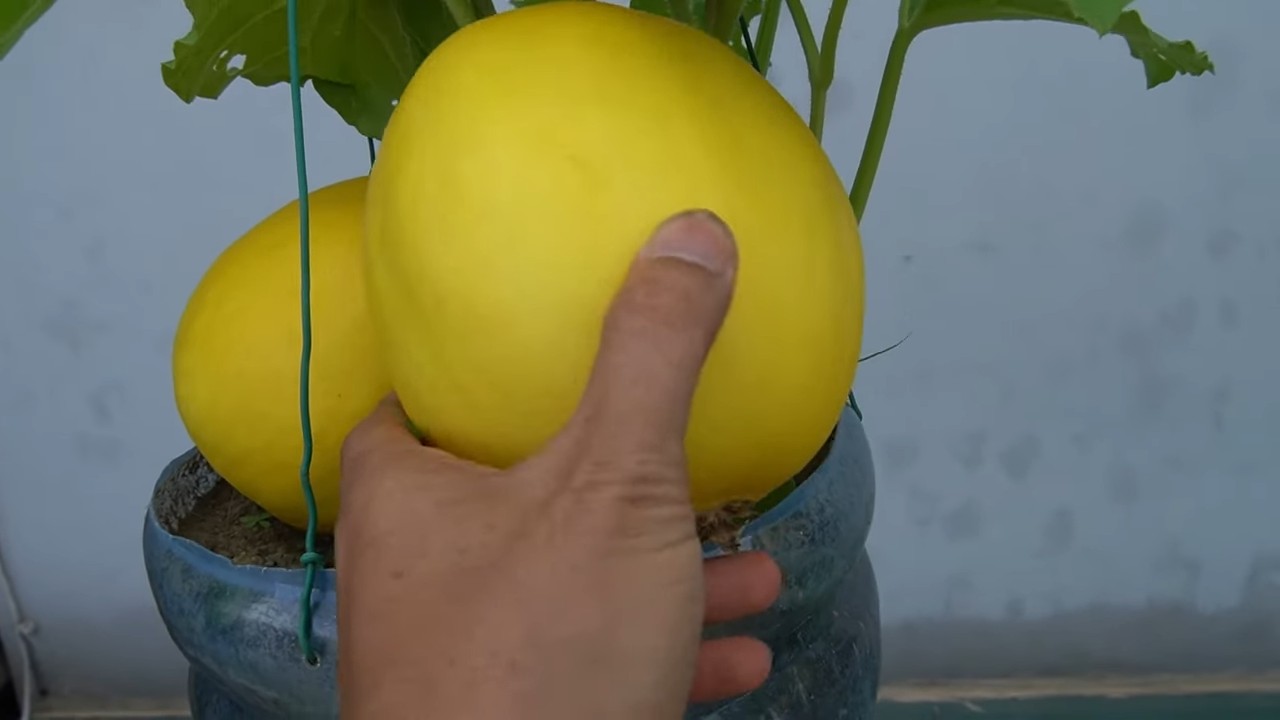
3. **Erntezeitpunkt:** Der richtige Erntezeitpunkt ist entscheidend für den Geschmack der Melone. Eine reife Cantaloupe-Melone verströmt einen süßen Duft und die Schale gibt bei leichtem Druck nach. Außerdem löst sich der Stiel leicht von der Frucht.
4. **Ernten:** Schneide die reife Melone vorsichtig mit einem scharfen Messer ab.
Zusätzliche Tipps für den Cantaloupe-Erfolg im Topf
* Wähle den richtigen Topf: Ein Terrakotta-Topf ist atmungsaktiver als ein Plastiktopf und kann helfen, Staunässe zu vermeiden.
* Sorge für gute Belüftung: Stelle den Topf an einen Ort, wo die Luft gut zirkulieren kann.
* Drehe den Topf regelmäßig: So bekommen alle Seiten der Pflanze ausreichend Sonne.
* Unterstütze die Früchte: Wenn die Früchte zu schwer werden, kannst du sie mit kleinen Netzen oder Stoffstreifen an der Rankhilfe befestigen, um zu verhindern, dass sie abbrechen.
* Schnecken fernhalten: Schnecken lieben Melonen! Schütze deine Pflanzen mit Schneckenkorn oder Schneckenzäunen.
Ich hoffe, diese Anleitung hilft dir dabei, deine eigenen Cantaloupe-Melonen im Topf zu ziehen. Es ist ein tolles Gefühl, die Früchte deiner Arbeit zu ernten und den süßen Geschmack selbstgezogener Melonen zu genießen. Viel Erfolg und lass es dir schmecken!
Conclusion
So, there you have it! Growing cantaloupe in containers might seem like a daunting task, reserved for seasoned gardeners with sprawling acres. But as we’ve shown, with a little know-how and the right approach, you can absolutely cultivate these sweet, juicy melons right on your patio, balcony, or even a sunny windowsill. The beauty of this DIY trick lies in its accessibility. It democratizes the joy of homegrown produce, bringing the taste of summer closer to everyone, regardless of their living situation.
Why is this a must-try? Because the flavor of a homegrown cantaloupe, ripened on the vine and bursting with sweetness, is simply unparalleled. It’s a world away from the often bland, commercially grown varieties you find in supermarkets. Plus, there’s an immense satisfaction in nurturing a plant from seed to fruit, witnessing the miracle of nature unfold before your eyes. It’s a rewarding experience that connects you to the earth and provides a delicious, healthy treat.
But the benefits extend beyond just taste and satisfaction. Container gardening allows for greater control over the growing environment. You can easily move your cantaloupe plant to chase the sun, protect it from harsh weather, and ensure it receives the precise amount of water and nutrients it needs. This level of control can lead to healthier plants and a more abundant harvest.
Looking for variations? Consider experimenting with different cantaloupe varieties. Smaller, personal-sized cantaloupes are particularly well-suited for container growing. You could also try companion planting, adding herbs like basil or marigolds to your container to deter pests and attract pollinators. Another variation is to use different types of containers. While a large pot is essential, you could explore using self-watering containers or even repurposed items like large buckets or tubs. Just ensure they have adequate drainage.
We encourage you to embrace this DIY trick and embark on your own container cantaloupe growing adventure. Don’t be afraid to experiment, learn from your mistakes, and adapt the techniques to suit your specific environment and preferences. The journey is just as rewarding as the destination.
And most importantly, we want to hear about your experiences! Share your photos, tips, and challenges in the comments below. Let’s create a community of container cantaloupe enthusiasts, supporting each other and celebrating the joys of homegrown goodness. Did you find a particular fertilizer that worked wonders? Did you discover a clever way to trellis your vines? Share your secrets! Together, we can unlock the full potential of container cantaloupe growing and inspire others to give it a try. So, grab your seeds, prepare your soil, and get ready to enjoy the sweet taste of success. Happy gardening!
Frequently Asked Questions (FAQ)
1. What is the best size container for growing cantaloupe?
A container that is at least 20 gallons in size is recommended for growing cantaloupe. The bigger, the better, as cantaloupe vines need ample space for their root systems to develop. A half-barrel planter or a large, sturdy plastic container works well. Ensure the container has adequate drainage holes to prevent waterlogging, which can lead to root rot. Remember, the goal is to provide enough room for the roots to spread and support the growth of a healthy, productive vine.
2. What type of soil should I use for container cantaloupe growing?
Use a high-quality potting mix that is well-draining and rich in organic matter. Avoid using garden soil, as it can become compacted in containers and hinder drainage. A good potting mix will provide the necessary nutrients and aeration for healthy root growth. You can also amend the potting mix with compost or aged manure to further enrich it. The ideal soil pH for cantaloupe is between 6.0 and 6.8.
3. How often should I water my container cantaloupe plant?
Water your cantaloupe plant deeply and regularly, especially during hot, dry weather. Check the soil moisture daily, and water when the top inch feels dry to the touch. Avoid overwatering, as this can lead to root rot. Container plants tend to dry out faster than those in the ground, so be vigilant about monitoring the moisture levels. A good rule of thumb is to water thoroughly until water drains out of the bottom of the container.
4. How much sunlight does a container cantaloupe plant need?
Cantaloupe plants need at least 6-8 hours of direct sunlight per day to thrive. Choose a sunny location for your container, such as a south-facing patio or balcony. If you don’t have a spot that receives full sun, you may need to supplement with artificial lighting. Insufficient sunlight can result in weak growth, poor fruit production, and bland-tasting melons.
5. Do I need to fertilize my container cantaloupe plant?
Yes, cantaloupe plants are heavy feeders and require regular fertilization. Use a balanced fertilizer, such as a 10-10-10 or 14-14-14, according to the package directions. You can also use an organic fertilizer, such as compost tea or fish emulsion. Fertilize every 2-3 weeks during the growing season to provide the plant with the nutrients it needs to produce healthy vines and sweet melons.
6. How do I trellis my container cantaloupe vine?
Trellising is essential for container cantaloupe growing, as it helps to support the heavy vines and fruits. You can use a variety of trellising methods, such as a tomato cage, a wooden trellis, or a wire fence. Train the vines to climb the trellis as they grow, and tie them loosely with twine or plant ties. Trellising not only saves space but also improves air circulation and reduces the risk of fungal diseases. For heavier fruits, consider providing additional support with slings made from pantyhose or netting.
7. How do I know when my cantaloupe is ripe?
There are several signs that indicate a cantaloupe is ripe. The skin will turn from green to a tan or yellowish color. The stem will begin to crack and separate from the fruit, a process known as “slipping.” The melon will also have a sweet, fragrant aroma. Gently press on the blossom end of the melon; if it yields slightly, it’s likely ripe. Don’t wait too long to harvest, as overripe cantaloupes can become mushy and lose their flavor.
8. What are some common pests and diseases that affect container cantaloupe plants?
Common pests that can affect cantaloupe plants include aphids, squash bugs, and vine borers. Diseases include powdery mildew, fusarium wilt, and anthracnose. Regularly inspect your plants for signs of pests or diseases, and take action promptly. Use insecticidal soap or neem oil to control pests, and apply a fungicide to prevent or treat fungal diseases. Good air circulation and proper watering practices can also help to prevent disease problems.
9. Can I grow cantaloupe from seed in a container?
Yes, you can grow cantaloupe from seed in a container. Start the seeds indoors 4-6 weeks before the last expected frost. Sow the seeds in small pots or seed trays filled with a seed-starting mix. Keep the soil moist and warm, and provide plenty of light. Once the seedlings have developed a few sets of true leaves, transplant them into your container. Alternatively, you can direct sow the seeds into the container after the last frost, but be sure to protect them from cold temperatures and pests.
10. How can I improve pollination for my container cantaloupe plant?
Cantaloupe plants require pollination to produce fruit. If you’re growing your plant indoors or in an area with limited bee activity, you may need to hand-pollinate the flowers. Use a small paintbrush to transfer pollen from the male flowers to the female flowers. Male flowers have a long, thin stem, while female flowers have a small, immature fruit at the base. Pollinate the flowers in the morning, when the pollen is most viable. You can also attract pollinators to your garden by planting flowers that bees and other insects love.
Leave a Comment