
Container chili growing is a fantastic way to bring the heat and flavor of fresh chilies right to your doorstep, even if you’re short on space! Have you ever dreamed of whipping up a spicy salsa with chilies you nurtured from tiny seedlings? Or adding a fiery kick to your favorite dishes with homegrown peppers? This DIY guide will turn that dream into a delicious reality.
Growing chilies has a rich history, dating back thousands of years in South America, where they were not only a culinary staple but also held cultural and medicinal significance. Today, the joy of cultivating your own food, especially something as vibrant and versatile as chilies, is experiencing a huge resurgence. But let’s face it, not everyone has a sprawling garden. That’s where container chili growing comes in!
I know what you’re thinking: “I don’t have a green thumb!” Don’t worry, you don’t need one! This article is packed with simple, effective DIY tricks and hacks that will empower even the most novice gardener to successfully grow chilies in containers. We’ll cover everything from choosing the right pot and soil to providing the perfect amount of sunlight and water. Plus, I’ll share some insider tips to help you avoid common pitfalls and maximize your chili harvest. Get ready to spice up your life, one container at a time!
Growing Chili Peppers in Containers: A Spicy DIY Guide
Hey there, fellow chili enthusiast! Want to bring the heat to your patio, balcony, or even your kitchen windowsill? Growing chili peppers in containers is surprisingly easy and rewarding. I’ve been doing it for years, and I’m excited to share my secrets with you. This guide will walk you through every step, from choosing the right peppers to harvesting a fiery bounty. Let’s get started!
Choosing Your Chili Peppers
First things first, you need to decide what kind of chili peppers you want to grow. The options are endless, ranging from mild bell peppers (yes, they’re technically chilies!) to scorching habaneros and ghost peppers. Consider your heat tolerance and what you plan to use the peppers for.
Here’s a quick rundown of some popular choices:
* Bell Peppers: Sweet and mild, perfect for salads, stuffing, and roasting.
* Jalapeños: A classic medium-heat pepper, great for salsas, pickling, and adding a kick to your favorite dishes.
* Serranos: Hotter than jalapeños, with a bright, grassy flavor. Ideal for sauces and salsas.
* Cayenne Peppers: A versatile hot pepper, often dried and ground into powder. Use it to add heat to soups, stews, and chili.
* Habaneros: Extremely hot, with a fruity, floral flavor. Use sparingly in sauces and salsas.
* Ghost Peppers (Bhut Jolokia): One of the hottest peppers in the world! Handle with extreme caution.
Pro Tip: If you’re a beginner, I recommend starting with jalapeños or serranos. They’re relatively easy to grow and offer a good balance of flavor and heat.
Gathering Your Supplies
Before you start planting, you’ll need to gather your supplies. Here’s what you’ll need:
* Containers: Choose containers that are at least 12 inches in diameter and depth. Larger containers are better, as they provide more room for the roots to grow. Make sure the containers have drainage holes to prevent waterlogging.
* Potting Mix: Use a high-quality potting mix that is well-draining and contains plenty of organic matter. Avoid using garden soil, as it can become compacted and prevent proper drainage.
* Chili Pepper Seeds or Seedlings: You can start your chili peppers from seed or purchase seedlings from a local nursery. Starting from seed is more economical, but it requires more time and effort.
* Fertilizer: Use a balanced fertilizer that is specifically formulated for vegetables.
* Watering Can or Hose: You’ll need a way to water your chili peppers regularly.
* Gloves: Wear gloves when handling chili peppers, especially hot varieties, to avoid skin irritation.
* Optional: Plant labels, garden stakes, and insecticidal soap.
Planting Your Chili Peppers
Now comes the fun part: planting your chili peppers! Whether you’re starting from seed or using seedlings, the process is relatively straightforward.
Starting from Seed
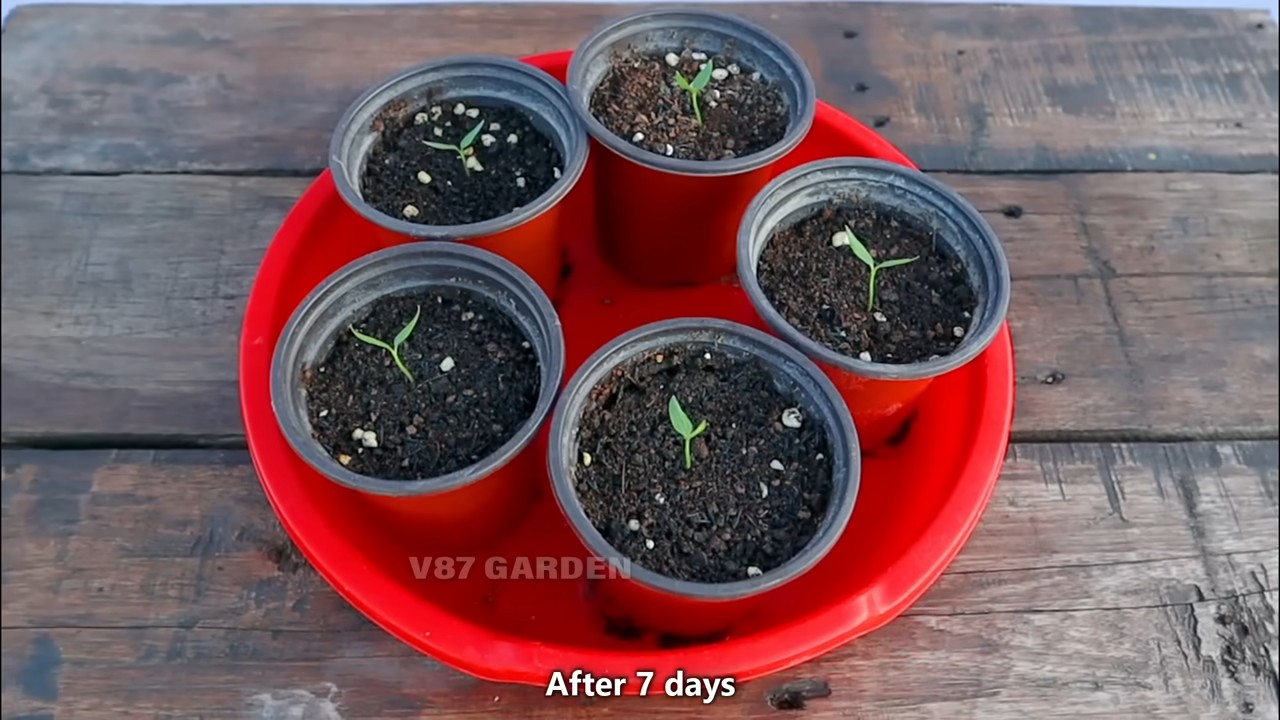
1. Start Seeds Indoors (6-8 weeks before the last frost): Fill small pots or seed trays with potting mix. Moisten the soil and sow the seeds about ¼ inch deep.
2. Provide Warmth and Light: Place the pots in a warm location, such as a sunny windowsill or under grow lights. Chili pepper seeds need warmth to germinate. Aim for a soil temperature of 70-80°F (21-27°C).
3. Keep the Soil Moist: Water the seeds regularly to keep the soil moist but not soggy.
4. Transplant Seedlings: Once the seedlings have developed a few sets of true leaves (usually after 6-8 weeks), they’re ready to be transplanted into larger containers.
Planting Seedlings
1. Prepare the Containers: Fill the containers with potting mix, leaving about an inch of space at the top.
2. Remove Seedlings from Pots: Gently remove the seedlings from their pots, being careful not to damage the roots. If the roots are pot-bound (tightly circling the bottom of the pot), gently loosen them before planting.
3. Plant the Seedlings: Dig a hole in the potting mix that is large enough to accommodate the root ball. Place the seedling in the hole and backfill with potting mix. Gently firm the soil around the base of the plant.
4. Water Thoroughly: Water the seedlings thoroughly after planting.
Caring for Your Chili Peppers
Once your chili peppers are planted, it’s important to provide them with the proper care to ensure a healthy and productive harvest.
* Sunlight: Chili peppers need at least 6-8 hours of sunlight per day. Place your containers in a sunny location where they will receive plenty of direct sunlight.
* Watering: Water your chili peppers regularly, especially during hot, dry weather. The soil should be kept moist but not soggy. Water deeply, allowing the water to soak into the soil. Avoid watering the foliage, as this can promote fungal diseases.
* Fertilizing: Fertilize your chili peppers every 2-3 weeks with a balanced fertilizer. Follow the instructions on the fertilizer package.
* Pruning: Pruning is not essential, but it can help to improve air circulation and promote bushier growth. You can prune away any dead or yellowing leaves.
* Pest Control: Chili peppers can be susceptible to pests such as aphids, spider mites, and whiteflies. Inspect your plants regularly for signs of pests. If you find any pests, treat them with insecticidal soap or neem oil.
* Support: As your chili pepper plants grow, they may need support to prevent them from falling over. You can use garden stakes or tomato cages to provide support.
Dealing with Common Problems
Even with the best care, you may encounter some problems while growing chili peppers. Here are some common issues and how to address them:
* Blossom End Rot: This is a condition where the bottom of the chili pepper develops a dark, sunken spot. It’s caused by a calcium deficiency. To prevent blossom end rot, make sure your soil is rich in calcium and water your plants regularly. You can also add calcium to the soil by using bone meal or eggshells.
* Leaf Curl: Leaf curl can be caused by a variety of factors, including pests, diseases, and environmental stress. Inspect your plants for pests and treat them accordingly. Make sure your plants are getting enough water and sunlight.
* Lack of Fruit: If your chili pepper plants are not producing fruit, it could be due to a lack of pollination. Chili peppers are self-pollinating, but they may need some help from you. You can hand-pollinate the flowers by gently shaking the plants or using a small brush to transfer pollen from one flower to another.
* Sunscald: This occurs when the peppers are exposed to too much direct sunlight, causing them to develop white or yellow patches. Provide some shade during the hottest part of the day.
Harvesting Your Chili Peppers
The moment you’ve been waiting for! Harvesting your chili peppers is the most rewarding part of the process.
* When to Harvest: The best time to harvest your chili peppers depends on the variety and your personal preference. Generally, chili peppers are ready to harvest when they have reached their mature color and size.
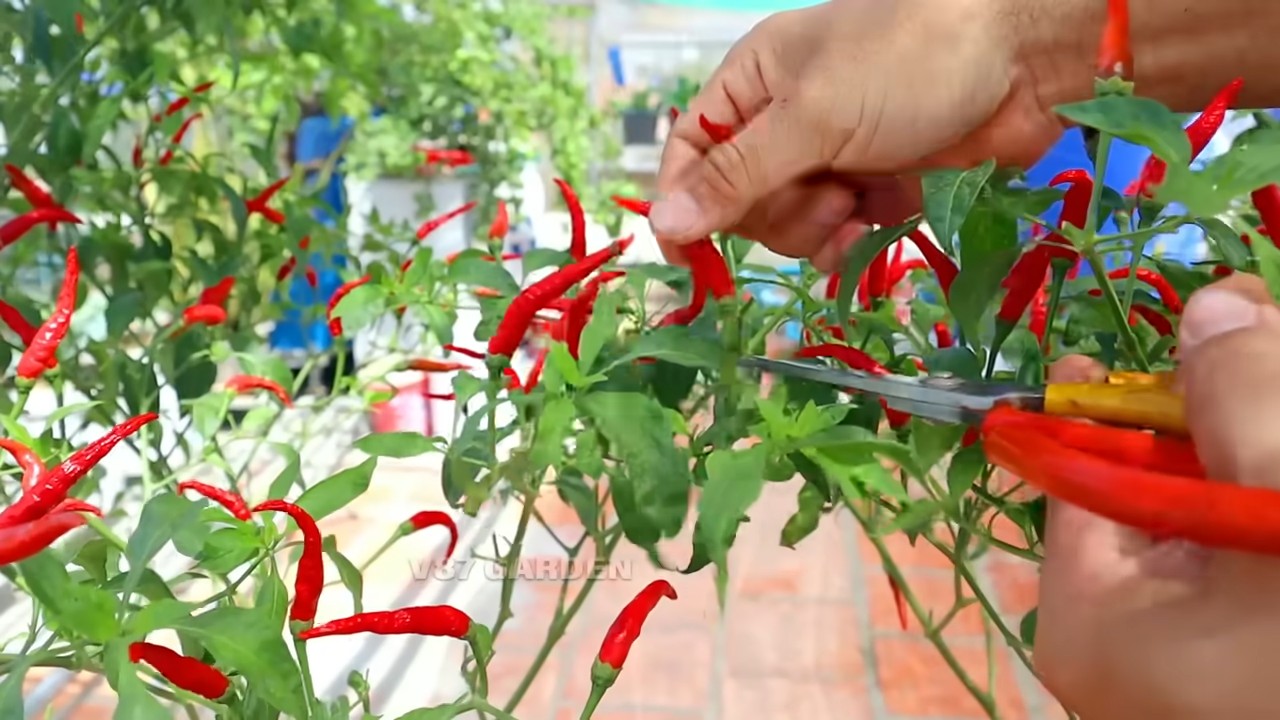
* How to Harvest: Use pruning shears or scissors to cut the chili peppers from the plant. Be careful not to damage the plant.
* Handling Hot Peppers: Wear gloves when handling hot peppers to avoid skin irritation. Avoid touching your eyes or face after handling hot peppers.
Using Your Chili Peppers
Now that you’ve harvested your chili peppers, it’s time to put them to use! There are countless ways to enjoy your homegrown chilies.
* Fresh: Use fresh chili peppers in salsas, sauces, stir-fries, and other dishes.
* Dried: Dry your chili peppers for long-term storage. You can dry them in a dehydrator, oven, or by hanging them in a warm, dry place.
* Pickled: Pickle your chili peppers for a tangy and spicy treat.
* Frozen: Freeze your chili peppers for later use.
Storing Your Chili Peppers
Proper storage is essential to keep your chili peppers fresh and flavorful.
* Fresh Chili Peppers: Store fresh chili peppers in the refrigerator for up to a week.
* Dried Chili Peppers: Store dried chili peppers in an airtight container in a cool, dark place for up to a year.
* Pickled Chili Peppers: Store pickled chili peppers in the refrigerator for up to several months.
* Frozen Chili Peppers: Store frozen chili peppers in a freezer-safe bag or container for up to a year.
Enjoying the Fruits (or Peppers!) of Your Labor
Growing chili peppers in containers is a fun and rewarding experience.
Conclusion
So, there you have it! Growing chili peppers in containers isn’t just a gardening trend; it’s a gateway to fresh, flavorful ingredients right at your fingertips. We’ve explored the ins and outs of this rewarding DIY project, from selecting the perfect pot to nurturing your plants for a bountiful harvest. But why is this container chili growing method a must-try?
Firstly, it’s incredibly accessible. Whether you have a sprawling backyard or a tiny balcony, container gardening allows you to cultivate your own chili peppers regardless of space constraints. This means even apartment dwellers can enjoy the satisfaction of harvesting their own homegrown spice.
Secondly, it offers unparalleled control. You dictate the soil quality, watering schedule, and sun exposure, creating the ideal environment for your chili plants to thrive. This level of control translates to healthier plants and a more abundant yield. Plus, moving your containers allows you to chase the sun or shelter your plants from harsh weather, giving them the best possible chance to flourish.
Thirdly, it’s a fantastic way to experiment with different varieties. From the mild poblano to the fiery habanero, the world of chili peppers is vast and diverse. Container gardening allows you to grow multiple varieties side-by-side, comparing their flavors and heat levels. Imagine creating your own custom chili blends using peppers you’ve grown yourself!
But the benefits don’t stop there. Growing your own chili peppers is also a sustainable and eco-friendly practice. You’re reducing your reliance on commercially grown produce, which often involves long-distance transportation and potentially harmful pesticides. Plus, you’re connecting with nature and experiencing the joy of nurturing something from seed to harvest.
Ready to take your container chili growing to the next level? Consider these variations:
* Vertical Gardening: Utilize vertical planters or hanging baskets to maximize space and create a stunning visual display.
* Companion Planting: Plant basil or marigolds alongside your chili peppers to deter pests and attract beneficial insects.
* Hydroponics: Explore hydroponic systems for a soilless growing experience that can yield impressive results.
* DIY Fertilizer: Create your own organic fertilizer using kitchen scraps like coffee grounds and eggshells.
We’re confident that you’ll find container chili growing to be a rewarding and enjoyable experience. It’s a chance to connect with nature, cultivate your own fresh ingredients, and add a touch of spice to your life.
So, grab a pot, some soil, and your favorite chili pepper seeds, and get started today! We encourage you to share your experiences with us. Post photos of your chili plants, share your favorite recipes, and let us know what you’ve learned along the way. Together, we can create a community of passionate container chili growers! Happy gardening!
Frequently Asked Questions (FAQ)
What is the best type of container for growing chili peppers?
The ideal container for chili peppers should be at least 5 gallons in size to provide ample room for root development. Terracotta pots, plastic containers, and even repurposed buckets can work well, as long as they have adequate drainage holes. Consider the material’s ability to retain moisture and regulate temperature. Terracotta is porous and allows for better airflow, but it can dry out quickly. Plastic is less breathable but retains moisture better. Dark-colored containers can absorb more heat, which may be beneficial in cooler climates but detrimental in hotter regions. Ultimately, the best container is one that suits your climate, watering habits, and aesthetic preferences.
How often should I water my container chili plants?
Watering frequency depends on several factors, including the size of the container, the type of soil, the climate, and the stage of plant growth. Generally, you should water your chili plants when the top inch of soil feels dry to the touch. Avoid overwatering, as this can lead to root rot. During hot, dry weather, you may need to water daily, while in cooler, wetter conditions, watering every few days may suffice. Check the soil moisture regularly and adjust your watering schedule accordingly. A good rule of thumb is to water deeply until water drains from the bottom of the container.
What type of soil is best for container chili growing?
Chili peppers thrive in well-draining, nutrient-rich soil. A good potting mix should consist of a blend of peat moss, perlite, and vermiculite. Peat moss helps retain moisture, while perlite and vermiculite improve drainage and aeration. You can also amend your potting mix with compost or aged manure to provide additional nutrients. Avoid using garden soil in containers, as it can become compacted and poorly drained. A slightly acidic to neutral pH (around 6.0 to 7.0) is ideal for chili peppers.
How much sunlight do chili peppers need?
Chili peppers are sun-loving plants and require at least 6-8 hours of direct sunlight per day to produce a bountiful harvest. Choose a location that receives ample sunlight throughout the day. If you live in a particularly hot climate, providing some afternoon shade can help prevent the plants from scorching. If you’re growing chili peppers indoors, supplement with grow lights to ensure they receive adequate light. Rotate your containers regularly to ensure even light exposure on all sides of the plant.
What are some common pests and diseases that affect chili peppers, and how can I prevent them?
Common pests that affect chili peppers include aphids, spider mites, whiteflies, and thrips. These pests can suck the sap from the leaves, causing them to become yellow and distorted. To prevent pest infestations, inspect your plants regularly and remove any affected leaves. You can also use insecticidal soap or neem oil to control pests. Common diseases that affect chili peppers include fungal diseases like powdery mildew and blossom end rot. To prevent fungal diseases, ensure good air circulation around your plants and avoid overwatering. Blossom end rot is caused by a calcium deficiency, so amend your soil with calcium-rich amendments like bone meal or eggshells.
How do I fertilize my container chili plants?
Chili peppers are heavy feeders and require regular fertilization to produce a good crop. Start fertilizing your plants a few weeks after transplanting them into their containers. Use a balanced fertilizer with an NPK ratio of 10-10-10 or 14-14-14. Follow the instructions on the fertilizer label for application rates. You can also use organic fertilizers like compost tea or fish emulsion. Fertilize your plants every 2-3 weeks during the growing season. Avoid over-fertilizing, as this can lead to excessive foliage growth and reduced fruit production.
When and how do I harvest my chili peppers?
The time to harvest chili peppers depends on the variety and your desired level of ripeness. Most chili peppers will change color as they ripen, from green to red, yellow, orange, or brown. You can harvest chili peppers at any stage of ripeness, but the flavor and heat will intensify as they mature. To harvest chili peppers, use a sharp knife or scissors to cut the peppers from the plant, leaving a small stem attached. Handle chili peppers with care, as the oils can irritate your skin. Wear gloves when handling hot peppers.
Can I overwinter my container chili plants?
Yes, you can overwinter your container chili plants to keep them alive through the winter and produce a crop the following year. Before the first frost, prune your plants back to about 6-8 inches tall. Move your containers to a cool, dark location, such as a garage or basement. Water sparingly, only enough to keep the soil from completely drying out. In the spring, gradually acclimate your plants to warmer temperatures and sunlight before moving them back outdoors.
What are some good companion plants for chili peppers?
Companion planting can help improve the health and productivity of your chili pepper plants. Some good companion plants for chili peppers include basil, marigolds, onions, garlic, and carrots. Basil repels pests like aphids and whiteflies, while marigolds attract beneficial insects like ladybugs. Onions and garlic deter pests and improve soil health. Carrots help loosen the soil and improve drainage. Avoid planting chili peppers near fennel or brassicas (like cabbage and broccoli), as these plants can inhibit their growth.


Leave a Comment