
Cowpea garden at home – sounds like a dream, right? Imagine stepping outside your back door and harvesting fresh, delicious cowpeas for your next meal. It’s not as far-fetched as you might think! For generations, growing your own food has been a source of sustenance and pride. From ancient civilizations cultivating beans in the Fertile Crescent to modern-day victory gardens, the desire to connect with the earth and nourish ourselves with homegrown goodness is deeply ingrained in us.
But let’s be honest, sometimes the idea of starting a garden can feel overwhelming. Where do you even begin? That’s where these simple DIY tricks and hacks come in! I’m here to show you that creating your own thriving cowpea garden at home is totally achievable, even if you’re a complete beginner. We’ll break down the process into easy-to-follow steps, sharing insider tips to help you avoid common pitfalls and maximize your harvest.
Why do you need these DIY tricks? Because growing cowpeas doesn’t have to be complicated or expensive. With a little know-how, you can enjoy fresh, organic cowpeas straight from your backyard, save money on groceries, and experience the satisfaction of nurturing your own food source. So, grab your gardening gloves, and let’s get started on this exciting journey together!
Bohnenpracht im eigenen Garten: Eine DIY-Anleitung für den Anbau von Augenbohnen
Hallo liebe Gartenfreunde! Habt ihr Lust, eure eigenen Augenbohnen (auch Kuhbohnen genannt) anzubauen? Es ist einfacher als ihr denkt und die frischen, selbstgezogenen Bohnen schmecken einfach unschlagbar. Ich zeige euch, wie ihr mit ein paar einfachen Schritten eure eigene kleine Augenbohnen-Oase erschaffen könnt. Los geht’s!
Was ihr für den Anbau von Augenbohnen benötigt:
* Augenbohnen-Samen: Am besten Bio-Qualität, damit ihr sicher sein könnt, dass sie nicht behandelt wurden.
* Einen sonnigen Standort: Augenbohnen lieben die Wärme!
* Gut durchlässigen Boden: Staunässe mögen sie gar nicht.
* Kompost oder organischen Dünger: Für einen guten Start.
* Gießkanne oder Gartenschlauch: Zum regelmäßigen Gießen.
* Rankhilfe (optional): Wenn ihr rankende Sorten anbaut.
* Geduld und Liebe: Das Wichtigste überhaupt!
Vorbereitung ist alles: Der richtige Standort und Boden
Bevor wir mit dem Pflanzen loslegen, müssen wir sicherstellen, dass unsere Augenbohnen den perfekten Platz zum Wachsen haben.
* Sonnenschein satt: Augenbohnen brauchen mindestens 6-8 Stunden Sonne pro Tag. Sucht euch also einen Platz in eurem Garten aus, der den ganzen Tag über gut besonnt ist.
* Bodenanalyse: Augenbohnen bevorzugen einen gut durchlässigen, sandigen Lehmboden. Wenn euer Boden sehr lehmig ist, könnt ihr ihn mit Sand und Kompost verbessern. Ein pH-Wert zwischen 6,0 und 7,0 ist ideal.
* Bodenbearbeitung: Lockert den Boden gründlich auf und entfernt Unkraut. Mischt Kompost oder organischen Dünger unter, um den Boden mit Nährstoffen anzureichern. Das gibt euren Augenbohnen einen ordentlichen Wachstumsschub.
Aussaat: Der Start ins Bohnen-Glück
Jetzt kommt der spannende Teil: Die Aussaat!
1. Der richtige Zeitpunkt: Augenbohnen sind wärmeliebend und sollten erst nach den letzten Frösten ausgesät werden. In Deutschland ist das meist ab Mitte Mai der Fall.
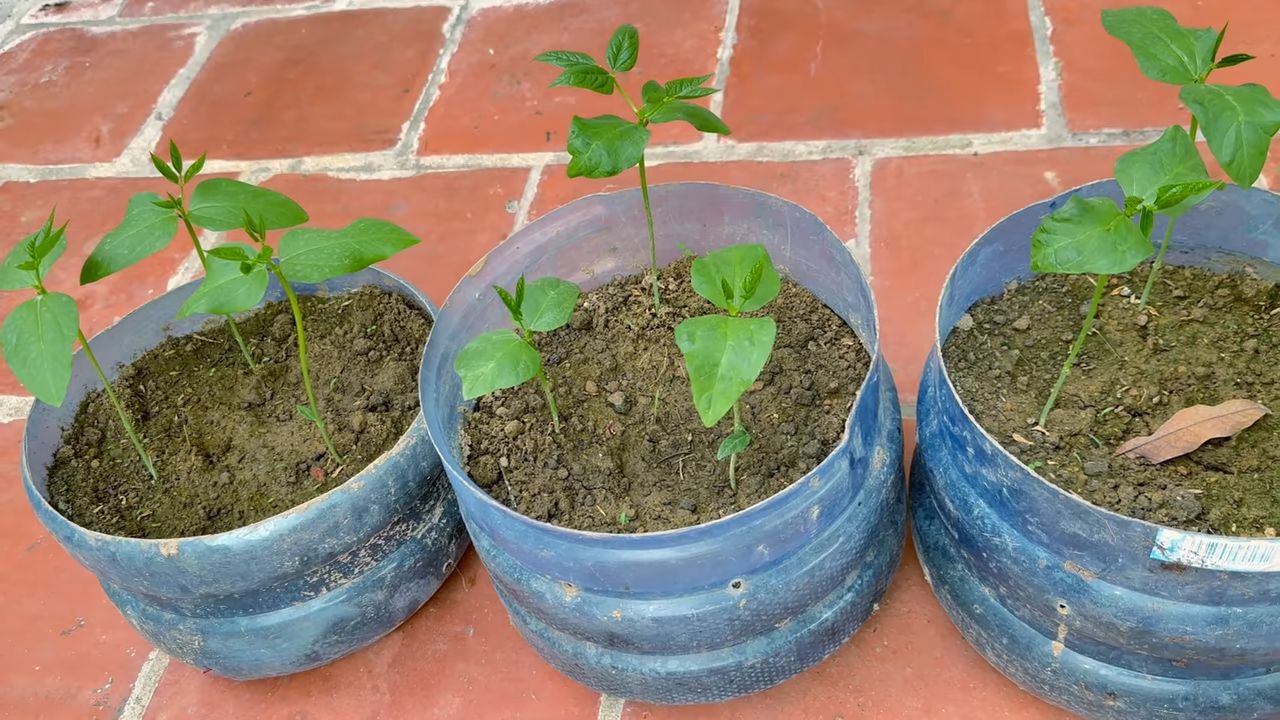
2. Direktsaat oder Vorziehen? Ihr könnt die Samen entweder direkt ins Beet säen oder sie in Töpfen vorziehen. Das Vorziehen hat den Vorteil, dass die Pflanzen einen kleinen Vorsprung haben und weniger anfällig für Schädlinge sind.
3. Direktsaat:
* Zieht mit einer Hacke oder einem Stock Rillen in den Boden, die etwa 2-3 cm tief sind.
* Legt die Samen im Abstand von 5-10 cm in die Rillen.
* Bedeckt die Samen mit Erde und drückt sie leicht an.
* Gießt die Rillen vorsichtig an.
4. Vorziehen:
* Füllt kleine Töpfe mit Anzuchterde.
* Legt in jeden Topf 2-3 Samen.
* Bedeckt die Samen mit Erde und drückt sie leicht an.
* Gießt die Töpfe vorsichtig an.
* Stellt die Töpfe an einen hellen und warmen Ort.
* Sobald die Pflanzen etwa 10 cm hoch sind, könnt ihr sie ins Beet umpflanzen. Achtet darauf, dass die Bodentemperatur mindestens 15°C beträgt.
5. Abstand halten: Zwischen den Reihen solltet ihr einen Abstand von etwa 60-80 cm lassen, damit die Pflanzen genügend Platz zum Wachsen haben.
Pflege: Damit eure Augenbohnen prächtig gedeihen
Nach der Aussaat ist es wichtig, die Augenbohnen gut zu pflegen, damit sie gesund und kräftig wachsen.
1. Gießen: Augenbohnen brauchen regelmäßig Wasser, besonders während der Blütezeit und der Hülsenbildung. Achtet darauf, dass der Boden immer leicht feucht ist, aber vermeidet Staunässe.
2. Unkraut jäten: Haltet das Beet unkrautfrei, damit die Augenbohnen nicht um Nährstoffe und Wasser konkurrieren müssen.
3. Düngen: Düngt die Pflanzen während der Wachstumsphase regelmäßig mit organischem Dünger oder Kompost.
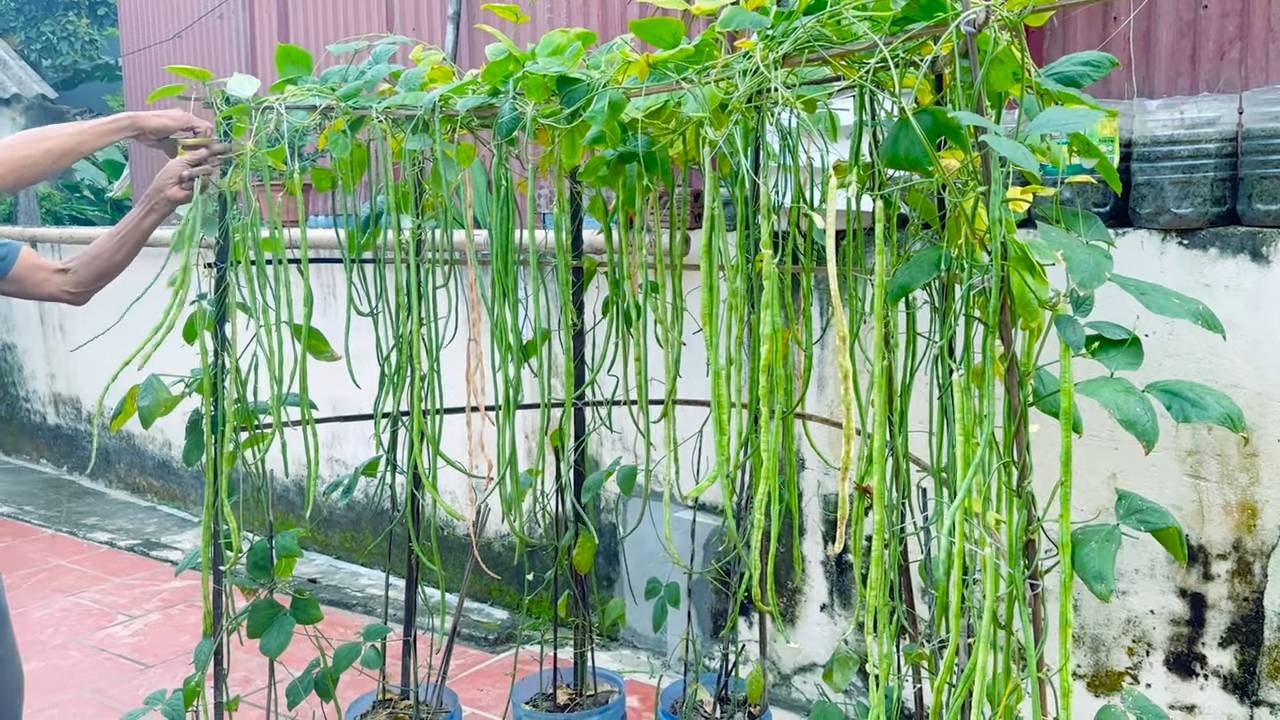
4. Rankhilfe (optional): Wenn ihr rankende Sorten anbaut, solltet ihr ihnen eine Rankhilfe anbieten. Das kann ein Zaun, ein Spalier oder ein einfacher Stab sein.
5. Schutz vor Schädlingen: Augenbohnen können von verschiedenen Schädlingen befallen werden, wie z.B. Blattläusen oder Bohnenkäfern. Kontrolliert die Pflanzen regelmäßig und entfernt Schädlinge gegebenenfalls von Hand oder mit biologischen Schädlingsbekämpfungsmitteln.
Ernte: Die Belohnung für eure Mühe
Nach etwa 60-90 Tagen könnt ihr eure eigenen Augenbohnen ernten!
1. Der richtige Zeitpunkt: Die Hülsen sind reif, wenn sie prall gefüllt sind und sich leicht vom Stiel lösen lassen.
2. Erntemethode: Pflückt die Hülsen vorsichtig von der Pflanze ab.
3. Regelmäßige Ernte: Erntet die Hülsen regelmäßig, damit die Pflanze weiterhin neue Hülsen bildet.
4. Verwendung: Augenbohnen können frisch, getrocknet oder eingefroren verwendet werden. Sie sind eine tolle Zutat für Suppen, Eintöpfe, Salate und viele andere Gerichte.
Sortenvielfalt: Welche Augenbohne darf es sein?
Es gibt viele verschiedene Sorten von Augenbohnen, die sich in Größe, Farbe und Geschmack unterscheiden. Hier sind ein paar beliebte Sorten:
* ‘California Blackeye’: Eine klassische Sorte mit cremefarbenen Hülsen und einem schwarzen “Auge”.
* ‘Pinkeye Purple Hull’: Eine Sorte mit rosafarbenen Hülsen und einem roten “Auge”.
* ‘Whippoorwill’: Eine Sorte mit gesprenkelten Hülsen und einem nussigen Geschmack.
* ‘Chinese Red Noodle’: Eine lange, rote Sorte, die sich gut für asiatische Gerichte eignet.
Probiert verschiedene Sorten aus und findet eure Lieblings-Augenbohne!
Häufige Probleme und Lösungen
Auch beim Anbau von Augenbohnen können Probleme auftreten. Hier sind ein paar häufige Probleme und wie ihr sie lösen könnt:
* Schlechte Keimung: Die Samen sind zu alt oder der Boden ist zu kalt. Verwendet frische Samen und wartet, bis der Boden warm genug ist.
* Blattläuse: Spritzt die Pflanzen mit einer Seifenlauge ab oder setzt Marienkäfer ein.
* Bohnenkäfer: Sammelt die Käfer von Hand ab oder verwendet ein biologisches Insektizid.
* Pilzkrankheiten: Sorgt für eine gute Belüftung und vermeidet Staunässe.
Augenbohnen als Gründüngung
Augenbohnen sind nicht nur lecker, sondern auch eine tolle Gründüngungspflanze. Sie binden Stickstoff aus der Luft im Boden und verbessern so die Bodenqualität. Nach der Ernte könnt ihr die Pflanzen einfach in den Boden einarbeiten.
Augenbohnen in der Küche: Vielseitig und lecker
Augenbohnen sind unglaublich vielseitig und können in vielen verschiedenen Gerichten verwendet werden. Hier sind ein paar Ideen:
* Augenbohnen-Suppe: Ein herzhaftes und wärmendes Gericht für kalte Tage.
* Augenbohnen-Salat: Ein erfrischender Salat mit Tomaten, Gurken und Paprika.
* Augenbohnen-Eintopf: Ein deftiger Eintopf mit Gemüse und Fleisch.
* Augenbohnen-Curry: Ein aromatisches Curry mit Kokosmilch und Gewürzen.
* Augenbohnen-Hummus: Eine leckere und gesunde Alternative zu Kichererbsen-Hummus.
Lasst eurer Kreativität freien Lauf und experimentiert mit verschiedenen Rezepten!
Fazit: Augenbohnen-Anbau ist ein Kinderspiel!
Wie ihr seht, ist der Anbau von Augenbohnen gar nicht so schwer. Mit ein bisschen Geduld und Liebe könnt ihr eure eigenen frischen Bohnen ernten und genießen. Also, worauf wartet ihr noch
Conclusion
So, there you have it! Cultivating your own cowpea garden at home is not just a rewarding experience; it’s a sustainable way to access fresh, nutritious vegetables right at your doorstep. We’ve explored the simple steps, from selecting the right seeds and preparing the soil to nurturing your plants and harvesting your bounty. But why is this DIY trick a must-try?
Firstly, consider the unparalleled freshness. Store-bought cowpeas, while convenient, often lack the vibrant flavor and nutritional value of homegrown produce. When you harvest your own cowpeas, you’re getting them at their peak ripeness, bursting with vitamins and minerals. This translates to healthier meals and a more satisfying culinary experience.
Secondly, think about the cost savings. While there’s an initial investment in seeds and perhaps some soil amendments, growing your own cowpeas can significantly reduce your grocery bills in the long run. You’ll be amazed at how much you can harvest from even a small garden plot or container.
Thirdly, and perhaps most importantly, growing your own cowpeas connects you to nature and promotes a sense of self-sufficiency. There’s something incredibly fulfilling about nurturing a plant from seed to harvest, knowing that you’re providing healthy food for yourself and your family. It’s a therapeutic activity that can reduce stress and improve your overall well-being.
But the beauty of this DIY project lies in its adaptability. Feel free to experiment with different varieties of cowpeas to find your favorites. Try adding companion plants like marigolds or basil to deter pests and attract beneficial insects. If you’re short on space, consider growing cowpeas in containers on your balcony or patio. You can even train them to climb a trellis for a vertical garden effect.
For those looking to enhance the flavor profile of their homegrown cowpeas, consider adding a touch of smoked paprika or a dash of chili flakes during cooking. Some gardeners also swear by soaking the dried cowpeas overnight before cooking to reduce cooking time and improve digestibility.
Don’t be afraid to get your hands dirty and embrace the learning process. Gardening is a journey, and there will be successes and failures along the way. But with a little patience and persistence, you’ll be rewarded with a bountiful harvest of delicious, homegrown cowpeas.
We wholeheartedly encourage you to try this DIY trick and experience the joy of growing your own food. Share your experiences with us! We’d love to hear about your successes, challenges, and any unique tips or tricks you discover along the way. Post pictures of your cowpea garden on social media using #HomegrownCowpeas and inspire others to join the movement. Let’s create a community of gardeners who are passionate about sustainable living and healthy eating.
Remember, growing your own cowpeas is not just about saving money or eating healthier; it’s about connecting with nature, fostering self-sufficiency, and creating a more sustainable future. So, grab your seeds, prepare your soil, and get ready to embark on a rewarding gardening adventure. Happy growing!
Frequently Asked Questions (FAQ)
What are the best varieties of cowpeas to grow at home?
Choosing the right cowpea variety depends on your climate and personal preferences. Some popular and reliable varieties for home gardens include ‘Black-Eyed Peas’ (a classic choice), ‘Pinkeye Purple Hull’ (known for its distinctive color and flavor), ‘California Blackeye No. 5’ (a high-yielding variety), and ‘Whippoorwill’ (an heirloom variety with a unique taste). Consider your local climate and growing season when making your selection. Look for varieties that are disease-resistant and well-suited to your region. Local nurseries and seed suppliers can provide valuable recommendations.
How much space do cowpeas need to grow?
Cowpeas are relatively compact plants, making them suitable for both garden plots and container gardening. In a garden plot, space plants about 4-6 inches apart in rows that are 2-3 feet apart. This allows for adequate air circulation and sunlight penetration. If you’re growing cowpeas in containers, choose pots that are at least 12 inches in diameter and depth. One or two plants can thrive in a container of this size. Remember to provide support for climbing varieties, such as a trellis or stakes.
What type of soil is best for growing cowpeas?
Cowpeas prefer well-drained soil that is rich in organic matter. Before planting, amend your soil with compost or well-rotted manure to improve its fertility and drainage. Cowpeas are relatively tolerant of poor soil conditions, but they will thrive in soil with a pH between 6.0 and 7.0. If your soil is heavy clay, consider adding sand or perlite to improve drainage. A soil test can help you determine the pH and nutrient levels of your soil and guide you in making necessary amendments.
How often should I water my cowpea plants?
Cowpeas need consistent moisture, especially during germination and flowering. Water deeply and regularly, especially during dry spells. Avoid overwatering, as this can lead to root rot. A good rule of thumb is to water when the top inch of soil feels dry to the touch. Mulching around your plants can help retain moisture and suppress weeds. Drip irrigation is an efficient way to water cowpeas, as it delivers water directly to the roots.
What are some common pests and diseases that affect cowpeas, and how can I control them?
Common pests that can affect cowpeas include aphids, bean beetles, and spider mites. These pests can be controlled with insecticidal soap, neem oil, or by introducing beneficial insects like ladybugs. Diseases that can affect cowpeas include fungal diseases like powdery mildew and root rot. Prevent these diseases by providing good air circulation, avoiding overwatering, and using disease-resistant varieties. If you notice signs of disease, remove affected leaves or plants immediately. Crop rotation can also help prevent the buildup of soilborne diseases.
When is the best time to harvest cowpeas?
The timing of your cowpea harvest depends on whether you’re harvesting them as snap beans or dried beans. For snap beans, harvest when the pods are young and tender, about 6-8 weeks after planting. The pods should be firm and snap easily when bent. For dried beans, allow the pods to dry completely on the plant. Harvest when the pods are brittle and the beans rattle inside. Shell the beans and store them in an airtight container in a cool, dry place.
Can I grow cowpeas in containers?
Yes, cowpeas are well-suited for container gardening. Choose a pot that is at least 12 inches in diameter and depth. Use a well-draining potting mix and provide support for climbing varieties. Water regularly and fertilize every few weeks with a balanced fertilizer. Place your container in a sunny location that receives at least 6-8 hours of sunlight per day.
How can I save seeds from my cowpea plants for future planting?
Saving seeds from your cowpea plants is a great way to ensure a continuous supply of seeds for future planting. Allow the pods to dry completely on the plant. Harvest the pods and shell the beans. Spread the beans out on a tray to dry completely for a few days. Store the dried beans in an airtight container in a cool, dry place. Label the container with the variety and date of harvest.
Are cowpeas good for the soil?
Yes, cowpeas are excellent for improving soil health. As legumes, they have the ability to fix nitrogen from the atmosphere and convert it into a form that plants can use. This enriches the soil and reduces the need for synthetic fertilizers. Cowpeas also have a deep root system that helps to break up compacted soil and improve drainage. After harvesting your cowpeas, you can leave the roots in the ground to decompose and further enrich the soil.
What are some creative ways to use homegrown cowpeas in cooking?
Homegrown cowpeas are incredibly versatile and can be used in a variety of dishes. You can use them in soups, stews, salads, and side dishes. They can also be used to make vegetarian burgers or dips. Try adding them to your favorite chili recipe or using them as a filling for tacos or burritos. The possibilities are endless! Experiment with different spices and herbs to create unique and flavorful dishes.
Leave a Comment