
Cucumber harvest mistakes are more common than you might think, even among seasoned gardeners! Have you ever eagerly anticipated that first juicy cucumber, only to find it bitter, oversized, or even yellowing on the vine? I know I have! It’s a frustrating experience, especially after all the hard work you’ve put into nurturing your cucumber plants.
Cucumbers have a rich history, dating back thousands of years to their origins in India. They’ve been cultivated and enjoyed across cultures, from ancient Rome to modern-day salads. But despite their widespread popularity, knowing exactly when and how to harvest them for peak flavor and texture can be tricky.
That’s why I’ve put together this guide to help you avoid those common cucumber harvest mistakes and ensure a bountiful and delicious crop. We’ll dive into the telltale signs of a perfectly ripe cucumber, the best harvesting techniques, and even some clever DIY hacks to extend your harvest season. Because let’s face it, nobody wants to waste those precious homegrown cucumbers! This article will equip you with the knowledge and skills to become a cucumber harvesting pro, so you can enjoy crisp, refreshing cucumbers all season long.
Gurken-Ernte-Fauxpas vermeiden: So machst du es richtig!
Hey Leute,
ich liebe es, mein eigenes Gemüse anzubauen, und Gurken sind da ganz vorne mit dabei! Aber ich muss ehrlich sagen, am Anfang habe ich so einige Fehler bei der Ernte gemacht. Das Ergebnis? Bittere Gurken, überreife Früchte und eine insgesamt geringere Ausbeute. Damit euch das nicht passiert, habe ich diesen Guide zusammengestellt. Hier zeige ich euch, wie ihr Gurken richtig erntet, um den maximalen Geschmack und Ertrag zu erzielen.
Die Grundlagen: Wann sind Gurken reif?
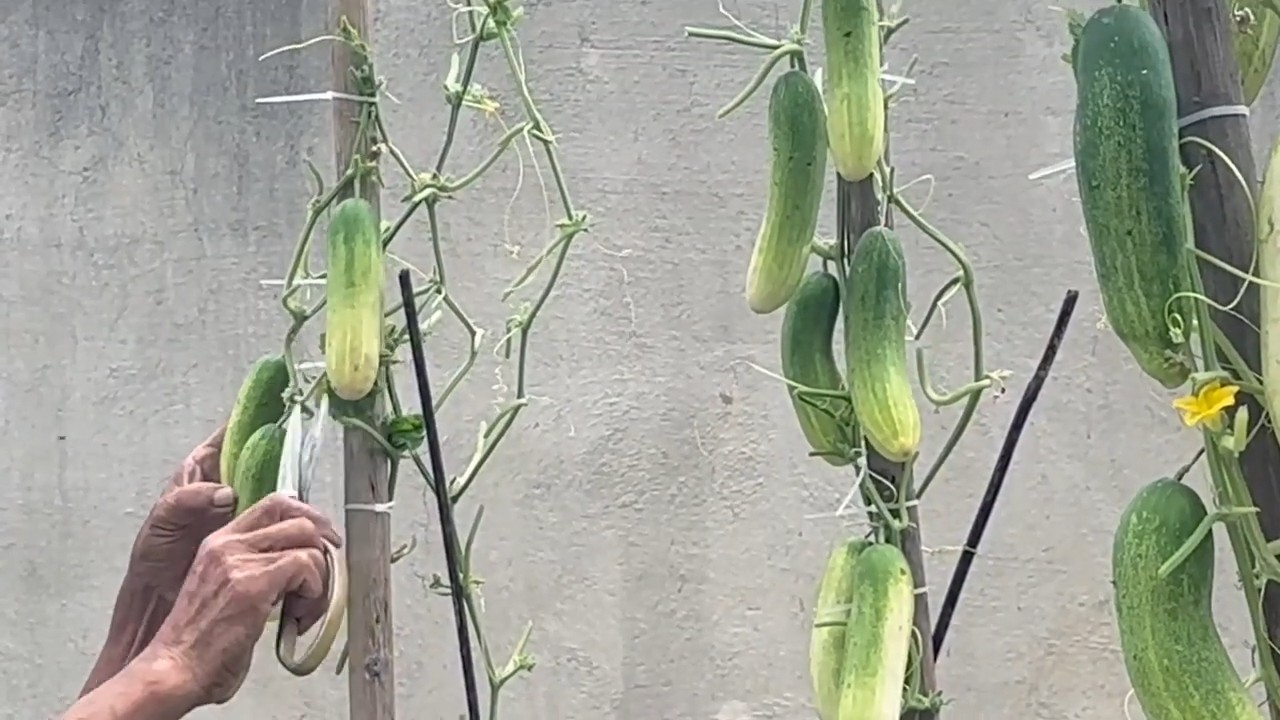
Bevor wir ins Detail gehen, ist es super wichtig zu wissen, wann eine Gurke überhaupt reif ist. Hier sind ein paar Anzeichen, auf die ihr achten solltet:
* **Größe:** Die Größe hängt natürlich von der Sorte ab, die ihr anbaut. Informiert euch also vorher, welche Größe eure Gurken erreichen sollten. Auf der Saatguttüte oder im Internet findet ihr diese Info meistens.
* **Farbe:** Die Farbe sollte gleichmäßig und sattgrün sein (oder gelb, wenn ihr eine gelbe Sorte habt). Vermeidet Gurken mit gelblichen oder braunen Stellen, da diese oft überreif sind.
* **Festigkeit:** Die Gurke sollte sich fest anfühlen, wenn ihr sie leicht drückt. Wenn sie weich oder schwammig ist, ist sie wahrscheinlich überreif.
* **Stachel:** Manche Gurkensorten haben kleine Stacheln auf der Haut. Wenn diese leicht abfallen, ist das ein Zeichen, dass die Gurke reif ist.
* **Zeitpunkt:** Achtet auf die Zeitangaben auf eurer Saatguttüte. Dort steht meistens, wie viele Tage nach der Blüte die Gurken erntereif sind.
Die richtige Erntetechnik: So geht’s!
Okay, jetzt wissen wir, worauf wir achten müssen. Aber wie erntet man Gurken eigentlich richtig, ohne die Pflanze zu beschädigen? Hier ist meine Schritt-für-Schritt-Anleitung:
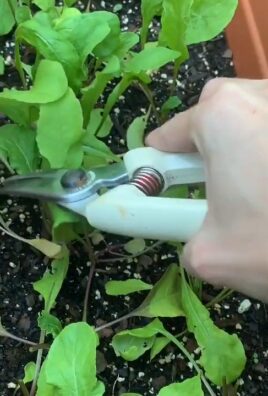
1. **Vorbereitung:** Zuerst einmal braucht ihr das richtige Werkzeug. Ein scharfes Messer oder eine Gartenschere sind ideal. Vermeidet es, die Gurken abzureißen, da ihr dabei die Pflanze beschädigen könnt.
2. **Ansatz finden:** Sucht den Stiel der Gurke, der sie mit der Pflanze verbindet.
3. **Schneiden:** Schneidet den Stiel mit dem Messer oder der Schere durch. Lasst dabei etwa 2-3 cm Stiel an der Gurke. Das hilft, sie länger frisch zu halten.
4. **Vorsicht:** Seid vorsichtig, wenn ihr die Gurke schneidet, um die Pflanze nicht zu verletzen. Vermeidet ruckartige Bewegungen.
5. **Kontrolle:** Überprüft die Pflanze regelmäßig auf weitere reife Gurken. Am besten erntet ihr alle paar Tage, um sicherzustellen, dass die Gurken nicht überreif werden.
Häufige Fehler vermeiden: Bittere Gurken adé!
Einer der häufigsten Fehler, den ich am Anfang gemacht habe, war, die Gurken zu spät zu ernten. Das Ergebnis waren bittere Gurken, die einfach nicht geschmeckt haben. Hier sind ein paar Tipps, wie ihr das vermeiden könnt:
* **Regelmäßige Ernte:** Erntet eure Gurken regelmäßig, auch wenn sie noch nicht ganz die gewünschte Größe erreicht haben. Kleine Gurken sind oft zarter und weniger bitter.
* **Bewässerung:** Achtet auf eine gleichmäßige Bewässerung. Trockenstress kann dazu führen, dass Gurken bitter werden.
* **Sonneneinstrahlung:** Zu viel direkte Sonneneinstrahlung kann ebenfalls zu bitteren Gurken führen. Sorgt für ausreichend Schatten, besonders während der heißesten Stunden des Tages.
* **Sorte:** Manche Gurkensorten sind anfälliger für Bitterkeit als andere. Informiert euch vor dem Anbau, welche Sorten weniger bitter sind.
* **Geschmacksprobe:** Wenn ihr euch unsicher seid, ob eine Gurke bitter ist, könnt ihr eine kleine Scheibe am Stiel abschneiden und probieren. Wenn sie bitter schmeckt, solltet ihr die Gurke nicht ernten.
Spezialfall: Einlegegurken ernten
Wenn ihr Einlegegurken anbauen wollt, gibt es ein paar Besonderheiten zu beachten:
* **Größe:** Einlegegurken werden in der Regel kleiner geerntet als Salatgurken. Die ideale Größe hängt von eurem Rezept ab, aber meistens sind sie zwischen 5 und 10 cm lang.
* **Festigkeit:** Einlegegurken sollten besonders fest sein, damit sie beim Einlegen nicht matschig werden.
* **Erntezeitpunkt:** Erntet Einlegegurken am besten morgens, wenn sie noch kühl und knackig sind.
* **Verarbeitung:** Verarbeitet die Einlegegurken so schnell wie möglich nach der Ernte, um ihre Frische zu bewahren.
Gurken richtig lagern: So bleiben sie länger frisch
Nach der Ernte ist es wichtig, die Gurken richtig zu lagern, damit sie möglichst lange frisch bleiben. Hier sind meine Tipps:
* **Kühlschrank:** Lagert die Gurken im Kühlschrank, am besten im Gemüsefach.
* **Feuchtigkeit:** Wickelt die Gurken in ein feuchtes Tuch oder legt sie in einen Plastikbeutel mit ein paar Löchern. Das verhindert, dass sie austrocknen.
* **Nicht zu kalt:** Vermeidet es, die Gurken zu kalt zu lagern, da sie sonst Schaden nehmen können.
* **Schnell verbrauchen:** Gurken sind nicht sehr lange haltbar. Verbraucht sie am besten innerhalb von ein paar Tagen nach der Ernte.
* **Nicht zusammen mit Äpfeln oder Bananen:** Lagert Gurken nicht in der Nähe von Äpfeln oder Bananen, da diese Ethylen abgeben, was die Reifung beschleunigt und die Gurken schneller verderben lässt.
Bonus-Tipp: Gurken-Ernte-Kalender
Um den Überblick zu behalten, wann ihr eure Gurken ernten solltet, könnt ihr euch einen kleinen Ernte-Kalender erstellen. Tragt dort das Datum der Aussaat, der Blüte und die voraussichtliche Erntezeit ein. So verpasst ihr keinen Erntezeitpunkt und könnt euch auf eine reiche Ernte freuen!
Zusammenfassung: Die wichtigsten Punkte auf einen Blick
* **Reife erkennen:** Achtet auf Größe, Farbe, Festigkeit und Stacheln.
* **Richtige Technik:** Schneidet den Stiel mit einem scharfen Messer oder einer Schere.
* **Fehler vermeiden:** Erntet regelmäßig, bewässert ausreichend und schützt vor zu viel Sonne.
* **Einlegegurken:** Erntet sie kleiner und fester.
* **Richtige Lagerung:** Lagert die Gurken im Kühlschrank und verbraucht sie schnell.
Ich hoffe, dieser Guide hilft euch dabei, eure Gurken-Ernte zu optimieren und leckere, knackige Gurken zu genießen! Viel Spaß beim Gärtnern!
Conclusion
So, you’ve accidentally harvested a batch of cucumbers that are a little too big, a little too yellow, or perhaps even a little bitter. Don’t despair! Instead of tossing them into the compost, embrace the opportunity to transform your “cucumber harvest mistake” into something delicious and useful. This simple DIY trick – turning those less-than-perfect cucumbers into refreshing refrigerator pickles – is a game-changer for reducing food waste and enjoying a tangy treat.
Why is this a must-try? Because it’s incredibly easy, requiring minimal ingredients and effort. It’s also a fantastic way to extend the life of your cucumbers, preventing them from spoiling before you can use them. Plus, homemade refrigerator pickles are far superior in flavor to many store-bought versions, allowing you to customize the taste to your exact preferences. You control the sweetness, the spice, and the overall tang, creating a pickle that perfectly complements your palate.
But the benefits don’t stop there. This method is incredibly versatile. Feel free to experiment with different variations to find your perfect pickle profile. Add a pinch of red pepper flakes for a spicy kick, a few sprigs of dill for a classic flavor, or a clove or two of garlic for a pungent bite. You could even try adding sliced onions or carrots to the jar for a colorful and flavorful medley. Consider using different types of vinegar, such as apple cider vinegar or rice vinegar, to alter the overall taste. For a sweeter pickle, increase the amount of sugar slightly. For a tangier pickle, add a splash of lemon juice. The possibilities are truly endless!
This DIY refrigerator pickle recipe is more than just a way to salvage a cucumber harvest mistake; it’s an invitation to get creative in the kitchen and discover the joy of homemade preservation. It’s a sustainable practice that reduces waste, saves money, and provides you with a delicious and healthy snack.
We wholeheartedly encourage you to give this DIY trick a try. It’s a simple, satisfying, and rewarding experience that will transform your perception of “imperfect” produce. Once you’ve made your first batch, we’re confident you’ll be hooked!
Don’t forget to share your experience with us! We’d love to hear about your variations, your successes, and any tips you discover along the way. Post photos of your pickles on social media using [Your Hashtag Here] and let us know what you think. Together, let’s turn cucumber harvest mistakes into culinary masterpieces!
Frequently Asked Questions (FAQ)
1. What kind of cucumbers work best for refrigerator pickles?
While this recipe is designed to rescue cucumbers that aren’t ideal for fresh eating, some varieties work better than others. Overgrown cucumbers with large seeds and tough skins can still be used, but you might want to peel them and remove the seeds before pickling. Smaller, younger cucumbers will generally result in a crisper pickle. Kirby cucumbers, Persian cucumbers, and even garden variety cucumbers all work well. The key is to adjust the pickling time based on the size and thickness of the cucumber slices.
2. How long do refrigerator pickles last?
Refrigerator pickles are not shelf-stable, meaning they need to be stored in the refrigerator. Properly stored, they will typically last for 2-3 weeks. However, their quality will gradually decline over time. The pickles will become softer and the flavor may become less vibrant. For the best flavor and texture, it’s recommended to consume them within the first week or two. Always use clean utensils when removing pickles from the jar to prevent contamination and extend their shelf life. If you notice any signs of spoilage, such as mold or an off odor, discard the pickles immediately.
3. Can I use different types of vinegar?
Absolutely! While white vinegar is a common choice for pickling, you can definitely experiment with other types of vinegar to create different flavor profiles. Apple cider vinegar will impart a slightly sweeter and fruitier flavor, while rice vinegar will offer a milder and more delicate taste. White wine vinegar can also be a good option. Avoid using balsamic vinegar, as its strong flavor and dark color can overpower the pickles. When substituting vinegar, be sure to use a vinegar with at least 5% acidity to ensure proper preservation.
4. Can I add other vegetables to the pickles?
Yes, you can! Adding other vegetables is a great way to customize your refrigerator pickles and create a more diverse flavor and texture. Sliced onions, carrots, bell peppers, and even jalapenos can be added to the jar along with the cucumbers. Just be sure to wash and prepare the vegetables properly before adding them. Consider the cooking time of each vegetable when deciding how thinly to slice them. For example, carrots may need to be sliced thinner than cucumbers to ensure they pickle properly.
5. My pickles are too sour/sweet/spicy. How can I adjust the recipe?
The beauty of homemade refrigerator pickles is that you can easily adjust the recipe to suit your taste preferences. If your pickles are too sour, add a little more sugar to the brine. If they are too sweet, add a splash of vinegar or lemon juice. If they are too spicy, reduce the amount of red pepper flakes or other spicy ingredients. It’s best to make small adjustments and taste the brine before adding the cucumbers to ensure you achieve the desired flavor. Remember that the flavor will continue to develop as the pickles sit in the refrigerator, so it’s always better to err on the side of caution and adjust the recipe gradually.
6. Do I need to sterilize the jars before making refrigerator pickles?
No, you don’t need to sterilize the jars for refrigerator pickles, as they are not shelf-stable. However, it’s important to use clean jars and lids to prevent contamination. Wash the jars and lids thoroughly with hot, soapy water and rinse them well. You can also run them through the dishwasher on a hot cycle. Make sure the jars are completely dry before adding the pickles.
7. Can I use this recipe for other vegetables besides cucumbers?
While this recipe is specifically designed for cucumbers, you can adapt it for other vegetables as well. Green beans, carrots, radishes, and even cauliflower can be pickled using a similar method. The key is to adjust the pickling time based on the type of vegetable and its texture. Harder vegetables, such as carrots and cauliflower, may require a longer pickling time than softer vegetables, such as green beans. Experiment with different vegetables and flavor combinations to discover your favorite pickled creations.
8. Why are my pickles not crunchy?
There are several reasons why your refrigerator pickles might not be as crunchy as you’d like. One common reason is using cucumbers that are too old or have been stored for too long. Older cucumbers tend to be softer and have a higher water content, which can result in less crunchy pickles. Another reason is over-processing the cucumbers. Avoid slicing the cucumbers too thinly, as this can make them more prone to softening. You can also try adding a grape leaf or a small piece of horseradish root to the jar, as these contain tannins that can help keep the pickles crisp. Finally, make sure the pickles are fully submerged in the brine, as this will help them pickle evenly and prevent them from becoming soft.
9. Can I use this recipe to make shelf-stable pickles?
No, this recipe is specifically for refrigerator pickles and is not suitable for making shelf-stable pickles. Shelf-stable pickles require a different process that involves sterilizing the jars and processing them in a boiling water bath to create a vacuum seal. This process is necessary to prevent spoilage and ensure the pickles are safe to eat at room temperature. Refrigerator pickles, on the other hand, are not processed and must be stored in the refrigerator to prevent spoilage.
10. What are some creative ways to use refrigerator pickles?
Refrigerator pickles are incredibly versatile and can be used in a variety of dishes. They can be enjoyed as a simple snack, added to sandwiches and burgers, or used as a topping for salads and tacos. They can also be chopped and added to potato salad, tuna salad, or egg salad for a tangy twist. Consider using the pickle brine to marinate chicken or fish, or to add flavor to salad dressings and sauces. The possibilities are endless!


Leave a Comment