
Cupcake Liner Crafts DIY: Unleash Your Inner Artist with These Simple Hacks!
Ever stared at a stack of leftover cupcake liners and wondered, “What else can I do with these?” I know I have! These humble paper cups, traditionally relegated to baking, hold a surprising amount of creative potential. From adorning birthday parties to adding a touch of whimsy to everyday décor, cupcake liners are a crafter’s secret weapon.
The history of paper baking cups dates back to the 19th century, evolving from simple paper cones to the fluted beauties we know today. While their primary purpose remains baking, their versatility has been embraced by artists and DIY enthusiasts alike. Think of them as miniature canvases, ready to be transformed into something extraordinary.
Why should you dive into cupcake liner crafts DIY? Because it’s fun, affordable, and incredibly rewarding! In a world of mass-produced items, creating something unique with your own hands is a powerful feeling. Plus, it’s a fantastic way to recycle and reduce waste. These cupcake liner crafts DIY projects are perfect for anyone looking to add a personal touch to their home, create memorable gifts, or simply unwind with a relaxing and creative activity. So, grab your liners, gather your supplies, and let’s get crafting!

Turn Ordinary Cupcake Liners into Extraordinary Crafts!
Hey there, fellow crafters! Get ready to unleash your inner artist because today, we’re diving headfirst into the wonderful world of cupcake liner crafts! You might think these little paper cups are just for baking, but trust me, they’re a treasure trove of creative possibilities. I’m going to show you how to transform simple cupcake liners into stunning decorations, adorable critters, and so much more. So, gather your supplies, and let’s get crafting!
Materials You’ll Need
Before we get started, let’s make sure you have everything you need. The beauty of cupcake liner crafts is that they’re super budget-friendly, and you probably already have most of these items lying around:
* Cupcake liners (various sizes, colors, and patterns – the more, the merrier!)
* Scissors
* Glue (hot glue gun, glue sticks, or craft glue – your preference!)
* Markers or colored pencils
* Googly eyes (optional, but they add so much character!)
* Pipe cleaners (for stems, legs, or other embellishments)
* Pom-poms (another great way to add texture and color)
* String or yarn (for hanging decorations)
* Cardstock or construction paper (for backing or creating bases)
* Ruler
* Pencil
Crafting a Cupcake Liner Flower Bouquet
This is a classic cupcake liner craft, and it’s perfect for adding a touch of spring to your home or giving as a handmade gift. I love how customizable these flowers are – you can create any color combination you can imagine!
Step-by-Step Instructions:
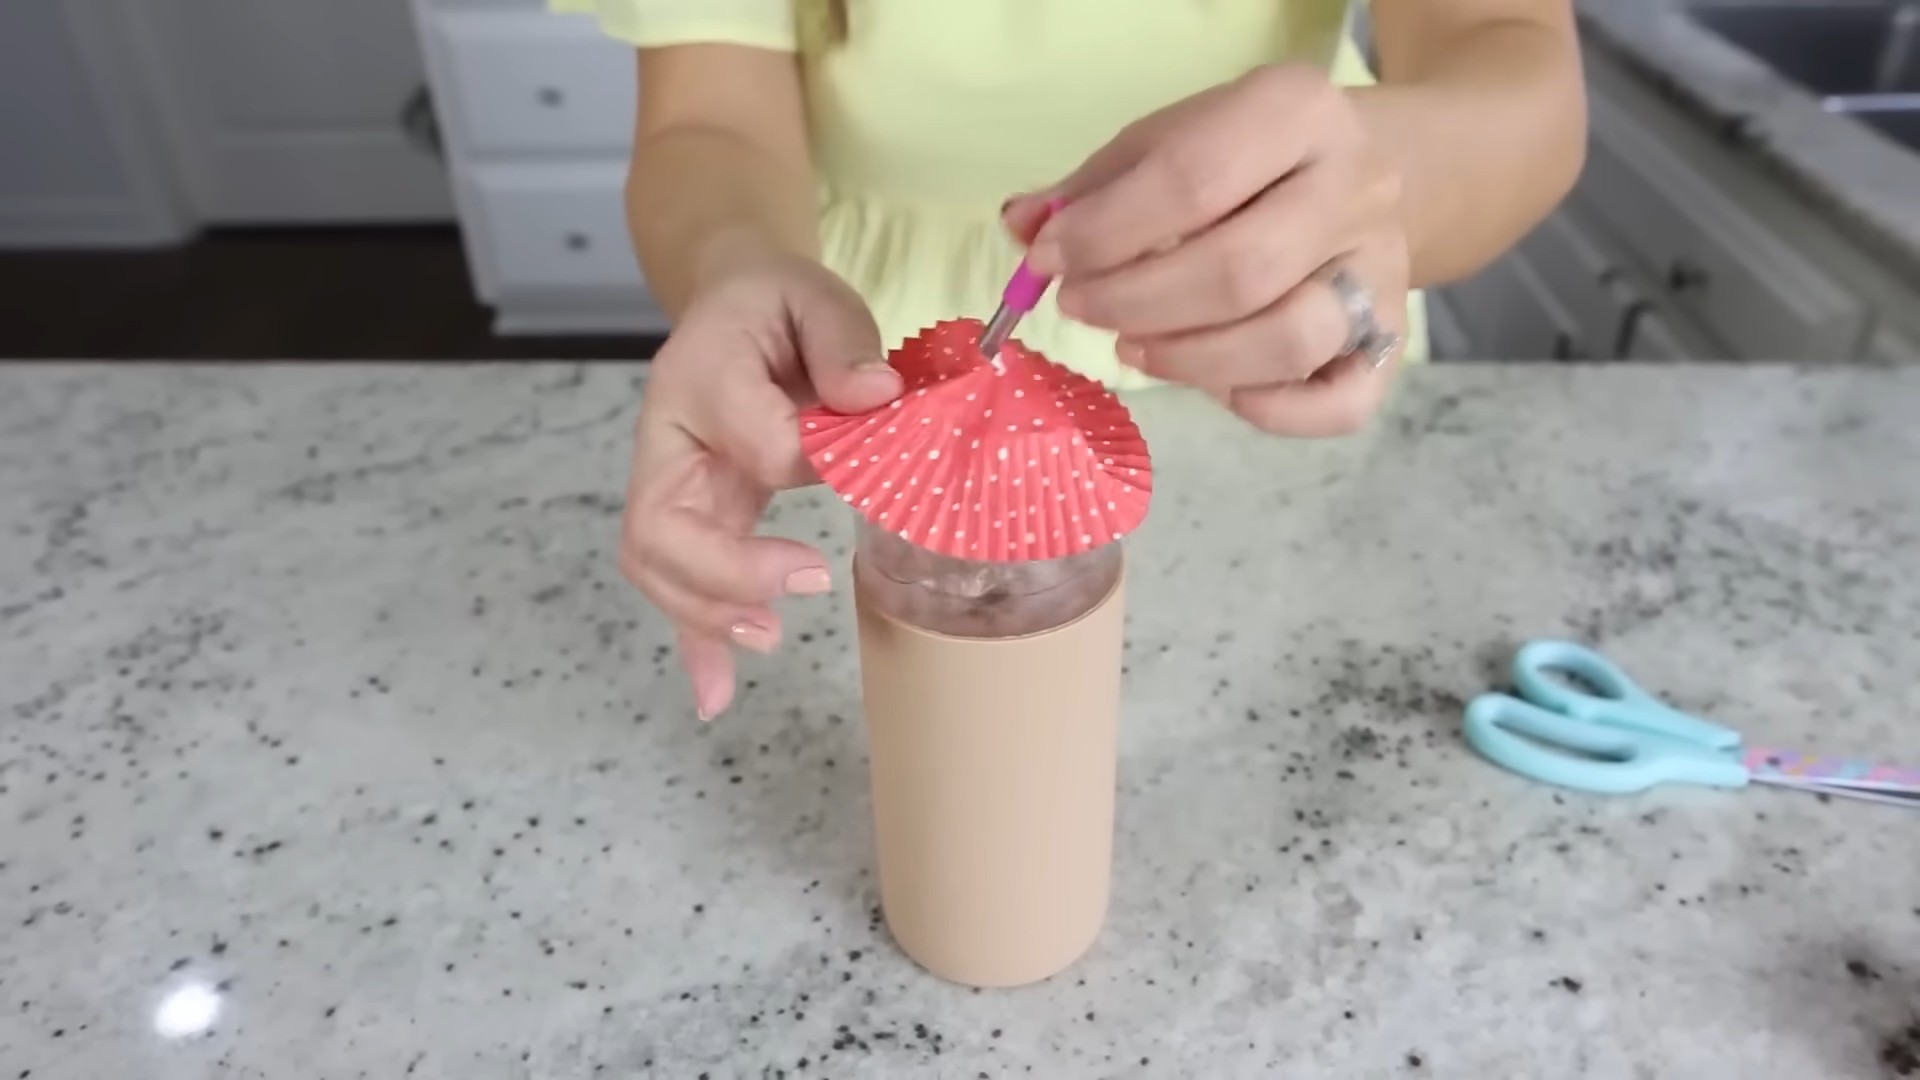
1. Flatten the Liners: Start by flattening several cupcake liners. Gently press them down on a flat surface until they’re completely flat. The number of liners you’ll need depends on how full you want your flowers to be. I usually use 3-5 liners per flower.
2. Layer and Fold: Stack the flattened liners on top of each other. Now, fold the stack in half, then in half again. You should have a wedge shape.
3. Cut the Petals: This is where you get to be creative! Use your scissors to round off the top edge of the wedge. You can create different petal shapes by varying the curve of your cut. For example, a deep curve will create rounded petals, while a shallow curve will create more pointed petals. You can also cut small slits or scallops along the edge for added texture.
4. Unfold and Fluff: Carefully unfold the liners. You should now have a flower shape with multiple layers of petals. Gently fluff the petals to give your flower some dimension.
5. Create the Center: You can create the flower center in a few different ways. One option is to use a small pom-pom and glue it to the center of the flower. Another option is to cut a small circle of cardstock and glue it to the center. You can also crumple up a small piece of tissue paper and glue it in place.
6. Add a Stem: To create a stem, you can use a pipe cleaner or a wooden skewer. If you’re using a pipe cleaner, simply poke it through the center of the flower and bend it over to secure it. If you’re using a wooden skewer, you can glue it to the back of the flower.
7. Arrange Your Bouquet: Once you’ve created several flowers, you can arrange them in a vase or tie them together with ribbon to create a bouquet. You can also add some greenery by cutting out leaf shapes from green construction paper and attaching them to the stems.
Making Adorable Cupcake Liner Animals
Cupcake liners are fantastic for creating cute and quirky animals. These are great for kids’ crafts, party decorations, or just adding a touch of whimsy to your home. I’m going to show you how to make a simple butterfly, but the possibilities are endless!
Step-by-Step Instructions:
1. Prepare the Wings: Flatten two cupcake liners. Fold each liner in half. These will be the butterfly’s wings.
2. Cut the Wing Shapes: Use your scissors to shape the wings. You can create different wing shapes by varying the curve of your cut. For example, you can create rounded wings, pointed wings, or even wings with scalloped edges.
3. Create the Body: Cut a small oval shape from cardstock or construction paper. This will be the butterfly’s body.
4. Assemble the Butterfly: Glue the wings to the back of the body. Position them so that they are slightly overlapping.
5. Add Antennae: Cut two small pieces of pipe cleaner and glue them to the top of the body to create antennae. You can curl the ends of the antennae for a more whimsical look.
6. Add Details: Use markers or colored pencils to add details to the wings and body. You can draw patterns, add spots, or even glue on small sequins or glitter. You can also add googly eyes to the body to give your butterfly some personality.
7. Variations: Once you’ve mastered the basic butterfly, you can experiment with different colors, patterns, and wing shapes to create a whole flutter of unique butterflies. You can also use the same techniques to create other animals, such as birds, fish, or even ladybugs.
Creating a Cupcake Liner Garland
A cupcake liner garland is a festive and easy way to decorate for parties, holidays, or just to add a pop of color to any room. I love how simple it is to customize the garland to match any theme or color scheme.
Step-by-Step Instructions:
1. Prepare the Liners: Flatten several cupcake liners. The number of liners you’ll need depends on how long you want your garland to be.
2. Fold and Cut (Optional): You can leave the liners flat, or you can fold them in half or in quarters for a different look. You can also cut shapes into the edges of the liners, such as scallops, points, or fringe.
3. String the Liners: Use a needle and thread or a hot glue gun to attach the liners to a length of string or yarn. If you’re using a needle and thread, simply poke the needle through the center of each liner and slide it onto the string. If you’re using a hot glue gun, apply a small dab of glue to the back of each liner and press it onto the string.
4. Space the Liners: Space the liners evenly along the string. You can adjust the spacing to create different effects. For example, you can space the liners close together for a denser garland, or you can space them further apart for a more delicate garland.
5. Add Embellishments (Optional): You can add embellishments to your garland to make it even more festive. For example, you can glue on small pom-poms, sequins, or glitter. You can also add small cutouts from cardstock or construction paper.
6. Hang Your Garland: Once you’ve finished stringing the liners, hang your garland in your desired location. You can hang it across a doorway, along a wall, or even from the ceiling.
Making a Cupcake Liner Christmas Tree Ornament
These ornaments are so fun to make and add a personal touch to your holiday decorations. I love how they can be customized with different colors and embellishments.
Step-by-Step Instructions:
1. Prepare the Liners: You’ll need cupcake liners in varying sizes, from small to large. Flatten each liner.
2. Fold the Liners: Fold each flattened liner in half, then in half again, creating a cone shape.
3. Cut the Edges (Optional): You can cut the edges of the folded liners to create different textures. Try cutting scallops, points, or fringe.
4. Assemble the Tree: Starting with the largest liner, glue the folded liners on top of each other, creating a layered tree shape. Make sure the points of the cones are facing upwards.
5. Add a Base: Cut a small circle from cardstock or construction paper and glue it to the bottom of the tree to create a base.
6. Add a Topper: You can add a star, a pom-pom, or any other small embellishment to the top of the tree.
7. Add a Hanger: Attach a loop of string or yarn to the top of the tree so you can hang it on your Christmas tree.
8. Embellish: Decorate your ornament with glitter, sequins, beads, or paint. Get creative and make each ornament unique!
Tips and Tricks for Cupcake Liner Crafts
* Experiment with different sizes and colors: Don’t be afraid to mix and match different sizes and colors of cupcake liners to create unique and interesting effects.
* Use different types of glue: Experiment with different types of glue to see which one works best for you. Hot glue is great for quick and
Conclusion
So, there you have it! Transforming simple cupcake liners into stunning and unique crafts is not only incredibly easy but also surprisingly versatile. We’ve explored just a few of the endless possibilities, from delicate paper flowers that brighten any room to whimsical garlands perfect for celebrations, and even adorable miniature animals that will delight children and adults alike.
Why is this Cupcake Liner Crafts DIY a must-try? Because it’s a fantastic way to unleash your creativity, repurpose everyday materials, and add a personal touch to your home decor, party decorations, or even gifts. It’s budget-friendly, eco-conscious, and a whole lot of fun! Plus, the satisfaction of creating something beautiful from something so simple is truly rewarding.
Don’t be afraid to experiment with different colors, patterns, and sizes of cupcake liners. Try layering them for added dimension, adding glitter for a touch of sparkle, or using different adhesives to achieve various textures. For the paper flowers, consider using floral wire to create stems and arrange them in a vase for a stunning centerpiece. For the garlands, mix and match different liner designs and add beads or ribbons for extra flair. If you’re feeling adventurous, try creating larger-scale projects like cupcake liner wreaths or even wall art.
The possibilities are truly limitless! The key is to let your imagination run wild and have fun with the process. This isn’t about perfection; it’s about creating something unique and beautiful that reflects your personal style.
We’re confident that once you try this Cupcake Liner Crafts DIY, you’ll be hooked. It’s a simple, satisfying, and incredibly rewarding way to express your creativity and add a touch of handmade charm to your life.
So, grab a stack of cupcake liners, gather your crafting supplies, and get ready to transform these humble baking essentials into something extraordinary. We can’t wait to see what you create!
We encourage you to try out these projects and share your creations with us! Post photos of your Cupcake Liner Crafts DIY masterpieces on social media using [Your Hashtag Here] so we can all admire your ingenuity and be inspired by your unique designs. Let’s build a community of cupcake liner crafters and share the joy of creating together! We are eager to see your unique take on these projects and learn from your experiences. Your feedback and shared creations will help inspire others to embark on their own cupcake liner crafting adventures. Happy crafting!
Frequently Asked Questions (FAQ)
What kind of cupcake liners work best for these crafts?
The beauty of Cupcake Liner Crafts DIY is that you can use almost any type of cupcake liner! Paper liners, foil liners, even silicone liners can be incorporated into your projects. However, for projects like flowers and garlands, paper liners are generally the easiest to work with. Thicker paper liners will hold their shape better, while thinner liners will create a more delicate look. Experiment with different types to see what works best for your desired outcome. Consider the color and pattern as well. Plain white liners offer a blank canvas for customization, while patterned liners add instant visual interest. Foil liners can add a metallic sheen, and silicone liners can be used for projects that require a more durable or waterproof material.
What kind of glue should I use?
The best type of glue depends on the specific project and the materials you’re using. For most paper-based Cupcake Liner Crafts DIY, a standard craft glue or glue stick will work perfectly well. Hot glue is a good option for projects that require a stronger bond or for attaching heavier embellishments. However, be careful when using hot glue, as it can burn your fingers. For more delicate projects, consider using a liquid glue with a fine tip applicator for precise placement. If you’re working with foil liners, a glue specifically designed for metal may be necessary. Always test the glue on a scrap piece of liner before applying it to your project to ensure that it doesn’t damage or discolor the material.
How do I prevent the cupcake liners from tearing when I’m working with them?
Cupcake liners can be delicate, so it’s important to handle them with care. When folding or shaping the liners, avoid using excessive force. If you’re using glue, apply it sparingly to prevent the paper from becoming saturated and tearing. If you’re working with older or more brittle liners, you can try gently misting them with water to make them more pliable. However, be careful not to over-wet them, as this can also cause them to tear. Another tip is to use a bone folder or similar tool to create crisp folds without damaging the paper.
Can I paint or color the cupcake liners?
Absolutely! Painting or coloring cupcake liners is a great way to customize them and create unique designs for your Cupcake Liner Crafts DIY. You can use a variety of mediums, such as acrylic paint, watercolors, markers, or even food coloring. If you’re using paint, apply it in thin layers to prevent the paper from becoming saturated and tearing. Watercolors can create a beautiful, translucent effect. Markers are great for adding fine details and patterns. Food coloring can be used to dye the liners a specific color. Before painting or coloring the entire liner, test your chosen medium on a scrap piece to ensure that it doesn’t bleed or damage the paper.
Are these crafts suitable for children?
Many Cupcake Liner Crafts DIY are perfect for children, but adult supervision is always recommended, especially when using sharp tools or hot glue. Simple projects like creating paper flowers or garlands are great for younger children, while older children can tackle more complex designs. These crafts are a fantastic way to encourage creativity, develop fine motor skills, and spend quality time together. Be sure to choose age-appropriate projects and provide clear instructions.
Where can I find inspiration for more cupcake liner craft ideas?
The internet is a treasure trove of inspiration for Cupcake Liner Crafts DIY! Pinterest, Instagram, and YouTube are excellent resources for finding tutorials, project ideas, and creative inspiration. You can also search for specific types of crafts, such as “cupcake liner flowers” or “cupcake liner animals,” to narrow down your search. Don’t be afraid to experiment and adapt existing ideas to create your own unique designs. The key is to let your imagination run wild and have fun with the process.
How can I store my finished cupcake liner crafts?
The best way to store your finished Cupcake Liner Crafts DIY depends on the specific project. Delicate items like paper flowers should be stored in a box or container to protect them from dust and damage. Garlands can be hung up or stored in a bag to prevent them from tangling. If you’ve created larger-scale projects like wreaths or wall art, you may need to store them in a larger container or hang them on a wall. Avoid storing your crafts in direct sunlight or in areas with high humidity, as this can cause them to fade or warp.

Leave a Comment