
Easy bell pepper growing is within your reach, even if you think you have a “brown thumb!” Have you ever dreamt of strolling into your backyard and plucking a vibrant, juicy bell pepper straight from the vine for your salad or stir-fry? It’s a rewarding experience that’s simpler than you might imagine. For centuries, bell peppers have been a staple in cuisines worldwide, tracing their roots back to South America. They’ve journeyed across continents, becoming a symbol of fresh, healthy eating and a vibrant addition to our gardens and plates.
But let’s be honest, sometimes growing your own food can feel intimidating. Maybe you’ve tried before and faced disappointing results, or perhaps you’re just not sure where to start. That’s where this DIY guide comes in! I’m here to share some tried-and-true tricks and hacks that will make easy bell pepper growing a reality for you. We’ll cover everything from choosing the right seeds and preparing your soil to protecting your plants from pests and diseases.
Why is this important? Because growing your own bell peppers not only provides you with fresh, delicious produce, but it also connects you to nature, reduces your carbon footprint, and gives you a sense of accomplishment. Plus, homegrown bell peppers just taste better! So, let’s ditch the grocery store peppers and embark on this exciting gardening adventure together. Get ready to harvest a bounty of colorful, flavorful bell peppers right from your own backyard!
Growing Bell Peppers: A Beginner’s Guide to a Bountiful Harvest
Hey there, fellow gardening enthusiasts! I’m so excited to share my tried-and-true method for growing bell peppers. Trust me, even if you think you have a “brown thumb,” you can totally do this! Bell peppers are surprisingly easy to grow, and nothing beats the taste of a fresh, homegrown pepper. Let’s dive in!
Choosing Your Bell Pepper Varieties
Before we get our hands dirty, let’s talk about pepper varieties. There are tons of options, each with its own unique flavor and color. Here are a few of my favorites:
* California Wonder: This is a classic, reliable green bell pepper. It’s perfect for stuffing or using in salads.
* Yolo Wonder: Similar to California Wonder, but often more disease-resistant.
* Golden Bell: A beautiful golden-yellow pepper with a slightly sweeter taste.
* Purple Beauty: A stunning deep purple pepper that turns green when cooked.
* Chocolate Beauty: A rich, chocolate-brown pepper with a sweet and smoky flavor.
Consider your climate and personal preferences when choosing your varieties. Some peppers are better suited for cooler climates, while others thrive in hot weather.
Getting Started: Seeds vs. Seedlings
You have two main options for starting your bell pepper plants: seeds or seedlings.
* Seeds: Starting from seed gives you more control over the entire process and can be more cost-effective. However, it requires more time and effort.
* Seedlings: Buying seedlings from a local nursery is a quicker and easier option, especially if you’re short on time or space.
I personally prefer starting from seed because I find it incredibly rewarding to watch my plants grow from tiny sprouts. But if you’re a beginner, seedlings are a great way to get started.
Starting Bell Peppers from Seed (My Preferred Method!)
If you’re like me and want to start your bell peppers from seed, here’s what you’ll need:
* Bell pepper seeds
* Seed starting trays or small pots
* Seed starting mix (a light, well-draining soil)
* A spray bottle
* A heat mat (optional, but highly recommended)
* A grow light (optional, but helpful)
Step-by-Step Instructions:
1. Sow the Seeds: Fill your seed starting trays or pots with seed starting mix. Moisten the soil with a spray bottle until it’s damp but not soggy. Sow the seeds about 1/4 inch deep, placing 2-3 seeds per cell or pot. Gently cover the seeds with soil and mist again.
2. Provide Warmth: Bell peppers need warmth to germinate. Place your seed starting trays on a heat mat set to around 80-85°F (27-29°C). This will significantly speed up germination. If you don’t have a heat mat, you can place the trays in a warm spot in your house, like on top of the refrigerator.
3. Provide Light: Once the seeds germinate (usually within 7-14 days), remove them from the heat mat and place them under a grow light. If you don’t have a grow light, you can place them in a sunny window, but be sure to rotate the trays regularly to prevent the seedlings from becoming leggy.
4. Water Carefully: Keep the soil consistently moist, but not waterlogged. Use a spray bottle to gently water the seedlings, avoiding overwatering which can lead to damping off (a fungal disease that can kill young seedlings).
5. Thin the Seedlings: Once the seedlings have their first true leaves (the second set of leaves that appear after the initial seed leaves), thin them to one seedling per cell or pot. Choose the strongest, healthiest-looking seedling and snip off the others at the soil line.
6. Harden Off the Seedlings: Before transplanting the seedlings outdoors, you need to “harden them off.” This means gradually exposing them to outdoor conditions over a period of 7-10 days. Start by placing the seedlings outdoors in a sheltered location for a few hours each day, gradually increasing the amount of time they spend outside. This will help them acclimate to the sun, wind, and temperature changes.
Transplanting Your Bell Pepper Plants
Once your seedlings are hardened off and the weather is warm enough (soil temperature above 60°F/15°C), it’s time to transplant them into your garden.
What You’ll Need:
* Your hardened-off bell pepper seedlings
* A garden trowel
* Compost or well-rotted manure
* All-purpose fertilizer
* Mulch (straw, wood chips, or shredded leaves)
* Stakes or cages (optional, but recommended)
Step-by-Step Instructions:
1. Choose a Sunny Location: Bell peppers need at least 6-8 hours of sunlight per day. Choose a location in your garden that receives plenty of sun.
2. Prepare the Soil: Bell peppers prefer well-drained soil that is rich in organic matter. Amend the soil with compost or well-rotted manure before planting.
3. Dig the Holes: Dig holes that are slightly larger than the root balls of your seedlings. Space the holes about 18-24 inches apart.
4. Plant the Seedlings: Gently remove the seedlings from their pots and loosen the roots slightly. Place the seedlings in the holes and backfill with soil. Make sure the top of the root ball is level with the surrounding soil.
5. Fertilize: Apply an all-purpose fertilizer to the soil around the seedlings. Follow the instructions on the fertilizer package.
6. Water Thoroughly: Water the seedlings thoroughly after planting.
7. Mulch: Apply a layer of mulch around the plants to help retain moisture, suppress weeds, and regulate soil temperature.
8. Stake or Cage (Optional): Bell pepper plants can become quite heavy with fruit, so it’s a good idea to stake or cage them to provide support. This will prevent the branches from breaking and keep the peppers off the ground.
Caring for Your Bell Pepper Plants
Now that your bell pepper plants are in the ground, it’s time to provide them with the care they need to thrive.
Watering:
Bell peppers need consistent moisture, especially during hot weather. Water deeply whenever the top inch of soil feels dry. Avoid overhead watering, as this can lead to fungal diseases. Drip irrigation or soaker hoses are ideal for watering bell peppers.
Fertilizing:
Bell peppers are heavy feeders, so they need regular fertilization. Side-dress the plants with compost or an all-purpose fertilizer every 4-6 weeks.
Pest and Disease Control:
Bell peppers are susceptible to a few common pests and diseases, including aphids, flea beetles, and blossom-end rot.
* Aphids: These tiny insects can suck the sap from your plants, causing them to become weak and stunted. You can control aphids by spraying them with a strong stream of water or by using insecticidal soap.
* Flea Beetles: These small, jumping beetles can chew holes in the leaves of your plants. You can control flea beetles by covering your plants with row covers or by using insecticidal soap.
* Blossom-End Rot: This condition is caused by a calcium deficiency and results in a dark, leathery spot on the bottom of the peppers. You can prevent blossom-end rot by ensuring that your soil is rich in calcium and by watering consistently. Adding crushed eggshells to the soil can help.
Pruning:
Pruning bell pepper plants can help improve air circulation and encourage fruit production. Remove any suckers (small shoots that grow from the base of the plant) and any yellowing or diseased leaves.
Harvesting Your Bell Peppers
The moment you’ve been waiting for! Bell peppers are typically ready to harvest 60-90 days after transplanting, depending on the variety.
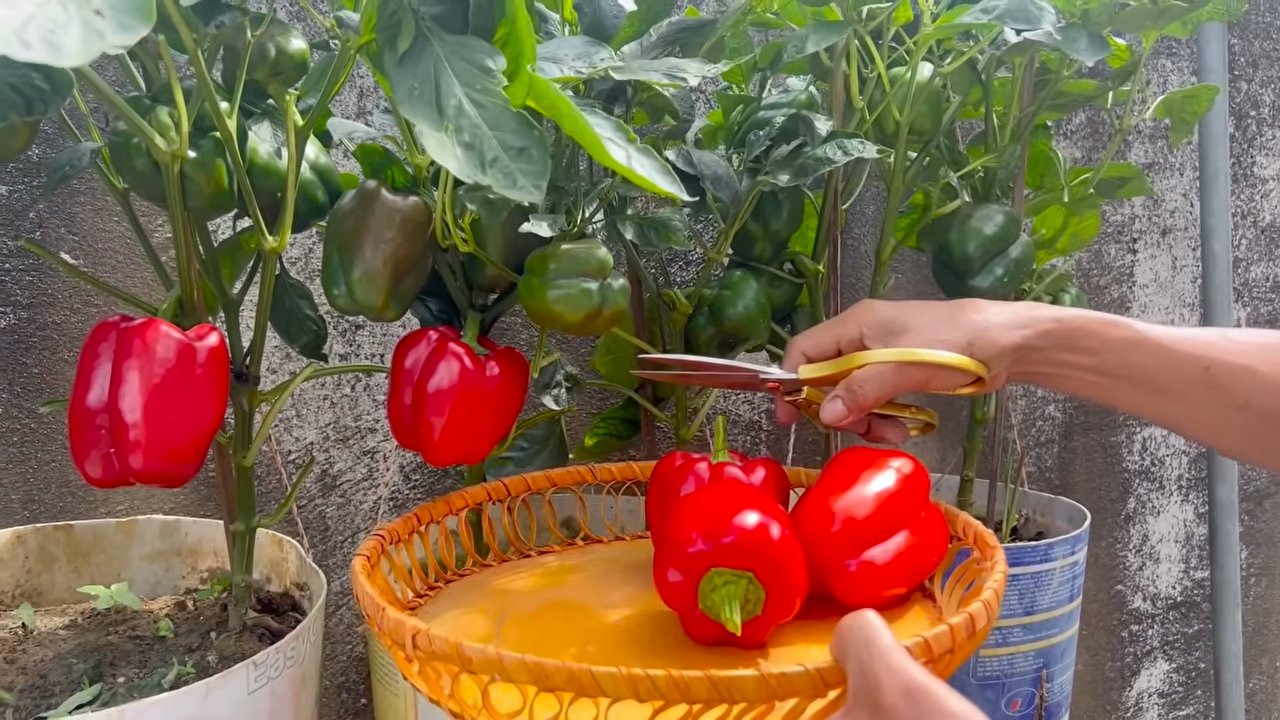
How to Harvest:
* Use a sharp knife or pruning shears to cut the peppers from the plant.
* Leave a short stem attached to the pepper.
* Harvest peppers when they are fully colored and firm to the touch.
* You can harvest green bell peppers at any stage of maturity, but they will be sweeter and more flavorful if you allow them to ripen to their full color.
Enjoying Your Harvest
Now that you’ve harvested your delicious bell peppers, it’s time to enjoy them! Bell peppers can be eaten raw, cooked, or pickled. They’re a versatile ingredient that can be used in a variety of dishes, from salads and stir-fries to stuffed peppers and sauces.
Here are a few of my favorite ways to use homegrown bell peppers:
* Stuffed Bell Peppers: A classic dish that’s perfect for a hearty meal.
* Bell Pepper and Onion Stir-Fry: A quick and easy side dish that’s

Conclusion
So, there you have it! Mastering the art of easy bell pepper growing doesn’t require a green thumb blessed by the gardening gods. It’s about understanding the plant’s needs, providing the right environment, and employing a few clever DIY tricks to boost your success. This method, focusing on [mention a specific technique from the article, e.g., “container gardening with nutrient-rich soil”] is a game-changer because it allows even those with limited space or challenging soil conditions to enjoy a bountiful harvest of crisp, colorful bell peppers.
Why is this a must-try? Because store-bought bell peppers, while convenient, often lack the vibrant flavor and satisfying crunch of homegrown varieties. Plus, you have complete control over the growing process, ensuring your peppers are free from harmful pesticides and chemicals. Imagine the satisfaction of serving a salad bursting with peppers you nurtured from seed to table!
But don’t stop there! Experiment with different bell pepper varieties. Try growing sweet banana peppers alongside your classic green and red bells for a colorful and flavorful mix. Consider adding companion plants like basil or marigolds to deter pests and attract beneficial insects. You can also explore different soil amendments to further enhance the nutrient content and drainage of your growing medium. For example, adding compost tea every few weeks can provide a significant boost to your plants’ health and productivity.
We’ve shown you how to make easy bell pepper growing a reality, now it’s your turn to put these tips into action. Don’t be afraid to get your hands dirty, embrace the learning process, and most importantly, have fun! We are confident that with a little patience and dedication, you’ll be rewarded with a delicious and abundant harvest.
We encourage you to try this DIY trick and share your experience with us. Post photos of your bell pepper plants, tell us about any challenges you encountered, and share any tips or variations that worked well for you. Let’s create a community of bell pepper enthusiasts, sharing our knowledge and inspiring each other to grow the best peppers possible! Your insights could be invaluable to other gardeners just starting out. So, get planting, get growing, and get sharing!
Frequently Asked Questions (FAQ)
Q: What is the best time of year to start bell pepper seeds?
A: The ideal time to start bell pepper seeds indoors is typically 6-8 weeks before the last expected frost in your area. This allows the seedlings to develop a strong root system before being transplanted outdoors. Check your local weather forecasts and gardening resources to determine the average last frost date for your region. Starting seeds too early can result in leggy, weak seedlings that struggle to thrive once transplanted. Conversely, starting them too late can shorten your growing season and reduce your overall yield.
Q: What kind of soil is best for growing bell peppers?
A: Bell peppers thrive in well-draining, nutrient-rich soil with a slightly acidic pH (around 6.0 to 6.8). A good starting point is a mix of equal parts garden soil, compost, and peat moss or coco coir. The compost provides essential nutrients, while the peat moss or coco coir helps retain moisture and improve drainage. Avoid heavy clay soils, as they can become waterlogged and suffocate the roots. If you have clay soil, amend it with plenty of organic matter, such as compost or aged manure, to improve its structure and drainage. You can also purchase a pre-mixed potting soil specifically formulated for vegetables.
Q: How often should I water my bell pepper plants?
A: Bell peppers need consistent moisture, especially during hot weather. Water deeply whenever the top inch of soil feels dry to the touch. Avoid overwatering, as this can lead to root rot. A good rule of thumb is to water thoroughly every 2-3 days, depending on the weather conditions and the type of soil you’re using. Mulching around the base of the plants can help retain moisture and reduce the need for frequent watering. Use organic mulches like straw, wood chips, or shredded leaves.
Q: How much sunlight do bell pepper plants need?
A: Bell peppers require at least 6-8 hours of direct sunlight per day to produce a good crop. Choose a sunny location in your garden or on your patio where your plants will receive ample sunlight throughout the day. If you’re growing bell peppers indoors, use grow lights to supplement natural sunlight, especially during the winter months. Rotate your plants regularly to ensure even light exposure on all sides.
Q: What are some common pests and diseases that affect bell pepper plants?
A: Common pests that can affect bell pepper plants include aphids, whiteflies, spider mites, and pepper weevils. Diseases include blossom-end rot, fungal leaf spots, and viral diseases. Regularly inspect your plants for signs of pests or diseases. Treat infestations with insecticidal soap or neem oil. Prevent diseases by providing good air circulation, avoiding overhead watering, and using disease-resistant varieties. Blossom-end rot is caused by a calcium deficiency, so ensure your soil is rich in calcium or supplement with calcium nitrate.
Q: How do I prevent blossom-end rot in my bell peppers?
A: Blossom-end rot, a common problem in bell peppers, is caused by a calcium deficiency in the developing fruit. This deficiency is often due to inconsistent watering, which prevents the plant from absorbing calcium properly. To prevent blossom-end rot, ensure consistent watering, especially during hot and dry periods. Amend your soil with calcium-rich materials like bone meal or crushed eggshells before planting. You can also use a calcium nitrate foliar spray to provide a quick boost of calcium to the plants.
Q: When should I harvest my bell peppers?
A: Bell peppers can be harvested at any stage of maturity, depending on your preference. Green bell peppers are typically harvested when they are firm, smooth, and have reached their full size. Colored bell peppers (red, yellow, orange) are harvested when they have fully ripened and developed their characteristic color. The longer you leave the peppers on the plant, the sweeter they will become. Use a sharp knife or pruning shears to cut the peppers from the plant, leaving a short stem attached.
Q: Can I grow bell peppers in containers?
A: Yes, bell peppers grow very well in containers, making them a great option for gardeners with limited space. Choose a container that is at least 12 inches in diameter and has good drainage holes. Use a high-quality potting mix specifically formulated for vegetables. Water regularly and fertilize every 2-3 weeks with a balanced fertilizer. Place the container in a sunny location where it will receive at least 6-8 hours of direct sunlight per day.
Q: How can I encourage more bell pepper production?
A: To encourage more bell pepper production, ensure your plants are receiving adequate sunlight, water, and nutrients. Fertilize regularly with a balanced fertilizer or a fertilizer specifically formulated for vegetables. Prune away any suckers (small shoots that grow from the base of the plant) to encourage more energy to be directed towards fruit production. You can also try pinching off the first few blossoms to encourage the plant to develop a stronger root system before setting fruit.

Leave a Comment