
Easy Cowpea Garden: Your Path to Bountiful Harvests!
Have you ever dreamed of stepping into your backyard and harvesting fresh, delicious cowpeas for a wholesome meal? I know I have! Imagine the satisfaction of growing your own food, knowing exactly where it comes from and how it was nurtured. Well, stop dreaming and start doing! This DIY guide is your ticket to creating an easy cowpea garden, even if you’re a complete beginner.
Cowpeas, also known as black-eyed peas, have a rich history, dating back thousands of years to Africa. They’ve been a staple food source in many cultures, prized for their nutritional value and ability to thrive in diverse climates. In the Southern United States, they’re a symbol of good luck and prosperity, often eaten on New Year’s Day.
But beyond tradition, why should *you* grow cowpeas? In today’s world, where we’re increasingly conscious of food security and healthy eating, having an easy cowpea garden offers a fantastic solution. You’ll save money on groceries, reduce your carbon footprint, and enjoy the unparalleled taste of homegrown goodness. Plus, cowpeas are incredibly versatile in the kitchen, perfect for soups, stews, salads, and so much more. So, let’s dive in and unlock the secrets to a thriving cowpea patch right in your own backyard!
Cowpea-Garten leicht gemacht: Dein DIY-Leitfaden für eine reiche Ernte
Hey Gartenfreunde! Ich freue mich riesig, euch heute zu zeigen, wie ihr ganz einfach einen Cowpea-Garten anlegen könnt. Cowpeas, auch bekannt als Augenbohnen oder Schwarzaugenbohnen, sind nicht nur super lecker und nahrhaft, sondern auch relativ pflegeleicht. Das macht sie perfekt für Anfänger und erfahrene Gärtner gleichermaßen. Also, krempeln wir die Ärmel hoch und legen los!
Was du für deinen Cowpea-Garten brauchst
Bevor wir loslegen, hier eine Liste mit allem, was du brauchst. Keine Sorge, die meisten Sachen hast du wahrscheinlich schon zu Hause oder kannst sie leicht im Gartencenter finden:
* Cowpea-Samen (wähle deine Lieblingssorte!)
* Einen sonnigen Standort (mindestens 6 Stunden Sonne pro Tag)
* Gut durchlässigen Boden
* Kompost oder organischen Dünger
* Gartengeräte: Spaten, Harke, Gießkanne
* Pflanzstäbe oder ein Rankgitter (optional, aber empfehlenswert für rankende Sorten)
* Mulch (z.B. Stroh oder Holzhackschnitzel)
Schritt-für-Schritt-Anleitung: So legst du deinen Cowpea-Garten an
Hier kommt der spannende Teil! Ich habe den Prozess in übersichtliche Schritte unterteilt, damit du ganz einfach folgen kannst.
1. Den Boden vorbereiten
Ein guter Boden ist das A und O für eine reiche Ernte. Cowpeas sind zwar nicht besonders anspruchsvoll, aber ein bisschen Vorbereitung zahlt sich aus.
1. Standort auswählen: Suche dir einen sonnigen Platz in deinem Garten aus. Cowpeas lieben die Sonne!
2. Boden lockern: Mit einem Spaten oder einer Grabegabel lockerst du den Boden auf. Entferne dabei Steine, Wurzeln und Unkraut.
3. Kompost einarbeiten: Mische reichlich Kompost oder organischen Dünger in den Boden ein. Das verbessert die Bodenstruktur und versorgt die Pflanzen mit Nährstoffen. Ich verwende am liebsten meinen selbstgemachten Kompost, aber du kannst auch gekauften Kompost verwenden.
4. Boden ebnen: Mit einer Harke ebne den Boden, sodass er schön glatt ist.
2. Cowpea-Samen säen
Jetzt geht es ans Eingemachte: das Säen der Samen!
1. Reihen ziehen: Ziehe mit einer Harke oder einem Stock Reihen in den vorbereiteten Boden. Die Reihen sollten etwa 60-90 cm auseinander liegen.
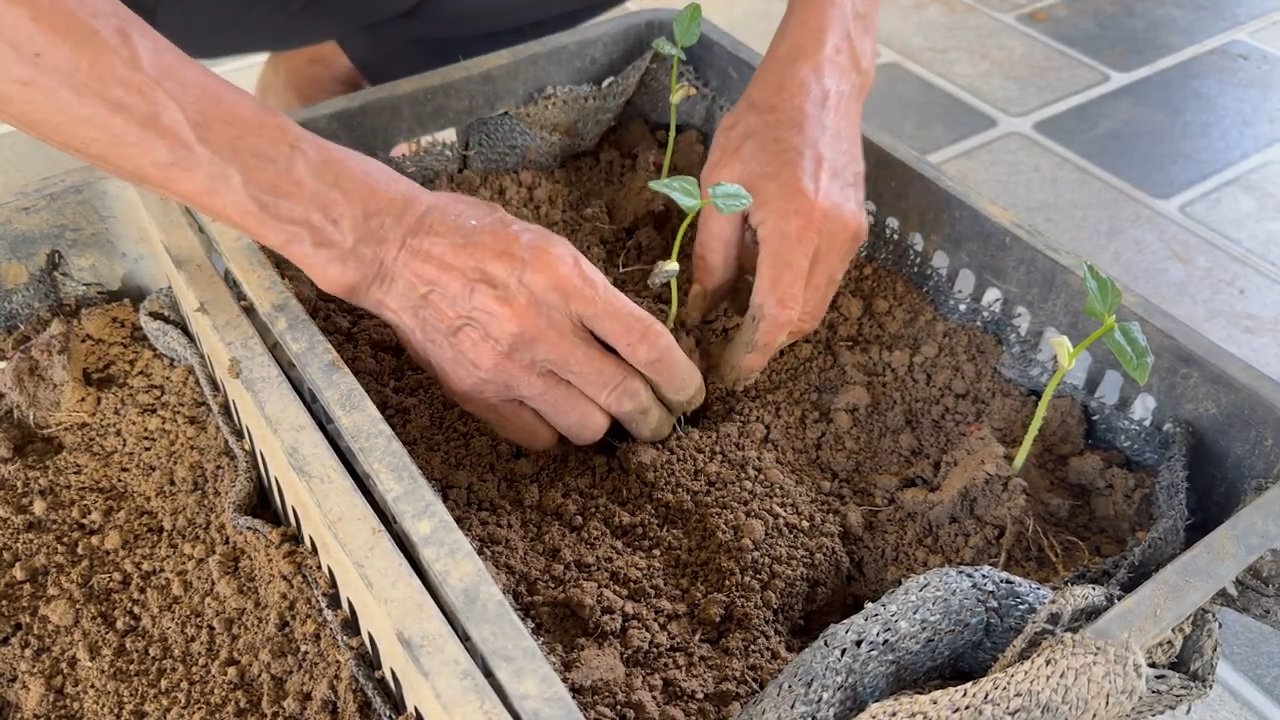
2. Samen säen: Lege die Cowpea-Samen in einem Abstand von etwa 5-10 cm in die Reihen. Die Samen sollten etwa 2-3 cm tief in der Erde liegen.
3. Mit Erde bedecken: Bedecke die Samen vorsichtig mit Erde und drücke sie leicht an.
4. Gießen: Gieße die Reihen vorsichtig an, sodass die Erde feucht, aber nicht nass ist.
3. Cowpeas pflegen
Nach dem Säen ist vor der Pflege! Damit deine Cowpeas gut wachsen und gedeihen, solltest du folgende Punkte beachten:
1. Regelmäßig gießen: Halte den Boden feucht, besonders während der Keimung und der Blütezeit. Gieße am besten früh morgens oder spät abends, um Verdunstung zu vermeiden.
2. Unkraut jäten: Entferne regelmäßig Unkraut, das mit deinen Cowpeas um Nährstoffe und Wasser konkurriert.
3. Düngen (optional): Wenn du das Gefühl hast, dass deine Pflanzen nicht optimal wachsen, kannst du sie mit einem organischen Dünger nachdüngen. Achte aber darauf, nicht zu viel zu düngen, da Cowpeas Stickstoff selbst binden können.
4. Rankhilfe anbringen (optional): Wenn du eine rankende Cowpea-Sorte angebaut hast, solltest du ihr eine Rankhilfe anbieten. Das kann ein Pflanzstab, ein Rankgitter oder ein Zaun sein. Die Pflanzen können sich daran hochranken und bekommen so mehr Licht und Luft.
5. Mulchen: Eine Mulchschicht aus Stroh oder Holzhackschnitzeln hilft, die Feuchtigkeit im Boden zu halten, Unkraut zu unterdrücken und den Boden vor Temperaturschwankungen zu schützen.
4. Cowpeas ernten
Der schönste Teil: die Ernte!
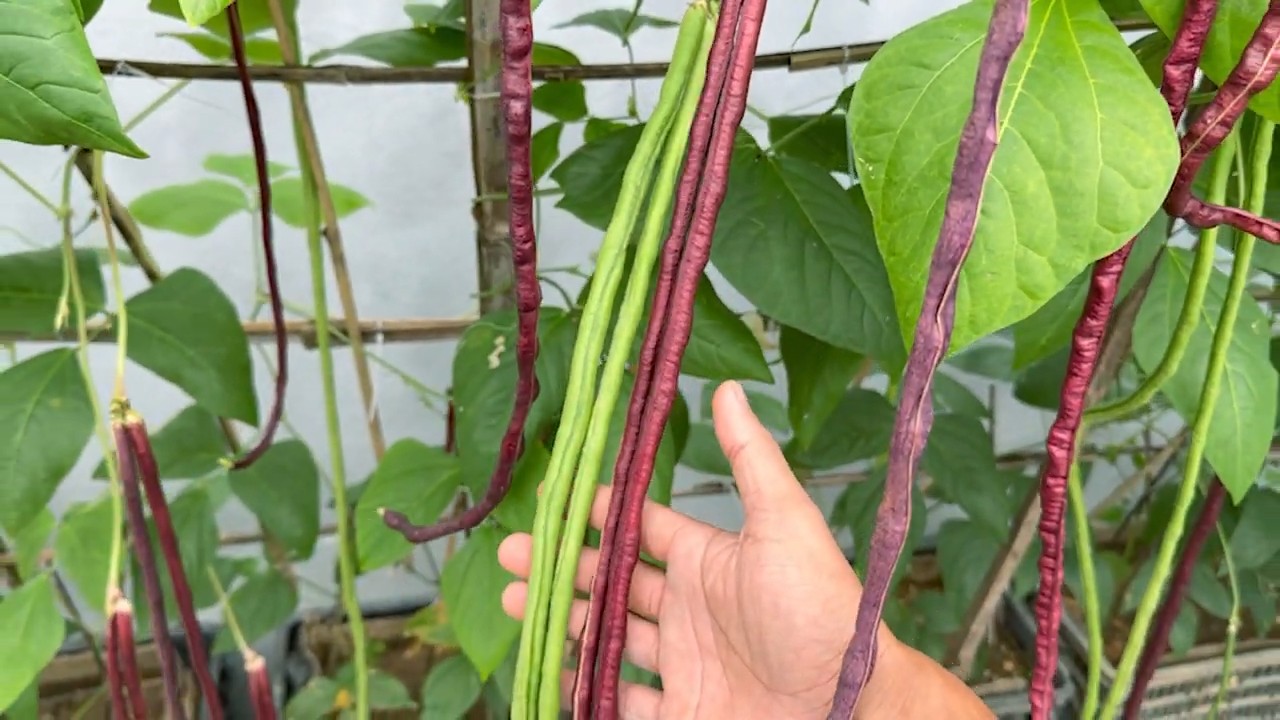
1. Erntezeitpunkt: Cowpeas können je nach Sorte und Verwendungszweck unterschiedlich geerntet werden. Grüne Hülsen können geerntet werden, wenn sie prall und saftig sind. Trockene Bohnen werden geerntet, wenn die Hülsen trocken und braun sind.
2. Erntemethode: Schneide die Hülsen mit einer Schere oder einem Messer ab. Bei trockenen Bohnen kannst du die ganze Pflanze ernten und zum Trocknen aufhängen.
3. Lagerung: Grüne Hülsen können im Kühlschrank aufbewahrt werden. Trockene Bohnen sollten an einem kühlen, trockenen und dunklen Ort gelagert werden.
Zusätzliche Tipps und Tricks für deinen Cowpea-Garten
Hier sind noch ein paar zusätzliche Tipps, die dir helfen können, deinen Cowpea-Garten noch erfolgreicher zu machen:
* Fruchtfolge beachten: Baue Cowpeas nicht jedes Jahr am selben Standort an. Wechsle die Kulturen ab, um Krankheiten und Schädlingen vorzubeugen.
* Nützlinge fördern: Locke Nützlinge wie Marienkäfer und Florfliegen in deinen Garten, die Blattläuse und andere Schädlinge bekämpfen.
* Krankheiten und Schädlinge beobachten: Achte auf Anzeichen von Krankheiten oder Schädlingen und handle frühzeitig, um größere Schäden zu vermeiden.
* Verschiedene Sorten ausprobieren: Es gibt viele verschiedene Cowpea-Sorten mit unterschiedlichen Eigenschaften. Probiere verschiedene Sorten aus, um herauszufinden, welche dir am besten schmecken und in deinem Garten am besten wachsen.
* Cowpeas als Gründüngung nutzen: Cowpeas sind eine tolle Gründüngungspflanze. Sie verbessern die Bodenstruktur, binden Stickstoff und unterdrücken Unkraut.
Häufige Probleme und Lösungen
Auch beim Anbau von Cowpeas können Probleme auftreten. Hier sind einige häufige Probleme und wie du sie lösen kannst:
* Schlechte Keimung: Stelle sicher, dass die Samen frisch sind und der Boden feucht genug ist.
* Blattläuse: Sprühe die Pflanzen mit einer Seifenlauge oder einem Neemöl ein.
* Bohnenkäfer: Sammle die Käfer ab oder verwende ein Insektizid.
* Pilzkrankheiten: Sorge für eine gute Belüftung und vermeide Staunässe.
Cowpeas in der Küche: Leckere Rezeptideen
Cowpeas sind unglaublich vielseitig und können in vielen verschiedenen Gerichten verwendet werden. Hier sind ein paar Ideen:
* Klassische Schwarzaugenbohnen-Eintopf: Ein herzhaftes Gericht mit Speck, Zwiebeln, Knoblauch und Gewürzen.
* Cowpea-Salat: Ein erfrischender Salat mit Tomaten, Gurken, Paprika und einem leichten Dressing.
* Gebratene Cowpeas: Eine einfache Beilage, die perfekt zu Fleisch oder Fisch passt.
* Cowpea-Curry: Ein aromatisches Curry mit Kokosmilch, Gemüse und Gewürzen.
Ich hoffe, dieser Leitfaden hat dir geholfen, deinen eigenen Cowpea-Garten anzulegen. Mit ein bisschen Geduld und Pflege wirst du bald eine reiche Ernte genießen können. Viel Spaß beim Gärtnern!
Conclusion
So, there you have it! Creating your own easy cowpea garden is not just a rewarding experience, it’s a practical solution for fresh, delicious, and sustainable food right at your fingertips. We’ve walked you through the simple steps, highlighting the ease and accessibility of this gardening project, even for beginners. Forget the expensive grocery store prices and the uncertainty of where your food comes from. With a little effort and the right conditions, you can cultivate a thriving cowpea patch that will provide you with a bounty of nutritious legumes throughout the growing season.
But why is this DIY trick a must-try? Beyond the obvious benefits of fresh produce, growing your own cowpeas offers a unique connection to nature. You’ll witness the entire life cycle of the plant, from tiny seed to mature, pod-laden vine. This hands-on experience is incredibly educational, especially for children, and fosters a deeper appreciation for the food we eat. Furthermore, cowpeas are nitrogen-fixing plants, meaning they enrich the soil as they grow, benefiting subsequent crops you might plant in the same area. This makes them an excellent choice for sustainable gardening practices.
Looking to add a personal touch to your cowpea garden? Consider these variations:
* Vertical Gardening: If you’re short on space, train your cowpeas to climb a trellis or fence. This not only maximizes your yield but also adds visual appeal to your garden.
* Companion Planting: Plant cowpeas alongside corn, sunflowers, or okra. These plants provide support for the cowpea vines and create a mutually beneficial ecosystem.
* Different Varieties: Experiment with different varieties of cowpeas to discover your favorites. Some popular choices include Black-Eyed Peas, Cream Peas, and Pink-Eyed Purple Hull Peas. Each variety offers a slightly different flavor and texture.
* Succession Planting: Plant cowpeas in stages, a few weeks apart, to ensure a continuous harvest throughout the growing season.
We are confident that you’ll find immense satisfaction in nurturing your own easy cowpea garden. The taste of freshly picked cowpeas, cooked simply with a little salt and pepper, is unparalleled. The pride you’ll feel in providing your family with healthy, homegrown food is immeasurable.
Don’t hesitate to embark on this exciting gardening adventure. We encourage you to try this DIY trick and experience the joy of growing your own cowpeas. And most importantly, we want to hear about your journey! Share your experiences, successes, and even challenges in the comments below. Let’s build a community of cowpea enthusiasts and learn from each other. Post pictures of your gardens, share your favorite recipes, and let us know what varieties you’re growing. Together, we can spread the word about the benefits of growing your own food and inspire others to get their hands dirty. So, grab your seeds, prepare your soil, and get ready to enjoy the fruits (or rather, the legumes) of your labor! Happy gardening!
Frequently Asked Questions (FAQ)
What are the best conditions for growing cowpeas?
Cowpeas thrive in warm weather and well-drained soil. They need at least 6-8 hours of sunlight per day. The ideal soil temperature for germination is between 65°F and 85°F (18°C and 29°C). While cowpeas are relatively drought-tolerant, consistent watering is important, especially during flowering and pod development. Avoid overwatering, as this can lead to root rot. Amending the soil with compost or other organic matter will improve drainage and fertility.
How long does it take for cowpeas to mature?
The time it takes for cowpeas to mature depends on the variety and growing conditions. Generally, you can expect to harvest your first cowpeas about 60-90 days after planting. Check the seed packet for specific information on the variety you’re growing. You’ll know the cowpeas are ready to harvest when the pods are plump and the seeds inside are fully developed.
What are some common pests and diseases that affect cowpeas, and how can I prevent them?
Common pests that affect cowpeas include aphids, bean beetles, and nematodes. Diseases include fungal infections like powdery mildew and root rot. To prevent these problems, practice good garden hygiene. Remove weeds and debris regularly, and avoid overcrowding plants. Use organic pest control methods like insecticidal soap or neem oil to control aphids and bean beetles. Ensure good soil drainage to prevent root rot. Crop rotation can also help to reduce the buildup of pests and diseases in the soil. Consider using resistant varieties of cowpeas if you have a history of pest or disease problems.
Can I grow cowpeas in containers?
Yes, you can successfully grow cowpeas in containers, especially bush varieties. Choose a large container (at least 12 inches in diameter) with drainage holes. Use a well-draining potting mix and provide adequate sunlight and water. You may need to fertilize container-grown cowpeas more frequently than those grown in the ground, as nutrients can leach out of the soil more quickly.
How do I harvest cowpeas?
Harvest cowpeas when the pods are plump and the seeds inside are fully developed but still tender. Snap the pods off the vine carefully, being mindful not to damage the plant. You can harvest cowpeas over a period of several weeks as the pods mature. For dry cowpeas, allow the pods to dry completely on the vine before harvesting.
How do I store cowpeas?
Fresh cowpeas can be stored in the refrigerator for up to a week. For longer storage, you can freeze them. Blanch the cowpeas in boiling water for 2-3 minutes, then cool them in ice water. Drain well and freeze in airtight containers or freezer bags. Dried cowpeas should be stored in an airtight container in a cool, dry place. They can last for several years if stored properly.
Are cowpeas good for the soil?
Yes, cowpeas are excellent for the soil. They are nitrogen-fixing plants, meaning they have the ability to convert atmospheric nitrogen into a form that plants can use. This enriches the soil and reduces the need for synthetic fertilizers. Cowpeas also have deep roots that help to improve soil structure and drainage. They can be used as a cover crop to prevent soil erosion and suppress weeds.
What are some ways to use cowpeas in cooking?
Cowpeas are incredibly versatile in the kitchen. They can be boiled, steamed, or fried. They are often used in soups, stews, salads, and side dishes. Black-eyed peas are a traditional Southern dish, often served with rice and greens. Cowpeas can also be used to make hummus, dips, and spreads. Experiment with different recipes and flavor combinations to discover your favorite ways to enjoy this nutritious legume.
Can I eat the cowpea leaves?
Yes, the young leaves of cowpeas are edible and can be used like spinach or other leafy greens. They are a good source of vitamins and minerals. Harvest the leaves when they are young and tender, and cook them lightly.
How often should I water my cowpea garden?
Water your cowpea garden regularly, especially during dry periods. Aim to keep the soil consistently moist but not waterlogged. Water deeply and less frequently, rather than shallowly and more often. Mulching around the plants can help to retain moisture in the soil. The frequency of watering will depend on the weather conditions and the type of soil you have. Check the soil moisture regularly and adjust your watering schedule accordingly.

Leave a Comment