
Foil Hacks Time Saving: Are you tired of spending countless hours scrubbing burnt food off your pots and pans, or constantly replacing your garden tools due to rust? I know I was! That’s why I dove headfirst into the world of DIY solutions, and let me tell you, the results have been amazing. For generations, resourceful individuals have sought clever ways to simplify their lives, often turning to readily available materials like aluminum foil. Think about it – our grandmothers probably used foil to keep leftovers fresh or even polish silverware!
But did you know that this humble kitchen staple can be a game-changer in your home and garden? This article is your ultimate guide to unlocking the surprising power of foil. We’ll explore a treasure trove of foil hacks time saving tips and tricks that will not only save you precious time and effort but also help you reduce waste and save money. From protecting your plants from pests to effortlessly cleaning stubborn grime, prepare to be amazed by the versatility of this everyday item. So, grab a roll of foil and get ready to transform your home and garden with these simple yet effective DIY solutions!
Foil Hacks: Save Time and Effort in Your Kitchen and Beyond!
Hey everyone! I’m super excited to share some of my favorite foil hacks with you. Aluminum foil is seriously a kitchen superhero, and it’s way more versatile than just wrapping leftovers. These tips will save you time, effort, and maybe even a little money! Let’s dive in!
Sharpening Scissors with Foil
Dull scissors are the bane of any crafter’s existence (or anyone who tries to open a package!). But don’t despair! Foil can bring them back to life.
What You’ll Need:
* A pair of dull scissors
* A sheet of aluminum foil
Step-by-Step Instructions:
1. Fold the Foil: Take a sheet of aluminum foil and fold it several times to create a thick, multi-layered strip. I usually aim for about 6-8 layers. The thicker it is, the better it will work.
2. Cut, Cut, Cut!: Now, simply take your dull scissors and start cutting through the folded foil strip. Make several long, deliberate cuts, using the full length of the blades. I usually do about 10-15 cuts.
3. Test the Scissors: After you’ve made your cuts, test the scissors on a piece of paper or fabric. You should notice a significant improvement in their sharpness. If they’re still not sharp enough, repeat the process with a fresh piece of folded foil.
4. Why it Works: The aluminum foil acts as a mild abrasive, gently honing the blades of the scissors as you cut through it. It’s a quick and easy way to maintain your scissors between professional sharpenings.
Cleaning Rusty Chrome with Foil
Rusty chrome can make anything look old and neglected. But before you reach for harsh chemicals, try this simple foil trick!
What You’ll Need:
* Aluminum foil
* Water (or a mild soapy water solution)
* Gloves (optional, but recommended)
Step-by-Step Instructions:
1. Prepare the Foil: Tear off a sheet of aluminum foil and crumple it into a ball. The rougher the surface, the better it will work.
2. Wet the Foil: Dip the crumpled foil ball into water or a mild soapy water solution. This will act as a lubricant and help prevent scratching.
3. Scrub the Rust: Gently scrub the rusty chrome surface with the wet foil ball. Apply light to medium pressure, and focus on the areas with the most rust. You’ll be amazed at how easily the rust comes off!
4. Rinse and Dry: Once you’ve removed the rust, rinse the chrome surface with clean water and dry it thoroughly with a soft cloth.
5. Important Note: Always test this method on a small, inconspicuous area first to ensure it doesn’t scratch the chrome. While foil is generally safe for chrome, some surfaces may be more delicate than others.
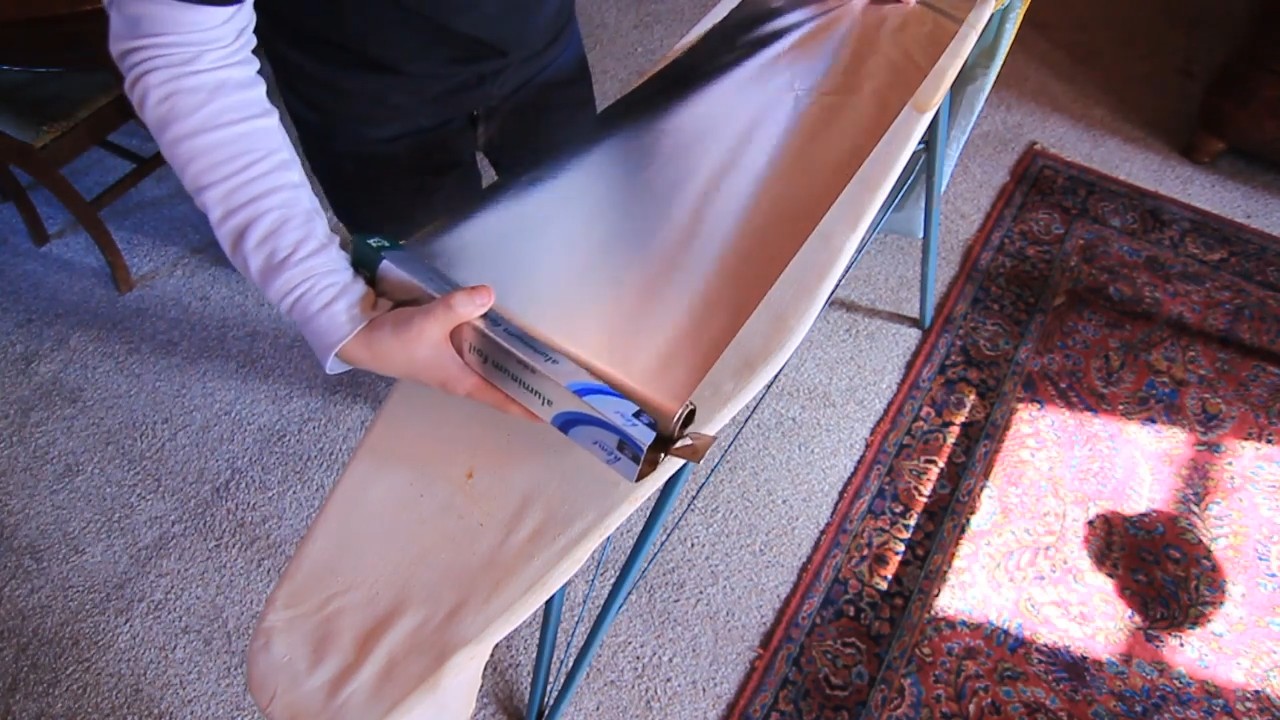
Boosting Your Iron’s Effectiveness
Ironing can be a chore, but this foil trick can make it faster and more efficient!
What You’ll Need:
* Aluminum foil
* Your ironing board
* The item you want to iron
Step-by-Step Instructions:
1. Prepare the Ironing Board: Lift the cover of your ironing board and place a sheet of aluminum foil underneath it, shiny side up. Make sure the foil covers the entire surface of the ironing board.
2. Replace the Cover: Carefully replace the ironing board cover, ensuring it’s smooth and wrinkle-free.
3. Iron as Usual: Now, iron your clothes as you normally would. You’ll notice that the clothes iron much faster.
4. How it Works: The aluminum foil reflects the heat from the iron back onto the fabric, essentially ironing both sides of the garment simultaneously. This significantly reduces ironing time and effort.
Making a Makeshift Piping Bag
Forgot to buy piping bags for your cake decorating project? No problem! Foil to the rescue!
What You’ll Need:
* Heavy-duty aluminum foil
* Scissors
* Tape (optional, but recommended)
Step-by-Step Instructions:
1. Cut a Square: Cut a large square of heavy-duty aluminum foil. The size will depend on how much frosting you need to pipe. I usually start with a square that’s about 12×12 inches.
2. Form a Cone: Roll the foil square into a cone shape, making sure the point of the cone is tightly sealed. Overlap the edges of the foil to create a secure seam.
3. Secure the Seam: If desired, use tape to secure the seam of the cone. This will prevent the frosting from leaking out.
4. Cut the Tip: Use scissors to cut off the tip of the cone, creating an opening for the frosting to flow through. The size of the opening will determine the thickness of the frosting line. Start with a small opening and enlarge it as needed.
5. Fill and Pipe: Fill the foil piping bag with frosting, twist the top closed, and start piping!
Cleaning Your Grill Grates with Foil
Grill grates can get incredibly greasy and grimy. But scrubbing them with a wire brush can be a real pain. Here’s a faster, easier way to clean them using foil!
What You’ll Need:
* Aluminum foil
* Grill brush (optional)
* Tongs (optional)
Step-by-Step Instructions:
1. Heat the Grill: Turn your grill on to high heat and let it heat up for about 10-15 minutes. This will help loosen the grease and grime.
2. Crumple the Foil: Tear off a large sheet of aluminum foil and crumple it into a ball.
3. Scrub the Grates: Using tongs (to protect your hands from the heat), scrub the hot grill grates with the crumpled foil ball. Apply firm pressure and focus on the areas with the most buildup. The foil will act as an abrasive, scraping away the grease and grime.
4. Use a Grill Brush (Optional): For stubborn buildup, you can use a grill brush in conjunction with the foil.
5. Dispose of the Foil: Once you’ve cleaned the grates, carefully dispose of the used foil ball.
Preventing Oven Splatter
Baking can be messy, especially when you’re dealing with sauces or juicy meats. Here’s how to use foil to minimize oven splatter and make cleanup a breeze!
What You’ll Need:
* Aluminum foil
* Baking dish or roasting pan
Step-by-Step Instructions:
1. Line the Baking Dish: Before placing your food in the baking dish or roasting pan, line it with a sheet of aluminum foil. Make sure the foil extends up the sides of the dish to catch any splatters.
2. Cook as Usual: Cook your food as you normally would.
3. Easy Cleanup: After cooking, simply remove the foil lining and discard it. Your baking dish or roasting pan will be virtually clean!
Making a Static-Free Dryer Ball
Dryer sheets can be expensive and contain chemicals that some people prefer to avoid. Here’s a natural alternative using foil!
What You’ll Need:
* Aluminum foil
Step-by-Step Instructions:
1. Crumple the Foil: Tear off a sheet of aluminum foil and crumple it into a tight ball, about the size of a tennis ball.
2. Toss in the Dryer: Toss the foil ball into the dryer along with your wet clothes.
3. Dry as Usual: Dry your clothes as you normally would.
4. How it Works: The aluminum foil ball helps to reduce static cling by conducting electricity and dissipating static charges. It can also help to soften clothes and reduce wrinkles.
5. Reuse: You can reuse the foil ball for several loads of laundry before it needs to be replaced. When it starts to unravel or lose its shape, simply crumple a new one.
Protecting Pie Crust Edges
Burnt pie crust edges are a common baking problem. Here’s how to use foil to prevent them from over-browning.
What You’ll Need:
* Aluminum foil
* Scissors
Step-by-Step Instructions:
1. Cut Foil Strips: Cut several strips of aluminum foil, about 2-3 inches wide.
2. Wrap the Crust: Gently wrap the foil strips around the edges of the pie crust, covering the areas that are browning too quickly.
3. Bake as Usual: Bake the pie as you normally would. The foil will protect the crust edges from burning, while allowing the rest of the pie to bake evenly.
4.

Conclusion
So, there you have it! This simple yet ingenious foil hack is more than just a clever trick; it’s a game-changer for anyone looking to streamline their cooking, cleaning, and even beauty routines. We’ve explored how aluminum foil, that unassuming roll in your kitchen drawer, can be transformed into a versatile tool that saves you time, money, and effort. From effortlessly cleaning your grill grates to boosting your iron’s performance and even creating salon-worthy highlights at home, the possibilities are truly endless.
Why is this foil hack a must-try? Because it’s practical, accessible, and incredibly effective. It eliminates the need for harsh chemicals in many cleaning scenarios, reducing your environmental impact and protecting your health. It extends the lifespan of your household appliances, saving you money on replacements. And it empowers you to tackle everyday tasks with greater ease and efficiency.
But don’t just take our word for it! We encourage you to experiment with these techniques and discover the magic of foil for yourself.
Variations and Suggestions
Feel free to adapt these foil hacks to suit your specific needs and preferences. For example:
* **Cleaning Burnt Food:** If you’re dealing with particularly stubborn burnt food residue, try adding a tablespoon of baking soda to the foil ball and water mixture for extra scrubbing power.
* **Sharpening Scissors:** For dull scissors, fold a sheet of foil multiple times to create a thicker pad. Then, repeatedly cut through the foil with the scissors. This will help to realign the blades and restore their sharpness.
* **Boosting Ironing:** For delicate fabrics, place a thin towel between the foil and the garment to prevent overheating.
* **DIY Hair Highlights:** Experiment with different widths and placements of the foil strips to achieve your desired highlighting effect. Remember to always perform a strand test before applying any hair dye to your entire head.
* **Protecting Pie Crusts:** If your pie crust is browning too quickly, create a foil shield by cutting a circle slightly larger than the pie and folding it into a ring shape. Place the foil ring over the crust to protect it from burning.
We’re confident that once you experience the convenience and effectiveness of these foil hacks, you’ll wonder how you ever lived without them. So, grab a roll of aluminum foil and get ready to revolutionize your daily routines!
We’d love to hear about your experiences with these foil hacks. Share your tips, tricks, and variations in the comments below. Let’s create a community of foil enthusiasts and discover even more innovative ways to utilize this amazing material! Don’t forget to tag us in your social media posts using #FoilHacks and show us your amazing creations. Happy hacking!
Frequently Asked Questions (FAQ)
**Q: Is it safe to use aluminum foil for cleaning?**
A: Yes, in most cases, using aluminum foil for cleaning is safe. It’s a natural abrasive that can effectively remove grime and residue without the need for harsh chemicals. However, it’s important to exercise caution when cleaning certain surfaces. Avoid using foil on delicate or easily scratched materials, such as non-stick cookware or polished surfaces. Always test a small, inconspicuous area first to ensure that the foil doesn’t cause any damage. Also, never mix foil with bleach or other harsh chemicals, as this can create dangerous fumes.
**Q: Can I reuse the aluminum foil after using it for these hacks?**
A: It depends on the specific hack and the condition of the foil after use. For cleaning tasks, the foil will likely become dirty and worn, so it’s best to discard it after a single use. However, for tasks like sharpening scissors or boosting ironing, the foil may be reusable for a few times, as long as it remains intact and free of debris. Always inspect the foil before reusing it and discard it if it’s damaged or excessively dirty.
**Q: Will the aluminum foil scratch my grill grates or other surfaces?**
A: Aluminum foil can be abrasive, so there is a potential for scratching delicate surfaces. To minimize the risk of scratching, use a gentle scrubbing motion and avoid applying excessive pressure. You can also dampen the foil with water or soapy water to reduce its abrasiveness. As mentioned earlier, it’s always a good idea to test a small, inconspicuous area first to ensure that the foil doesn’t cause any damage. For non-stick surfaces, consider using a softer cleaning tool instead of foil.
**Q: Are there any alternatives to aluminum foil for these hacks?**
A: While aluminum foil is often the most readily available and effective material for these hacks, there are some alternatives you can consider. For cleaning tasks, you can try using a scouring pad or a non-scratch sponge. For sharpening scissors, you can use a sharpening stone or a honing steel. For boosting ironing, you can use a heat-reflective ironing board cover. However, keep in mind that these alternatives may not be as effective or convenient as aluminum foil.
**Q: Can I use these foil hacks on all types of grills?**
A: These foil hacks are generally safe to use on most types of grills, including gas grills, charcoal grills, and electric grills. However, it’s important to consult your grill’s owner’s manual for specific cleaning instructions and recommendations. Some grill manufacturers may advise against using abrasive cleaning tools, such as aluminum foil, on certain grill components.
**Q: How often should I use these foil hacks?**
A: The frequency of using these foil hacks depends on your individual needs and preferences. For cleaning tasks, you can use them as needed to remove grime and residue. For sharpening scissors or boosting ironing, you can use them whenever you notice a decline in performance. There’s no set rule for how often you should use these hacks, so feel free to experiment and find what works best for you.
**Q: Is it safe to use aluminum foil in the oven?**
A: Yes, aluminum foil is generally safe to use in the oven. It can be used to line baking sheets, cover dishes, or create foil packets for cooking. However, it’s important to avoid direct contact between aluminum foil and acidic foods, such as tomatoes or citrus fruits, as this can cause the aluminum to leach into the food. Also, never use aluminum foil to line the bottom of your oven, as this can interfere with heat distribution and potentially damage the oven.
**Q: Can I use these foil hacks for other purposes not mentioned in the article?**
A: Absolutely! The possibilities for using aluminum foil are virtually endless. We encourage you to experiment and discover new and innovative ways to utilize this versatile material. If you come up with any new foil hacks, be sure to share them with us in the comments below! We’re always eager to learn new tips and tricks from our readers.
Leave a Comment