
Grow Bigger Cantaloupes DIY: Ever dreamt of slicing into a juicy, incredibly sweet cantaloupe that you nurtured from a tiny seed right in your own backyard? I know I have! There’s something deeply satisfying about harvesting your own food, and cantaloupes, with their vibrant orange flesh and refreshing taste, are a true summer delight. But let’s be honest, sometimes those homegrown cantaloupes end up a little… underwhelming. Small, bland, and not quite the flavor explosion you were hoping for.
Cantaloupe cultivation has a rich history, dating back to ancient times. From its origins in Africa and Asia, this melon has traveled the world, becoming a beloved fruit in countless cultures. But even with centuries of cultivation experience, getting those prize-winning, market-worthy cantaloupes can feel like a challenge. That’s where these DIY tricks come in!
Why do you need these hacks? Because everyone deserves to experience the joy of biting into a perfectly ripe, incredibly large, and flavorful cantaloupe that they grew themselves! These simple, yet effective, DIY methods will help you grow bigger cantaloupes than you ever thought possible. I’m going to share my favorite tips and tricks to help you achieve cantaloupe greatness. Get ready to impress your friends and family with your impressive harvest!
DIY: Unlock Giant Cantaloupe Growth!
Okay, fellow gardeners, let’s talk cantaloupes! We all love that sweet, juicy flavor, but wouldn’t it be amazing to harvest cantaloupes that are truly impressive in size? I’m going to share my tried-and-true method for growing bigger, better cantaloupes right in your own backyard. It’s not magic, just a little bit of science and a whole lot of TLC.
Understanding Cantaloupe Needs
Before we dive into the how-to, let’s quickly cover what cantaloupes need to thrive. Think of it as laying the groundwork for success.
* Sunlight: Cantaloupes are sun worshippers! They need at least 6-8 hours of direct sunlight each day. The more, the merrier.
* Soil: Well-draining soil is crucial. Cantaloupes hate sitting in soggy soil, which can lead to root rot. Aim for a slightly acidic to neutral pH (around 6.0-6.8).
* Water: Consistent watering is key, especially during fruit development. However, avoid overwatering, which can dilute the sugars and affect the flavor.
* Nutrients: Cantaloupes are heavy feeders. They need a good balance of nutrients, especially potassium and phosphorus, to produce large, sweet fruits.
* Pollination: Cantaloupes rely on pollinators like bees to set fruit. We’ll talk about how to encourage pollination later.
Getting Started: Preparing Your Garden Bed
The foundation of any successful garden is the soil. Let’s get our cantaloupe bed ready for action!
1. Choose the Right Location: Select a spot in your garden that gets plenty of sunlight and has good air circulation. This will help prevent fungal diseases.
2. Soil Testing (Optional but Recommended): A soil test will tell you the pH and nutrient levels of your soil. You can get a soil test kit at most garden centers or send a sample to your local agricultural extension office.
3. Amend the Soil: Based on your soil test results (or if you’re skipping the test, just to be safe), amend the soil with plenty of organic matter. I like to use a combination of compost, well-rotted manure, and peat moss. This will improve drainage, aeration, and nutrient content.
4. Till or Dig: Loosen the soil to a depth of at least 12 inches. This will allow the cantaloupe roots to penetrate deeply and access nutrients.
5. Create Raised Beds or Hills (Optional): Raised beds or hills can improve drainage, especially in areas with heavy clay soil. They also warm up faster in the spring, giving your cantaloupes a head start. If you choose to create hills, space them about 3-4 feet apart.
Planting Your Cantaloupe Seeds or Transplants
Now for the fun part – getting those cantaloupes in the ground!
1. Start Seeds Indoors (Optional): Starting seeds indoors gives you a head start, especially in cooler climates. Sow seeds about 4-6 weeks before the last expected frost. Use peat pots or biodegradable pots to avoid disturbing the roots when transplanting.
2. Direct Sow Seeds: If you live in a warmer climate, you can direct sow seeds directly into the garden after the last frost. Plant seeds about 1 inch deep and 2-3 feet apart.
3. Transplant Seedlings: If you started seeds indoors, harden them off for about a week before transplanting. This means gradually exposing them to outdoor conditions. Transplant seedlings into the garden after the last frost, spacing them about 2-3 feet apart.
4. Water Thoroughly: After planting, water the seeds or transplants thoroughly. Keep the soil consistently moist, but not soggy.
5. Mulch: Apply a layer of mulch around the plants to help retain moisture, suppress weeds, and regulate soil temperature. I like to use straw or shredded leaves.
Nurturing Your Cantaloupes: Watering, Fertilizing, and Pruning
This is where the real magic happens. Consistent care is essential for growing those giant cantaloupes.
1. Watering: Water deeply and regularly, especially during hot, dry weather. Aim for about 1-2 inches of water per week. Water at the base of the plants to avoid wetting the foliage, which can lead to fungal diseases. Drip irrigation or soaker hoses are ideal. Reduce watering as the fruits ripen to concentrate the sugars.
2. Fertilizing: Cantaloupes are heavy feeders, so regular fertilization is important.
* Initial Feeding: About two weeks after transplanting (or when seedlings emerge), fertilize with a balanced fertilizer (e.g., 10-10-10). Follow the instructions on the fertilizer package.
* Second Feeding: When the vines start to run, fertilize again with a fertilizer that is higher in phosphorus and potassium (e.g., 5-10-10). This will promote fruit development.
* Third Feeding: When the fruits are about the size of a tennis ball, fertilize one last time with a fertilizer that is high in potassium (e.g., 0-0-50). This will help the fruits ripen and sweeten.
* Organic Options: If you prefer organic fertilizers, you can use compost tea, fish emulsion, or bone meal.
3. Pruning (Optional): Pruning can help improve air circulation and direct the plant’s energy towards fruit production.
* Remove Suckers: Remove any suckers (small shoots that grow from the base of the plant) to encourage the main vine to grow.
* Pinch Back Vines: Once the vines have reached a certain length (e.g., 6-8 feet), you can pinch back the tips to encourage branching and fruit set.
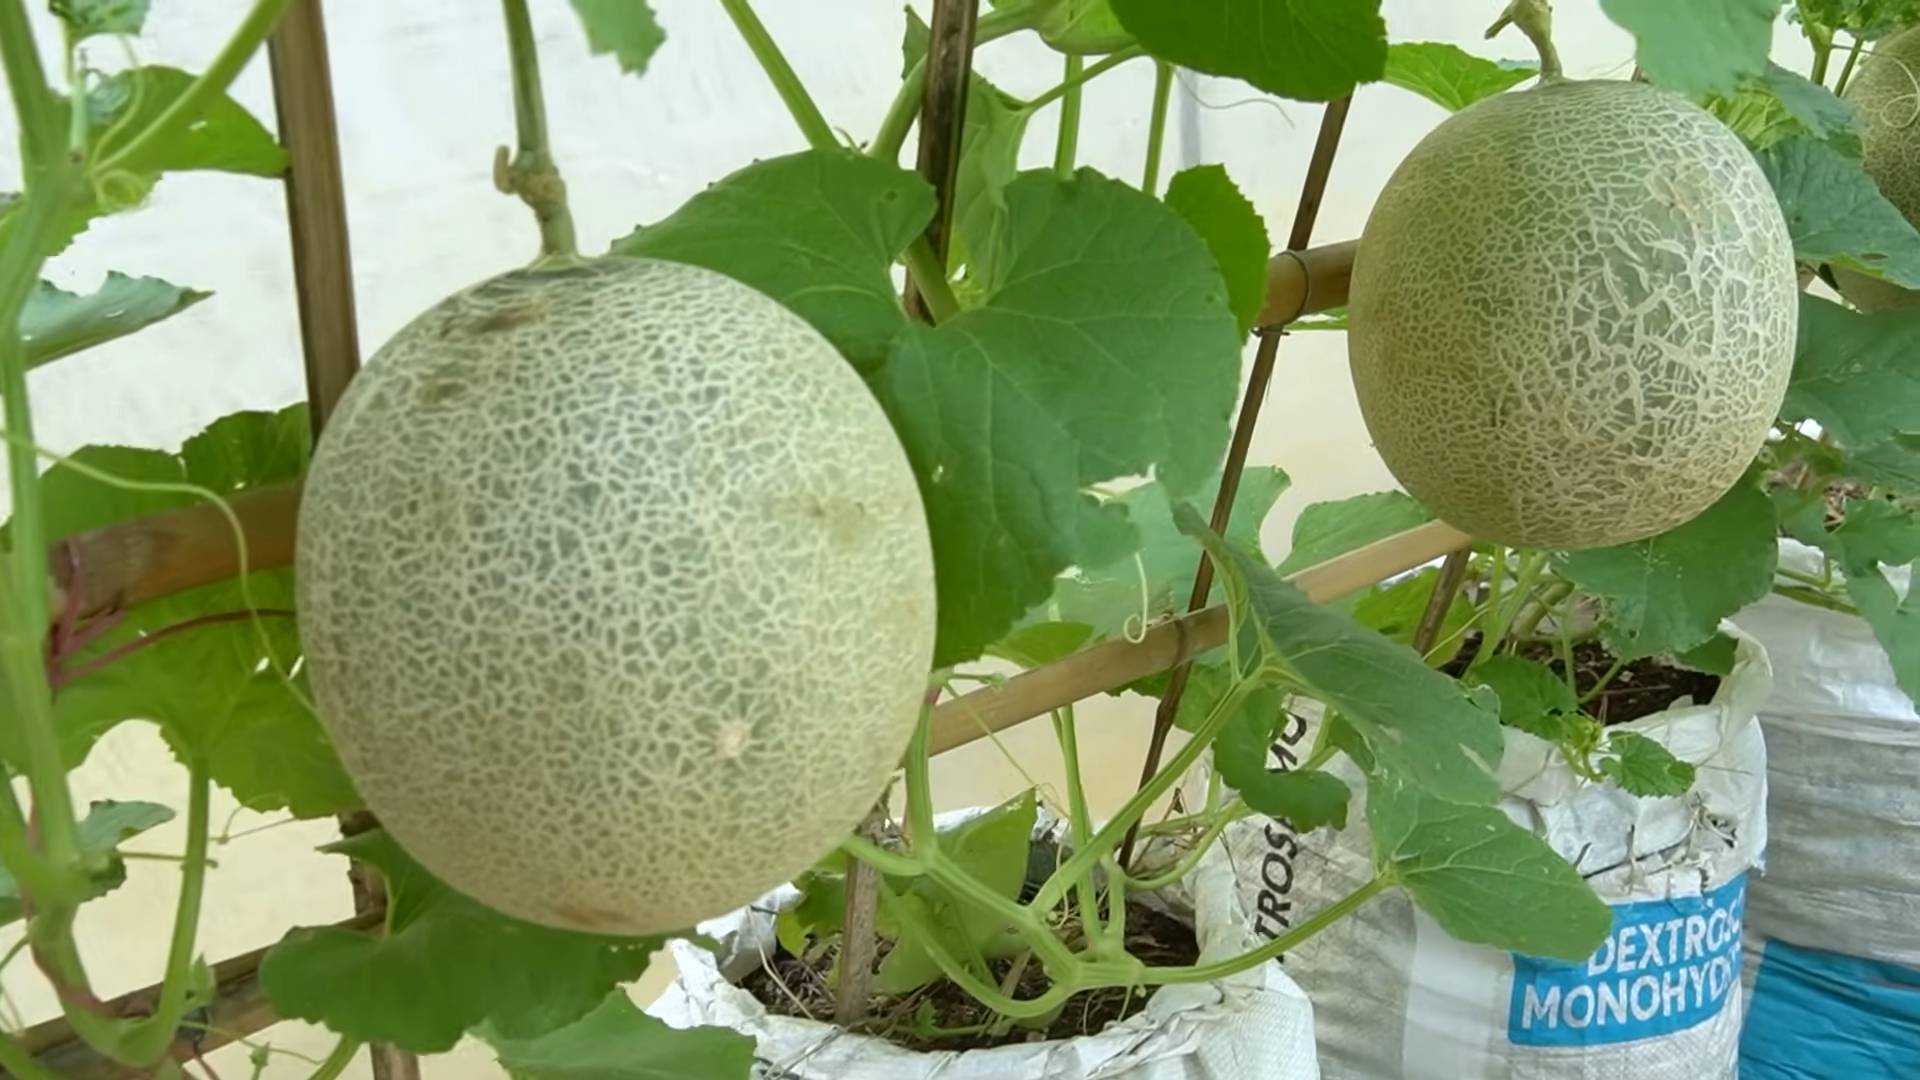
* Limit Fruit: If you want to grow really large cantaloupes, you can limit the number of fruits per vine. Remove any small or misshapen fruits to allow the plant to focus its energy on the remaining fruits. I usually aim for 2-3 cantaloupes per vine for maximum size.
4. Support the Fruits (Optional): As the cantaloupes grow larger, they may need support to prevent them from touching the ground and rotting. You can use slings made from old pantyhose or netting to support the fruits.
5. Weed Control: Keep the garden bed free of weeds, which can compete with the cantaloupes for nutrients and water. Hand-pull weeds or use a hoe to cultivate the soil.
6. Pest and Disease Control: Keep an eye out for pests and diseases. Common cantaloupe pests include aphids, squash bugs, and cucumber beetles. Common diseases include powdery mildew and fusarium wilt.
* Pest Control: Use insecticidal soap or neem oil to control pests. You can also hand-pick pests off the plants.
* Disease Control: Improve air circulation by pruning the plants. Apply a fungicide if necessary. Choose disease-resistant varieties when possible.
Boosting Pollination for Bigger Fruits
Pollination is absolutely critical for cantaloupe production. Without proper pollination, you’ll end up with small, misshapen fruits.
1. Attract Pollinators: Plant flowers that attract pollinators, such as bees, butterflies, and hummingbirds. Some good choices include sunflowers, zinnias, and lavender.
2. Hand Pollination (If Necessary): If you’re not seeing enough pollinators in your garden, you can hand-pollinate the cantaloupe flowers.
* Identify Male and Female Flowers: Cantaloupes have separate male and female flowers. Male flowers have a long, thin stem, while female flowers have a small fruit-like structure at the base of the flower.
* Pollinate in the Morning: Pollinate the flowers in the morning, when the pollen is most viable.
* Transfer Pollen: Use a small paintbrush or cotton swab to transfer pollen from the male flower to the female flower. Gently brush the pollen onto the stigma (the sticky part in the center of the female flower).
* Repeat: Repeat the process for several days to ensure pollination.
Harvesting Your Giant Cantaloupes
The moment we’ve all been waiting for! Knowing when to harvest is key to getting that perfect sweetness and flavor.
1. Check the Tendril: The tendril closest to the fruit will turn brown and dry when the cantaloupe is ripe.
2. Look for Color Change: The skin of the cantaloupe will change color from green to tan or yellow.
3. Smell the Aroma: A ripe cantaloupe will have a sweet, musky aroma.
4. The Slip Test: Gently press on the stem where it attaches to the fruit. If the stem slips easily from

Conclusion
So, there you have it! This simple, yet effective DIY trick to grow bigger cantaloupes is a game-changer for any home gardener. Forget those small, disappointing melons you might have struggled with in the past. By implementing this strategic pruning and support system, you’re setting the stage for a bountiful harvest of juicy, flavorful cantaloupes that will be the envy of the neighborhood.
Why is this a must-try? Because it addresses the core issues that often limit cantaloupe size: insufficient sunlight, inadequate airflow, and the plant’s tendency to expend energy on producing numerous, smaller fruits. By carefully pruning away excess foliage and non-fruit-bearing vines, you’re redirecting the plant’s energy towards the developing melons, allowing them to reach their full potential. The support system, whether it’s a simple sling or a more elaborate trellis, prevents the cantaloupes from resting on the ground, protecting them from pests, rot, and uneven ripening.
But don’t stop there! Feel free to experiment with variations to suit your specific growing conditions and preferences. For instance, if you live in a particularly hot climate, consider providing some afternoon shade to protect the developing cantaloupes from sunburn. You could also try different types of support systems, such as using pantyhose to create individual slings for each melon. Another variation is to experiment with different fertilizers specifically formulated for melons, ensuring they receive the nutrients they need to thrive. Some gardeners swear by adding Epsom salts to the soil, claiming it enhances sweetness.
The key is to observe your plants closely and adjust your approach as needed. Remember, gardening is a learning process, and every season brings new opportunities to refine your techniques.
We’re confident that this DIY trick will significantly improve your cantaloupe harvest. Imagine biting into a perfectly ripe, incredibly sweet cantaloupe that you grew yourself – a true testament to your gardening skills and dedication.
Don’t just take our word for it, though. We highly encourage you to try this DIY trick and see the results for yourself. And most importantly, share your experience with us! We’d love to hear about your successes, challenges, and any variations you tried. Post photos of your impressive cantaloupes on social media using #GrowBiggerCantaloupesDIY and tag us so we can celebrate your gardening triumphs together. Let’s create a community of cantaloupe enthusiasts who are passionate about growing the best possible fruit!
Ready to transform your cantaloupe patch? Get started today and prepare to be amazed by the difference this simple DIY trick can make. Happy gardening!
Frequently Asked Questions (FAQ)
1. When is the best time to start pruning my cantaloupe plants?
The ideal time to begin pruning your cantaloupe plants is when they are young and actively growing, typically around 4-6 weeks after transplanting or when the vines are about 1-2 feet long. At this stage, you can start removing any suckers (small shoots that grow from the base of the plant) and non-fruit-bearing vines. Continue pruning throughout the growing season as needed to maintain good airflow and sunlight penetration. Avoid pruning during periods of extreme heat or drought, as this can stress the plants.
2. How many cantaloupes should I allow to grow on each vine?
For optimal size and flavor, it’s generally recommended to limit the number of cantaloupes to 2-3 per vine. Once you see several small cantaloupes developing, select the healthiest and most promising ones and remove the others. This will allow the plant to focus its energy on nurturing the remaining fruits, resulting in larger and sweeter cantaloupes.
3. What type of support system is best for cantaloupes?
The best type of support system depends on your available space and personal preference. For smaller gardens, individual slings made from pantyhose or netting can be used to support each cantaloupe. For larger gardens, a trellis or A-frame structure can provide more comprehensive support for the entire vine. The key is to ensure that the support system is strong enough to hold the weight of the developing cantaloupes and that it allows for good airflow around the fruits.
4. How do I know when my cantaloupes are ripe?
Determining when a cantaloupe is ripe can be tricky, but there are several telltale signs to look for. First, the skin color should change from green to a tan or yellowish hue. Second, the stem should easily slip from the vine with a gentle tug. Third, the cantaloupe should have a fragrant aroma, especially near the stem end. Finally, the blossom end (the opposite end of the stem) should be slightly soft to the touch. Avoid picking cantaloupes that are still hard or have a green rind, as they are not yet ripe.
5. What are some common pests and diseases that affect cantaloupes, and how can I prevent them?
Cantaloupes are susceptible to several pests and diseases, including aphids, squash bugs, vine borers, powdery mildew, and fusarium wilt. To prevent these problems, start by selecting disease-resistant varieties. Practice crop rotation to avoid building up pathogens in the soil. Provide adequate spacing between plants to promote good airflow. Regularly inspect your plants for signs of pests or diseases and take action promptly. Organic pest control methods, such as insecticidal soap or neem oil, can be effective for controlling aphids and squash bugs. Fungicides can be used to prevent or treat powdery mildew. For vine borers, you can try wrapping the base of the stems with aluminum foil to deter them from laying eggs.
6. Can I use this DIY trick for other types of melons?
Yes, this DIY trick can be adapted for other types of melons, such as honeydew melons and watermelons. The principles of pruning and providing support are the same, although the specific techniques may vary slightly depending on the size and growth habit of the melon variety. For example, watermelons typically require stronger support systems due to their larger size and weight.
7. What type of fertilizer is best for cantaloupes?
Cantaloupes benefit from a balanced fertilizer that is rich in nitrogen, phosphorus, and potassium. A fertilizer with an NPK ratio of 10-10-10 or 14-14-14 is a good starting point. You can also supplement with organic fertilizers, such as compost or manure. Avoid over-fertilizing, as this can lead to excessive foliage growth and reduced fruit production.
8. How often should I water my cantaloupe plants?
Cantaloupe plants need consistent moisture, especially during fruit development. Water deeply and regularly, aiming for about 1-2 inches of water per week. Avoid overhead watering, as this can promote fungal diseases. Drip irrigation or soaker hoses are the preferred methods of watering.
9. What if my cantaloupe vines are not producing any fruit?
If your cantaloupe vines are not producing any fruit, there could be several reasons why. First, ensure that the plants are receiving enough sunlight (at least 6-8 hours per day). Second, check the soil pH and nutrient levels. Cantaloupes prefer a slightly acidic soil with a pH of 6.0-6.8. Third, make sure that the plants are being pollinated properly. Cantaloupes rely on bees and other pollinators to transfer pollen from the male flowers to the female flowers. If you are not seeing any bees in your garden, you may need to hand-pollinate the flowers yourself. Finally, consider the weather conditions. Extreme heat or cold can inhibit fruit production.
10. How can I improve the sweetness of my cantaloupes?
Several factors can influence the sweetness of cantaloupes. First, choose a variety that is known for its sweetness. Second, provide the plants with plenty of sunlight and water. Third, avoid over-fertilizing with nitrogen, as this can reduce sweetness. Fourth, allow the cantaloupes to ripen fully on the vine before harvesting. Finally, some gardeners swear by adding Epsom salts to the soil, claiming it enhances sweetness.
Leave a Comment