
Grow Bigger Melons? Absolutely! Who wouldn’t want to harvest juicy, impressively sized melons from their own backyard? Let’s be honest, there’s something incredibly satisfying about nurturing a tiny seed into a bountiful fruit, especially when that fruit is a showstopper. For centuries, cultivating melons has been a cherished practice, dating back to ancient civilizations in Africa and Asia. These cultures revered melons not only for their delicious taste but also for their hydrating properties in arid climates.
But let’s face it, sometimes our melon dreams don’t quite match reality. You might end up with small, underwhelming fruits despite your best efforts. That’s where these DIY tricks and hacks come in! I’m here to share some simple yet effective techniques that will help you grow bigger melons than you ever thought possible. These aren’t complicated, time-consuming methods; they’re practical tips that anyone, regardless of their gardening experience, can implement.
Imagine the look on your friends’ faces when you present them with a homegrown watermelon that rivals anything you’d find at the grocery store. Or the pride you’ll feel knowing you nurtured that impressive cantaloupe from seed to table. So, are you ready to unlock the secrets to melon-growing success? Let’s dive in and get those melons growing big and beautiful!
DIY: Unleash Melon Mania – How to Grow Giant, Juicy Melons!
Okay, melon lovers, gather ’round! I’m about to share my secrets to growing melons so big, they’ll make your neighbors green with envy (pun intended!). Forget those tiny, flavorless grocery store melons. We’re talking prize-winning, juicy giants bursting with sweetness. This isn’t just about planting seeds; it’s about understanding what these thirsty fruits crave and giving them the royal treatment. Let’s get started!
Choosing the Right Variety
Before we even think about soil, we need to pick the right melon for our climate and goals. Not all melons are created equal! Some are naturally larger, while others are better suited for shorter growing seasons.
* Watermelons: ‘Carolina Cross’ is the undisputed king of giant watermelons, often exceeding 200 pounds! ‘Charleston Gray’ is another good choice, known for its elongated shape and disease resistance. If you’re in a cooler climate, consider ‘Blacktail Mountain,’ a smaller but faster-maturing variety.
* Cantaloupes: ‘Hale’s Best Jumbo’ lives up to its name, producing large, flavorful cantaloupes. ‘Athena’ is a popular hybrid known for its sweetness and disease resistance.
* Honeydew: ‘Honey Dew Green Flesh’ is a classic choice, offering a smooth, sweet flavor. ‘Temptation’ is a newer variety with excellent sugar content.
Pro Tip: Check your local extension office or garden center for recommendations on varieties that thrive in your specific area.
Preparing the Soil: The Foundation for Success
Melons are heavy feeders, meaning they need a lot of nutrients to grow big and strong. Soil preparation is absolutely crucial.
* Sunlight: Melons need at least 6-8 hours of direct sunlight per day. Choose a location that gets plenty of sunshine.
* Soil Type: Melons prefer well-drained, sandy loam soil with a pH between 6.0 and 6.8.
* Soil Testing: Before you do anything, test your soil! You can purchase a soil testing kit at most garden centers or send a sample to your local extension office. This will tell you exactly what nutrients your soil is lacking.
* Amending the Soil: Based on your soil test results, amend your soil accordingly.
* Compost: Add plenty of compost to improve soil structure, drainage, and nutrient content. I like to use a mix of homemade compost and well-rotted manure.
* Manure: Aged manure is a fantastic source of nitrogen, phosphorus, and potassium. Avoid using fresh manure, as it can burn the roots.
* Fertilizer: Incorporate a slow-release fertilizer specifically formulated for vegetables. Look for a balanced fertilizer with an NPK ratio (nitrogen, phosphorus, potassium) of around 10-10-10.
* Sand: If your soil is heavy clay, add sand to improve drainage.
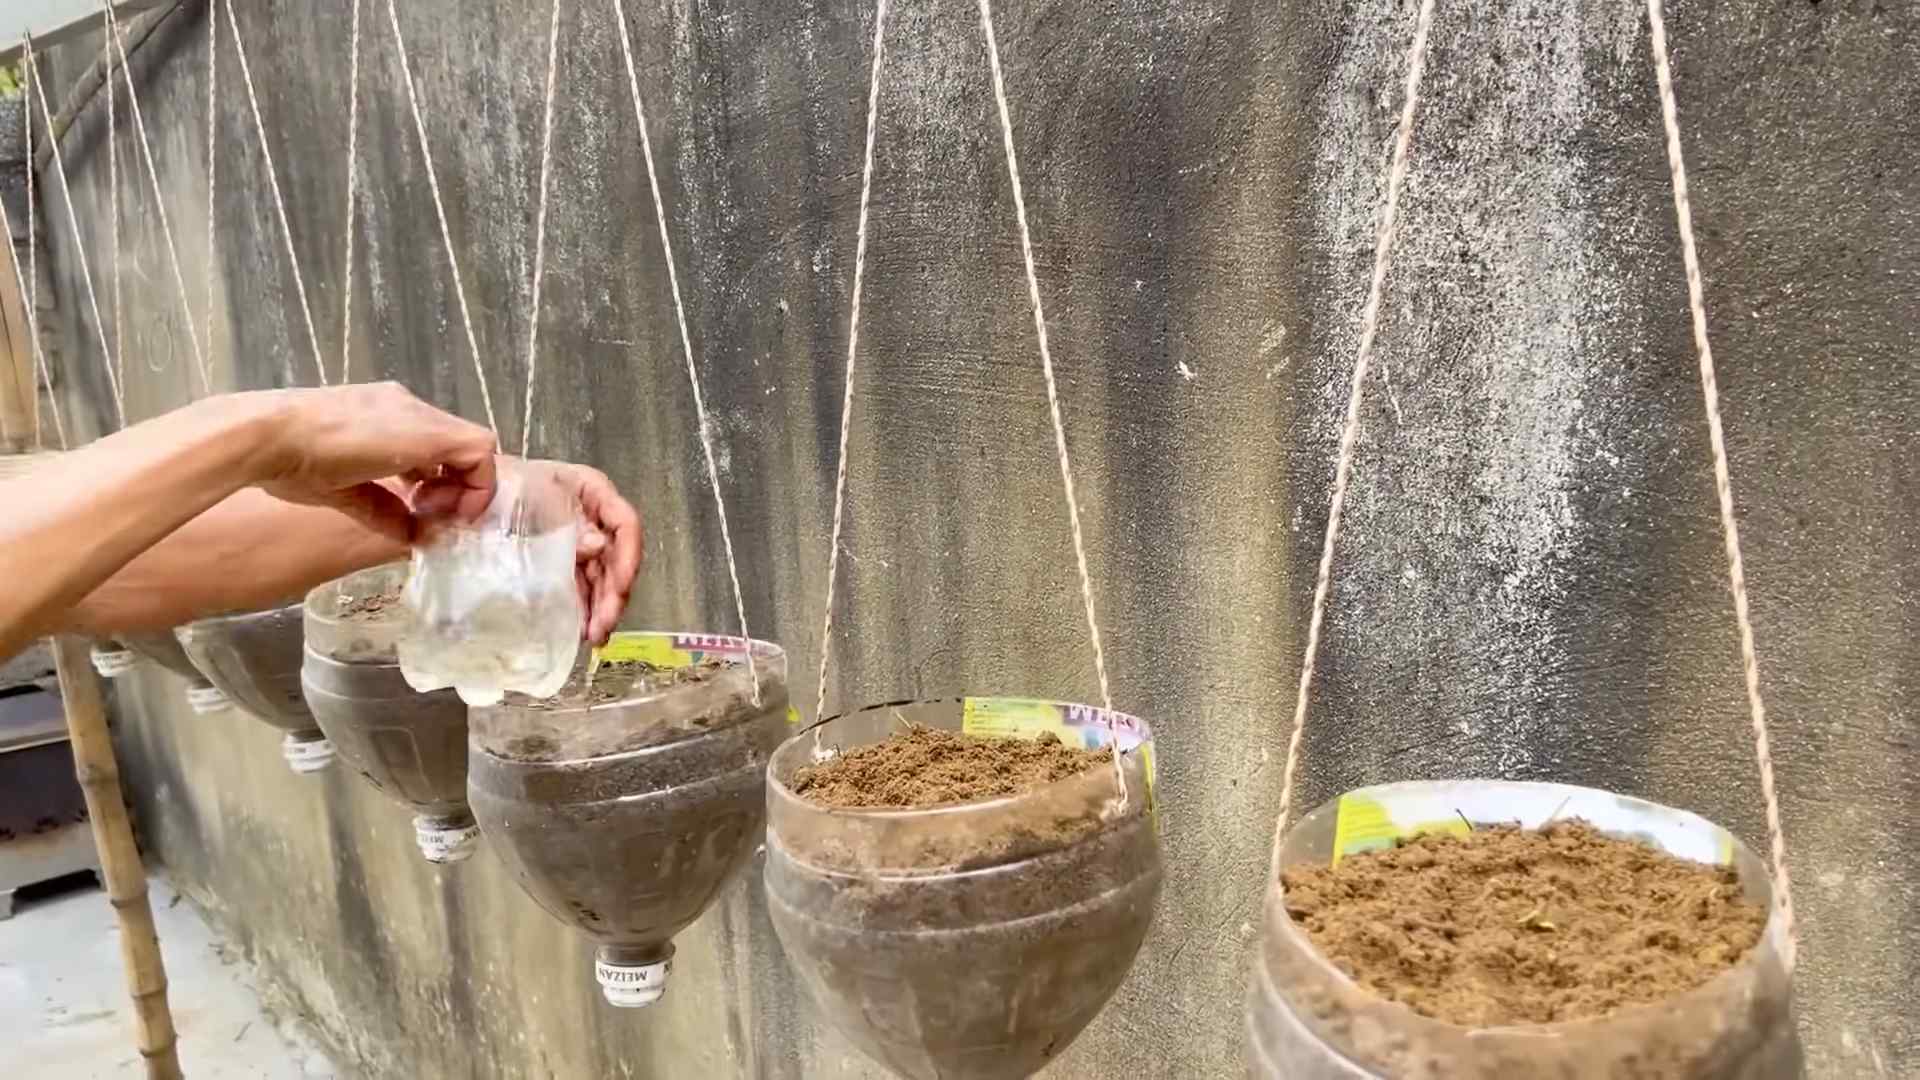
* Creating Mounds or Rows: Melons grow best on raised mounds or rows. This improves drainage and warms the soil more quickly. Create mounds that are about 12 inches high and 3-4 feet wide. Space the mounds about 4-6 feet apart, depending on the variety.
Pro Tip: I like to add a handful of bone meal to each planting hole. Bone meal is a great source of phosphorus, which promotes strong root development.
Planting Your Melon Seeds or Transplants
Now for the fun part – getting those seeds in the ground!
* Starting Seeds Indoors (Optional): If you live in a cooler climate with a short growing season, you can start your melon seeds indoors 4-6 weeks before the last expected frost. Use peat pots or biodegradable containers to avoid disturbing the roots when transplanting.
* Sow seeds about 1 inch deep in a seed-starting mix.
* Keep the soil moist but not soggy.
* Provide plenty of light, either with a grow light or a sunny windowsill.
* Harden off the seedlings by gradually exposing them to outdoor conditions for a week before transplanting.
* Direct Sowing: If you have a long growing season, you can direct sow melon seeds directly into the garden.
* Wait until the soil has warmed to at least 70°F (21°C).
* Sow seeds about 1 inch deep and 2-3 inches apart.
* Thin the seedlings to one plant per mound or row when they are a few inches tall.
* Transplanting: When transplanting seedlings, handle them carefully to avoid damaging the roots.
* Dig a hole that is slightly larger than the root ball.
* Gently remove the seedling from its container and place it in the hole.
* Backfill with soil and water thoroughly.
* Space transplants according to the variety’s recommendations.
Pro Tip: I like to soak my melon seeds in water for 24 hours before planting. This helps to soften the seed coat and speed up germination.
Watering and Fertilizing: Keeping Your Melons Hydrated and Happy
Melons need consistent watering, especially during hot, dry weather.
* Watering: Water deeply and regularly, especially when the fruits are developing. Aim for about 1-2 inches of water per week.
* Use a soaker hose or drip irrigation to deliver water directly to the roots. Avoid overhead watering, as this can promote fungal diseases.
* Water in the morning to allow the foliage to dry before nightfall.
* Fertilizing: Side-dress your melon plants with a fertilizer high in potassium when the fruits begin to set. Potassium is essential for fruit development and sweetness.
* Use a fertilizer with an NPK ratio of around 6-12-24.
* Follow the instructions on the fertilizer label.
* Avoid over-fertilizing, as this can lead to excessive vine growth and fewer fruits.
Pro Tip: Mulch around your melon plants with straw or black plastic to conserve moisture, suppress weeds, and warm the soil.
Pruning and Training: Directing the Energy for Maximum Growth
Pruning and training can help to improve air circulation, reduce disease, and encourage larger fruits.
* Pruning:
* Remove any suckers (small shoots that grow from the base of the plant) to direct energy to the main vines.
* Pinch off the growing tips of the vines after the fruits have set to encourage the plant to focus on fruit development.
* Remove any diseased or damaged leaves.
* Training:
* Train the vines to grow in a specific direction to maximize sunlight exposure and prevent overcrowding.
* Use stakes or trellises to support the vines, especially for smaller melon varieties.
* Place a board or piece of cardboard under the developing melons to prevent them from rotting on the ground.
Pro Tip: When growing giant watermelons, limit the plant to one or two fruits per vine to maximize their size.
Pest and Disease Control: Protecting Your Precious Melons
Melons are susceptible to a variety of pests and diseases.
* Common Pests:
* Squash Bugs: Handpick squash bugs and their eggs. Use insecticidal soap or neem oil to control infestations.
* Cucumber Beetles: Cover young plants with row covers to prevent cucumber beetles from feeding. Use yellow sticky traps to catch adult beetles.
* Aphids: Spray aphids with a strong stream of water or use insecticidal soap.
* Vine Borers: Wrap the base of the vines with aluminum foil to prevent vine borers from laying their eggs.
* Common Diseases:
* Powdery Mildew: Improve air circulation by pruning the vines. Apply a fungicide if necessary.
* Downy Mildew: Avoid overhead watering. Apply a fungicide if necessary.
* Fusarium Wilt: Choose disease-resistant varieties. Practice crop rotation.
* Anthracnose: Avoid overhead watering. Apply a fungicide if necessary.
Pro Tip: Regularly inspect your melon plants for signs of pests or diseases. Early detection and treatment are key to preventing serious problems.
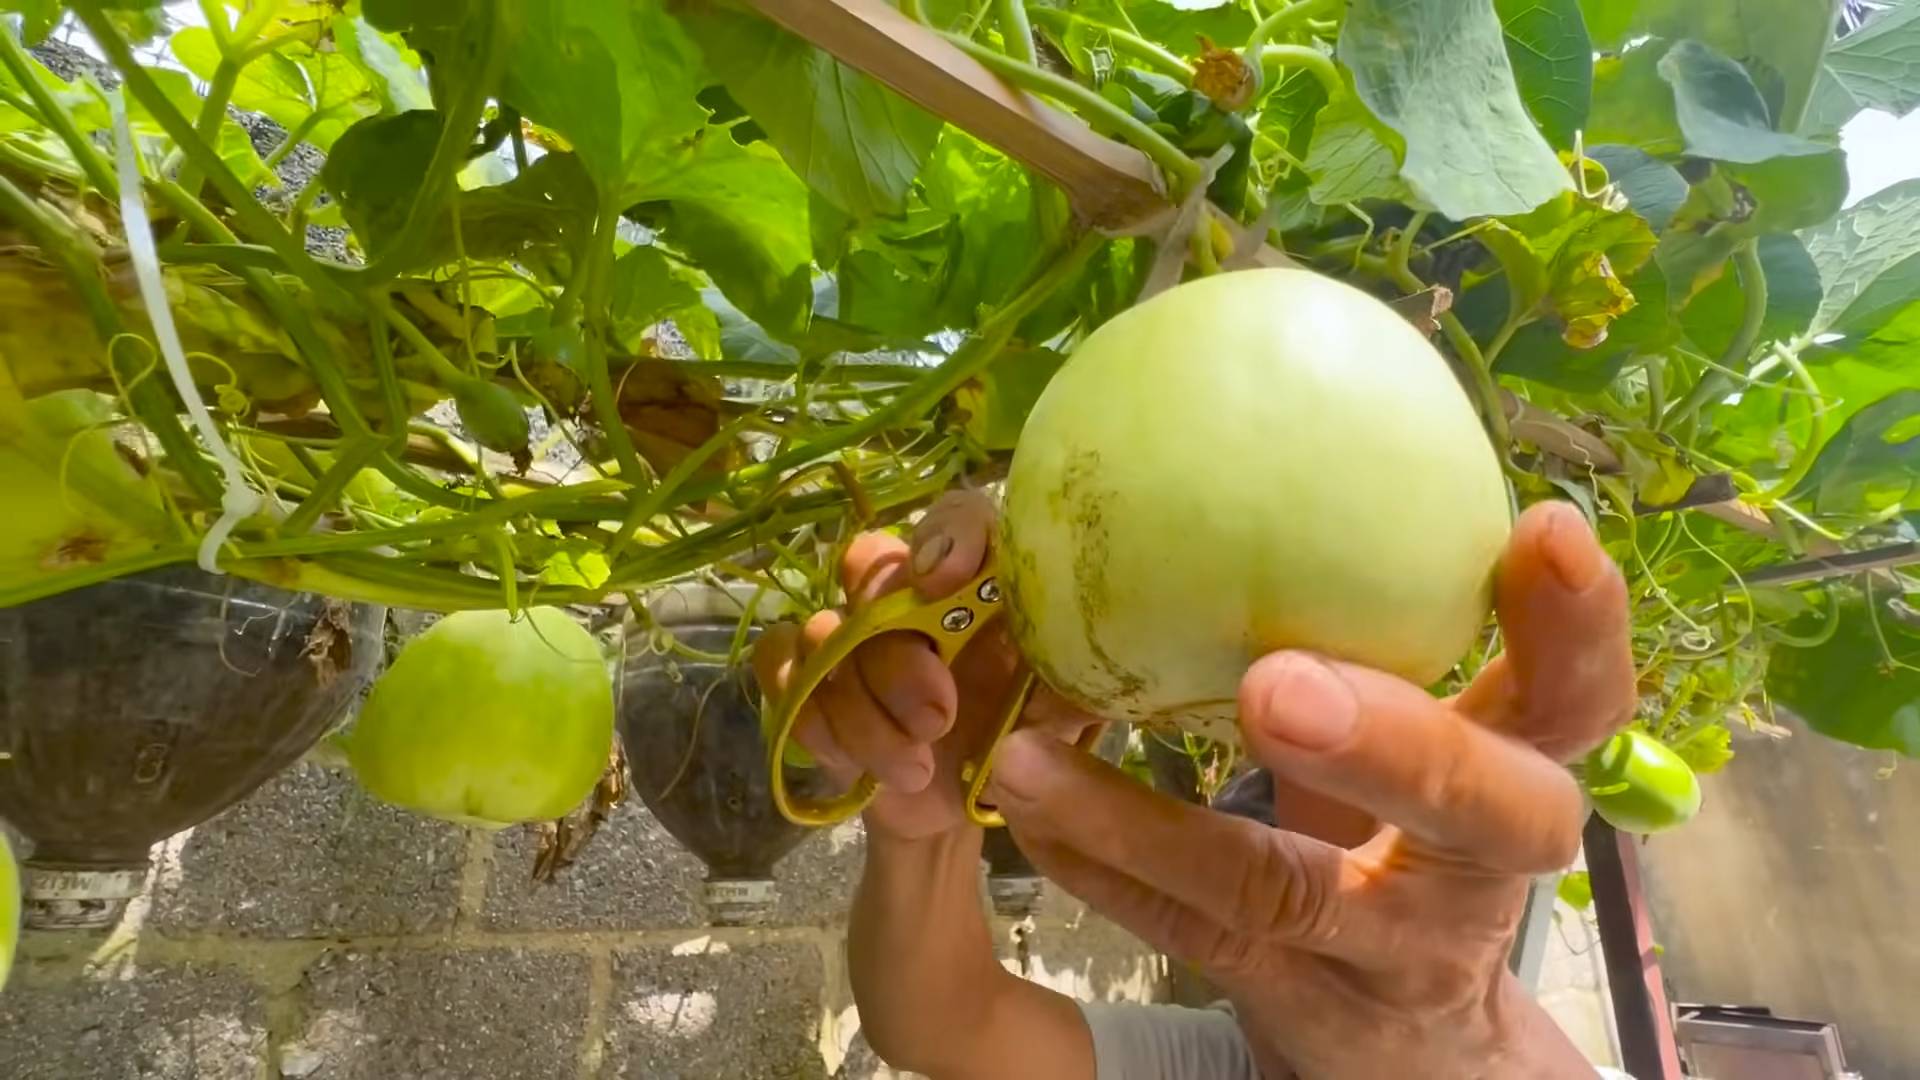
Harvesting: The Sweet Reward
Knowing when to harvest your melons is crucial for getting the best flavor and texture.
* Watermelons:
* Look for a dull, thumping sound when you tap the melon.
* The tendril closest to the melon should be brown and dry.
* The underside of the melon (where it rests on the ground) should be yellow or cream-colored.
* Cantaloupes:
* The melon should slip easily from the vine with a gentle tug.
* The skin should be a golden-tan color.
* The
Conclusion
So, there you have it! This simple, yet incredibly effective DIY trick to grow bigger melons is a game-changer for any gardener, whether you’re a seasoned pro or just starting out. We’ve walked you through the process, highlighting the science behind why it works and offering practical tips to ensure your success.
But why is this a must-try? Because it’s more than just about size. It’s about maximizing the potential of your plants, ensuring they receive the nutrients they need to produce the most delicious, juicy, and satisfying melons possible. Imagine biting into a perfectly ripe watermelon, cantaloupe, or honeydew, bursting with flavor – all thanks to a little extra care and attention. This method not only encourages larger fruit, but also contributes to improved sweetness and overall quality.
Beyond the basic technique, there’s plenty of room for experimentation. Consider using different types of organic fertilizers to tailor the nutrient profile to your specific melon variety. For example, watermelons might benefit from a fertilizer higher in potassium, while cantaloupes might prefer a blend richer in phosphorus. You can also adjust the frequency of application based on your soil type and climate. If you live in a particularly hot and dry region, you might need to water more frequently to compensate for increased evaporation.
Another variation to explore is the use of companion planting. Certain plants, like marigolds and nasturtiums, can help deter pests and attract beneficial insects, creating a healthier environment for your melon plants to thrive. Basil is also a great companion plant, known to improve the flavor of many fruits and vegetables.
Ultimately, the best way to discover what works best for you is to get your hands dirty and try it out! Don’t be afraid to experiment with different techniques and variations to find what yields the best results in your garden. We are confident that this DIY trick will significantly improve your melon harvest.
We’re incredibly excited to see your results! We encourage you to try this DIY trick to grow bigger melons and share your experiences with us. Post pictures of your impressive melons on social media using #GrowBiggerMelons and tag us so we can celebrate your success. Let’s build a community of melon enthusiasts, sharing tips and tricks to help everyone achieve their gardening goals. Happy growing!
Frequently Asked Questions (FAQ)
What exactly does this DIY trick do to help melons grow bigger?
This DIY trick focuses on providing targeted nutrition and support to the developing melon fruit. By strategically fertilizing and potentially pruning, you’re ensuring that the plant directs its energy towards producing larger, healthier melons. The specific nutrients in the fertilizer, like phosphorus and potassium, are crucial for fruit development and ripening. The pruning aspect, if applicable, helps to reduce competition for resources, allowing the remaining melons to receive a greater share of the plant’s energy. It’s about optimizing the plant’s resources to maximize fruit size and quality.
How often should I apply the fertilizer solution?
The frequency of application depends on several factors, including your soil type, climate, and the specific fertilizer you’re using. As a general guideline, start with applying the fertilizer solution every 1-2 weeks during the active growing season, when the melons are starting to develop. Monitor your plants closely for signs of nutrient deficiencies or excesses. If you notice yellowing leaves (chlorosis), it could indicate a deficiency. If you see excessive leaf growth but little fruit development, it could indicate an excess of nitrogen. Adjust the frequency and concentration of the fertilizer solution accordingly. In sandy soils, which drain quickly, you might need to apply fertilizer more frequently than in clay soils, which retain moisture and nutrients for longer.
What type of fertilizer is best for growing bigger melons?
A balanced fertilizer with a higher ratio of phosphorus (P) and potassium (K) is generally recommended for melon growth. Look for a fertilizer with an NPK ratio like 5-10-10 or 10-20-20. Phosphorus is essential for root development and flowering, while potassium is crucial for fruit development, ripening, and overall plant health. Avoid fertilizers that are too high in nitrogen (N), as this can promote excessive leaf growth at the expense of fruit production. Organic options like bone meal (for phosphorus) and wood ash (for potassium) can also be beneficial. Consider conducting a soil test to determine the specific nutrient needs of your soil and choose a fertilizer accordingly.
Is this DIY trick suitable for all types of melons?
Yes, this DIY trick can be adapted for most types of melons, including watermelons, cantaloupes, honeydews, and muskmelons. However, the specific nutrient requirements and growing conditions may vary slightly depending on the variety. For example, watermelons generally require more space and water than cantaloupes. Research the specific needs of your chosen melon variety and adjust the technique accordingly. The core principles of providing targeted nutrition and support remain the same, but the details may need to be tweaked to optimize results.
Can I use this trick in containers or raised beds?
Absolutely! This DIY trick is perfectly suitable for growing melons in containers or raised beds. In fact, it can be even more effective in these settings, as you have greater control over the soil composition and nutrient levels. Choose a large container with good drainage and use a high-quality potting mix amended with compost or other organic matter. Pay close attention to watering, as containers tend to dry out more quickly than in-ground gardens. The same fertilizer recommendations apply, but you may need to adjust the frequency of application based on the size of the container and the growth rate of the plant.
What if I don’t see results immediately?
Patience is key! Growing bigger melons takes time and effort. Don’t get discouraged if you don’t see dramatic results overnight. It can take several weeks or even months for the effects of the DIY trick to become noticeable. Continue to monitor your plants closely, provide consistent care, and adjust your techniques as needed. Factors like weather conditions, soil quality, and pest pressure can also influence the outcome. Remember that gardening is a learning process, and every season brings new challenges and opportunities. Keep experimenting, keep learning, and keep growing!
Are there any potential downsides to this DIY trick?
While this DIY trick is generally safe and effective, there are a few potential downsides to be aware of. Over-fertilizing can lead to nutrient imbalances and plant damage. Always follow the instructions on the fertilizer label and avoid applying too much. Excessive pruning can also stress the plant and reduce its overall yield. Only prune when necessary and avoid removing too many leaves or stems. Finally, be mindful of the potential for pests and diseases. Healthy plants are generally more resistant to problems, but it’s important to monitor your melons regularly and take action if you notice any signs of trouble.
How do I know when my melons are ripe and ready to harvest?
Knowing when to harvest your melons is crucial for enjoying their full flavor and sweetness. The specific indicators of ripeness vary depending on the type of melon. For watermelons, look for a dull rind, a yellow or cream-colored spot on the underside where it rested on the ground, and a hollow sound when you thump it. For cantaloupes, look for a sweet aroma, a slight give when you press on the blossom end, and a stem that slips easily from the fruit. For honeydews, look for a creamy yellow color and a slightly waxy feel. Don’t rely solely on one indicator; use a combination of factors to determine ripeness. Harvesting at the peak of ripeness will ensure the most delicious and satisfying melons.

Leave a Comment