
Grow Bitter Gourd Home – sounds like a challenge, right? But trust me, it’s a rewarding one! Have you ever dreamt of strolling into your backyard and harvesting your own vibrant, slightly quirky-looking bitter gourds? Well, stop dreaming and start doing! This DIY guide is your passport to cultivating these nutritional powerhouses right in the comfort of your own home.
Bitter gourd, also known as karela, isn’t just another vegetable; it’s a culinary and medicinal staple with roots stretching back centuries. In many Asian cultures, it’s revered for its health benefits and unique flavor profile. While its bitterness might be an acquired taste, its versatility in dishes is undeniable. From stir-fries to juices, bitter gourd adds a distinctive touch.
But why should you bother to grow bitter gourd home? Simple! Freshness, control over pesticides, and the sheer satisfaction of nurturing something from seed to harvest. Plus, with rising food costs, growing your own produce is a fantastic way to save money and eat healthier. This DIY article will equip you with all the essential tricks and hacks to successfully cultivate bitter gourd, even if you’re a complete beginner. I’ll guide you through everything from seed selection to pest control, ensuring you have a bountiful harvest. So, grab your gardening gloves, and let’s get started!
Growing Bitter Gourd at Home: A Comprehensive DIY Guide
Hey there, fellow gardening enthusiasts! I’m so excited to share my experience and knowledge on growing bitter gourd (also known as bitter melon or *karela*) right in your own backyard or even in containers. It might seem intimidating at first, but trust me, with a little patience and the right guidance, you’ll be harvesting your own bitter gourds in no time! This guide will walk you through every step, from seed to harvest.
Choosing Your Bitter Gourd Variety
Before we dive into the nitty-gritty, let’s talk about choosing the right variety. There are several types of bitter gourd, each with slightly different characteristics. Some are longer and thinner, while others are shorter and more rounded. Some are darker green, while others are lighter. Consider these factors when making your choice:
* Climate: Some varieties are better suited to warmer climates, while others can tolerate cooler temperatures. Check the seed packet or plant description for specific recommendations.
* Space: If you’re growing in containers, you might want to choose a more compact variety.
* Taste: Yes, even bitter gourds have slightly different flavor profiles! Some are more intensely bitter than others. Do a little research to find one that suits your palate.
I personally prefer the long, slender, dark green varieties, as they seem to thrive in my garden.
Preparing for Planting
Okay, now that you’ve chosen your variety, let’s get ready for planting! This involves a few key steps:
* Seed Starting vs. Direct Sowing: You can either start your bitter gourd seeds indoors or sow them directly into the ground. Starting indoors gives you a head start, especially in cooler climates. I usually start mine indoors about 4-6 weeks before the last expected frost.
* Soil Preparation: Bitter gourd loves well-drained, fertile soil. Amend your soil with plenty of compost or well-rotted manure. This will provide the nutrients your plants need to thrive.
* Sunlight: Bitter gourd needs at least 6-8 hours of sunlight per day. Choose a location in your garden that gets plenty of sun.
* Trellis or Support: Bitter gourd is a vine, so it needs something to climb on. A trellis, fence, or even a sturdy bamboo structure will work perfectly.
Step-by-Step Planting Guide
Here’s the step-by-step guide to planting your bitter gourd, whether you’re starting from seeds or transplanting seedlings:
Starting Seeds Indoors (Optional)
1. Soaking the Seeds: To improve germination, soak the bitter gourd seeds in warm water for 24 hours before planting. This helps soften the hard outer shell.
2. Planting in Seed Trays or Pots: Fill seed trays or small pots with a good quality seed-starting mix. Make a small hole (about 1/2 inch deep) in each cell or pot.
3. Sowing the Seeds: Place one or two seeds in each hole and cover them gently with soil.
4. Watering: Water the soil gently to moisten it. Avoid overwatering, which can lead to rot.
5. Providing Warmth: Bitter gourd seeds need warmth to germinate. Place the seed trays or pots in a warm location, such as on top of a refrigerator or near a heat vent. You can also use a heat mat.
6. Waiting for Germination: Germination usually takes about 7-14 days. Keep the soil consistently moist but not waterlogged.
7. Providing Light: Once the seedlings emerge, move them to a sunny location or provide them with artificial light (grow lights).
8. Hardening Off: Before transplanting the seedlings outdoors, you need to harden them off. This means gradually exposing them to outdoor conditions over a period of 7-10 days. Start by placing them outside for a few hours each day, gradually increasing the amount of time they spend outdoors.
Direct Sowing
1. Preparing the Soil: As mentioned earlier, amend your soil with compost or well-rotted manure. Make sure the soil is well-drained.
2. Creating Mounds or Rows: Bitter gourd grows best on mounds or in rows. Create mounds that are about 1-2 feet apart or rows that are about 2-3 feet apart.
3. Sowing the Seeds: Sow the seeds directly into the soil, about 1/2 inch deep. Place two or three seeds in each mound or space them about 6 inches apart in the rows.
4. Watering: Water the soil gently to moisten it.
5. Thinning: Once the seedlings emerge, thin them to one plant per mound or space them about 1 foot apart in the rows. Choose the strongest and healthiest seedlings to keep.
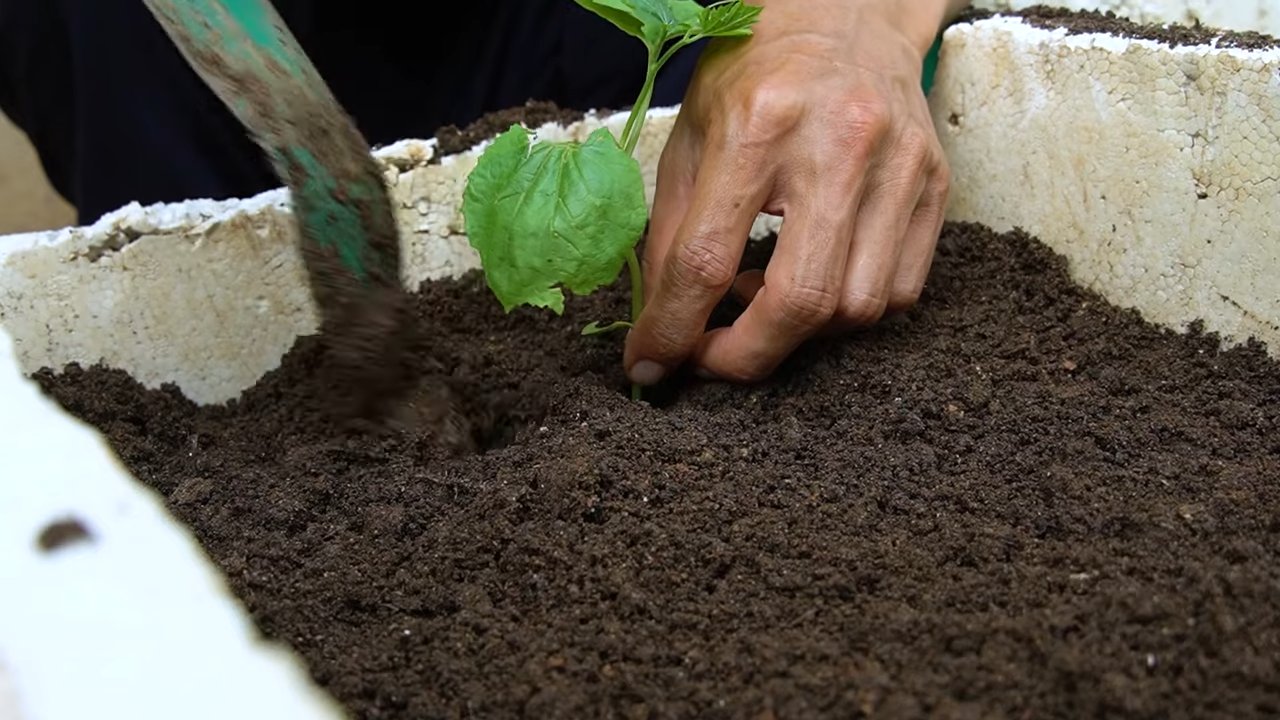
Transplanting Seedlings
1. Choosing the Right Time: Transplant your seedlings outdoors after the last expected frost and when the soil has warmed up.
2. Preparing the Planting Holes: Dig holes that are slightly larger than the root balls of the seedlings.
3. Removing the Seedlings: Gently remove the seedlings from their pots or seed trays. Be careful not to damage the roots.
4. Planting the Seedlings: Place the seedlings in the planting holes and cover them with soil. Gently firm the soil around the base of the plants.
5. Watering: Water the seedlings thoroughly after planting.
Caring for Your Bitter Gourd Plants
Now that your bitter gourd plants are in the ground, it’s time to provide them with the care they need to thrive.
* Watering: Water your plants regularly, especially during dry periods. Bitter gourd needs consistent moisture to produce healthy fruits. Avoid overwatering, which can lead to root rot. I usually water deeply once or twice a week, depending on the weather.
* Fertilizing: Fertilize your plants every 2-3 weeks with a balanced fertilizer. You can also use compost tea or fish emulsion.
* Weeding: Keep the area around your plants free of weeds. Weeds compete with your plants for nutrients and water.
* Pruning: Pruning can help improve air circulation and encourage fruit production. Remove any dead or yellowing leaves. You can also pinch off the tips of the vines to encourage branching.
* Pest and Disease Control: Bitter gourd can be susceptible to certain pests and diseases, such as aphids, spider mites, and powdery mildew. Inspect your plants regularly and take action if you notice any problems. Use organic pest control methods whenever possible. Neem oil is a great option for controlling many common pests. For powdery mildew, improve air circulation and use a fungicide if necessary.
Training the Vines
As your bitter gourd vines grow, you’ll need to train them to climb on the trellis or support structure.
* Guiding the Vines: Gently guide the vines towards the trellis and tie them loosely with twine or plant ties.
* Encouraging Vertical Growth: Encourage the vines to grow vertically by pruning any side shoots that are growing horizontally.
* Providing Support: Make sure the trellis or support structure is strong enough to support the weight of the vines and the fruits.
Pollination
Bitter gourd plants have separate male and female flowers. The female flowers have a small, immature fruit at the base. Pollination is necessary for the female flowers to develop into fruits.
* Natural Pollination: Bees and other insects can pollinate the flowers naturally.
* Hand Pollination: If you’re not seeing enough fruit production, you can hand-pollinate the flowers. Use a small paintbrush to transfer pollen from the male flowers to the female flowers.
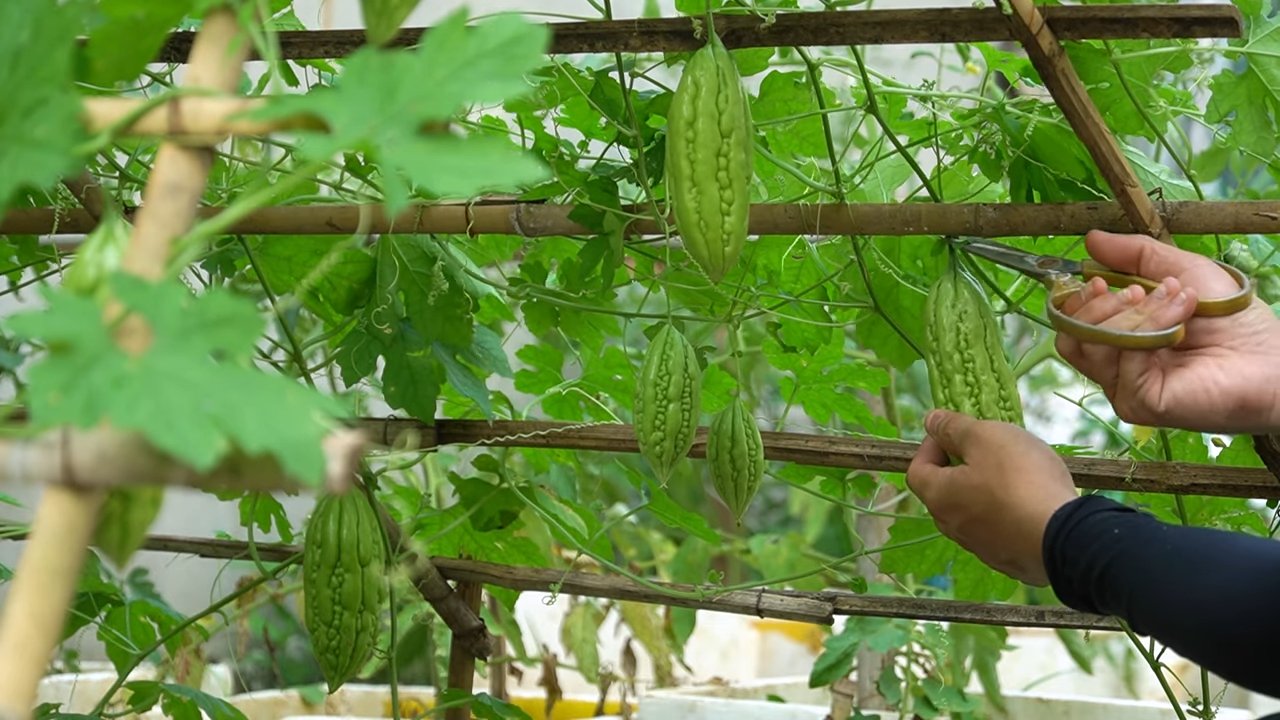
Harvesting Your Bitter Gourd
The moment you’ve been waiting for! Harvesting your own bitter gourd is incredibly rewarding.
* When to Harvest: Harvest your bitter gourds when they are still green and slightly immature. They should be firm to the touch and about 6-8 inches long, depending on the variety. If you wait too long, they will turn yellow and become more bitter.
* How to Harvest: Use a sharp knife or pruning shears to cut the bitter gourds from the vine. Leave a small stem attached to the fruit.
* Storing: Store your bitter gourds in the refrigerator for up to a week.
Enjoying Your Harvest
Now that you’ve harvested your bitter gourds, it’s time to enjoy them! Bitter gourd can be used in a variety of dishes.
* Preparing Bitter Gourd: To reduce the bitterness, you can soak the sliced bitter gourd in salt water for about 30 minutes before cooking.
* Cooking Methods: Bitter gourd can be stir-fried, steamed, baked, or added to soups and stews.
* Popular Dishes: Some popular bitter gourd dishes include stir-fried bitter gourd with eggs, bitter gourd curry, and bitter gourd chips.
Troubleshooting Common Problems
Even with the
Conclusion
So, there you have it! Growing bitter gourd at home is not only achievable but also incredibly rewarding. From the satisfaction of nurturing a plant from seed to the joy of harvesting your own fresh produce, this DIY project offers a unique connection to your food source. We’ve walked you through the essential steps, from seed preparation and soil selection to trellising and pest control, equipping you with the knowledge to cultivate a thriving bitter gourd vine right in your backyard or balcony.
But why is this DIY trick a must-try? Beyond the obvious benefits of fresh, organic produce, growing your own bitter gourd allows you to control the entire process, ensuring that your vegetables are free from harmful pesticides and chemicals. You’ll also be amazed at the difference in taste and texture compared to store-bought varieties. Homegrown bitter gourd tends to be more tender and flavorful, making it a delicious and healthy addition to your diet.
Furthermore, this project is a fantastic way to connect with nature, learn about plant life cycles, and even reduce your carbon footprint by minimizing transportation costs associated with commercially grown produce. It’s a sustainable and fulfilling hobby that can bring joy and nourishment to your life.
Ready to take your bitter gourd growing to the next level? Consider these variations and suggestions:
* Experiment with different varieties: Explore the diverse world of bitter gourd cultivars, each with its unique size, shape, and flavor profile. Some popular options include the Chinese bitter melon, the Indian bitter gourd, and the Japanese goya.
* Companion planting: Enhance your bitter gourd’s growth and deter pests by planting beneficial companion plants like beans, peas, or marigolds nearby.
* Vertical gardening: If you have limited space, consider growing your bitter gourd vertically using a trellis or fence. This not only saves space but also improves air circulation and sunlight exposure.
* Seed saving: Preserve your favorite bitter gourd varieties by saving seeds from mature fruits. This allows you to continue growing your own produce year after year.
* Composting: Use your kitchen scraps and garden waste to create nutrient-rich compost for your bitter gourd plants. This is a sustainable way to improve soil health and reduce waste.
We are confident that with a little effort and dedication, you can successfully grow bitter gourd at home and enjoy the many benefits it offers. Don’t be afraid to experiment, learn from your mistakes, and adapt your approach as needed. The journey of growing your own food is a rewarding one, filled with challenges and triumphs.
So, what are you waiting for? Grab your seeds, prepare your soil, and embark on this exciting DIY adventure. We encourage you to try this grow bitter gourd home project and share your experiences with us. Let us know what worked well for you, what challenges you faced, and any tips or tricks you discovered along the way. Your feedback will help us improve this guide and inspire others to embrace the joy of homegrown produce. Share your photos and stories on our social media channels using #HomegrownBitterGourd. Happy gardening!
Frequently Asked Questions (FAQ)
What is the best time of year to plant bitter gourd?
Bitter gourd thrives in warm weather, so the best time to plant it is during the late spring or early summer, after the last frost has passed. The soil temperature should be at least 65°F (18°C) for optimal germination. In warmer climates, you can also plant bitter gourd in the early fall for a winter harvest.
How long does it take for bitter gourd to mature?
Bitter gourd typically takes about 60-80 days to mature after planting. However, the exact time can vary depending on the variety, growing conditions, and climate. You’ll know your bitter gourd is ready to harvest when it reaches its mature size and color, but before it turns completely orange or yellow.
What kind of soil is best for growing bitter gourd?
Bitter gourd prefers well-drained, fertile soil that is rich in organic matter. A slightly acidic to neutral pH (6.0-7.0) is ideal. Before planting, amend your soil with compost, aged manure, or other organic materials to improve its fertility and drainage.
How much sunlight does bitter gourd need?
Bitter gourd requires at least 6-8 hours of direct sunlight per day to thrive. Choose a sunny location in your garden or balcony where your plants will receive ample sunlight throughout the day.
How often should I water my bitter gourd plants?
Water your bitter gourd plants regularly, especially during hot and dry weather. Aim to keep the soil consistently moist but not waterlogged. Water deeply at the base of the plants, avoiding wetting the foliage, which can increase the risk of fungal diseases.
What are some common pests and diseases that affect bitter gourd?
Common pests that can affect bitter gourd include aphids, spider mites, and fruit flies. Diseases include powdery mildew, downy mildew, and anthracnose. Regularly inspect your plants for signs of pests or diseases and take appropriate action, such as using insecticidal soap, neem oil, or fungicide.
How do I trellis my bitter gourd plants?
Bitter gourd vines need a trellis or other support structure to climb on. You can use a variety of materials, such as bamboo stakes, wire mesh, or a wooden trellis. Install the trellis before planting or shortly after the seedlings emerge. Train the vines to climb the trellis by gently guiding them and tying them loosely with twine.
How do I harvest bitter gourd?
Harvest bitter gourd when it reaches its mature size and color, but before it turns completely orange or yellow. Use a sharp knife or pruning shears to cut the fruit from the vine, leaving a short stem attached. Handle the fruit carefully to avoid bruising.
Is bitter gourd really that bitter? How can I reduce the bitterness?
Yes, bitter gourd is known for its distinctively bitter taste. However, there are several ways to reduce the bitterness:
* Choose younger fruits: Younger fruits tend to be less bitter than older ones.
* Soak in salt water: Soak sliced bitter gourd in salt water for about 30 minutes before cooking. This helps to draw out some of the bitterness.
* Blanching: Blanch the bitter gourd in boiling water for a few minutes before cooking.
* Pair with strong flavors: Cook bitter gourd with strong flavors like garlic, ginger, onions, or chili peppers to mask the bitterness.
* Remove the seeds and pith: The seeds and pith (the white spongy part inside the fruit) are the most bitter parts of the bitter gourd. Remove them before cooking.
Can I grow bitter gourd in containers?
Yes, you can grow bitter gourd in containers, but you’ll need to choose a large container (at least 10-15 gallons) to accommodate the plant’s root system. Use a well-draining potting mix and provide a trellis or other support structure for the vines to climb on. Container-grown bitter gourd may require more frequent watering and fertilization than plants grown in the ground.
How do I save seeds from my bitter gourd plants?
To save seeds from your bitter gourd plants, allow a few fruits to mature fully on the vine until they turn orange or yellow. Harvest the fruits and extract the seeds. Wash the seeds thoroughly and dry them in a cool, dry place for several days. Store the dried seeds in an airtight container in a cool, dark place until you’re ready to plant them.
What are the health benefits of eating bitter gourd?
Bitter gourd is a nutrient-rich vegetable that offers a variety of health benefits. It is a good source of vitamins, minerals, and antioxidants. Some of the potential health benefits of eating bitter gourd include:
* Blood sugar control: Bitter gourd may help to lower blood sugar levels and improve insulin sensitivity, making it beneficial for people with diabetes.
* Cholesterol reduction: Bitter gourd may help to lower cholesterol levels, reducing the risk of heart disease.
* Immune system support: Bitter gourd is rich in antioxidants, which can help to boost the immune system and protect against disease.
* Weight management: Bitter gourd is low in calories and high in fiber, which can help to promote weight loss and maintain a healthy weight.
* Anti-cancer properties: Some studies have suggested that bitter gourd may have anti-cancer properties.
Remember to consult with a healthcare professional before making any significant changes to your diet or using bitter gourd for medicinal purposes.


Leave a Comment