
Grow Bok Choy at Home and unlock a world of fresh, crisp greens right outside your door! Have you ever dreamt of snipping vibrant, healthy vegetables just moments before adding them to your stir-fry? Well, dream no more! This DIY guide is your passport to cultivating your very own thriving Bok Choy patch, no matter the size of your garden (or lack thereof!).
Bok Choy, also known as Chinese cabbage, boasts a rich history deeply rooted in Asian cuisine. For centuries, it has been a staple in countless dishes, prized for its delicate flavor and impressive nutritional value. But beyond its culinary appeal, growing your own Bok Choy offers a unique connection to this heritage, allowing you to participate in a tradition that spans generations.
Why should you embark on this Bok Choy-growing adventure? Simple! Store-bought vegetables often lack the freshness and flavor of homegrown produce. Plus, knowing exactly where your food comes from and how it’s grown provides peace of mind. With our easy-to-follow DIY tricks, even beginners can successfully grow Bok Choy at home, enjoying a continuous supply of this delicious and nutritious vegetable. I’m excited to share these tips with you, so let’s get started!
Growing Bok Choy at Home: Your DIY Guide for Crisp Greens
Hey garden friends! Bok choy, also known as pak choi, is an incredibly versatile and healthy vegetable that is super easy to grow at home. Whether you have a large garden, a small balcony, or just a sunny windowsill, with this guide, you are guaranteed to succeed in growing it. I’ll show you how you can enjoy crisp bok choy from sowing to harvest. Let’s get started!
What You Need for Growing Bok Choy:
- Seeds: Choose a bok choy variety that you like. There are various types, from mini bok choy to larger varieties.
- Seedling pots or trays: For starting indoors.
- Seed starting mix: Special soil for starting seeds that is low in nutrients and loose.
- Containers or a garden bed: Depending on where you want to grow your bok choy.
- Garden soil: High-quality soil for growing in a bed or in pots.
- Fertilizer: Organic fertilizer or vegetable fertilizer.
- Watering can or spray bottle: For watering.
- Plant labels: To keep track.
- (Optional) Fleece/Row cover: To protect against pests and frost.
Sowing and Starting Indoors
Starting seeds indoors is particularly useful if you live in a region with short summers. It gives your plants a head start.
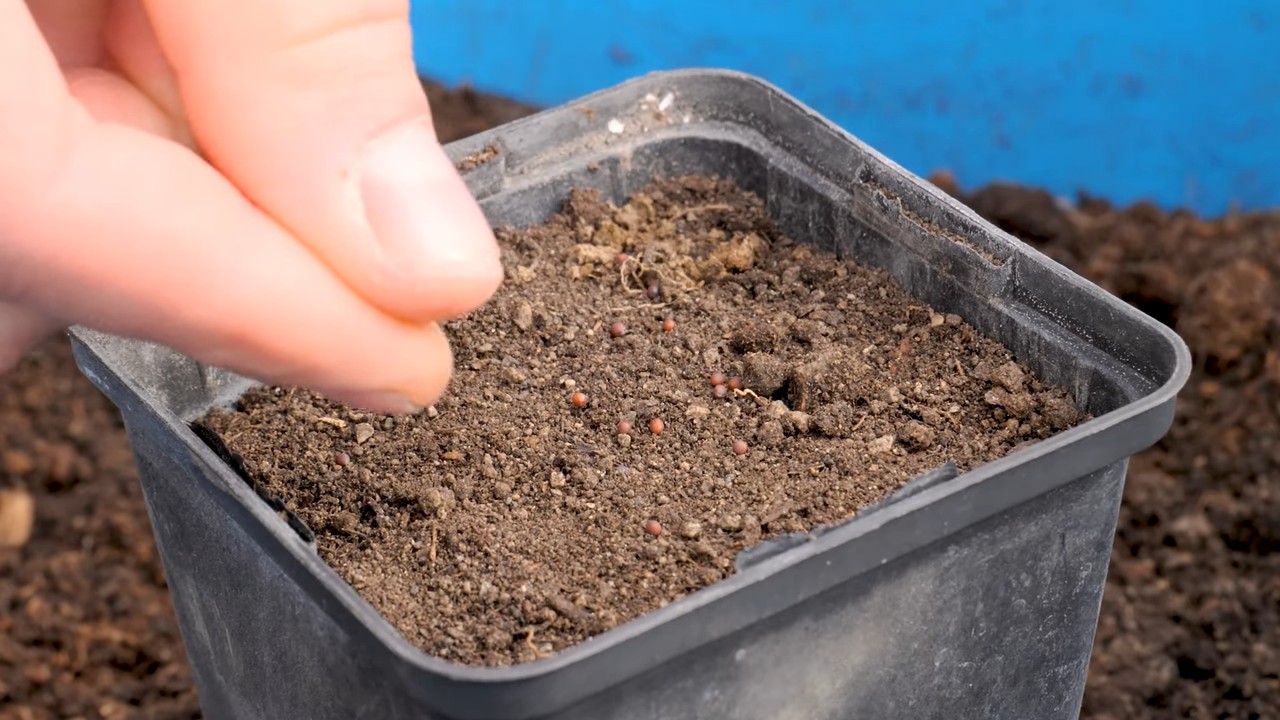
- Prepare the seedling pots: Fill the seedling pots or trays with seed starting mix. Press the soil down lightly.
- Sow the seeds: Place 2-3 seeds per pot into the soil. The seeds should be about 0.5 cm deep.
- Water: Moisten the soil carefully with a spray bottle. The soil should be damp, but not wet.
- Location: Place the seedling pots in a bright and warm place. A temperature of 18-22°C is ideal.
- Germination: The seeds usually germinate within 5-10 days. Keep the soil moist during germination.
- Pricking out: As soon as the seedlings have developed their first true leaves (besides the seed leaves), you can prick them out. This means you transplant the strongest seedlings into larger pots so they have more space to grow.
Direct Sowing Outdoors
If the weather permits, you can also sow bok choy directly into the garden bed.
- Soil preparation: Loosen the soil thoroughly and remove weeds. Work compost or organic fertilizer into the soil.
- Sowing: Make shallow furrows in the soil, about 1 cm deep. Place the seeds in the furrows and cover them lightly with soil. The distance between the furrows should be about 20-30 cm.
- Watering: Water the soil gently.
- Thinning: As soon as the seedlings are large enough to handle, thin them out so that the plants are about 15-20 cm apart.
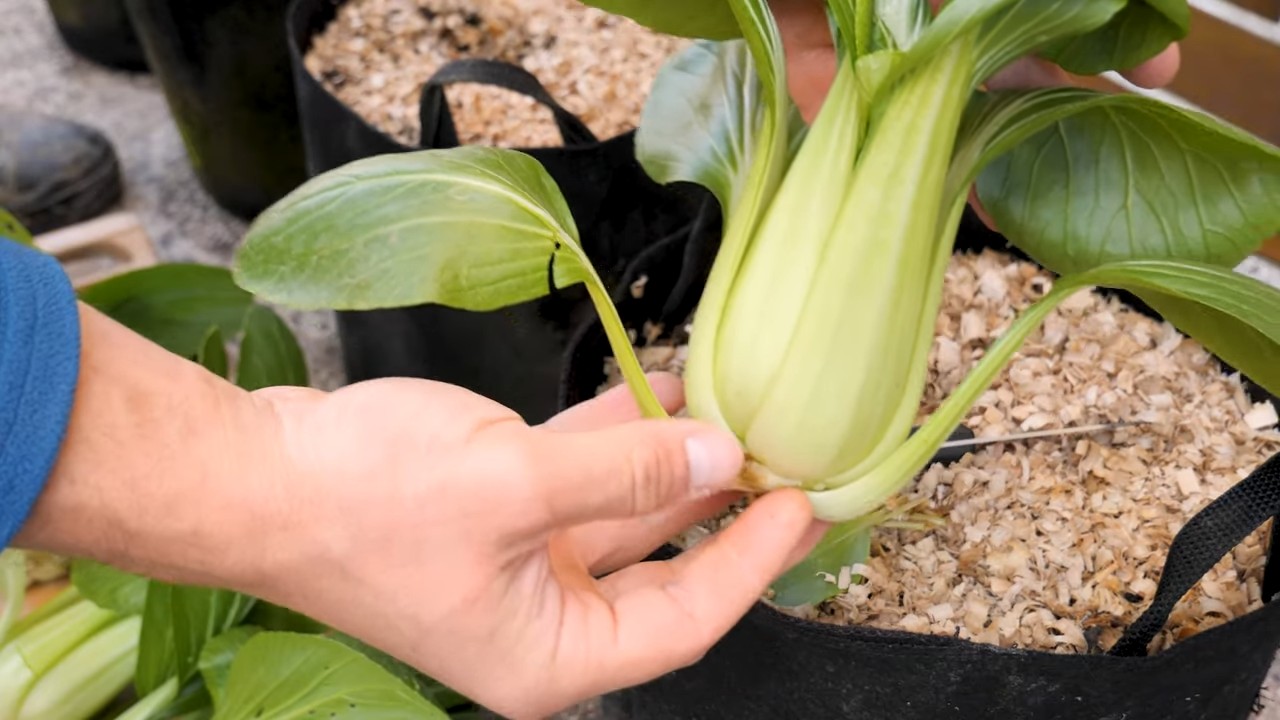
Planting in a Bed or Pot
Whether you have started the plants indoors or sown them directly, eventually it’s time to move them to their final location.
- Prepare the bed or pot: Loosen the soil in the bed or fill the pot with high-quality garden soil.
- Planting: Dig a hole large enough to accommodate the plant’s root ball. Place the plant in the hole and fill it with soil. Press the soil down lightly. The distance between the plants should be about 15-20 cm.
- Watering: Water the plants thoroughly.
- Mulching: Cover the soil around the plants with mulch to retain moisture and reduce weed growth.
Caring for Bok Choy
Proper care is crucial for a bountiful harvest.
- Watering: Bok choy needs regular watering, especially during dry periods. The soil should always be slightly moist, but not wet.
- Fertilizing: Fertilize the plants every 2-3 weeks with organic fertilizer or vegetable fertilizer.
- Weed control: Remove weeds regularly to reduce competition for nutrients and water.
- Pest protection: Bok choy can be affected by various pests, such as slugs, flea beetles, and cabbage white butterflies. Protect the plants with a row cover or use organic pesticides.
- Frost protection: Bok choy is relatively frost-hardy, but during a hard frost, you should cover the plants with a row cover.
Harvest
The harvest is the best part!
- Harvest time: Bok choy can be harvested as soon as the leaves are large enough. Depending on the variety and growing conditions, this is usually 45-60 days after sowing.
- Harvesting method: Cut the entire plant just above the ground or harvest individual leaves as needed.
- Storage: Bok choy can be stored in the refrigerator for about a week.
Challenges and Solutions
Challenges can also arise when growing bok choy. Here are some common problems and how you can solve them:
- Pests:
- Problem: Slugs, flea beetles, cabbage white butterflies.
- Solution: Row cover, organic pesticides, slug pellets.
- Diseases:
- Problem: Downy mildew, clubroot.
- Solution: Good ventilation, avoiding waterlogging, resistant varieties.
- Yellow leaves:
- Problem: Nutrient deficiency, overwatering.
- Solution: Fertilize, adjust watering.
- Bolting (flowering):
- Problem: Temperatures too high, drought.
- Solution: Shading, regular watering, planting in spring or fall.
Growing Bok Choy in Pots
Even if you don’t have a garden, you can easily grow bok choy in pots.
- Pot size: Choose pots with a diameter of at least 20 cm.
- Soil: Use high-quality garden soil.
- Drainage: Ensure good drainage to avoid waterlogging.
- Location: Place the pots in a sunny location.
- Watering and fertilizing: Water and fertilize the plants regularly.
Variety Recommendations
There are many different bok choy varieties. Here are some recommendations:
- Joi Choi: A popular variety with large, green leaves and white stems.
- Mei Qing Choi: A mini bok choy variety with tender, green leaves.
- Shanghai Green: A variety with light green leaves and light green stems.
- Purple Lady: A decorative variety with purple leaves.
Bok Choy in the Kitchen
Bok choy is incredibly versatile and can be prepared in many different ways.
Raw: In salads or as a snack.
Conclusion
So, there you have it! Growing your own bok choy at home is not only achievable, but it’s also incredibly rewarding. From the vibrant green leaves gracing your garden to the crisp, fresh flavor enhancing your meals, the benefits are undeniable. We’ve walked you through the simple steps, demystifying the process and empowering you to cultivate this nutritious and delicious vegetable right in your own backyard or even on your balcony.
Why is this DIY trick a must-try? Because it puts you in control. You know exactly what goes into your food – no pesticides, no hidden ingredients, just pure, homegrown goodness. Plus, it’s a fantastic way to connect with nature, learn about the growing process, and enjoy the satisfaction of harvesting your own food. Imagine the pride you’ll feel serving a stir-fry featuring bok choy you nurtured from seed to table!
But the adventure doesn’t stop there. Feel free to experiment with different varieties of bok choy. Try the baby bok choy for its delicate flavor and tender leaves, or opt for the larger Shanghai bok choy for its robust texture. You can also explore different planting methods, such as container gardening or raised beds, to suit your space and preferences. Consider companion planting with herbs like dill or chamomile to attract beneficial insects and deter pests naturally.
Don’t be afraid to get creative with your bok choy harvest either! Beyond stir-fries, bok choy is a versatile ingredient that can be used in soups, salads, steamed dishes, and even grilled preparations. Its mild, slightly sweet flavor pairs well with a variety of cuisines and ingredients.
We wholeheartedly encourage you to give this DIY bok choy growing trick a try. It’s a simple, affordable, and incredibly satisfying way to enhance your culinary experience and connect with the natural world. And most importantly, it’s a fantastic way to ensure you always have fresh, healthy bok choy on hand.
Once you’ve embarked on your bok choy growing journey, we’d love to hear about your experiences! Share your tips, tricks, and triumphs in the comments below. Let us know what varieties you’ve tried, what challenges you’ve overcome, and what delicious dishes you’ve created with your homegrown bok choy. Your insights will not only inspire others but also help us build a community of passionate home gardeners. So, grab your seeds, get your hands dirty, and get ready to enjoy the delicious rewards of growing your own bok choy!
Frequently Asked Questions (FAQ)
What is the best time of year to plant bok choy?
Bok choy thrives in cooler temperatures, making spring and fall the ideal times to plant. In spring, sow seeds as soon as the soil can be worked, typically 2-4 weeks before the last expected frost. For a fall harvest, plant seeds 6-8 weeks before the first expected frost. Avoid planting during the heat of summer, as high temperatures can cause bolting (premature flowering), which can affect the taste and texture of the leaves. If you live in a region with mild winters, you may even be able to grow bok choy throughout the winter months.
How much sunlight does bok choy need?
Bok choy prefers partial shade, especially during the hottest part of the day. Aim for at least 4-6 hours of sunlight per day. In hotter climates, providing afternoon shade can help prevent bolting and ensure optimal growth. If you’re growing bok choy indoors, use grow lights to supplement natural sunlight and provide adequate illumination.
What kind of soil is best for growing bok choy?
Bok choy prefers well-drained, fertile soil that is rich in organic matter. Amend your soil with compost or aged manure before planting to improve drainage and nutrient content. The ideal soil pH for bok choy is between 6.0 and 7.5. You can test your soil pH using a soil testing kit and adjust it accordingly with lime or sulfur.
How often should I water bok choy?
Bok choy needs consistent moisture to thrive. Water deeply and regularly, especially during dry periods. Aim to keep the soil consistently moist but not waterlogged. Mulching around the plants can help retain moisture and suppress weeds. Check the soil moisture regularly by sticking your finger into the soil. If the top inch feels dry, it’s time to water.
What are some common pests and diseases that affect bok choy?
Common pests that can affect bok choy include aphids, flea beetles, cabbage worms, and slugs. To control these pests, you can use organic pest control methods such as insecticidal soap, neem oil, or diatomaceous earth. Row covers can also be used to protect plants from pests. Diseases that can affect bok choy include downy mildew, clubroot, and black rot. To prevent these diseases, practice crop rotation, ensure good air circulation, and avoid overhead watering.
How do I harvest bok choy?
You can harvest bok choy at any stage of growth, depending on your preference. For baby bok choy, harvest when the leaves are about 4-6 inches long. For mature bok choy, harvest when the heads are firm and compact. To harvest, simply cut the entire head of bok choy at the base of the plant with a sharp knife. You can also harvest individual leaves as needed, starting with the outer leaves.
Can I grow bok choy in containers?
Yes, bok choy can be successfully grown in containers. Choose a container that is at least 12 inches deep and wide to provide enough space for the roots to grow. Use a well-draining potting mix and water regularly. Place the container in a location that receives partial shade.
How do I prevent bok choy from bolting?
Bolting is a common problem with bok choy, especially during hot weather. To prevent bolting, choose bolt-resistant varieties, plant in partial shade, water regularly, and harvest promptly when the heads are mature. You can also try using shade cloth to protect plants from the sun.
Is bok choy nutritious?
Yes, bok choy is a highly nutritious vegetable. It is a good source of vitamins A, C, and K, as well as calcium, potassium, and fiber. It is also low in calories and fat. Adding bok choy to your diet can help boost your immune system, improve bone health, and promote digestive health.
How can I store bok choy after harvesting?
To store bok choy after harvesting, wrap it loosely in a damp paper towel and place it in a plastic bag in the refrigerator. It will typically last for about 3-5 days. Avoid washing bok choy before storing it, as this can promote spoilage.
Leave a Comment