
Grow Celery at Home? Absolutely! Imagine plucking crisp, juicy celery stalks straight from your own backyard, ready to be dipped in hummus or tossed into a refreshing salad. Forget those limp, store-bought bunches – we’re talking about vibrant, flavorful celery grown with your own two hands. This isn’t just about saving money; it’s about connecting with nature and enjoying the unparalleled taste of homegrown produce.
Celery, with its satisfying crunch and subtle sweetness, has been cultivated for centuries. Originating in the Mediterranean region, it was initially valued for its medicinal properties before becoming a culinary staple. Today, celery is a beloved ingredient in cuisines worldwide, adding depth and texture to countless dishes. But did you know that you can easily grow celery at home, even if you have limited space?
In this DIY guide, I’m going to share some simple yet effective tricks and hacks that will empower you to cultivate your own thriving celery patch. Whether you’re a seasoned gardener or a complete beginner, these tips will help you overcome common challenges and enjoy a bountiful harvest. Why settle for bland, expensive celery from the grocery store when you can have fresh, organic celery right at your fingertips? Let’s get started!
Grow Your Own Celery: A Beginner’s Guide
Hey there, fellow gardening enthusiasts! Ever thought about growing your own celery? It’s surprisingly easy and rewarding, and nothing beats the fresh, crisp taste of homegrown celery. I’m going to walk you through everything you need to know, from starting from seed (or even a leftover stalk!) to harvesting your crunchy bounty. Let’s get started!
Choosing Your Celery Growing Method
Before we dive into the nitty-gritty, let’s talk about the two main ways to grow celery: from seed and from a leftover celery base. Both have their pros and cons, so choose the method that best suits your patience level and resources.
* **From Seed:** This method takes longer, but it gives you more control over the variety of celery you grow. You’ll need to start the seeds indoors several weeks before the last expected frost.
* **From Celery Base:** This is a quicker and easier method, perfect for beginners. You simply replant the base of a celery stalk you bought from the grocery store. While you won’t get a huge harvest, it’s a fun way to recycle and get a taste of homegrown celery.
Growing Celery from Seed: A Detailed Guide
If you’re feeling ambitious and want to start from seed, here’s what you need to do:
Phase 1: Starting the Seeds Indoors
Celery seeds are tiny and need a head start indoors.
1. **Gather Your Supplies:** You’ll need:
* Celery seeds (choose a variety that suits your climate)
* Seed starting trays or small pots
* Seed starting mix (a fine, sterile soil mix)
* Spray bottle filled with water
* Heat mat (optional, but helpful)
* Grow light (optional, but recommended)
2. **Sow the Seeds:** Celery seeds need light to germinate, so don’t bury them too deep.
* Moisten the seed starting mix thoroughly.
* Sprinkle the celery seeds thinly over the surface of the soil.
* Gently press the seeds into the soil, but don’t cover them with more soil.
* Mist the surface with water to ensure good contact between the seeds and the soil.
3. **Provide Warmth and Light:** Celery seeds germinate best in warm conditions.
* Place the seed trays or pots on a heat mat, if you have one. The ideal temperature is around 70-75°F (21-24°C).
* Place the trays under a grow light or in a very bright, sunny window. If using a grow light, keep it a few inches above the seedlings.
4. **Keep the Soil Moist:** The soil needs to stay consistently moist, but not soggy.
* Check the soil moisture daily and mist with water as needed.
* Cover the trays with a clear plastic dome or plastic wrap to help retain moisture. Remove the cover once the seeds start to germinate.
5. **Be Patient:** Celery seeds can take 2-3 weeks to germinate, so don’t give up!
* Once the seedlings emerge, continue to provide warmth and light.
Phase 2: Transplanting the Seedlings
Once the seedlings have developed a few sets of true leaves (the leaves that look like miniature celery stalks), it’s time to transplant them into larger pots.
1. **Prepare the Pots:** You’ll need:
* Small pots (2-3 inches in diameter)
* Potting mix (a general-purpose potting mix)
* Water
2. **Gently Transplant the Seedlings:**
* Carefully remove the seedlings from the seed starting trays, being careful not to damage the roots. You can use a small spoon or fork to help lift them out.
* Plant each seedling in its own pot, burying the stem up to the first set of leaves.
* Gently water the seedlings after transplanting.
3. **Continue to Grow Indoors:**
* Keep the seedlings under the grow light or in a sunny window.
* Water regularly, allowing the soil to dry out slightly between waterings.
* Fertilize with a diluted liquid fertilizer every 2-3 weeks.
Phase 3: Hardening Off the Seedlings
Before you can plant the celery seedlings outdoors, you need to “harden them off.” This process gradually acclimates the plants to outdoor conditions, preventing shock.
1. **Start Gradually:**
* Begin by placing the seedlings outdoors in a sheltered location for just an hour or two each day.
* Gradually increase the amount of time they spend outdoors each day, over a period of 1-2 weeks.
2. **Protect from Extreme Weather:**
* Bring the seedlings back indoors if there is a risk of frost, strong winds, or heavy rain.
3. **Observe the Plants:**
* Watch for signs of stress, such as wilting or leaf burn. If you see these signs, reduce the amount of time the seedlings spend outdoors.
Phase 4: Planting Outdoors
Once the seedlings are hardened off and the danger of frost has passed, it’s time to plant them in the garden.
1. **Choose a Location:** Celery needs:
* Full sun (at least 6 hours of sunlight per day)
* Rich, well-drained soil
* Consistent moisture
2. **Prepare the Soil:**
* Amend the soil with compost or other organic matter to improve drainage and fertility.
* Celery prefers a slightly acidic soil pH (6.0-6.8).
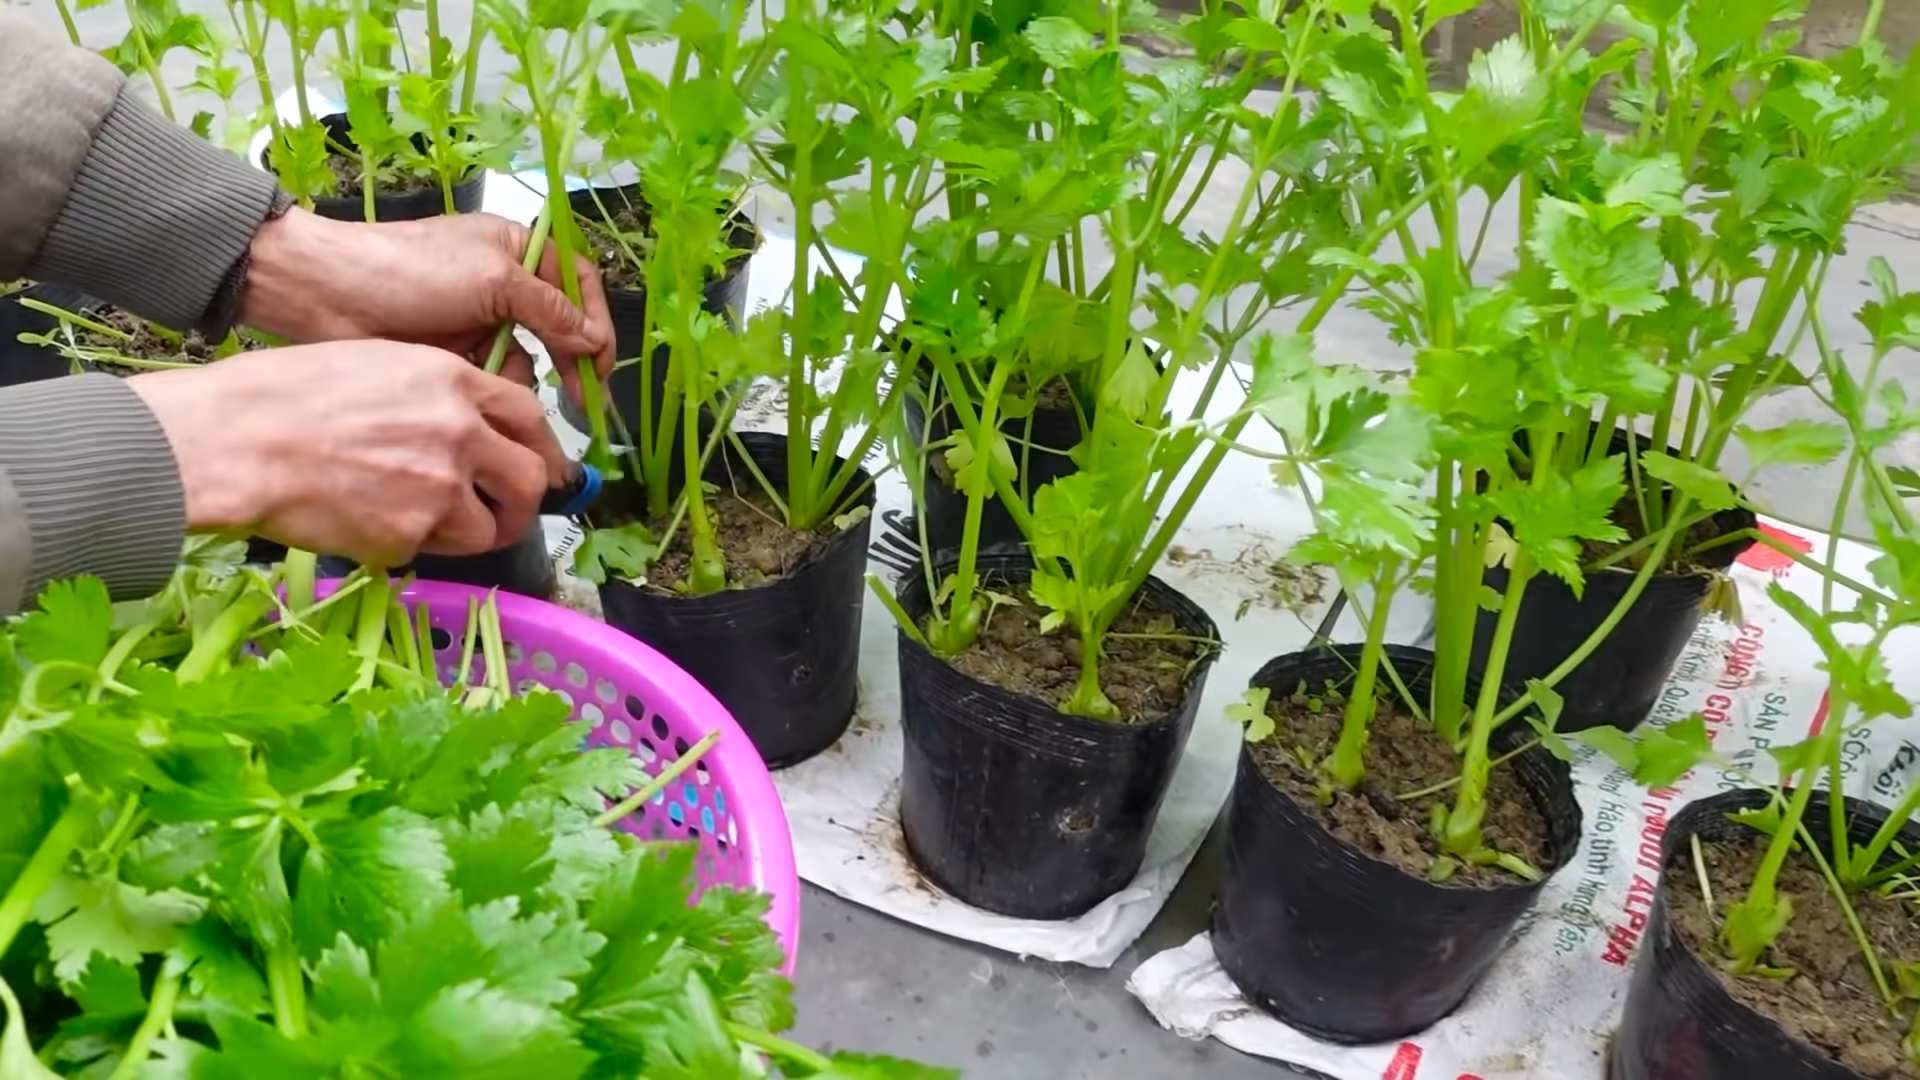
3. **Plant the Seedlings:**
* Space the seedlings about 6-8 inches apart in rows that are 12-18 inches apart.
* Dig a hole that is large enough to accommodate the root ball.
* Gently remove the seedling from its pot and place it in the hole.
* Backfill with soil and gently firm around the base of the plant.
* Water thoroughly after planting.
4. **Mulch:**
* Apply a layer of mulch around the plants to help retain moisture and suppress weeds.
Growing Celery from a Celery Base: A Quick Start
This method is super simple and a great way to get a small celery harvest.
1. **Cut and Prepare the Base:**
* After using a celery stalk, cut off the base about 2 inches from the bottom.
* Make sure the base includes the root end.
2. **Place in Water:**
* Place the celery base in a shallow dish or glass filled with about an inch of water.
* Set the dish in a sunny windowsill.
3. **Change the Water Regularly:**
* Change the water every 1-2 days to prevent bacteria growth.
4. **Watch for Growth:**
* After a few days, you should see new roots sprouting from the bottom and new leaves emerging from the top.
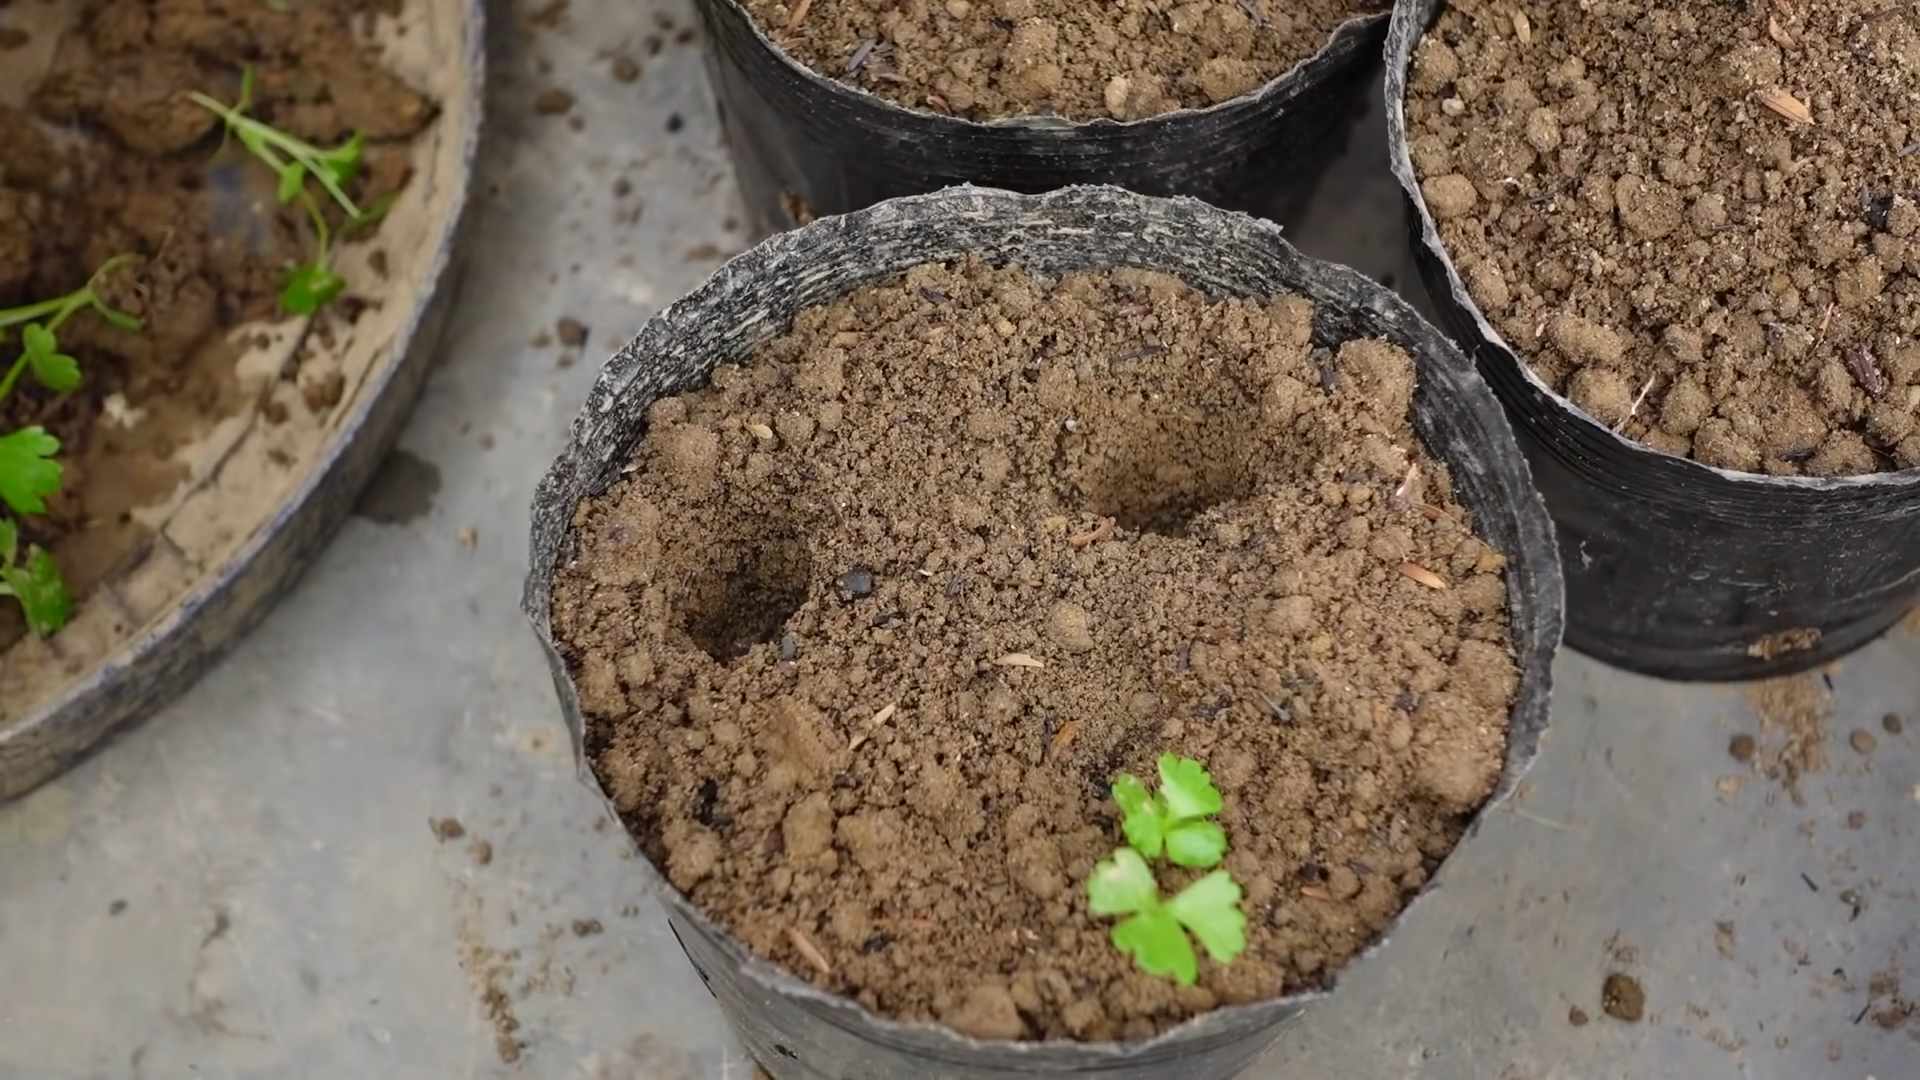
5. **Plant in Soil:**
* Once the roots are about an inch long, it’s time to plant the celery base in soil.
* Choose a pot that is at least 6 inches in diameter.
* Fill the pot with potting mix.
* Plant the celery base in the pot, burying the roots and the bottom part of the base.
* Water thoroughly after planting.
6. **Care for the Plant:**
* Place the pot in a sunny location.
* Water regularly, allowing the soil to dry out slightly between waterings.
* Fertilize with a diluted liquid fertilizer every 2-3 weeks.
Caring for Your Celery Plants
Whether you started from seed or a celery base, these tips will help you keep your celery plants healthy and productive:
* **Watering:** Celery needs consistent moisture, especially during hot weather. Water deeply and regularly, aiming to keep the soil consistently moist but not waterlogged.
* **Fertilizing:** Celery is a heavy feeder, so fertilize regularly with a balanced fertilizer. Follow the instructions on the fertilizer package.
* **Weeding:** Keep the area around the celery plants free of weeds, which can compete for nutrients and water.
* **Blanching (Optional):** Blanching celery stalks makes them milder and less bitter. To blanch, mound soil around the stalks or wrap them with paper or cardboard a few weeks before harvest.
* **Pest and Disease Control:** Celery can be susceptible to pests like aphids and celery leaf miners, and diseases like celery blight. Inspect your plants regularly and take action if you see any problems. Organic pest control methods, such as insecticidal soap or neem oil, can be effective.
Harvesting Your Celery
The time to harvest celery depends on the variety and growing conditions, but generally, celery is ready to harvest when the stalks are at least 6
Conclusion
So, there you have it! Growing celery at home from scraps is not just a fun experiment; it’s a sustainable way to reduce food waste, enjoy fresh, crisp celery, and even impress your friends and family. It’s a surprisingly simple process that yields tangible results, making it a rewarding project for gardeners of all levels, from seasoned pros to absolute beginners.
Why is this DIY trick a must-try? Because it’s economical, environmentally friendly, and incredibly satisfying. Instead of tossing those celery bases into the compost bin, you’re giving them a second life, transforming kitchen scraps into a vibrant, edible plant. Think about it: you’re essentially getting free celery! Plus, you’re reducing your carbon footprint by minimizing food waste and the need to purchase commercially grown celery, which often travels long distances.
But the benefits don’t stop there. Homegrown celery boasts a flavor that’s often superior to store-bought varieties. It’s fresher, crisper, and packed with more nutrients. Imagine adding that homegrown crunch to your salads, soups, or even enjoying it as a healthy snack with your favorite dip.
Ready to take your celery growing to the next level? Consider these variations and suggestions:
* Experiment with different celery varieties: While the method remains the same, you can try regrowing different types of celery, such as Pascal celery or even celeriac (celery root), although celeriac will primarily focus on root development.
* Enhance the soil: Once you transplant your celery to soil, enrich it with compost or well-rotted manure to provide essential nutrients for optimal growth.
* Companion planting: Plant your celery alongside other beneficial plants, such as onions, garlic, or marigolds, to deter pests and promote healthy growth.
* Hydroponic celery: For a fun twist, try growing your celery hydroponically. This involves suspending the celery base in a nutrient-rich water solution instead of soil.
Growing celery at home is more than just a gardening project; it’s a step towards a more sustainable and self-sufficient lifestyle. It’s a chance to connect with nature, learn about plant life cycles, and enjoy the fruits (or rather, stalks) of your labor.
We wholeheartedly encourage you to give this DIY trick a try. It’s a simple, rewarding, and environmentally conscious way to enjoy fresh, delicious celery. And most importantly, don’t forget to share your experience! We’d love to hear about your successes, challenges, and any unique variations you discover along the way. Share your photos and stories on social media using #HomegrownCelery or leave a comment below. Let’s build a community of celery-growing enthusiasts and inspire others to embrace sustainable gardening practices. So, grab that celery base, get your hands dirty, and start growing your own delicious, homegrown celery today!
Frequently Asked Questions (FAQ)
1. How long does it take to regrow celery from a base?
The initial regrowth phase, where you see new leaves sprouting from the celery base in water, typically takes about 1-2 weeks. After transplanting to soil, it can take another 2-3 months for the celery to mature and be ready for harvest. The exact timeframe depends on factors like sunlight, temperature, and soil quality.
2. What kind of water should I use to regrow celery?
Tap water is generally fine for regrowing celery. However, if your tap water is heavily chlorinated, it’s best to let it sit out for 24 hours before using it to allow the chlorine to dissipate. Alternatively, you can use filtered water or rainwater.
3. How much sunlight does regrowing celery need?
Celery thrives in full sun, meaning at least 6-8 hours of direct sunlight per day. However, in hotter climates, it can benefit from some afternoon shade to prevent the leaves from scorching. When starting the regrowth process indoors, place the celery base near a sunny window or under a grow light.
4. What kind of soil is best for growing celery?
Celery prefers rich, well-draining soil that is high in organic matter. Amend your garden soil with compost, well-rotted manure, or other organic materials to improve its fertility and drainage. A slightly acidic to neutral soil pH (around 6.0-7.0) is ideal.
5. How often should I water my regrown celery?
Celery needs consistent moisture to thrive. Water deeply whenever the top inch of soil feels dry to the touch. Avoid overwatering, as this can lead to root rot. Mulching around the base of the plant can help retain moisture and suppress weeds.
6. What are some common problems when growing celery and how can I fix them?
Some common problems include:
* Yellowing leaves: This can be caused by nutrient deficiencies, overwatering, or underwatering. Ensure the soil is well-draining and fertilize regularly with a balanced fertilizer.
* Pests: Celery can be susceptible to pests like aphids, celery leaf tiers, and carrot rust flies. Inspect your plants regularly and treat infestations with insecticidal soap or neem oil.
* Bolting: Bolting (premature flowering) can occur if the celery is exposed to prolonged periods of cold weather or stress. Choose bolt-resistant varieties and provide consistent care.
* Root rot: This is caused by overwatering and poor drainage. Ensure the soil is well-draining and avoid overwatering.
7. Can I grow celery indoors permanently?
While you can start the regrowth process indoors, celery generally needs to be transplanted to a larger container or garden bed to reach its full potential. Growing celery indoors permanently can be challenging due to the plant’s need for ample sunlight and space. However, with sufficient light (grow lights are recommended) and a large enough container, it is possible to grow a smaller celery plant indoors.
8. How do I harvest my regrown celery?
You can harvest individual stalks as needed once the plant has reached a sufficient size. Simply cut the outer stalks near the base of the plant. Alternatively, you can harvest the entire plant by cutting it off at the base.
9. Can I regrow celery multiple times from the same base?
While it’s possible to get a second or even third regrowth from the same celery base, the subsequent harvests will likely be smaller and less vigorous than the first. It’s generally best to start with a fresh celery base for optimal results.
10. Is regrowing celery from scraps organic?
Whether your regrown celery is organic depends on the celery you originally purchased. If you started with organic celery, and you use organic soil and fertilizers, then your regrown celery will also be organic. If you started with non-organic celery, it will not be considered organic, even if you use organic growing methods.

Leave a Comment