
Grow Chili Peppers at Home and spice up your life! Imagine plucking fiery red, vibrant green, or even chocolate-colored peppers straight from your own backyard. No more bland meals – just a burst of fresh, homegrown flavor whenever you desire. For centuries, chili peppers have added zest to cuisines around the globe, from the ancient Aztecs who used them in rituals to the fiery curries of India.
But you don’t need to be a seasoned gardener to enjoy the thrill of growing your own. I’m here to tell you that cultivating these flavorful gems is easier than you think! Many people are intimidated by the thought of gardening, believing it requires vast spaces and expert knowledge. That’s simply not true, especially when it comes to chili peppers.
This DIY guide is packed with simple, effective tricks and hacks that will empower you to grow chili peppers at home, regardless of your experience level or the size of your garden. Whether you have a sprawling backyard or just a sunny windowsill, I’ll show you how to nurture these plants from seed to harvest. Get ready to unleash your inner gardener and transform your meals with the vibrant taste of homegrown chili peppers!

Growing Fiery Chili Peppers at Home: A DIY Guide
Okay, chili pepper enthusiasts, gather ’round! I’m going to walk you through everything you need to know to cultivate your own vibrant, spicy chili peppers right in your home. Forget those bland, store-bought peppers – we’re talking about homegrown flavor that packs a serious punch! This guide is designed for beginners, so don’t worry if you’ve never grown anything before. Let’s get started!
Choosing Your Chili Pepper Variety
Before we dive into the nitty-gritty, let’s talk about choosing the right chili pepper for you. There’s a whole world of chili peppers out there, ranging from mild and sweet to face-meltingly hot. Consider your spice tolerance and what you plan to use the peppers for.
Here are a few popular options:
* **Jalapeño:** A classic choice, offering a moderate level of heat. Great for salsas, poppers, and adding a kick to your favorite dishes.
* **Serrano:** Hotter than jalapeños, serranos are perfect for those who like a bit more fire. They’re often used in Mexican and Southeast Asian cuisine.
* **Cayenne:** These slender red peppers are known for their intense heat. They’re commonly dried and ground into powder for seasoning.
* **Habanero:** Proceed with caution! Habaneros are extremely hot and should be handled with care. They have a fruity flavor that complements their fiery heat.
* **Scotch Bonnet:** Similar to habaneros in heat level and flavor, Scotch bonnets are a staple in Caribbean cuisine.
* **Poblano:** Milder than jalapeños, poblanos have a rich, smoky flavor. They’re often used in stuffed peppers and chili rellenos.
* **Bell Pepper:** Okay, okay, not technically a chili pepper, but if you want to start with something completely mild, bell peppers are a great option for practicing your growing skills.
Once you’ve chosen your variety, you’ll need to decide whether to start from seeds or buy seedlings. Starting from seeds gives you more control over the process, but it requires more time and effort. Buying seedlings is a quicker option, but you’ll have less choice in terms of variety.
Starting from Seeds: The Patient Gardener’s Path
If you’re feeling adventurous, starting from seeds is a rewarding experience. Here’s how to do it:
1. **Gather Your Supplies:** You’ll need chili pepper seeds, seed starting trays or small pots, seed starting mix (a light, well-draining soil), a spray bottle, a heat mat (optional but recommended), and a grow light (optional but helpful).
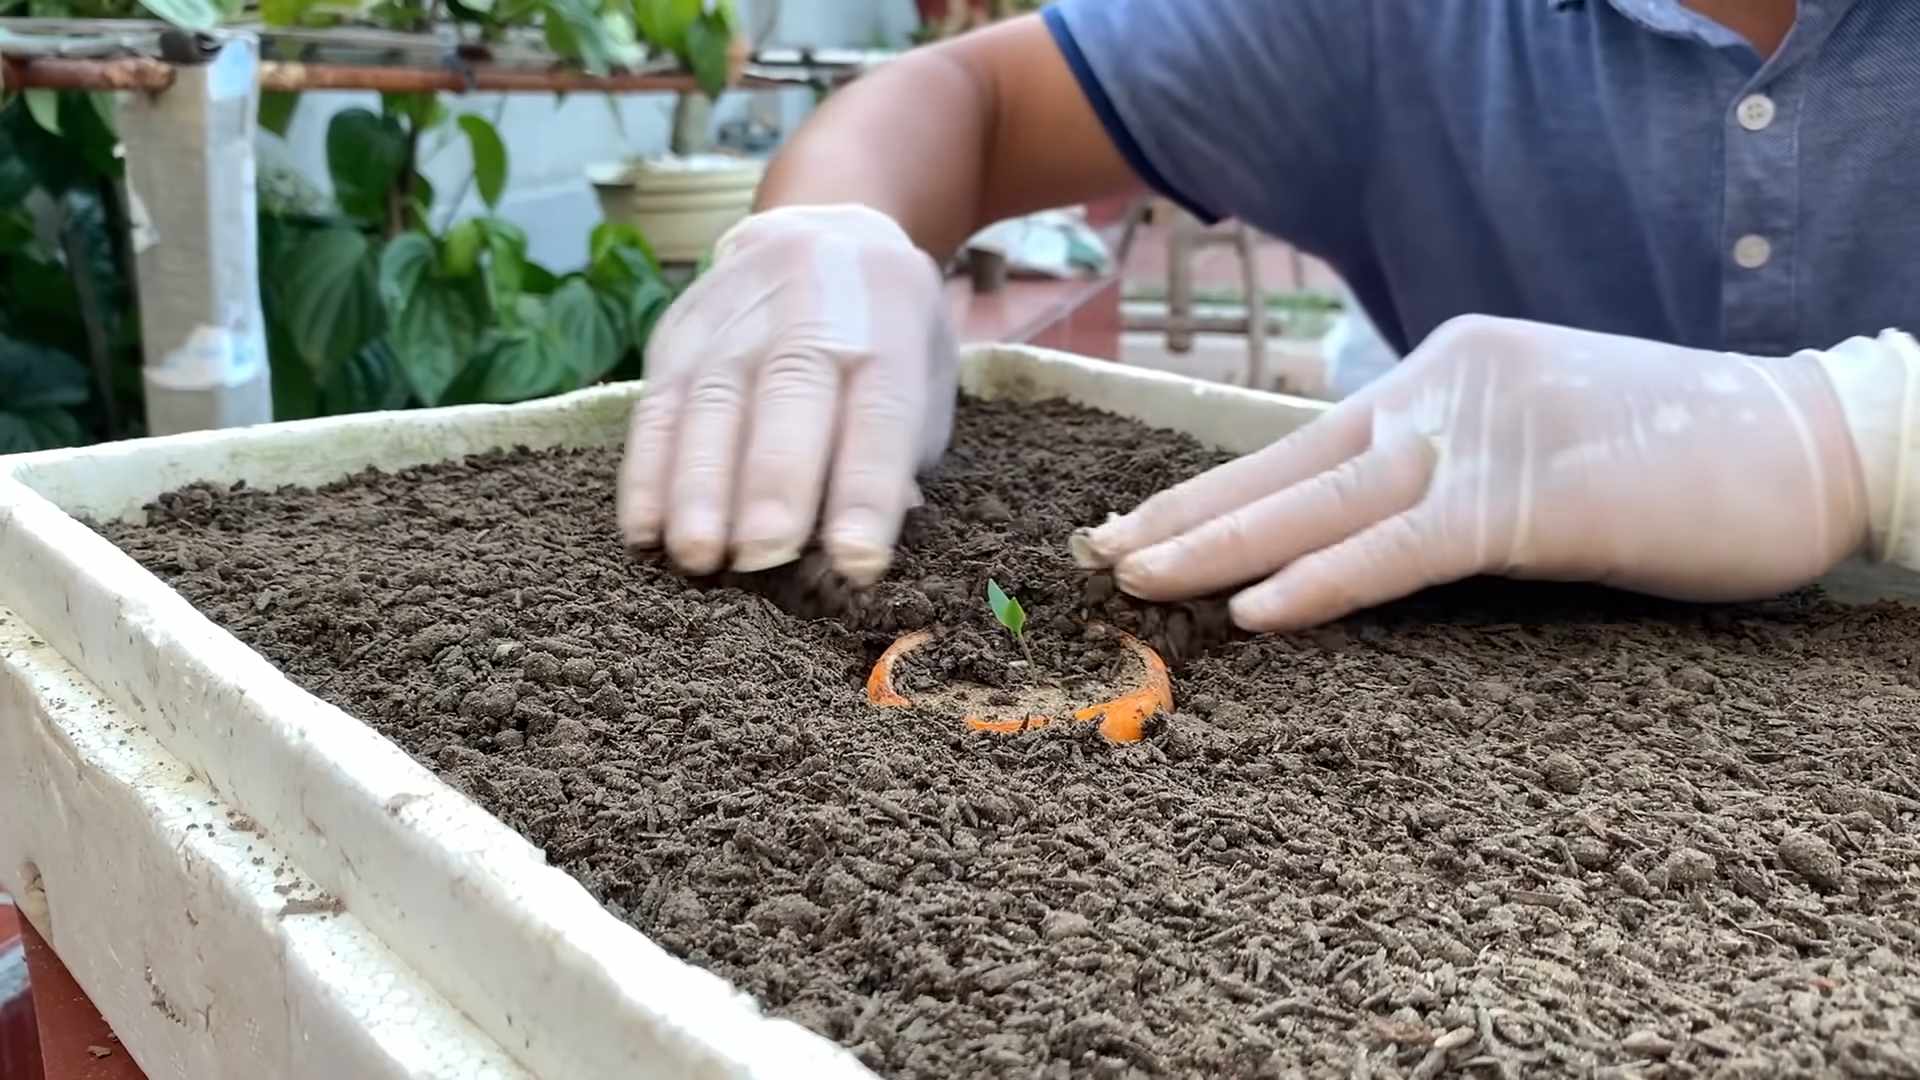
2. **Sow the Seeds:** Fill your seed starting trays or pots with seed starting mix. Moisten the soil with the spray bottle. Sow the seeds about ¼ inch deep, placing 2-3 seeds per cell or pot. Gently cover the seeds with soil and mist again.
3. **Provide Warmth and Light:** Chili pepper seeds need warmth to germinate. Place the seed starting trays on a heat mat, if using. Cover the trays with a clear plastic lid or plastic wrap to create a humid environment. Place the trays under a grow light or in a warm, sunny location.
4. **Keep the Soil Moist:** Check the soil daily and mist it with the spray bottle as needed to keep it moist but not soggy.
5. **Wait for Germination:** Germination typically takes 7-21 days, depending on the variety and temperature. Once the seedlings emerge, remove the plastic lid or plastic wrap.
6. **Thin the Seedlings:** Once the seedlings have their first true leaves (the second set of leaves that appear after the initial seed leaves), thin them to one seedling per cell or pot. Choose the strongest, healthiest seedling and snip off the others at the soil line.
7. **Harden Off the Seedlings:** Before transplanting the seedlings outdoors, you’ll need to harden them off. This process gradually acclimates the seedlings to outdoor conditions. Start by placing the seedlings outdoors in a sheltered location for an hour or two each day, gradually increasing the amount of time they spend outdoors over the course of a week.
Transplanting Seedlings or Planting Store-Bought Seedlings
Whether you started from seeds or bought seedlings, the next step is transplanting them into larger pots or directly into your garden.
1. **Choose the Right Pot or Location:** Chili peppers need plenty of sunlight and well-draining soil. Choose a pot that is at least 5 gallons in size or find a sunny spot in your garden that receives at least 6-8 hours of sunlight per day.
2. **Prepare the Soil:** If you’re planting in pots, use a high-quality potting mix. If you’re planting in the garden, amend the soil with compost or other organic matter to improve drainage and fertility.
3. **Transplant the Seedlings:** Gently remove the seedlings from their containers. If the roots are pot-bound (tightly circling the bottom of the pot), gently loosen them before planting. Dig a hole that is slightly larger than the root ball and place the seedling in the hole. Backfill with soil and gently firm it around the base of the plant.
4. **Water Thoroughly:** Water the seedlings thoroughly after transplanting.
5. **Add Support (Optional):** As your chili pepper plants grow, they may need support to prevent them from toppling over. You can use stakes, cages, or trellises to provide support.
Caring for Your Chili Pepper Plants
Now that your chili pepper plants are in their new homes, it’s time to provide them with the care they need to thrive.
1. **Watering:** Water your chili pepper plants regularly, especially during hot, dry weather. Allow the soil to dry out slightly between waterings. Avoid overwatering, as this can lead to root rot.
2. **Fertilizing:** Chi
Okay, chili pepper enthusiasts, gather ’round! I’m going to walk you through everything you need to know to cultivate your own vibrant, spicy chili peppers right in your home. Forget those bland, store-bought peppers – we’re talking about homegrown flavor that packs a serious punch! This guide is designed for beginners, so don’t worry if you’ve never grown anything before. Let’s get started!
Choosing Your Chili Pepper Variety
Before we dive into the nitty-gritty, let’s talk about choosing the right chili pepper for you. There’s a whole world of chili peppers out there, ranging from mild and sweet to face-meltingly hot. Consider your spice tolerance and what you plan to use the peppers for.
Here are a few popular options:
* **Jalapeño:** A classic choice, offering a moderate level of heat. Great for salsas, poppers, and adding a kick to your favorite dishes.
* **Serrano:** Hotter than jalapeños, serranos are perfect for those who like a bit more fire. They’re often used in Mexican and Southeast Asian cuisine.
* **Cayenne:** These slender red peppers are known for their intense heat. They’re commonly dried and ground into powder for seasoning.
* **Habanero:** Proceed with caution! Habaneros are extremely hot and should be handled with care. They have a fruity flavor that complements their fiery heat.
* **Scotch Bonnet:** Similar to habaneros in heat level and flavor, Scotch bonnets are a staple in Caribbean cuisine.
* **Poblano:** Milder than jalapeños, poblanos have a rich, smoky flavor. They’re often used in stuffed peppers and chili rellenos.
* **Bell Pepper:** Okay, okay, not technically a chili pepper, but if you want to start with something completely mild, bell peppers are a great option for practicing your growing skills.
Once you’ve chosen your variety, you’ll need to decide whether to start from seeds or buy seedlings. Starting from seeds gives you more control over the process, but it requires more time and effort. Buying seedlings is a quicker option, but you’ll have less choice in terms of variety.
Starting from Seeds: The Patient Gardener’s Path
If you’re feeling adventurous, starting from seeds is a rewarding experience. Here’s how to do it:
1. **Gather Your Supplies:** You’ll need chili pepper seeds, seed starting trays or small pots, seed starting mix (a light, well-draining soil), a spray bottle, a heat mat (optional but recommended), and a grow light (optional but helpful).
2. **Sow the Seeds:** Fill your seed starting trays or pots with seed starting mix. Moisten the soil with the spray bottle. Sow the seeds about ¼ inch deep, placing 2-3 seeds per cell or pot. Gently cover the seeds with soil and mist again.
3. **Provide Warmth and Light:** Chili pepper seeds need warmth to germinate. Place the seed starting trays on a heat mat, if using. Cover the trays with a clear plastic lid or plastic wrap to create a humid environment. Place the trays under a grow light or in a warm, sunny location.
4. **Keep the Soil Moist:** Check the soil daily and mist it with the spray bottle as needed to keep it moist but not soggy.
5. **Wait for Germination:** Germination typically takes 7-21 days, depending on the variety and temperature. Once the seedlings emerge, remove the plastic lid or plastic wrap.
6. **Thin the Seedlings:** Once the seedlings have their first true leaves (the second set of leaves that appear after the initial seed leaves), thin them to one seedling per cell or pot. Choose the strongest, healthiest seedling and snip off the others at the soil line.
7. **Harden Off the Seedlings:** Before transplanting the seedlings outdoors, you’ll need to harden them off. This process gradually acclimates the seedlings to outdoor conditions. Start by placing the seedlings outdoors in a sheltered location for an hour or two each day, gradually increasing the amount of time they spend outdoors over the course of a week.
Transplanting Seedlings or Planting Store-Bought Seedlings
Whether you started from seeds or bought seedlings, the next step is transplanting them into larger pots or directly into your garden.
1. **Choose the Right Pot or Location:** Chili peppers need plenty of sunlight and well-draining soil. Choose a pot that is at least 5 gallons in size or find a sunny spot in your garden that receives at least 6-8 hours of sunlight per day.
2. **Prepare the Soil:** If you’re planting in pots, use a high-quality potting mix. If you’re planting in the garden, amend the soil with compost or other organic matter to improve drainage and fertility.
3. **Transplant the Seedlings:** Gently remove the seedlings from their containers. If the roots are pot-bound (tightly circling the bottom of the pot), gently loosen them before planting. Dig a hole that is slightly larger than the root ball and place the seedling in the hole. Backfill with soil and gently firm it around the base of the plant.
4. **Water Thoroughly:** Water the seedlings thoroughly after transplanting.
5. **Add Support (Optional):** As your chili pepper plants grow, they may need support to prevent them from toppling over. You can use stakes, cages, or trellises to provide support.
Caring for Your Chili Pepper Plants
Now that your chili pepper plants are in their new homes, it’s time to provide them with the care they need to thrive.
1. **Watering:** Water your chili pepper plants regularly, especially during hot, dry weather. Allow the soil to dry out slightly between waterings. Avoid overwatering, as this can lead to root rot.
2. **Fertilizing:** Chili peppers are heavy feeders and benefit from regular fertilization. Use a balanced fertilizer or a fertilizer specifically formulated for tomatoes and peppers. Follow the instructions on the fertilizer label.
3. **Sunlight:** Chili peppers need plenty of sunlight to produce fruit. Make sure your plants are getting at least 6-8 hours of sunlight per day.
4. **Pruning:** Pruning can help to improve air circulation and encourage bushier growth. Remove any yellowing or dead leaves. You can also pinch off the tips of the branches to encourage branching.
5. **Pest and Disease Control:** Keep an eye out for pests and diseases. Common pests of chili peppers include aphids, spider mites, and whiteflies. Common diseases include powdery mildew and blossom end rot. Treat any problems promptly with appropriate organic or chemical controls.
6. **Pollination:** Chili peppers are self-pollinating, but you can help them along by gently shaking the plants or using a small paintbrush to transfer pollen from one flower to another. This is especially important if you’re growing your plants indoors.
Harvesting Your Chili Peppers
The moment you’ve been waiting for! Harvesting your chili peppers is the most rewarding part of the process.
1. **When to Harvest:** The timing of harvest depends on the variety of chili pepper and your personal preference. Generally, chili peppers are ready to harvest when they have reached their mature size and color.
2. **How to Harvest:** Use a sharp knife or scissors to cut the peppers from the plant. Be careful not to damage the plant.
3. **Handling Hot Peppers:** If you’re harvesting hot peppers, wear gloves to protect your skin from the capsaicin, the compound that makes chili peppers hot. Avoid touching your eyes or face while handling hot peppers.
4. **Storing Your Harvest:** Fresh chili peppers can be stored in the refrigerator for up to a week. You can also dry, freeze, or pickle your chili peppers for longer storage.
Troubleshooting Common Problems
Even with the best care, you may encounter some problems along the way. Here are a few common issues and how to address them:
* **Blossom End Rot:** This condition causes the bottom of the peppers to rot. It’s usually caused by a calcium deficiency. To prevent blossom end rot, make sure your soil is well-drained and that you’re providing your plants with adequate calcium. You can also use a calcium supplement.
* **Aphids:** These small, sap-sucking insects can weaken your plants. Control aphids with insecticidal soap or neem oil.
* **Spider Mites:** These tiny pests can cause yellowing and stippling of the leaves. Control spider mites with insecticidal soap or neem oil.
* **Powdery Mildew:** This fungal disease causes a white, powdery coating on the leaves. Control powdery mildew with a fungicide.
Enjoying Your Homegrown Chili Peppers
Congratulations! You’ve successfully grown your own chili peppers. Now it’s time to enjoy the fruits (or should I say, peppers?) of your labor. Use your homegrown chili peppers in your favorite recipes, make your own hot sauce, or simply enjoy them fresh off the plant. The possibilities are endless!
Growing chili peppers at home is a fun and rewarding experience. With a little bit of effort, you can enjoy
Conclusion
So, there you have it! Growing chili peppers at home is not only achievable, but it’s also incredibly rewarding. Imagine the satisfaction of plucking vibrant, fiery peppers from your own plant, knowing you nurtured them from seed to spice. This DIY trick, cultivating your own chili pepper garden, is a must-try for anyone who loves adding a kick to their culinary creations, appreciates fresh, homegrown produce, or simply enjoys the therapeutic process of gardening.
But why is this DIY method so compelling? First and foremost, you gain complete control over the growing process. You can choose organic methods, ensuring your peppers are free from harmful pesticides and chemicals. You also have the freedom to select the exact varieties of chili peppers you crave, from the mildest Anaheim to the scorching Carolina Reaper. No more settling for whatever the grocery store offers!
Beyond the control and variety, growing your own chili peppers is surprisingly cost-effective. A packet of seeds is far cheaper than buying fresh peppers regularly, especially if you enjoy using them frequently. Plus, once your plants mature, they can produce a bountiful harvest, providing you with a steady supply of spice for months to come.
Ready to take your chili pepper game to the next level? Consider these variations and suggestions to personalize your growing experience:
* Experiment with different growing mediums: While soil is the most common choice, you can also try hydroponics or aquaponics for a faster and more efficient growing process.
* Explore companion planting: Basil, tomatoes, and carrots are excellent companions for chili peppers, helping to deter pests and improve growth.
* Get creative with containers: Don’t limit yourself to traditional pots. Upcycle old buckets, tires, or even fabric grow bags for a unique and eco-friendly garden.
* Preserve your harvest: When your chili peppers are ready, explore different preservation methods like drying, pickling, or making your own hot sauce. This allows you to enjoy your homegrown spice year-round.
* Consider indoor growing: If you live in a colder climate, you can still enjoy fresh chili peppers by growing them indoors under grow lights.
We’re confident that once you experience the joy of growing chili peppers at home, you’ll be hooked. It’s a simple, satisfying, and delicious way to connect with nature and elevate your cooking. So, grab some seeds, get your hands dirty, and prepare to be amazed by the fiery fruits of your labor.
Don’t forget to share your experiences with us! We’d love to see your chili pepper gardens and hear about your favorite recipes. Tag us in your photos and videos on social media, and let’s inspire others to embrace the rewarding world of homegrown spice. Happy growing!
Frequently Asked Questions (FAQ)
What are the best chili pepper varieties to grow for beginners?
For beginners, it’s best to start with easier-to-grow varieties like Jalapeños, Anaheim, or Serrano peppers. These peppers are relatively low-maintenance and produce a good yield. They are also readily available as seeds or seedlings. Avoid extremely hot varieties like Ghost peppers or Carolina Reapers until you have some experience under your belt, as they can be more challenging to cultivate. Remember to consider your local climate when selecting varieties. Some peppers thrive in warmer climates, while others are more tolerant of cooler temperatures.
How much sunlight do chili pepper plants need?
Chili pepper plants are sun-loving plants and require at least 6-8 hours of direct sunlight per day to thrive. If you’re growing them indoors, you’ll need to supplement with grow lights to ensure they receive adequate light. Insufficient sunlight can lead to leggy growth, reduced flowering, and smaller, less flavorful peppers. When choosing a location for your chili pepper plants, select a spot that receives full sun throughout the day.
What kind of soil is best for growing chili peppers?
Chili peppers prefer well-draining soil that is rich in organic matter. A good potting mix for chili peppers should be a blend of peat moss, perlite, and vermiculite. You can also amend your garden soil with compost or aged manure to improve its fertility and drainage. Avoid heavy clay soils, as they can become waterlogged and suffocate the roots. The ideal soil pH for chili peppers is between 6.0 and 7.0.
How often should I water my chili pepper plants?
Water your chili pepper plants regularly, especially during hot, dry weather. The frequency of watering will depend on the climate, soil type, and size of the plant. As a general rule, water deeply when the top inch of soil feels dry to the touch. Avoid overwatering, as this can lead to root rot. It’s best to water in the morning so that the foliage has time to dry before nightfall, which can help prevent fungal diseases.
How do I fertilize my chili pepper plants?
Chili pepper plants benefit from regular fertilization, especially during the growing season. Use a balanced fertilizer with equal amounts of nitrogen, phosphorus, and potassium. You can also use a fertilizer that is specifically formulated for peppers or tomatoes. Fertilize your plants every 2-3 weeks, following the instructions on the fertilizer label. Avoid over-fertilizing, as this can lead to excessive foliage growth and reduced fruit production.
What are some common pests and diseases that affect chili pepper plants?
Common pests that affect chili pepper plants include aphids, spider mites, whiteflies, and thrips. These pests can suck the sap from the leaves, causing them to become yellow and distorted. You can control these pests with insecticidal soap, neem oil, or by introducing beneficial insects like ladybugs. Common diseases that affect chili pepper plants include fungal diseases like powdery mildew, blossom end rot, and anthracnose. These diseases can cause spots on the leaves, fruit rot, and plant death. You can prevent these diseases by providing good air circulation, avoiding overwatering, and using disease-resistant varieties.
How do I harvest chili peppers?
Harvest your chili peppers when they have reached their mature color and size. The color will vary depending on the variety. Use pruning shears or scissors to cut the peppers from the plant, leaving a small stem attached. Avoid pulling the peppers off, as this can damage the plant. Wear gloves when harvesting hot peppers to protect your skin from the capsaicin oil.
How can I preserve my chili pepper harvest?
There are several ways to preserve your chili pepper harvest, including drying, pickling, freezing, and making hot sauce. Drying is a simple method that involves hanging the peppers in a warm, dry place until they are completely dry. Pickling involves preserving the peppers in a vinegar-based brine. Freezing involves blanching the peppers and then freezing them in airtight containers. Making hot sauce involves blending the peppers with vinegar, salt, and other spices.
Can I grow chili peppers indoors?
Yes, you can grow chili peppers indoors, especially if you live in a colder climate. To grow chili peppers indoors, you’ll need to provide them with adequate light, warmth, and humidity. Use grow lights to supplement natural sunlight, and keep the temperature between 70-80°F during the day and 60-70°F at night. You can increase humidity by misting the plants regularly or using a humidifier. Choose a pot that is at least 12 inches in diameter and use a well-draining potting mix.
How long does it take for chili peppers to grow from seed?
The time it takes for chili peppers to grow from seed to harvest varies depending on the variety and growing conditions. Generally, it takes about 60-90 days for most chili pepper varieties to mature. Some varieties, like Habaneros and Scotch Bonnets, can take longer, up to 120 days. To speed up the germination process, you can start the seeds indoors 6-8 weeks before the last frost.

Leave a Comment