
Grow Dragon Beans at Home and unlock a world of vibrant color and delicious flavor right in your backyard! Have you ever seen those stunning, purple-streaked beans at the farmer’s market and thought, “Wow, I wish I could grow those!”? Well, guess what? You absolutely can! This isn’t just about growing beans; it’s about adding a touch of magic to your garden and your plate.
Beans, in general, have a rich history, dating back thousands of years and playing a vital role in diets across the globe. Dragon beans, with their unique appearance, bring a modern twist to this ancient staple. They’re not only beautiful but also incredibly nutritious and versatile in the kitchen.
But why should *you* specifically learn how to grow dragon beans at home? Because it’s easier than you think! Many people shy away from gardening, thinking it’s too complicated or time-consuming. But with a few simple tricks and DIY hacks, you can enjoy a bountiful harvest of these gorgeous beans, even if you’re a complete beginner. Imagine the satisfaction of serving a meal featuring vegetables you grew yourself – it’s a feeling like no other! Plus, growing your own food is a fantastic way to save money, eat healthier, and connect with nature. So, let’s dive in and discover the secrets to cultivating these beauties in your own garden!
Drachenbohnen zu Hause ziehen: Dein umfassender DIY-Leitfaden
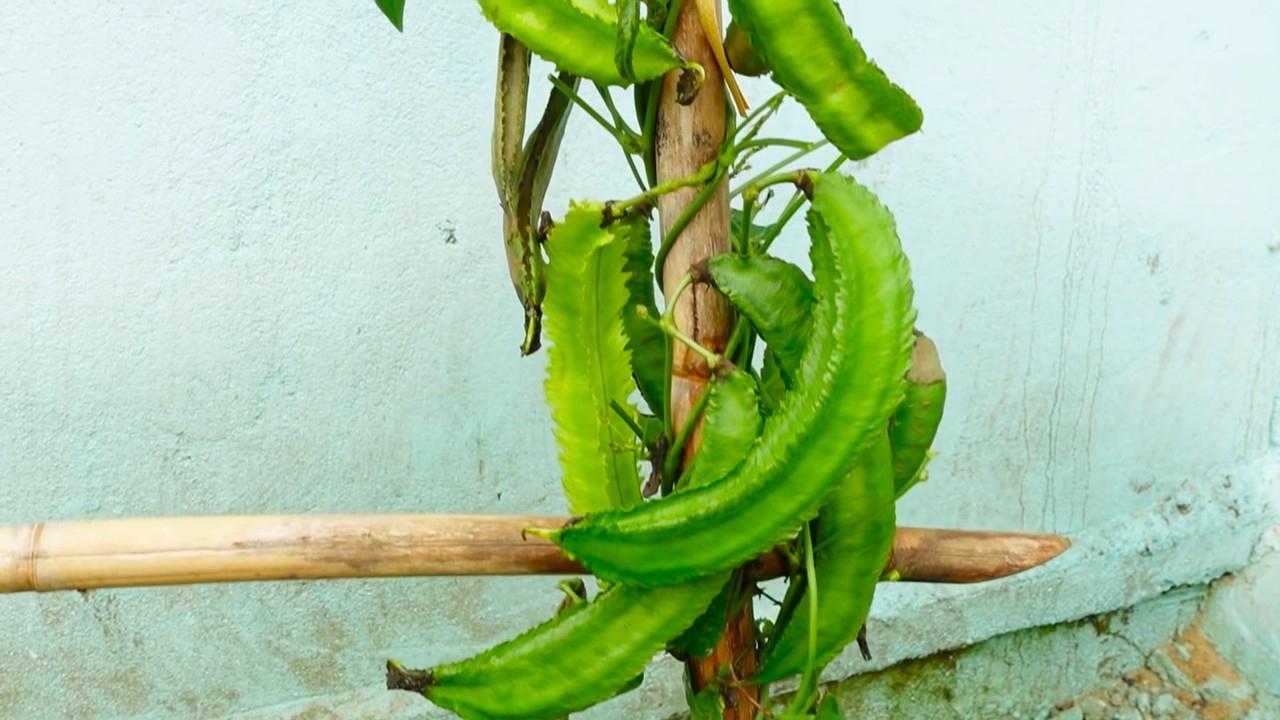
Hey Pflanzenfreunde! Habt ihr schon mal von Drachenbohnen gehört? Diese faszinierenden Pflanzen, auch bekannt als Spargelbohnen oder Yardlong-Bohnen, sind nicht nur super lecker, sondern auch ein echter Hingucker im Garten oder auf dem Balkon. Ihre langen, schlanken Schoten können bis zu einem Meter lang werden! Ich zeige euch heute, wie ihr diese exotischen Schönheiten ganz einfach selbst ziehen könnt. Keine Angst, es ist einfacher als ihr denkt!
Was du für den Anbau von Drachenbohnen brauchst:
* Samen: Drachenbohnensamen (gibt’s online oder im Gartencenter)
* Anzuchttöpfe oder -schalen: Für die Voranzucht (optional)
* Pflanzerde: Am besten eine nährstoffreiche Gemüseerde
* Gartenerde: Für das Beet oder den Topf, in dem die Bohnen später wachsen sollen
* Kompost oder organischer Dünger: Für eine gute Nährstoffversorgung
* Rankhilfe: Drachenbohnen sind Kletterpflanzen und brauchen Unterstützung
* Gießkanne oder Schlauch: Zum Bewässern
* Spaten oder Schaufel: Zum Umtopfen und Pflanzen
* Geduld und Liebe: Das Wichtigste überhaupt!
Schritt-für-Schritt-Anleitung: Drachenbohnen selbst ziehen
1. Die Vorbereitung: Samen und Standort
1. Samen auswählen: Sucht euch qualitativ hochwertige Samen aus. Achtet auf das Verfallsdatum und kauft am besten Bio-Samen, um sicherzustellen, dass sie nicht mit Pestiziden behandelt wurden.
2. Standort bestimmen: Drachenbohnen lieben die Sonne! Wählt einen sonnigen Standort mit mindestens 6 Stunden direkter Sonneneinstrahlung pro Tag. Der Boden sollte gut durchlässig und locker sein.
3. Boden vorbereiten: Lockert den Boden gründlich auf und entfernt Unkraut. Mischt Kompost oder organischen Dünger unter, um den Boden mit Nährstoffen anzureichern.
2. Die Aussaat: Zwei Wege zum Erfolg
Es gibt zwei Möglichkeiten, Drachenbohnen auszusäen: direkt ins Beet oder in Anzuchttöpfen vorziehen. Ich persönlich bevorzuge die Voranzucht, da sie den Pflanzen einen kleinen Vorsprung verschafft.
A. Direktsaat ins Beet:
1. Zeitpunkt wählen: Die Direktsaat erfolgt am besten nach den letzten Frösten, wenn der Boden sich ausreichend erwärmt hat (mindestens 15°C). Das ist meistens ab Mitte Mai der Fall.
2. Aussaat vorbereiten: Macht mit dem Finger oder einem kleinen Stock etwa 2-3 cm tiefe Löcher im Abstand von ca. 10-15 cm.
3. Samen einlegen: Legt in jedes Loch 2-3 Samen. Das erhöht die Wahrscheinlichkeit, dass mindestens ein Samen keimt.
4. Löcher schließen: Bedeckt die Samen mit Erde und drückt sie leicht an.
5. Gießen: Gießt die Erde vorsichtig an, sodass sie feucht, aber nicht nass ist.
6. Geduld haben: Es dauert in der Regel 1-2 Wochen, bis die Samen keimen. Haltet die Erde in dieser Zeit feucht.
B. Voranzucht in Anzuchttöpfen:
1. Töpfe vorbereiten: Füllt die Anzuchttöpfe mit Anzuchterde.
2. Samen säen: Legt in jeden Topf 1-2 Samen, etwa 2-3 cm tief.
3. Gießen: Gießt die Erde vorsichtig an.
4. Warm stellen: Stellt die Töpfe an einen warmen, hellen Ort. Eine Fensterbank oder ein Gewächshaus sind ideal.
5. Feucht halten: Haltet die Erde feucht, aber nicht nass.
6. Pikieren (optional): Wenn mehrere Samen in einem Topf gekeimt sind, könnt ihr die schwächsten Pflänzchen entfernen, sodass nur noch ein kräftiges Pflänzchen pro Topf übrig bleibt.
3. Das Umsetzen: Ab ins Freie!
1. Zeitpunkt wählen: Sobald die Jungpflanzen etwa 10-15 cm groß sind und keine Frostgefahr mehr besteht, können sie ins Freie umgepflanzt werden. Das ist meistens ab Ende Mai/Anfang Juni der Fall.
2. Pflanzlöcher vorbereiten: Grabt Pflanzlöcher im Abstand von ca. 30-40 cm. Die Löcher sollten etwas größer sein als die Wurzelballen der Jungpflanzen.
3. Pflanzen einsetzen: Nehmt die Jungpflanzen vorsichtig aus den Töpfen und setzt sie in die Pflanzlöcher. Achtet darauf, die Wurzeln nicht zu beschädigen.
4. Löcher schließen: Füllt die Löcher mit Erde und drückt sie leicht an.
5. Gießen: Gießt die Pflanzen gründlich an.
6. Rankhilfe anbringen: Drachenbohnen sind Kletterpflanzen und brauchen eine Rankhilfe. Ihr könnt Bambusstäbe, ein Rankgitter oder ein Seil verwenden. Achtet darauf, dass die Rankhilfe stabil ist und den Pflanzen ausreichend Halt bietet.
4. Die Pflege: Gießen, Düngen, Ernten
1. Gießen: Drachenbohnen brauchen regelmäßig Wasser, besonders während der Blütezeit und der Fruchtbildung. Gießt am besten morgens oder abends, um Verdunstung zu vermeiden. Vermeidet Staunässe, da dies zu Wurzelfäule führen kann.
2. Düngen: Düngt die Pflanzen regelmäßig mit einem organischen Dünger oder Kompost. Das sorgt für eine gute Nährstoffversorgung und fördert das Wachstum und die Ernte.
3. Unkraut entfernen: Haltet das Beet oder den Topf unkrautfrei. Unkraut konkurriert mit den Drachenbohnen um Nährstoffe und Wasser.
4. Schädlinge und Krankheiten: Achtet auf Schädlinge wie Blattläuse oder Schnecken. Bei Bedarf könnt ihr biologische Schädlingsbekämpfungsmittel einsetzen. Drachenbohnen sind relativ robust, können aber bei feuchtem Wetter anfällig für Pilzkrankheiten sein. Sorgt für eine gute Belüftung und entfernt befallene Blätter.
5. Ernten: Die Drachenbohnen sind erntereif, wenn die Schoten etwa 30-50 cm lang sind und sich noch leicht biegen lassen. Erntet die Bohnen regelmäßig, um die weitere Fruchtbildung anzuregen. Schneidet die Schoten mit einer Schere oder einem Messer ab.
Zusätzliche Tipps für eine reiche Ernte:
* Mulchen: Eine Mulchschicht aus Stroh oder Rasenschnitt hilft, die Feuchtigkeit im Boden zu halten und Unkraut zu unterdrücken.
* Pflanzen stützen: Wenn die Pflanzen sehr hoch werden, kann es sinnvoll sein, sie zusätzlich zu stützen, um zu verhindern, dass sie umknicken.
* Regelmäßig kontrollieren: Kontrolliert die Pflanzen regelmäßig auf Schädlinge und Krankheiten. Je früher ihr Probleme erkennt, desto einfacher lassen sie sich beheben.
* Freude haben: Das Wichtigste ist, dass ihr Spaß am Gärtnern habt! Beobachtet eure Pflanzen, lernt von ihnen und freut euch über jede einzelne Bohne, die ihr ernten könnt.
Drachenbohnen in Töpfen anbauen: So geht’s!
Auch wenn ihr keinen Garten habt, könnt ihr Drachenbohnen problemlos in Töpfen auf dem Balkon oder der Terrasse anbauen.
* Topfgröße: Wählt einen ausreichend großen Topf mit einem Durchmesser von mindestens 30 cm.
* Erde: Verwendet eine hochwertige Gemüseerde.
* Drainage: Achtet auf eine gute Drainage, um Staunässe zu vermeiden.
* Rankhilfe: Auch im Topf brauchen die Drachenbohnen eine Rankhilfe.
* Gießen und Düngen: Gießt und düngt die Pflanzen regelmäßig.
* Standort: Stellt den Topf an einen sonnigen Standort.
Warum Drachenbohnen anbauen?
* Gesund und lecker: Drachenbohnen sind reich an Vitaminen, Mineralstoffen und Ballaststoffen

Conclusion
So, there you have it! Growing dragon beans at home is not only achievable, but it’s also a deeply rewarding experience. Forget those bland, store-bought beans that lack the vibrant flavor and satisfying crunch of freshly harvested produce. With a little patience and the right approach, you can cultivate your own supply of these impressive legumes, adding a touch of exotic flair to your garden and your plate.
The beauty of this DIY project lies in its simplicity and adaptability. Whether you have a sprawling backyard or a small balcony, dragon beans can thrive with the proper support and care. Imagine the satisfaction of watching those vigorous vines climb and produce an abundance of colorful pods, knowing that you nurtured them from seed to harvest.
But the benefits extend far beyond the aesthetic appeal. Homegrown dragon beans offer superior flavor and nutritional value compared to their commercially grown counterparts. You control the growing conditions, ensuring that your beans are free from harmful pesticides and herbicides. Plus, the act of gardening itself is a fantastic stress reliever and a great way to connect with nature.
Don’t be afraid to experiment with different varieties of dragon beans. Some are known for their striking purple streaks, while others boast a more subtle green hue. You can also explore different trellising methods to create a visually stunning display in your garden. Consider companion planting with herbs like basil or rosemary to deter pests and enhance the flavor of your beans.
And the culinary possibilities are endless! Dragon beans are incredibly versatile in the kitchen. Enjoy them steamed, stir-fried, or added to soups and stews. Their firm texture and slightly sweet flavor make them a delightful addition to any meal. You can even pickle them for a tangy and refreshing snack.
We wholeheartedly encourage you to embark on this exciting gardening adventure. Growing dragon beans at home is a fantastic way to enhance your culinary skills, connect with nature, and enjoy the satisfaction of harvesting your own food. It’s a project that’s suitable for gardeners of all levels, from beginners to seasoned pros.
So, grab some seeds, prepare your soil, and get ready to witness the magic of dragon beans unfold in your own backyard. We’re confident that you’ll be amazed by the results. And don’t forget to share your experiences with us! We’d love to hear about your successes, challenges, and creative ways of using your homegrown dragon beans. Share your photos and stories on social media using #HomegrownDragonBeans – let’s create a community of dragon bean enthusiasts!
Ready to Grow?
Don’t delay! Start planning your dragon bean garden today. You’ll be amazed at how easy and rewarding it is to grow your own delicious and nutritious beans.
Frequently Asked Questions (FAQ)
What are dragon beans and why should I grow them?
Dragon beans, also known as asparagus beans or yardlong beans, are a type of legume characterized by their exceptionally long pods, often reaching lengths of up to three feet. They are not only visually striking but also offer a delicious and nutritious addition to your diet. Growing dragon beans at home allows you to enjoy fresh, flavorful beans that are free from harmful chemicals and pesticides. Plus, the act of gardening itself is a rewarding and therapeutic experience.
What is the best time to plant dragon beans?
Dragon beans are warm-weather crops, so it’s crucial to wait until the danger of frost has passed before planting them. The ideal time to plant is typically in late spring or early summer, when the soil temperature has reached at least 60°F (15°C). In warmer climates, you may be able to plant a second crop in late summer for a fall harvest. Check your local climate and growing zone for specific planting recommendations.
What kind of soil do dragon beans need?
Dragon beans thrive in well-drained soil that is rich in organic matter. Before planting, amend your soil with compost or aged manure to improve its fertility and drainage. A slightly acidic to neutral pH (around 6.0 to 7.0) is ideal. Avoid planting in heavy clay soil, as this can lead to root rot. If your soil is compacted, consider adding sand or perlite to improve drainage.
How much sunlight do dragon beans require?
Dragon beans need at least 6-8 hours of direct sunlight per day to thrive. Choose a planting location that receives ample sunlight throughout the day. If you live in a particularly hot climate, some afternoon shade may be beneficial to prevent the plants from scorching.
What kind of support do dragon beans need?
Dragon beans are climbing plants and require a sturdy support structure to grow properly. A trellis, fence, or teepee made of bamboo poles or netting are all excellent options. The support should be at least 6-8 feet tall to accommodate the vigorous growth of the vines. Make sure the support is strong enough to withstand the weight of the mature plants and the beans.
How often should I water dragon beans?
Dragon beans need consistent moisture, especially during hot and dry weather. Water deeply and regularly, aiming to keep the soil consistently moist but not waterlogged. Avoid overhead watering, as this can promote fungal diseases. Mulching around the base of the plants can help to retain moisture and suppress weeds.
Do dragon beans need fertilizer?
While dragon beans are relatively low-maintenance, they can benefit from occasional fertilization. Apply a balanced fertilizer (e.g., 10-10-10) at planting time and again when the plants begin to flower. Avoid over-fertilizing, as this can lead to excessive foliage growth at the expense of bean production. You can also amend the soil with compost tea every few weeks to provide a gentle boost of nutrients.
How do I harvest dragon beans?
Dragon beans are typically ready to harvest about 60-70 days after planting. Harvest the beans when they are young and tender, before the seeds inside become too large and tough. The pods should be firm and snap easily when bent. Use scissors or pruning shears to cut the beans from the vine, being careful not to damage the plant. Harvest regularly to encourage continued production.
What are some common pests and diseases that affect dragon beans?
Dragon beans can be susceptible to various pests and diseases, including aphids, bean beetles, and fungal diseases like powdery mildew. Inspect your plants regularly for signs of infestation or disease. Control aphids and bean beetles with insecticidal soap or neem oil. Prevent fungal diseases by providing good air circulation, avoiding overhead watering, and applying a fungicide if necessary. Companion planting with herbs like basil or rosemary can also help to deter pests.
Can I save seeds from my dragon beans?
Yes, you can save seeds from your dragon beans for planting next year. Allow a few pods to mature completely on the vine, until they are dry and brown. Remove the seeds from the pods and store them in a cool, dry place until planting time. Keep in mind that seeds saved from hybrid varieties may not produce plants that are true to type.
What are some creative ways to use dragon beans in cooking?
Dragon beans are incredibly versatile in the kitchen. They can be steamed, stir-fried, grilled, or added to soups and stews. Their firm texture and slightly sweet flavor make them a delightful addition to any meal. Try them in Asian-inspired dishes, salads, or as a side dish with grilled meats or fish. You can also pickle them for a tangy and refreshing snack. Get creative and experiment with different recipes to discover your favorite ways to enjoy these delicious beans.


Leave a Comment