
Grow Ginger in a Small Garden? Absolutely! Imagine the satisfaction of harvesting your own fresh, spicy ginger right from your backyard, ready to add zing to your favorite dishes or brew into a comforting tea. Forget those bland, store-bought rhizomes – homegrown ginger bursts with flavor and vitality.
For centuries, ginger has been revered in cultures around the globe, from its medicinal uses in traditional Chinese medicine to its culinary prominence in Indian and Southeast Asian cuisine. It’s a spice with a rich history, and now, you can easily bring that history to your own home, even if you’re short on space.
Many people think growing ginger requires acres of land, but that’s simply not true! This DIY guide will unlock the secrets to successfully grow ginger in a small garden, whether you have a sprawling vegetable patch, a sunny balcony, or just a few pots on your windowsill. I’ll share my tried-and-true techniques, from selecting the perfect ginger root to nurturing it through every stage of growth. You’ll learn how to create the ideal growing environment, combat common pests and diseases, and ultimately, reap a bountiful harvest of this incredible spice. So, grab your gardening gloves, and let’s get started!
Growing Ginger in Your Small Garden: A DIY Guide
Hey there, fellow garden enthusiasts! Ever thought about growing your own ginger? It’s surprisingly easy, even if you’re working with a small garden space. Fresh, homegrown ginger is so much more flavorful than what you find in the store, and the satisfaction of harvesting your own is unbeatable. Let’s dive into how you can cultivate this amazing spice right in your backyard!
Choosing the Right Ginger and Preparing for Planting
Before we get our hands dirty, let’s talk about selecting the right ginger and getting it ready for its new home.
* Selecting Your Ginger Rhizome: Look for plump, healthy-looking ginger rhizomes (the “root” part we eat) at your local grocery store or nursery. Opt for organic ginger if possible, as it’s less likely to have been treated with growth inhibitors. The rhizomes should be firm, with no signs of shriveling or mold. You want to see “eyes” or buds – these are the little bumps that will sprout into new plants.
* Preparing the Rhizome: Once you’ve got your ginger, soak it in lukewarm water overnight. This rehydrates the rhizome and encourages those buds to wake up.
* Cutting the Rhizome (Optional): If your rhizome is large, you can cut it into smaller pieces, ensuring each piece has at least one or two buds. Let the cut pieces air dry for a day or two to allow the cut surfaces to callous over. This helps prevent rot.
* Choosing the Right Location: Ginger loves warmth and partial shade. Think about a spot in your garden that gets morning sun but is protected from the harsh afternoon rays. If you live in a cooler climate, consider growing ginger in a container that you can move indoors during the winter.
* Preparing the Soil: Ginger needs well-draining, nutrient-rich soil. Amend your garden soil with plenty of compost or well-rotted manure. A slightly acidic soil pH (around 6.0 to 6.5) is ideal. If you’re using containers, choose a high-quality potting mix.
Planting Your Ginger
Now for the fun part – getting that ginger in the ground!
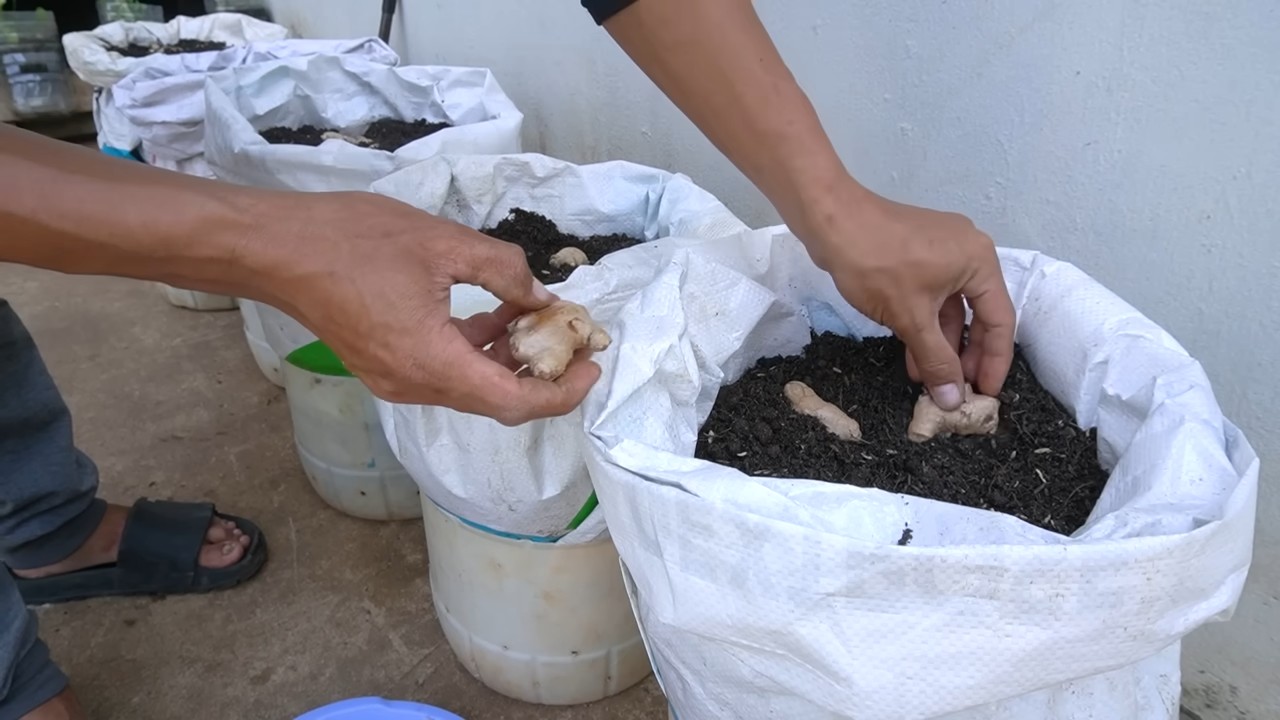
1. Digging the Hole: Dig a shallow hole, about 2-4 inches deep, depending on the size of your rhizome.
2. Planting the Rhizome: Place the ginger rhizome horizontally in the hole, with the buds facing upwards.
3. Covering the Rhizome: Gently cover the rhizome with soil, being careful not to damage the buds.
4. Watering: Water thoroughly after planting. The soil should be moist but not waterlogged.
5. Mulching (Optional): Add a layer of mulch around the ginger plant to help retain moisture and suppress weeds. Straw, shredded leaves, or wood chips work well.
Caring for Your Ginger Plants
Consistent care is key to a bountiful ginger harvest.
* Watering: Keep the soil consistently moist, especially during hot, dry weather. Ginger doesn’t like to dry out completely. However, avoid overwatering, as this can lead to root rot. Check the soil moisture regularly by sticking your finger into the soil. If the top inch feels dry, it’s time to water.
* Fertilizing: Ginger is a heavy feeder, so regular fertilization is important. Use a balanced organic fertilizer every few weeks during the growing season. You can also side-dress with compost or well-rotted manure.
* Weeding: Keep the area around your ginger plants free of weeds. Weeds compete for nutrients and water, and they can also harbor pests and diseases.
* Pest and Disease Control: Ginger is generally pest-resistant, but keep an eye out for common garden pests like aphids or spider mites. Treat any infestations promptly with insecticidal soap or neem oil. Root rot can be a problem if the soil is poorly drained, so ensure good drainage and avoid overwatering.
* Providing Support (Optional): As your ginger plants grow, they may become top-heavy. You can provide support by staking them or using a tomato cage.
Harvesting Your Ginger
The moment we’ve all been waiting for!
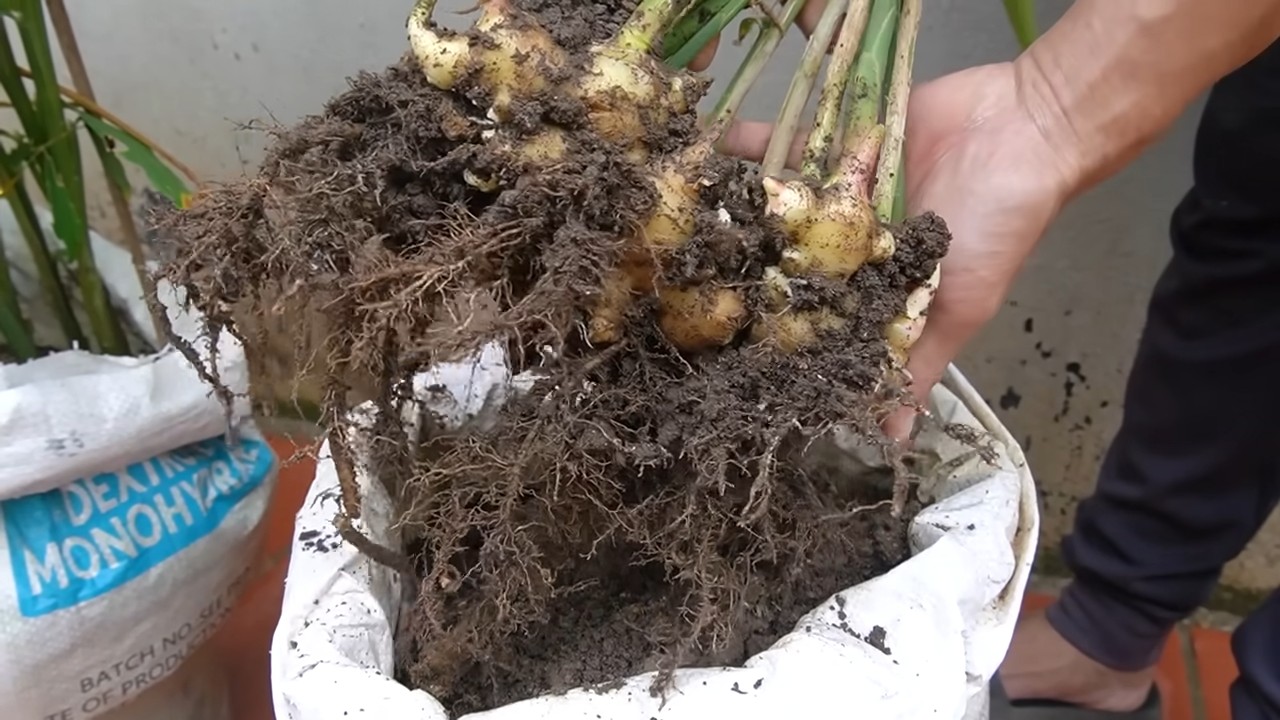
1. When to Harvest: You can start harvesting ginger about 8-10 months after planting. The leaves will start to turn yellow and die back, indicating that the rhizomes are mature. However, you can harvest small pieces of ginger earlier if you need them.
2. Harvesting Method: Gently dig around the ginger plant with a garden fork or trowel. Be careful not to damage the rhizomes.
3. Lifting the Rhizomes: Carefully lift the entire plant out of the ground.
4. Cleaning the Rhizomes: Brush off any excess soil from the rhizomes.
5. Storing Your Ginger: Freshly harvested ginger can be stored in the refrigerator for several weeks. Wrap it in a paper towel and place it in a plastic bag. You can also freeze ginger for longer storage. To freeze, peel and chop the ginger, then spread it out on a baking sheet and freeze until solid. Transfer the frozen ginger to a freezer bag.
Propagating Ginger
Want more ginger plants? It’s easy to propagate them!
1. Dividing the Rhizomes: When you harvest your ginger, you can divide the rhizomes into smaller pieces, ensuring each piece has at least one or two buds.
2. Replanting: Plant the divided rhizomes as described above.
Troubleshooting
Even with the best care, you might encounter some challenges. Here are a few common problems and how to address them:
* Yellowing Leaves: This could be a sign of overwatering, underwatering, nutrient deficiency, or pest infestation. Check the soil moisture, fertilize if necessary, and inspect for pests.
* Root Rot: This is caused by poorly drained soil and overwatering. Ensure good drainage and avoid overwatering. If root rot is severe, you may need to replant the ginger in fresh soil.
* Slow Growth: This could be due to insufficient sunlight, poor soil, or lack of fertilizer. Ensure your ginger plants are getting enough sunlight, amend the soil with compost, and fertilize regularly.
Growing Ginger in Containers
If you have limited garden space or live in a cooler climate, growing ginger in containers is a great option.
* Choosing the Right Container: Select a container that is at least 12 inches deep and wide. Ensure the container has drainage holes.
* Potting Mix: Use a high-quality potting mix that is well-draining.
* Planting: Plant the ginger rhizome as described above.
* Care: Water and fertilize regularly. Move the container indoors during the winter if you live in a cooler climate.
* Harvesting: Harvest the ginger as described above.
Ginger Varieties to Consider
While most ginger sold in stores is the common variety, *Zingiber officinale*, you might find other interesting varieties to grow.
* Common Ginger (Zingiber officinale): This is the most widely available and commonly used ginger. It has a spicy, pungent flavor.
* Galangal (Alpinia galanga): Also known as Thai ginger, galangal has a citrusy, earthy flavor.
* Turmeric (Curcuma longa): While technically not ginger, turmeric is in the same family and has similar growing requirements. It’s known for its vibrant yellow color and earthy flavor.
* Ornamental Ginger: These varieties are grown for their beautiful flowers and foliage. They are not typically used for culinary purposes.
Uses for Your Homegrown Ginger
Once you’ve harvested your ginger, the possibilities are endless!
* Cooking: Use fresh ginger in stir-fries, soups, curries, and marinades.
* Tea: Make ginger tea by steeping sliced ginger in hot water. Add honey or lemon to taste.
* Baking: Add grated ginger to cookies, cakes, and breads.
* Pickling: Pickle ginger to serve as a condiment with sushi or other dishes.
* Medicinal Uses: Ginger has been used for centuries for its medicinal properties. It can help relieve nausea, reduce inflammation, and boost the immune system.
Enjoying the Fruits (or Rhizomes!) of Your Labor
Growing your own ginger is a rewarding experience. Not only will you have access to fresh, flavorful ginger, but you’ll also enjoy the satisfaction of nurturing a plant from rhizome to harvest. So, get out there and start growing! You’ll be amazed at how easy and fun it is. Happy gardening!
Conclusion
So, there you have it! Growing ginger in a small garden, even if it’s just a container on your balcony, is not only achievable but also incredibly rewarding. Forget those bland, store-bought rhizomes that lack the vibrant zest of freshly grown ginger. This DIY trick unlocks a world of flavor and freshness right at your fingertips. Think about it: you can add a spicy kick to your stir-fries, brew a soothing ginger tea, or even create your own homemade ginger ale, all with ginger you nurtured yourself.
This isn’t just about saving a few dollars; it’s about connecting with your food, understanding its origins, and experiencing the satisfaction of cultivating something delicious. The aroma of the ginger leaves alone is enough to brighten any day! Plus, you’re reducing your carbon footprint by opting for homegrown produce over commercially shipped options.
But the beauty of this method lies in its adaptability. Feel free to experiment with different varieties of ginger. Some gardeners swear by the ‘Chinese Ginger’ for its intense flavor, while others prefer the ‘Hawaiian Ginger’ for its milder, sweeter notes. You can also play around with the soil composition. Adding a bit of extra compost or well-rotted manure can give your ginger plants a significant boost. Consider companion planting too! Turmeric, another rhizome-producing plant, thrives in similar conditions and can be grown alongside your ginger. Marigolds are also excellent companions, as they help deter nematodes, common pests that can affect ginger growth.
Don’t be afraid to get creative with your container choices either. While a standard pot works perfectly well, you could also repurpose an old bucket, a large plastic tub, or even a fabric grow bag. Just ensure that whatever you choose has adequate drainage.
We strongly encourage you to give this DIY trick a try. It’s a relatively low-maintenance project that yields impressive results. Imagine the pride you’ll feel when you harvest your first batch of homegrown ginger! And once you’ve experienced the difference in flavor and quality, you’ll never want to go back to store-bought again.
More importantly, we want to hear about your experiences! Share your tips, tricks, and photos with us in the comments section below. Did you try a different variety of ginger? Did you encounter any challenges along the way? What are your favorite ways to use your homegrown ginger? Your insights could help other aspiring gardeners embark on their own ginger-growing adventures. Let’s build a community of ginger enthusiasts and share the joy of cultivating this amazing spice in our own small gardens. So, grab some ginger root, prepare your soil, and get ready to experience the magic of growing ginger yourself! This is your chance to master the art of **growing ginger in a small garden**.
Frequently Asked Questions (FAQ)
1. What kind of ginger should I plant?
The best type of ginger to plant depends on your personal preference and what’s readily available in your area. Culinary ginger, also known as common ginger (Zingiber officinale), is the most widely available and suitable for growing at home. Look for rhizomes that are plump, firm, and have visible “eyes” or growth buds. Avoid rhizomes that are shriveled, soft, or show signs of mold. You can often find suitable ginger at your local grocery store or Asian market. If you’re looking for specific varieties, such as ‘Chinese Ginger’ or ‘Hawaiian Ginger,’ you may need to source them from a specialty nursery or online seed supplier. Remember to choose organic ginger if possible, to avoid any potential pesticide residue.
2. How much sunlight does ginger need?
Ginger thrives in partial shade. Direct sunlight can scorch the leaves, especially in hotter climates. Aim for a location that receives morning sun and afternoon shade, or dappled sunlight throughout the day. If you’re growing ginger indoors, place it near a window that receives bright, indirect light. You can also supplement with grow lights if necessary. Observe your plants closely and adjust their location if you notice any signs of stress, such as yellowing or browning leaves.
3. What kind of soil is best for growing ginger?
Ginger prefers well-draining, fertile soil that is rich in organic matter. A good potting mix for ginger should be loose and airy, allowing for good root development. You can create your own mix by combining equal parts of potting soil, compost, and perlite or vermiculite. The compost provides essential nutrients, while the perlite or vermiculite improves drainage and aeration. Avoid heavy clay soils, as they can become waterlogged and lead to root rot. Before planting, amend the soil with plenty of compost or well-rotted manure to improve its fertility and drainage.
4. How often should I water my ginger plants?
Ginger needs consistent moisture, but it’s important to avoid overwatering. Water thoroughly when the top inch of soil feels dry to the touch. During hot, dry weather, you may need to water more frequently. Be sure to provide good drainage to prevent water from pooling around the roots. Overwatering can lead to root rot, which is a common problem with ginger plants. Check the drainage holes in your container to ensure that water is flowing freely. Reduce watering during the cooler months when the plant’s growth slows down.
5. When is the best time to harvest ginger?
You can start harvesting ginger about 8-10 months after planting. The leaves will begin to turn yellow and die back, indicating that the rhizomes are mature. You can harvest the entire plant at once, or you can selectively harvest individual rhizomes as needed. To harvest, gently dig around the plant and lift the rhizomes out of the soil. Wash off any excess soil and store the ginger in a cool, dry place. Freshly harvested ginger has the most intense flavor and aroma.
6. Can I grow ginger indoors?
Yes, you can absolutely grow ginger indoors! In fact, growing ginger indoors is a great option for those who live in colder climates or have limited outdoor space. Choose a pot that is at least 12 inches deep and wide to allow for adequate root growth. Use a well-draining potting mix and place the pot in a location that receives bright, indirect light. Water regularly and fertilize every few weeks with a balanced liquid fertilizer. You may need to supplement with grow lights if your indoor space doesn’t receive enough natural light.
7. What are some common problems when growing ginger?
Some common problems when growing ginger include root rot, nematodes, and fungal diseases. Root rot is caused by overwatering and poor drainage. To prevent root rot, ensure that your soil is well-draining and avoid overwatering. Nematodes are microscopic worms that can damage the roots of ginger plants. To prevent nematode infestations, use sterilized soil and consider companion planting with marigolds, which are known to repel nematodes. Fungal diseases can also affect ginger plants, especially in humid conditions. To prevent fungal diseases, provide good air circulation and avoid overhead watering. If you notice any signs of disease, such as spots on the leaves, treat the plant with a fungicide.
8. How do I store fresh ginger?
Fresh ginger can be stored in several ways. For short-term storage (up to a week), you can wrap the ginger in a paper towel and store it in the refrigerator. For longer-term storage (up to a month), you can store the ginger in a plastic bag in the refrigerator. You can also freeze ginger for even longer storage. To freeze ginger, peel it and slice it into small pieces or grate it. Place the ginger in a freezer bag and store it in the freezer for up to six months. You can also pickle ginger in vinegar or brine for a longer shelf life.
9. Can I grow ginger from store-bought ginger?
Yes, you can grow ginger from store-bought ginger, but it’s important to choose organic ginger if possible. Non-organic ginger may have been treated with growth inhibitors to prevent sprouting. Look for rhizomes that are plump, firm, and have visible “eyes” or growth buds. Soak the ginger in water overnight before planting to rehydrate it.
10. What are some uses for homegrown ginger?
Homegrown ginger can be used in a variety of culinary and medicinal applications. You can use it to flavor stir-fries, soups, stews, and curries. You can also use it to make ginger tea, ginger ale, and other beverages. Ginger has anti-inflammatory and antioxidant properties and can be used to treat nausea, indigestion, and other ailments. You can also use ginger to make homemade beauty products, such as face masks and hair treatments. The possibilities are endless!

Leave a Comment