
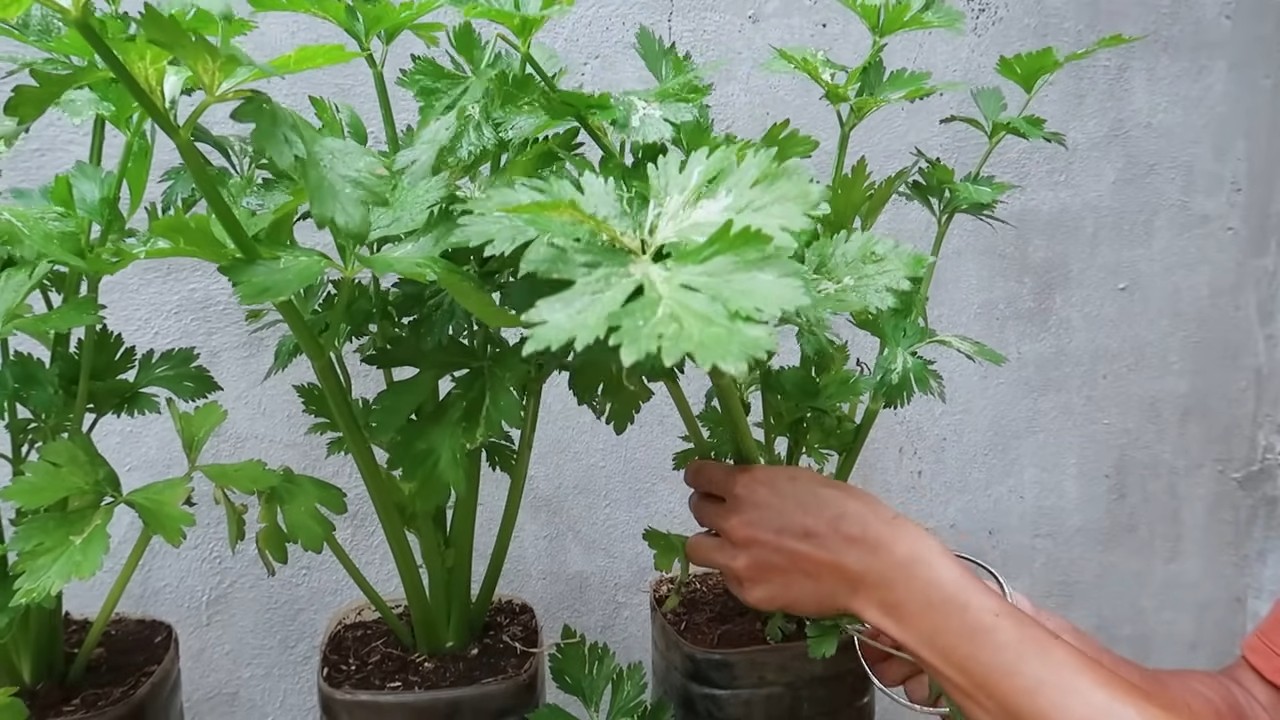
Grow Juicy Celery Fast – that’s the dream, right? Imagine biting into crisp, refreshing celery sticks you’ve nurtured from tiny seedlings, bursting with flavor and packed with nutrients. Forget the limp, lifeless stalks from the grocery store! This isn’t just about saving money; it’s about connecting with nature, enjoying the satisfaction of growing your own food, and experiencing the unparalleled taste of homegrown goodness.
Celery, with its origins tracing back to the Mediterranean, has been cultivated for centuries, initially for medicinal purposes before becoming a culinary staple. From ancient Roman banquets to modern-day crudité platters, celery has always held a special place. But let’s be honest, growing celery can be a bit tricky. It needs the right conditions, consistent watering, and a little bit of know-how. That’s where these DIY tricks and hacks come in!
I know what you’re thinking: “I don’t have a green thumb!” But trust me, you don’t need to be a master gardener to grow juicy celery fast. These simple, step-by-step instructions will guide you through the process, from preparing the soil to harvesting your delicious crop. We’ll cover everything from choosing the right variety to protecting your plants from pests. So, ditch the store-bought celery and get ready to enjoy the freshest, most flavorful celery you’ve ever tasted. Let’s get growing!
Grow Juicy Celery Faster Than You Thought Possible!
Hey there, fellow gardening enthusiasts! I’m so excited to share my secrets for growing incredibly juicy and delicious celery, and the best part? We’re going to speed up the process! Forget waiting months for a spindly stalk; with these tips and tricks, you’ll be enjoying crisp, flavorful celery much sooner than you think.
Choosing the Right Celery Variety
First things first, let’s talk about variety. Not all celery is created equal! Some varieties are naturally faster-growing and more resistant to bolting (going to seed prematurely), which is crucial for a quick harvest.
* ‘Utah Improved’: This is a classic choice, known for its reliability and good flavor. It’s relatively fast-growing and widely available.
* ‘Golden Self-Blanching’: This heirloom variety is not only beautiful with its pale yellow stalks but also matures relatively quickly. It has a milder flavor than green varieties.
* ‘Tendercrisp’: As the name suggests, this variety is known for its tender stalks and crisp texture. It’s also a good choice for faster growth.
Starting Celery Seeds Indoors (The Key to Speed!)
Celery has a notoriously long growing season, so starting seeds indoors is absolutely essential for getting a head start. I usually start my seeds about 10-12 weeks before the last expected frost.
1. Gather Your Supplies: You’ll need:
* Celery seeds (of course!)
* Seed starting trays or small pots
* Seed starting mix (a fine, sterile mix is best)
* A spray bottle filled with water
* A heat mat (optional, but highly recommended)
* A grow light (also optional, but helps prevent leggy seedlings)
2. Sow the Seeds: Celery seeds are tiny, so handle them with care. Sprinkle them thinly over the surface of the seed starting mix. Don’t bury them too deeply; they need light to germinate. Gently press them into the soil.
3. Water Carefully: Use a spray bottle to mist the soil thoroughly. You want to keep the soil consistently moist, but not soggy.
4. Provide Warmth and Light: Place the seed trays on a heat mat, if using, and under a grow light. The ideal temperature for germination is around 70-75°F (21-24°C). If you don’t have a grow light, place the trays in a bright, sunny window.
5. Maintain Moisture: Cover the seed trays with a clear plastic dome or plastic wrap to help retain moisture. Remove the cover for a few hours each day to allow for air circulation and prevent fungal growth.
6. Be Patient (But Not Too Patient!): Celery seeds can be slow to germinate, sometimes taking up to 2-3 weeks. Keep the soil consistently moist and warm, and you should see seedlings emerge eventually.
7. Thin the Seedlings: Once the seedlings have a few true leaves (the leaves that look like miniature celery stalks), thin them out so that they are spaced about 1-2 inches apart. This will give them room to grow.
8. Harden Off the Seedlings: About a week or two before you plan to transplant the seedlings outdoors, you’ll need to “harden them off.” This means gradually exposing them to outdoor conditions so they can adjust to the temperature, sunlight, and wind. Start by placing them outdoors in a sheltered spot for an hour or two each day, gradually increasing the amount of time they spend outside.
Preparing the Garden Bed for Celery
Celery is a bit of a diva when it comes to soil. It needs rich, well-drained soil that’s high in organic matter.
1. Choose a Sunny Location: Celery needs at least 6 hours of sunlight per day.
2. Amend the Soil: Dig in plenty of compost or well-rotted manure to improve the soil’s fertility and drainage. Celery is a heavy feeder, so don’t skimp on the organic matter! I also like to add a slow-release organic fertilizer at this stage.
3. Check the Soil pH: Celery prefers a slightly acidic soil pH of around 6.0-6.8. You can test your soil pH with a soil testing kit and amend it accordingly.
4. Create a Trench (Optional): Some gardeners like to grow celery in a shallow trench to help blanch the stalks (make them paler and milder in flavor). If you want to try this, dig a trench about 6-8 inches deep and wide.
Transplanting Celery Seedlings Outdoors
Once the danger of frost has passed and your seedlings are hardened off, it’s time to transplant them into the garden.
1. Choose a Cloudy Day: Transplanting on a cloudy day will help reduce stress on the seedlings.
2. Water the Seedlings: Water the seedlings thoroughly before transplanting.
3. Space the Seedlings: Space the seedlings about 6-8 inches apart in rows that are 12-18 inches apart. If you’re growing celery in a trench, plant the seedlings along the bottom of the trench.
4. Plant Carefully: Dig a small hole for each seedling and gently remove it from its pot. Be careful not to damage the roots. Plant the seedling at the same depth it was growing in the pot.
5. Water Thoroughly: Water the seedlings thoroughly after transplanting.
6. Mulch Around the Plants: Apply a layer of mulch around the plants to help retain moisture, suppress weeds, and regulate soil temperature. I like to use straw or shredded leaves.
Caring for Your Celery Plants
Celery needs consistent moisture and regular feeding to thrive.
1. Water Regularly: Celery needs consistently moist soil, so water deeply and regularly, especially during hot, dry weather. Aim for about 1-2 inches of water per week.
2. Fertilize Regularly: Celery is a heavy feeder, so fertilize it every 2-3 weeks with a balanced organic fertilizer. You can also side-dress the plants with compost or well-rotted manure.
3. Blanch the Stalks (Optional): Blanching the stalks will make them paler and milder in flavor. You can blanch the stalks by wrapping them with newspaper, cardboard, or soil. Start blanching about 2-3 weeks before you plan to harvest.
4. Watch Out for Pests and Diseases: Celery can be susceptible to a few pests and diseases, such as celery leaf tier, aphids, and celery blight. Inspect your plants regularly and take action if you see any signs of trouble. Organic pest control methods, such as insecticidal soap or neem oil, can be effective.
Speeding Up Growth: My Secret Weapons!
Okay, now for the real secrets to getting that juicy celery faster! These are the things I’ve learned over the years that really make a difference.
* Consistent Watering is Key: I can’t stress this enough! Celery is mostly water, so it needs a constant supply. I use a soaker hose to ensure even watering.
* Liquid Seaweed Fertilizer: This is my secret weapon! I give my celery plants a weekly dose of liquid seaweed fertilizer. It’s packed with micronutrients that promote strong growth and disease resistance.
* Epsom Salts: Celery loves magnesium! I dissolve a tablespoon of Epsom salts in a gallon of water and use it to water my celery plants every few weeks. This helps prevent magnesium deficiency, which can cause stunted growth.
* Row Covers: Using row covers can help protect your celery plants from pests and diseases, and also create a warmer microclimate that promotes faster growth.
* Companion Planting: Plant celery near onions, garlic, or marigolds. These plants can help repel pests and attract beneficial insects.
Harvesting Your Celery
You can start harvesting celery when the stalks are about 6-8 inches long.
1. Harvest Individual Stalks: You can harvest individual stalks as needed by cutting them off at the base of the plant.
2. Harvest the Whole Plant: To harvest the whole plant, cut it off at the base with a sharp knife.
3. Store Celery Properly: Store celery in the refrigerator in a plastic bag or container. It will keep for several weeks.
Troubleshooting Common Celery Problems
Even with the best care, you might encounter a few problems along the way. Here are some common issues and how to fix them:
* Bolting (Going to Seed): This is when the celery plant starts to produce a flower stalk. It’s usually caused by stress, such as hot weather or inconsistent watering. To prevent bolting, choose a bolt-resistant variety, provide consistent moisture, and protect the plants from extreme heat.
* Stunted Growth: This can be caused by a number of factors, such as poor soil, nutrient
Conclusion
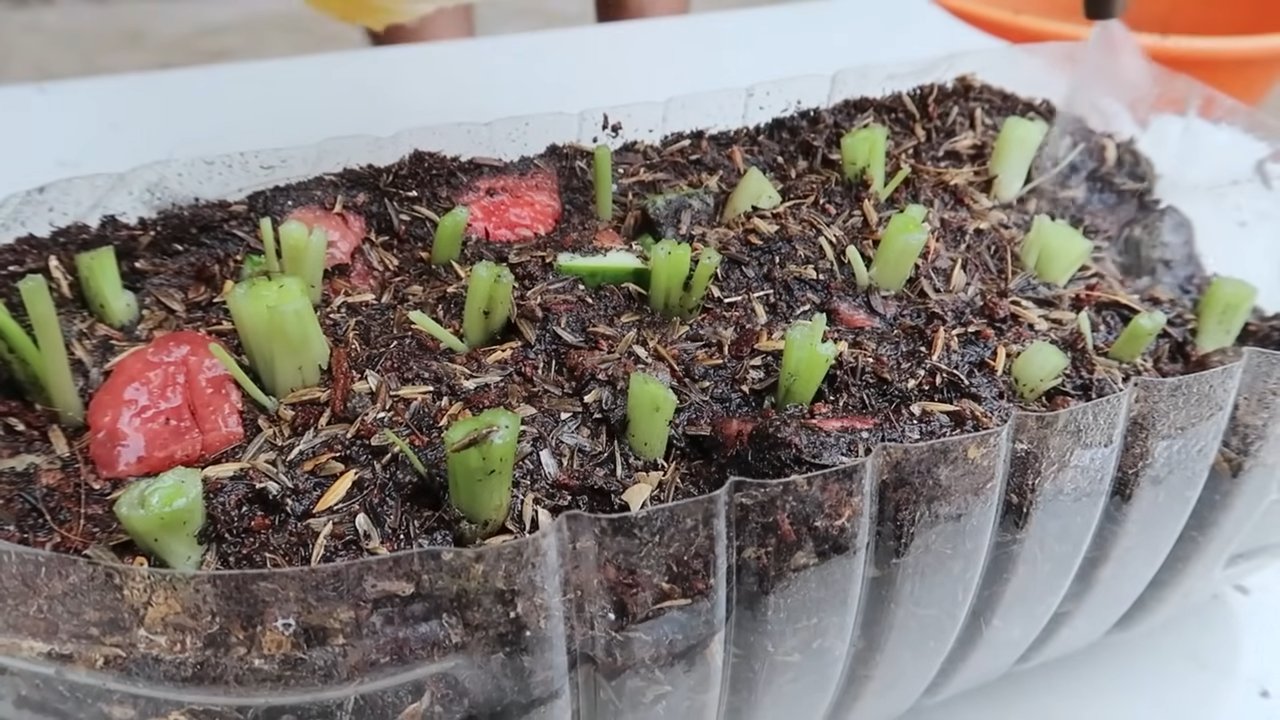
So, there you have it! Growing juicy celery fast doesn’t have to be a pipe dream relegated to experienced gardeners. With this simple, yet effective DIY trick, you can transform your celery-growing experience and enjoy crisp, flavorful stalks much sooner than you ever thought possible. We’ve demystified the process, breaking down each step to ensure even novice gardeners can achieve remarkable results.
Why is this a must-try? Because it addresses the two biggest challenges in celery cultivation: slow growth and lack of moisture. By pre-sprouting your seeds and providing a consistently moist environment, you’re giving your celery plants a significant head start. This method bypasses the often-frustrating waiting game and allows you to witness tangible progress in a fraction of the time. Imagine the satisfaction of harvesting your own homegrown celery, bursting with freshness and flavor, knowing you nurtured it from seed to table.
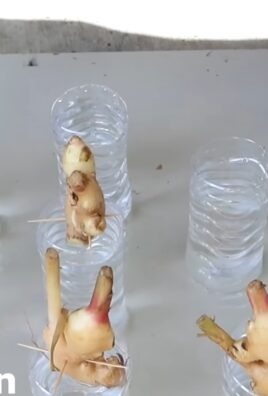
But the beauty of this DIY trick lies not only in its effectiveness but also in its adaptability. Feel free to experiment with variations to suit your specific needs and preferences. For instance, if you live in a particularly hot climate, consider using a shade cloth to protect your young celery plants from scorching sun. You could also try different types of containers, from repurposed plastic bottles to fabric grow bags, as long as they provide adequate drainage.
Another exciting variation involves enriching the soil with organic matter. Celery is a heavy feeder, so incorporating compost, well-rotted manure, or even coffee grounds into the soil can provide a boost of essential nutrients. This will not only accelerate growth but also enhance the flavor and nutritional value of your celery.
Furthermore, don’t be afraid to explore different celery varieties. While the standard Pascal celery is a popular choice, there are other options like Golden Self-Blanching celery, which has a milder flavor and doesn’t require blanching. Experimenting with different varieties can add diversity to your garden and culinary creations.
The key to success with this DIY trick is consistency. Regularly check the moisture levels of the soil and water as needed. Monitor your plants for any signs of pests or diseases and take appropriate action. With a little care and attention, you’ll be rewarded with a bountiful harvest of juicy celery that will elevate your salads, soups, and snacks.
We are confident that this method will revolutionize your celery-growing endeavors. It’s a game-changer for anyone seeking to accelerate growth, improve flavor, and enjoy the satisfaction of homegrown produce.
Now, we want to hear from you! Give this DIY trick a try and share your experiences with us. Did it work for you? What variations did you experiment with? What challenges did you encounter? Your feedback is invaluable and will help us refine this method even further. Post your photos, tips, and stories in the comments section below. Let’s create a community of celery enthusiasts and learn from each other’s successes and failures. Together, we can unlock the secrets to growing the most delicious and abundant celery possible. So, grab your seeds, gather your supplies, and get ready to embark on a celery-growing adventure! You’ll be amazed at what you can achieve with this simple yet powerful DIY trick.
Frequently Asked Questions (FAQ)
What kind of celery seeds should I use?
You can use any variety of celery seeds you prefer. Pascal celery is a common and reliable choice, known for its crisp texture and classic celery flavor. However, don’t hesitate to experiment with other varieties like Golden Self-Blanching celery, which has a milder flavor and doesn’t require blanching. Consider your local climate and growing conditions when selecting your seeds. Some varieties may be better suited to certain regions than others. Look for seeds from reputable suppliers to ensure good germination rates and healthy plants. Organic seeds are also a great option if you prefer to avoid synthetic pesticides and fertilizers.
How long does it take for celery seeds to germinate?
Celery seeds can be notoriously slow to germinate, typically taking anywhere from 14 to 21 days, and sometimes even longer. This is why pre-sprouting is so beneficial. By pre-sprouting, you can significantly reduce the germination time and ensure that only viable seeds are planted. The pre-sprouting process allows you to monitor the seeds and discard any that don’t germinate, saving you time and resources. Remember to keep the seeds consistently moist during the germination process, as dryness can inhibit germination.
What kind of soil is best for growing celery?
Celery thrives in rich, well-draining soil that is high in organic matter. Amend your soil with compost, well-rotted manure, or other organic materials to improve its fertility and drainage. Celery prefers a slightly acidic to neutral soil pH, ideally between 6.0 and 7.0. You can test your soil pH using a soil testing kit and adjust it accordingly. Avoid heavy clay soils, as they can become waterlogged and inhibit root growth. If you have clay soil, consider adding sand or perlite to improve drainage.
How often should I water my celery plants?
Celery requires consistent moisture to thrive. Water your plants deeply and regularly, especially during hot and dry weather. Aim to keep the soil consistently moist but not waterlogged. Check the soil moisture levels regularly by sticking your finger into the soil. If the top inch of soil feels dry, it’s time to water. Avoid overhead watering, as it can increase the risk of fungal diseases. Instead, water at the base of the plants, using a soaker hose or drip irrigation system.
What are some common pests and diseases that affect celery?
Celery can be susceptible to various pests and diseases, including aphids, celery leaf miners, and fungal diseases like early blight and late blight. Regularly inspect your plants for any signs of pests or diseases. Aphids can be controlled with insecticidal soap or neem oil. Celery leaf miners can be managed by removing and destroying infested leaves. To prevent fungal diseases, ensure good air circulation around your plants and avoid overhead watering. You can also use organic fungicides if necessary.
How do I know when my celery is ready to harvest?
Celery is typically ready to harvest when the stalks are at least 6-8 inches long and have reached a desirable thickness. The exact harvesting time will depend on the variety and growing conditions. You can harvest individual stalks as needed or harvest the entire plant at once. To harvest, simply cut the stalks at the base of the plant with a sharp knife.
Can I grow celery in containers?
Yes, celery can be successfully grown in containers, especially if you are limited on space. Choose a large container that is at least 12 inches deep and wide to accommodate the celery’s root system. Use a well-draining potting mix and ensure that the container has drainage holes. Water regularly and fertilize every few weeks with a balanced fertilizer. Container-grown celery may require more frequent watering than celery grown in the ground.
How can I blanch my celery?
Blanching celery involves excluding light from the stalks to make them more tender and less bitter. While some varieties like Golden Self-Blanching celery don’t require blanching, you can blanch other varieties by mounding soil around the base of the plants or wrapping the stalks with newspaper or cardboard. Start blanching about two weeks before harvest.
What can I do with my harvested celery?
The possibilities are endless! Celery can be enjoyed raw in salads, dips, and snacks. It can also be cooked in soups, stews, and stir-fries. Celery adds a refreshing crunch and flavor to any dish. You can also juice celery for a healthy and refreshing beverage. Don’t forget to use the celery leaves, which are packed with flavor and nutrients. They can be added to salads, soups, or used as a garnish.
How do I store celery after harvesting?
To store celery after harvesting, wrap it tightly in plastic wrap or place it in a resealable plastic bag. Store it in the refrigerator crisper drawer. Celery stored this way can last for several weeks. You can also freeze celery for longer storage. To freeze celery, wash and chop it into desired pieces. Blanch it in boiling water for a few minutes, then transfer it to an ice bath to stop the cooking process. Drain well and freeze in freezer bags or containers.

Leave a Comment