
Grow Luffa Indoors Easily and unlock the secret to having your own sustainable spa right at home! Imagine stepping into your shower and reaching for a naturally grown, exfoliating luffa sponge – one that you nurtured from a tiny seed right in your own living space. Sounds dreamy, right? Well, it’s more achievable than you might think!
Luffa, also known as loofah, has a rich history, with evidence suggesting its cultivation dates back centuries in Asia and Africa. Traditionally, it’s been used not only for bathing but also for cleaning, crafting, and even as a food source when young. But let’s be honest, most of us know it best for its amazing exfoliating properties!
Why should you learn to grow luffa indoors easily? Well, for starters, it’s incredibly rewarding to cultivate your own resources. Plus, depending on where you live, outdoor growing seasons can be short or unpredictable. Bringing the luffa vine indoors allows you to control the environment, extending the growing season and ensuring a bountiful harvest. And let’s not forget the eco-friendly aspect – ditching those plastic shower poufs for a natural, biodegradable alternative is a win for the planet! I’m excited to share some simple DIY tricks and hacks that will guide you through every step of the process, from seed to scrub. Let’s get started!
Grow Your Own Luffa Sponges Indoors: A Complete Guide
Hey there, fellow gardening enthusiasts! Ever dreamt of growing your own natural sponges? Well, you’re in for a treat! I’m going to walk you through the process of growing luffa (also spelled loofah) indoors, even if you don’t have a sprawling garden. It’s a rewarding experience, and trust me, nothing beats scrubbing with a sponge you grew yourself!
What You’ll Need
Before we dive in, let’s gather our supplies. Here’s a list of everything you’ll need to successfully grow luffa indoors:
* Luffa Seeds: You can find these online or at your local garden center. Make sure they’re viable!
* Seed Starting Trays or Small Pots: These will be our nurseries for the baby luffas.
* Seed Starting Mix: This is a light, airy soil mix perfect for germination.
* Larger Pots (at least 5 gallons): Luffas need room to grow, so choose pots that are big enough.
* Potting Soil: A good quality potting mix will provide the necessary nutrients.
* Grow Lights: Since we’re growing indoors, we’ll need supplemental light.
* Trellis or Support System: Luffas are vines and need something to climb on.
* Watering Can or Spray Bottle: For gentle watering.
* Fertilizer: A balanced fertilizer to feed your growing luffas.
* Warm Location: Luffas love warmth, so find a sunny spot or use a heat mat.
* Patience: Growing luffas takes time and care, so be patient!
Phase 1: Seed Starting
Okay, let’s get those seeds started! This is a crucial step, so pay close attention.
1. Soak the Seeds: To help with germination, soak your luffa seeds in warm water for 24-48 hours. This softens the seed coat and encourages sprouting. I usually put them in a small bowl on my kitchen counter.
2. Prepare the Seed Starting Trays: Fill your seed starting trays or small pots with seed starting mix. Moisten the mix thoroughly, but don’t make it soggy.
3. Plant the Seeds: Plant the seeds about 1 inch deep in the soil. I usually plant 2-3 seeds per pot, just in case some don’t germinate.
4. Provide Warmth and Light: Place the trays in a warm location, ideally between 70-80°F (21-27°C). You can use a heat mat to maintain a consistent temperature. Also, position your grow lights about 2-3 inches above the trays.
5. Keep the Soil Moist: Water gently with a spray bottle to keep the soil consistently moist. Avoid overwatering, which can lead to rot.
6. Wait for Germination: Germination usually takes 7-14 days. Be patient and keep an eye on your little seedlings!
Phase 2: Transplanting and Setting Up the Growing Environment
Once your seedlings have developed a few true leaves (the second set of leaves that appear after the initial seed leaves), it’s time to transplant them into larger pots.
1. Prepare the Larger Pots: Fill your 5-gallon (or larger) pots with potting soil. Make sure the pots have drainage holes to prevent waterlogging.
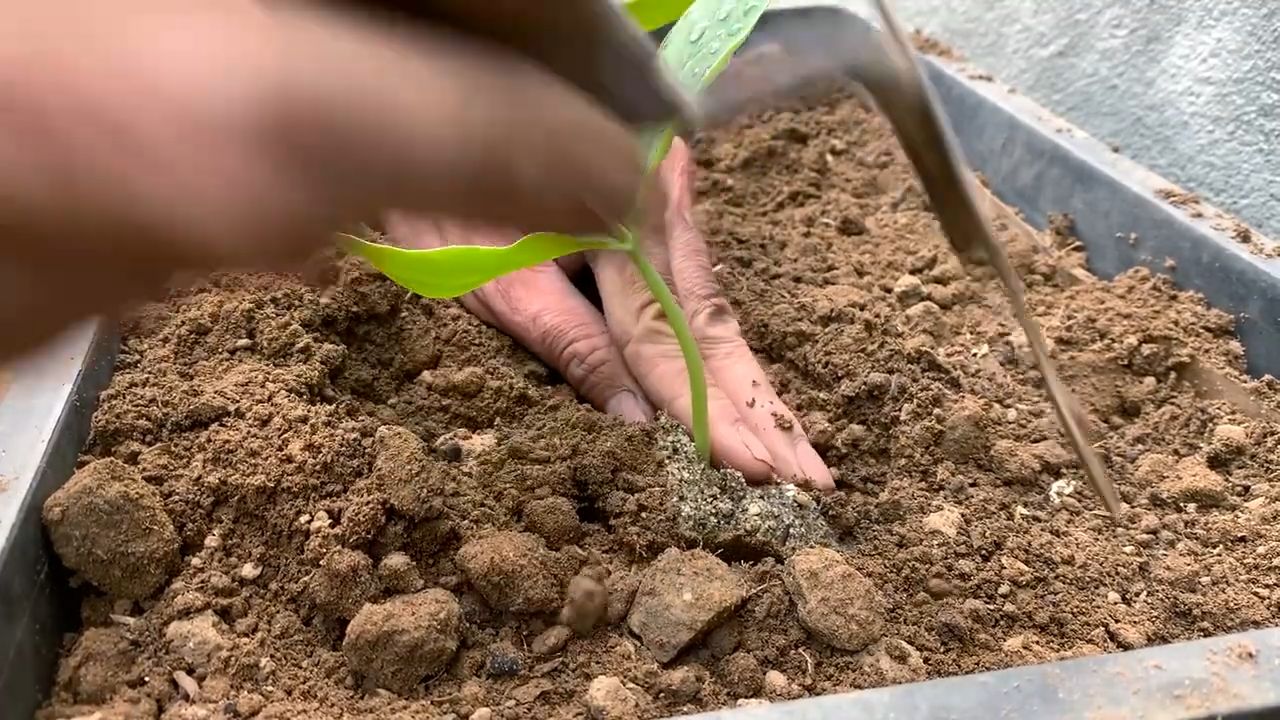
2. Carefully Transplant the Seedlings: Gently remove the seedlings from the seed starting trays, being careful not to damage the roots. I like to use a small spoon to help lift them out.
3. Plant the Seedlings: Plant one seedling per pot. Dig a hole in the potting soil and carefully place the seedling in the hole. Gently pat the soil around the base of the plant.
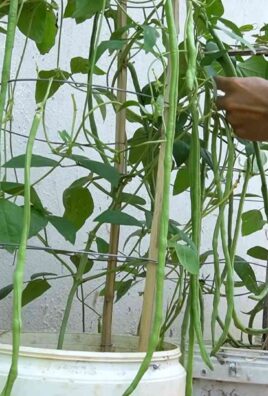
4. Set Up the Trellis: Luffas are vines and need a trellis or support system to climb on. You can use a store-bought trellis, or get creative and build your own using bamboo stakes, netting, or even an old ladder. Make sure the trellis is sturdy enough to support the weight of the growing vines and luffa gourds.
5. Position the Grow Lights: Adjust the height of your grow lights so they are about 6-12 inches above the plants. Luffas need plenty of light to thrive, so aim for at least 12-14 hours of light per day.
6. Water Thoroughly: Water the newly transplanted seedlings thoroughly, allowing the excess water to drain out of the drainage holes.
Phase 3: Ongoing Care and Maintenance
Now that your luffas are growing, it’s important to provide them with the care they need to flourish.
1. Watering: Water your luffas regularly, especially during hot weather. The soil should be consistently moist, but not soggy. Check the soil moisture by sticking your finger about an inch into the soil. If it feels dry, it’s time to water.
2. Fertilizing: Feed your luffas with a balanced fertilizer every 2-3 weeks. Follow the instructions on the fertilizer package. I like to use a liquid fertilizer that I can mix with water.
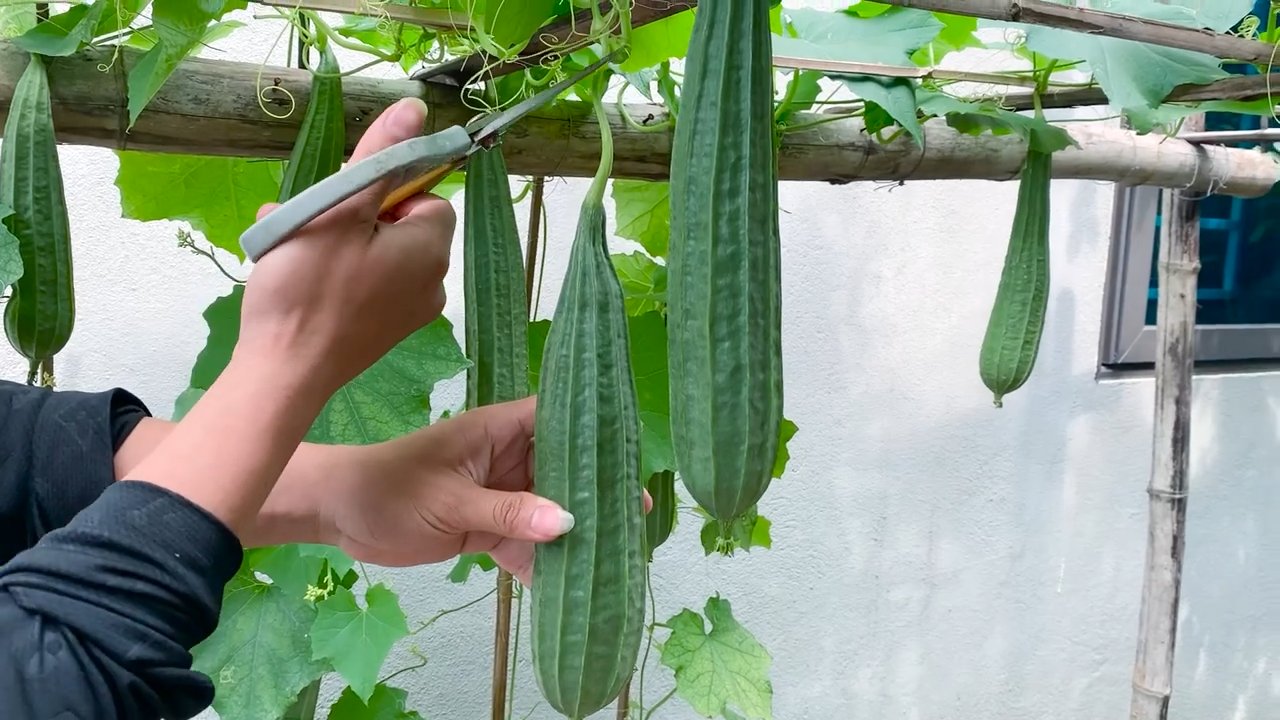
3. Pruning: Prune your luffa vines to encourage branching and fruit production. You can pinch off the tips of the vines to promote lateral growth. Also, remove any yellowing or dead leaves.
4. Pollination: Luffas produce both male and female flowers. The female flowers have a small luffa gourd behind them. To ensure pollination, you can hand-pollinate the flowers by transferring pollen from the male flowers to the female flowers using a small brush. I usually do this in the morning when the flowers are open.
5. Pest Control: Keep an eye out for pests such as aphids, spider mites, and whiteflies. If you notice any pests, you can treat them with insecticidal soap or neem oil.
6. Support the Growing Gourds: As the luffa gourds grow, they can become quite heavy. You may need to provide additional support to prevent the vines from breaking. You can use twine or cloth to tie the gourds to the trellis.
Phase 4: Harvesting and Processing Your Luffa Sponges
The moment you’ve been waiting for! Harvesting your own luffa sponges is incredibly satisfying.
1. Harvesting: The luffa gourds are ready to harvest when they turn yellow or brown and the skin becomes dry and brittle. You should be able to easily dent the gourd with your fingernail.
2. Peeling the Gourds: Once harvested, peel the outer skin of the luffa gourds. You can do this by soaking the gourds in water for a few days to soften the skin. Then, use your hands or a knife to peel away the skin.
3. Removing the Seeds: After peeling, shake out the seeds from the luffa sponge. You can save these seeds for planting next year.
4. Washing and Drying: Rinse the luffa sponges thoroughly with water to remove any remaining pulp or debris. Then, hang them up to dry in a well-ventilated area.
5. Bleaching (Optional): If you want to lighten the color of your luffa sponges, you can soak them in a diluted bleach solution for a few minutes. Be sure to rinse them thoroughly afterwards.
6. Enjoy Your Homemade Sponges! Once the luffa sponges are dry, they’re ready to use! You can use them for bathing, scrubbing dishes, or even exfoliating your skin.
Troubleshooting Tips
Even with the best care, you might encounter some challenges along the way. Here are a few common problems and how to address them:
* Poor Germination: If your seeds aren’t germinating, make sure they’re viable and that the soil is warm enough. You can also try scarifying the seeds by gently rubbing them with sandpaper to help them absorb water.
* Slow Growth: If your luffas are growing slowly, make sure they’re getting enough light, water, and fertilizer. Also, check the soil pH to make sure it’s within the optimal range (6.0-6.8).
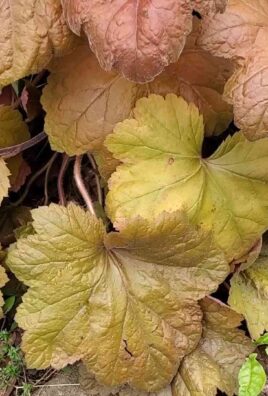
* Yellowing Leaves: Yellowing leaves can be a sign of overwatering, nutrient deficiency, or pest infestation. Adjust your watering schedule, fertilize your plants, and inspect them for pests.
* Lack of Fruit Production: If your luffas aren’t producing fruit, it could be due to lack of pollination. Hand-pollinate the flowers to ensure fruit set. Also, make sure your plants are getting enough sunlight.
* Rotting Gourds: Rotting gourds can be caused by excessive moisture or fungal diseases. Improve air circulation around the plants and avoid overwatering. You can also treat the plants with a fungicide if
Conclusion
So, there you have it! Growing luffa indoors easily is not just a whimsical gardening experiment; it’s a rewarding journey that brings the beauty and utility of nature right into your home. We’ve explored the steps, from selecting the right seeds and providing optimal growing conditions to hand-pollinating and patiently waiting for those glorious gourds to mature.
Why is this DIY trick a must-try? Because it empowers you to cultivate your own sustainable source of natural sponges, reducing your reliance on commercially produced alternatives. Imagine the satisfaction of scrubbing your dishes with a luffa you nurtured from a tiny seed! Beyond the practical benefits, growing luffa indoors offers a unique connection to the natural world, a therapeutic activity that can alleviate stress and boost your mood. It’s a conversation starter, a fascinating project for kids, and a testament to your green thumb.
But the adventure doesn’t stop here! Feel free to experiment with different varieties of luffa seeds. Try the angled luffa (Luffa acutangula) for a slightly different texture and shape. Consider adding companion plants like basil or marigolds to your indoor garden to deter pests and enhance the overall health of your luffa vines. You can even explore different trellising methods to maximize space and create a visually stunning display.
Don’t be afraid to get creative with your luffa harvest! Once your gourds are fully mature and dried, you can use them not only as sponges but also as exfoliating scrubs, bath mats, or even decorative elements in your home. The possibilities are endless!
We understand that indoor gardening can sometimes present challenges, but with a little patience, dedication, and the knowledge you’ve gained from this guide, you’ll be well on your way to harvesting your own homegrown luffa sponges. Remember to monitor your plants regularly, adjust your watering schedule as needed, and provide adequate support for the growing vines.
We are confident that you’ll find this DIY project incredibly fulfilling. So, grab your seeds, prepare your pots, and embark on this exciting journey of growing luffa indoors easily. We can’t wait to hear about your experiences! Share your photos, tips, and challenges in the comments below. Let’s create a community of indoor luffa growers and inspire others to embrace the joys of sustainable gardening. Happy growing!
Frequently Asked Questions (FAQ)
What kind of seeds should I use for growing luffa indoors?
The best seeds for growing luffa indoors are those specifically labeled for luffa aegyptiaca or Luffa acutangula. Ensure you purchase seeds from a reputable source to guarantee viability and quality. Look for seeds that are specifically marked for shorter growing seasons or indoor cultivation if possible. Starting with high-quality seeds significantly increases your chances of success.
How much sunlight does my indoor luffa plant need?
Luffa plants are sun-loving and require at least 6-8 hours of direct sunlight per day. If you don’t have a south-facing window that provides sufficient sunlight, consider supplementing with grow lights. LED grow lights are energy-efficient and can provide the full spectrum of light that luffa plants need to thrive. Position the grow lights a few inches above the plants and adjust as they grow taller.
What type of soil is best for growing luffa indoors?
Luffa plants prefer well-draining, fertile soil. A good mix would be equal parts of potting soil, compost, and perlite or vermiculite. The potting soil provides a base, the compost adds nutrients, and the perlite or vermiculite improves drainage and aeration. Avoid using garden soil, as it can be too heavy and may contain pests or diseases.
How often should I water my indoor luffa plant?
Water your luffa plant regularly, keeping the soil consistently moist but not waterlogged. Check the soil moisture by sticking your finger about an inch deep. If the soil feels dry, it’s time to water. During the active growing season, you may need to water daily or every other day. Reduce watering during the dormant season. Ensure your pot has drainage holes to prevent root rot.
How do I hand-pollinate my luffa flowers indoors?
Luffa plants have separate male and female flowers. To hand-pollinate, use a small paintbrush or cotton swab to collect pollen from the male flower (which has a long, thin stem) and transfer it to the stigma of the female flower (which has a small luffa fruit developing behind it). Do this in the morning when the flowers are freshly opened. Repeat the process for several days to ensure successful pollination.
How long does it take for a luffa gourd to mature indoors?
It typically takes 90-120 days for a luffa gourd to mature indoors, depending on the variety and growing conditions. The gourd is ready to harvest when it turns yellow or brown and the skin becomes dry and brittle. You should be able to easily press your fingernail into the skin.
How do I dry and process my luffa gourd?
Once the gourd is mature, cut it from the vine and allow it to dry completely. This may take several weeks. Once dry, soak the gourd in water for a few days to loosen the skin. Then, peel off the skin and shake out the seeds. Rinse the luffa sponge thoroughly and allow it to dry completely before using.
What are some common problems when growing luffa indoors and how can I fix them?
Common problems include pests (like aphids or spider mites), fungal diseases (like powdery mildew), and nutrient deficiencies. Inspect your plants regularly for signs of pests or diseases. Treat infestations with insecticidal soap or neem oil. Improve air circulation to prevent fungal diseases. Fertilize your plants regularly with a balanced fertilizer to prevent nutrient deficiencies.
Can I grow luffa in a container? What size container is needed?
Yes, you can grow luffa in a container. Choose a large container, at least 15-20 gallons in size, to accommodate the plant’s extensive root system. Ensure the container has drainage holes.
What kind of support or trellis do I need for my indoor luffa plant?
Luffa vines are vigorous climbers and require a strong trellis or support system. You can use a sturdy trellis, a tomato cage, or even a rope system attached to the ceiling. Ensure the support is strong enough to hold the weight of the mature vines and gourds.
How do I store luffa seeds for future planting?
After harvesting the seeds from your luffa gourd, dry them completely and store them in an airtight container in a cool, dark, and dry place. Properly stored luffa seeds can remain viable for several years.
Can I eat young luffa gourds?
Yes, young luffa gourds are edible and can be used in stir-fries, soups, and other dishes. They have a mild, slightly sweet flavor. Harvest them when they are still tender and before the fibers develop.
What are some creative uses for my homegrown luffa sponges?
Besides using them for dishwashing and exfoliating, you can use luffa sponges as bath mats, pot scrubbers, or even as decorative elements in your home. You can also cut them into smaller pieces and use them as seed starters or as natural filters in aquariums.
Is growing luffa indoors easily organic?
Yes, growing luffa indoors easily can be completely organic. By using organic soil, fertilizers, and pest control methods, you can ensure that your luffa sponges are free from harmful chemicals.

Leave a Comment